Blazor Basics: Component Parameters and State Management

Summarize with AI:
Passing data from parent to child component is a basic mechanism in a component-oriented architecture. In Blazor, there are several ways parent and child components communicate with each other.
Blazor uses a component-oriented architecture. A Blazor application comprises multiple small and large Blazor components forming a component tree.
Rendering flows from top to bottom. Parent components render before child components.
So far, so good. But how do we pass data from a parent component to its children? And what about if we want to pass data from a child component to its parent?
You can access the code used in this example on GitHub.
Passing Data from Parent to Child Component
We will use a car and its engine as an example. Let’s say the engine has a mode with three possible values. The values are eco, cruise and sport.
In the car, in reality, the driver decides what mode to use. In our example, the Car component provides the information as a parameter to the Engine component.
The code looks like this:
Car.razor:
<h2>Car</h2>
<Engine Mode="EngineMode.Sport" />
Engine.razor:
<h3>Engine</h3>
Mode: @Mode

@code {
    [Parameter]
    public EngineMode Mode { get; set; }
}
EngineMode.cs:
public enum EngineMode
{
    Eco,
    Cruise,
    Sport
}
We use the Parameter attribute on the Mode property within the Engine component. It tells Blazor that we accept an EngineMode from whatever component uses the Engine component.
In the parent component, the Car component, we use the Engine component and provide the sport mode as the argument for the Engine’s Mode property.
If we don’t explicitly provide an argument to the Mode property within the Car component, the default value of the variable will be used. In our case, we are using an enum type, meaning the first element of the enumeration will be used.
We also need to add the Car component to the Index component. It’s the default page that loads when we start the application.
Index.razor:
@page "/"
<PageTitle>Blazor Parameters And State Management</PageTitle>
<Car />
Starting with .NET 6, we can add the EditorRequired attribute to mark Blazor component parameters as required.
Engine.razor:
<h3>Engine</h3>
Mode: @Mode

@code {
    [Parameter, EditorRequired]
    public EngineMode Mode { get; set; }
}
If we still don’t provide a value when using the Engine component, we receive the following compiler warning:
RZ2012: Component ‘Engine’ expects a value for the parameter ‘Mode’, but a value may not have been provided.
Hint: If you want, you can configure your IDE to treat this warning as an error to prevent the application from compiling.
The Parameter attribute is straightforward and allows a unidirectional parent-to-child data flow.
Cascading Parameters (Contextual Parameters)
Passing data from parent to child is simple and works great. But what if you want to provide a value to multiple nested components?
Yes, you can pass them from the parent to its children and another level down until you arrive at the destination. However, that’s neither fun nor maintainable.
It is where cascading parameters come into play. I prefer calling them contextual parameters. Let me explain why and how they work.
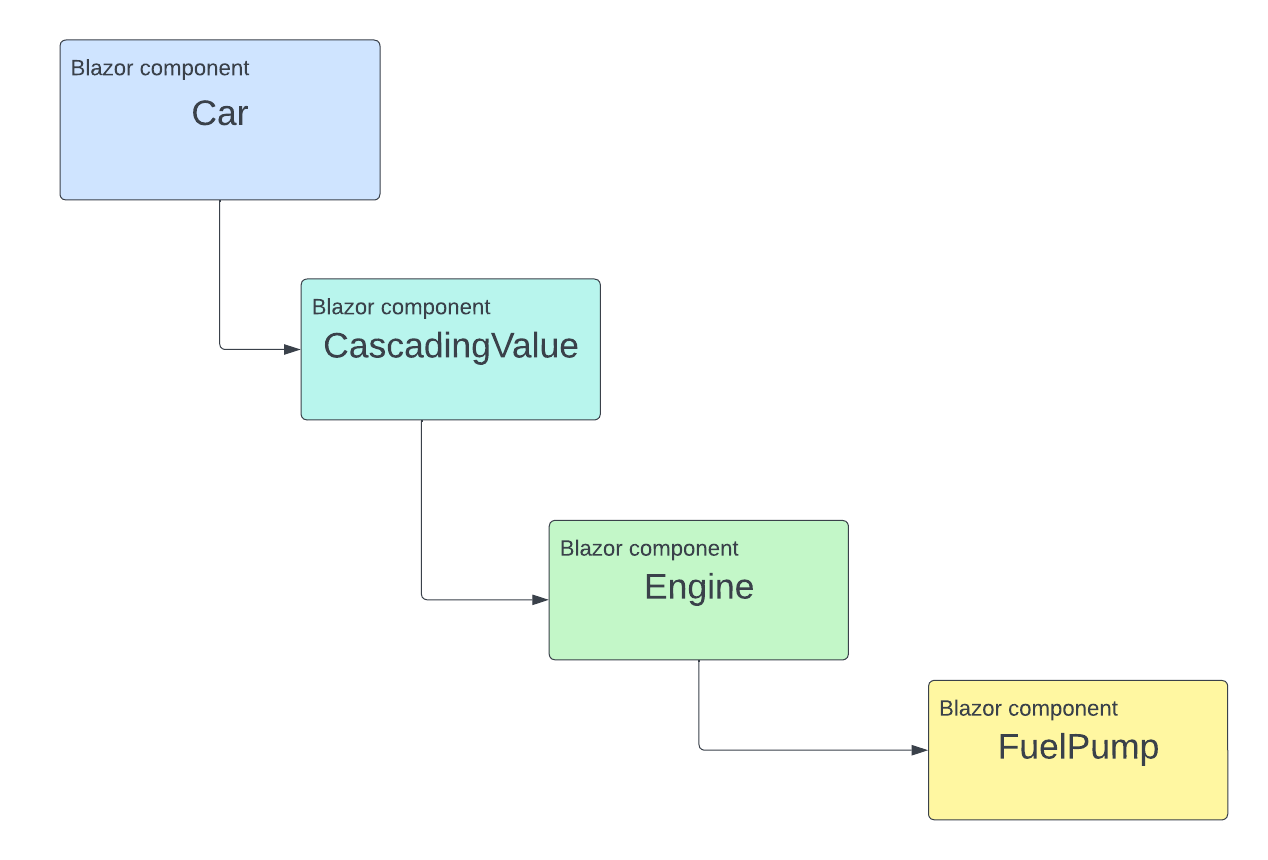
Let’s improve our code example. Let’s say we add more detail and implement a FuelPump component as a third level. It will be a child of the Engine component. Without getting too detailed, the fuel pump in a car also needs to know what engine mode the car is expected to use.
The implementation of the FuelPump component looks like this:
FuelPump.razor:
<h3>FuelPump</h3>
Running in mode @Mode

@code {
    [CascadingParameter]
    public EngineMode Mode { get; set; }
}
Notice the CascadingParameter attribute above the Mode property in the code section of the FuelPump component.
We add the FuelPump component to the Engine component, resulting in the following code.
Engine.razor:
<h3>Engine</h3>
Mode: @Mode

<FuelPump />

@code {
    [CascadingParameter]
    public EngineMode Mode { get; set; }
}
We also update the Mode property in the Engine component to use the CascadingParameter attribute instead of the Parameter attribute.
Now, let’s explore how we make the value available within the child components of the Car component.
Car.razor:
<h2>Car</h2>

<CascadingValue Value="EngineMode.Sport">
    <Engine />
</CascadingValue>
We removed the EngineMode from the Engine component. Instead, we wrap the Engine component usage within a CascadingValue component. It contains a Value property where we supply the engine mode.
The CascadingValue component makes a value available to all components inside the component tree that it encloses.

Note: A grandchild of the parent component can consume a cascading value without the direct children consuming it.
But how does it work?
It uses the type to determine what value gets resolved when a property is decorated with the CascadingParameter attribute.
Also, similar to regular parameters, whenever the value of the CascadingValue component changes, the children are notified and their values are updated.
In the example above, we use a constant value. However, you could also bind this value from within a property of the Car component.
But what if we have multiple parameters of the same type?
If we have multiple cascading parameters of the same type, we can name them. We can provide the Name as a second property to the CascadingValue component when defining the value.
We can also provide a Name property to the CascadingParameter attribute when resolving it in child components.
Providing State Using Services
Although this article is part of a Blazor Series, I won’t limit myself to talking about Blazor features. Blazor applications are .NET applications and, therefore, get all the power and opportunities of any other .NET application.
When it comes to state management, we can implement services to share data with different components. We use the @inject directive in Blazor components to access an instance of a service through dependency injection.
We can then call methods on that service to either update or receive data from it and use the data within the Blazor component.
Accessing Data from a Child Component
We learned three ways to pass data from a parent component to its children. But what if we also want to access data from a child component within its parent?
We learned about data binding in a previous article of this Blazor Basics series. A two-way binding will help us bind a property from a child component to a parent component.
Let’s add a Temperature property to the Engine component.
[Parameter]
public int Temperature { get; set; }
Next, we also add an EventCallback to the component. Make sure to follow the naming convention: Name the property the same as the value property and add Changed at the end.
[Parameter]
public EventCallback<int> TemperatureChanged { get; set; }
We also change the component’s template to show the engine temperature on the screen.
<h3>Engine</h3>
<ul>
    <li>Mode: @Mode</li>
    <li>Temperature: @Temperature <button @onclick="ChangeTemperature">Change</button></li>
</ul>

<FuelPump />
Besides the mode, we also show the current engine temperature. We also have a button next to it. When the user presses the button, we want to change the engine temperature.
We add the following ChangeTemperature method handling the button click in the component’s code section:
public async Task ChangeTemperature()
{
    var random = new Random();
    Temperature = random.Next(60, 400);
    await TemperatureChanged.InvokeAsync(Temperature);
}
We use an async method and return a Task. We use the Random object to generate a new value for the Temperature between 60 and 400 degrees Celsius.
At the end of the method, we asynchronously invoke the TemperatureChanged event. It will notify the parent component that the value of the Temperature property has changed.
The completed Engine component looks like this:
<h3>Engine</h3>
<ul>
    <li>Mode: @Mode</li>
    <li>Temperature: @Temperature <button @onclick="ChangeTemperature">Change</button></li>
</ul>

<FuelPump />

@code {
    [CascadingParameter]
    public EngineMode Mode { get; set; }

    [Parameter]
    public int Temperature { get; set; }

    [Parameter]
    public EventCallback<int> TemperatureChanged { get; set; }

    public async Task ChangeTemperature()
    {
        var random = new Random();
        Temperature = random.Next(60, 400);
        await TemperatureChanged.InvokeAsync(Temperature);
    }
}
Next, we need to make a few changes to the Car component.
First, we add an @code section, define a property of type int, and name it EngineTemp. We can use whatever name we want. It doesn’t have to be the same name as in the child component. We assign a default value of 16 degrees.
@code {
    public int EngineTemp { get; set; } = 16;
}
Now, we update the Car component’s template.
<h2>Car</h2>
<p>Engine Temperature: @EngineTemp</p>

<CascadingValue Value="EngineMode.Sport">
    <Engine @bind-Temperature="EngineTemp" />
</CascadingValue>
We use the @bind-Temperature syntax to bind the EngineTemp property of the Car component to the Temperature property of the Engine component.
The syntax @bind-[PropertyName] makes it a two-way binding. Compare it to the Value property of the CascadingValue component. Without the @bind in front of the name of the property (Value), it creates a one-way binding.
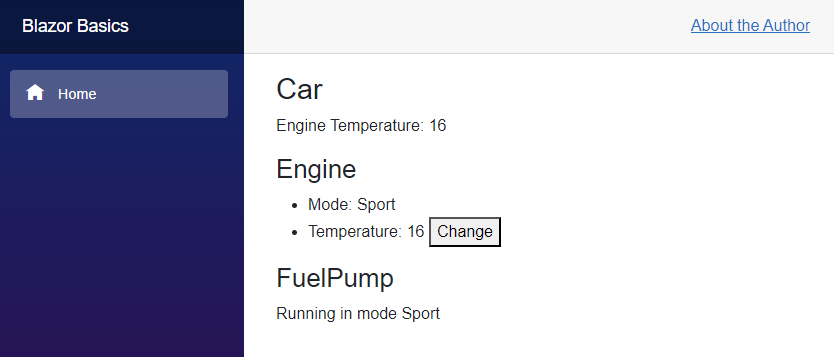
When we start the application, we see the engine temperature in the Car component and the Engine component. For both components, the default value set in the Engine component (16) is shown.

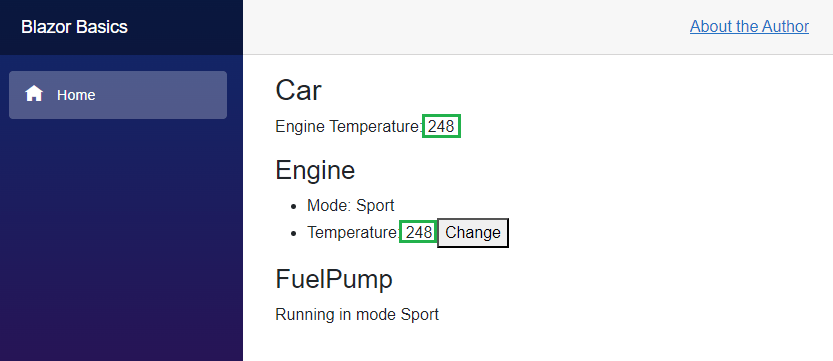
When we press the Change button on the Engine component, the engine temperature changes. Not only does it change in the Engine component, but also in the parent component—the Car component.

There is a lot going on behind the scenes. But for us developers, it’s pretty simple to bind a value from a parent component to a child component and get notified whenever the value changes.
Note: This mechanism combines two-way bindings with event callbacks.
Centralized State Management
We have learned a lot about passing data from parent to child components. We learned about different options to directly pass it down the tree, and we learned about cascading parameters that allow access to a value from anywhere in the component tree.
However, there is also a completely different approach.
In JavaScript, centralized state management is very popular. For example, Redux is a library widely adopted when building React-based web applications.
For Blazor, there are a few centralized state management options available:
There might be even more, lesser known open-source projects providing centralized state management.
The focus of this article is to show the different options we have to handle state and provide data from one component to another.
We won’t discuss centralized state management here, but the goal was to show all the options we have. Developers coming from JavaScript web frameworks will most likely be familiar with the concept.
Note: I would only use it when you have educated yourself about the pros and cons of the centralized state approach. Also, don’t implement it yourself—use one of the options available.
Conclusion
There are different approaches to state management and passing data from parent to child or vice versa.
The Parameter and CascadingParameter attributes provide a simple API to receive parameters from parent components.
The Service-based approach utilizes standard .NET features to share data between different components using dependency injection.
Binding parameters allow us to access data from child components within parent components.
If you want to use centralized state management, open-source projects provide implementations for Blazor applications.
You can access the code used in this example on GitHub.
If you want to learn more about Blazor development, you can watch my free Blazor Crash Course on YouTube. And stay tuned to the Telerik blog for more Blazor Basics.

Claudio Bernasconi
Claudio Bernasconi is a passionate software engineer and content creator writing articles and running a .NET developer YouTube channel. He has more than 10 years of experience as a .NET developer and loves sharing his knowledge about Blazor and other .NET topics with the community.

