Getting Started with Blazor’s New Render Modes in .NET 8

Summarize with AI:
Learn the distinctions between the new Blazor render modes in .NET 8, what advantages and trade-offs to expect, and when you might plan to use which mode.
Blazor has always been about components, making it easy to take parts of your UI and break it down into small jigsaw pieces, like this:
Here we have a handy Banner component that we can use wherever we need a banner in our app.
Prior to .NET 8, you typically ran your entire Blazor app using one of Blazor’s hosting models: Blazor WASM or Blazor Server.
- With Blazor Server your components run on the server, and all UI interactions between the browser and server take place via an open socket connection.
- In Blazor WASM your entire app is shipped to the browser where it runs (and all UI interactions are handled right there in the browser).
.NET 8 shakes things up, and gives you the ability to control on a per-component basis how your components run, by changing something called the render mode.
The render modes for components in .NET 8 are:
- Static server-side
- Interactive Server
- Interactive WASM
- Interactive Auto
But what are they, what are their relative strengths/weaknesses, and which one(s) should you use?
Let’s find out!
Static by Default
When you spin up a new project using the .NET 8 Blazor project template:
dotnet new blazor
You’ll get a Blazor app which is wired to render components statically on the server by default.
For example, let’s say we copy the Banner component from the example above and paste it into a new Blazor .NET 8 project. Then reference it in Home.razor, like this:
Home.razor
<Banner Text="Hello World" />
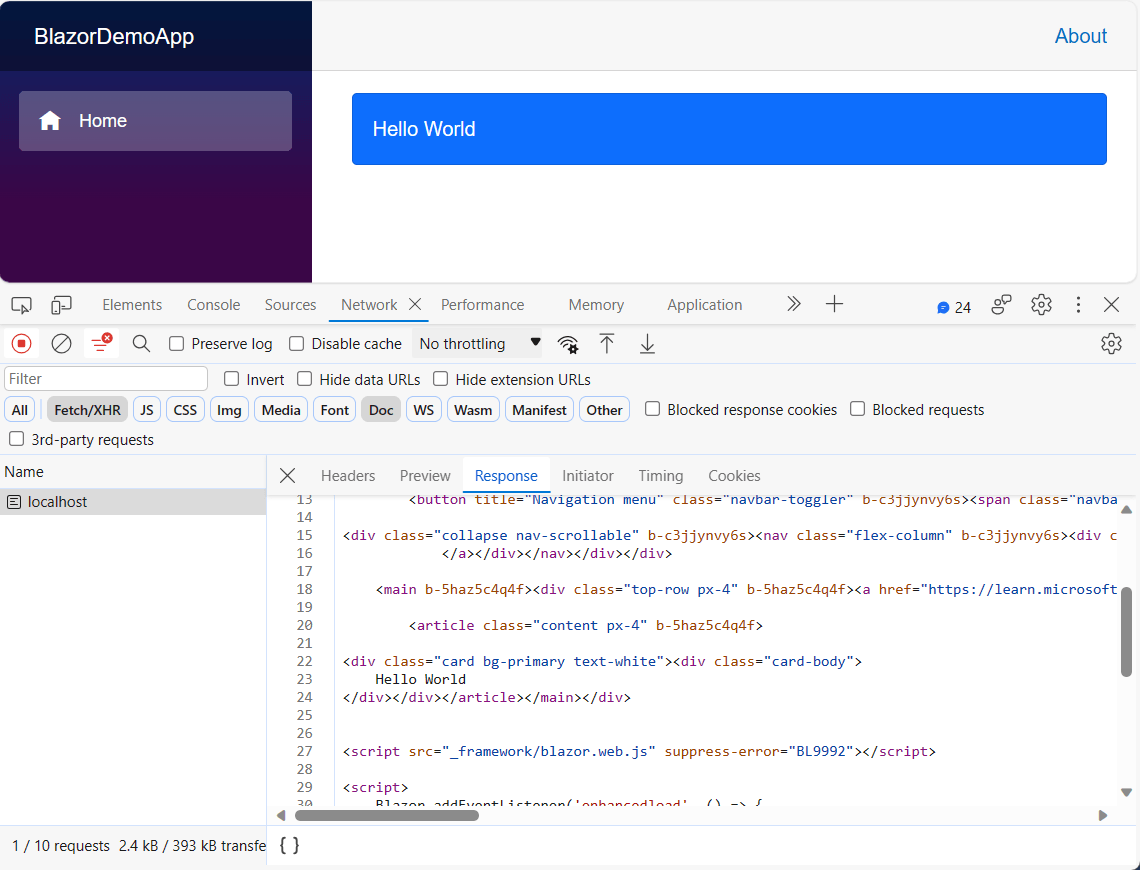
When we run this and check the results in the browser, we’ll see the Banner in all its glory.
Take a look at the Developer Tools, and we’ll see a full document request/response, containing the HTML which is ultimately displayed in the browser.
How to Enable Static Server-Side Rendering
When you create a Blazor project using the new .NET 8 project template, you can choose which render modes you want to use.
Take a look at Program.cs and you’ll find see the configuration you get as a result.
Program.cs
builder.Services.AddRazorComponents();

...

app.MapRazorComponents<App>();
For static rendering to work, the minimum you need are the two calls to AddRazorComponents and MapRazorComponents<App>().
How It Works
ASP.NET will route incoming requests to any Razor Component that has a matching route template. It will then render the component and return the resulting HTML.
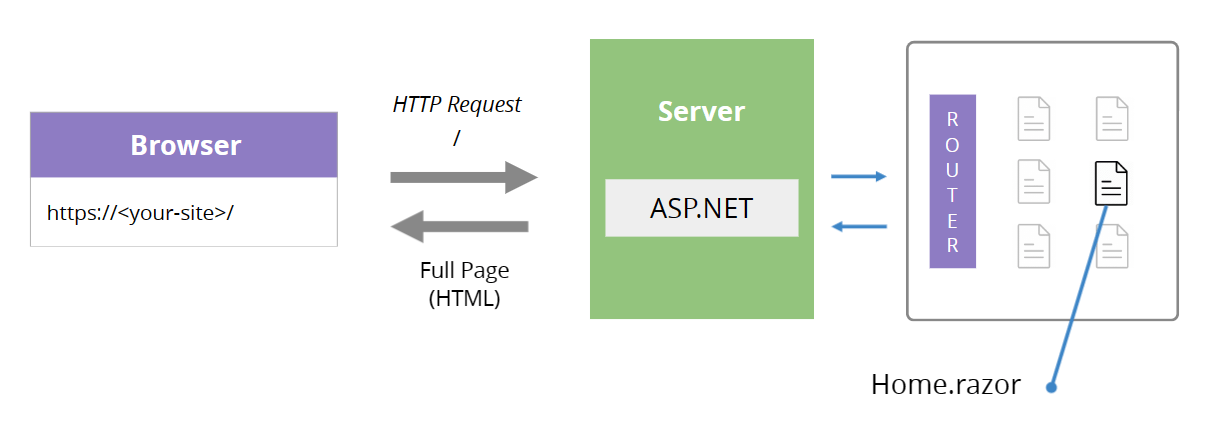
Static server-side rendering is particularly useful where components don’t need to be interactive.
So long as you’re not expecting users to be able to interact via button clicks, sliding toggles, etc., this mode is simple and fast and doesn’t require the component to live for any longer than it takes the HTML response to be rendered and returned.
What’s It Good for?
Static server-side rendering is particularly useful for sites where displaying information is key, like landing pages, online product pages, non-interactive charts, etc.
Advantages
Static server-side rendering is simple, with no long-running components or component state to think about.
ASP.NET handles the incoming request, renders the component, then immediately disposes of it. If you’re used to building web apps using Razor Pages or MVC, using Razor components this approach will feel very similar.
Trade-offs
Because the resulting components are rendered statically you can’t wire up event handlers to DOM events, such as the user clicking a button.
For some interactivity, you can get away with static rendering and forms (to capture user input), but any more advanced interactivity (like multiple button clicks, sliders, dynamic business logic) would require one of the other modes.
In this mode, your app is not running as a single-page application (SPA), so you can’t keep state in the UI part of your app for any period of time. Your components are only alive for as long as it takes to render and return the HTML for any given request.
Interactive Server
If you need your components to be more interactive, one option is to run them using Blazor Server.
Say, for example, we implement a button to dismiss the banner.
@if(!dismissed)
{
    <div class="border p-4 d-flex justify-content-between align-items-start bg-primary text-white">
        <p class="fs-2">
            @Text
        </p>
        <button @onclick="()=>dismissed=true">
            X
        </button>
    </div>
}
@code {

    [Parameter]
    public string Text { get; set; }

    bool dismissed;

}
This won’t work in static rendering mode. The user could click the X button as many times as they liked and nothing would happen!
But we can make it work if we run the component in Interactive Server mode, which we can do via the rendermode attribute:
<Banner Text="Hello World" @rendermode="@RenderMode.InteractiveServer" />
With this the Banner component will be rendered using Blazor Server.
We can also configure this in the component itself (so it will default to run using Interactive Server).
Banner.razor
@rendermode RenderMode.InteractiveServer

...
Look at the dev tools and you’ll notice a socket connection is opened.
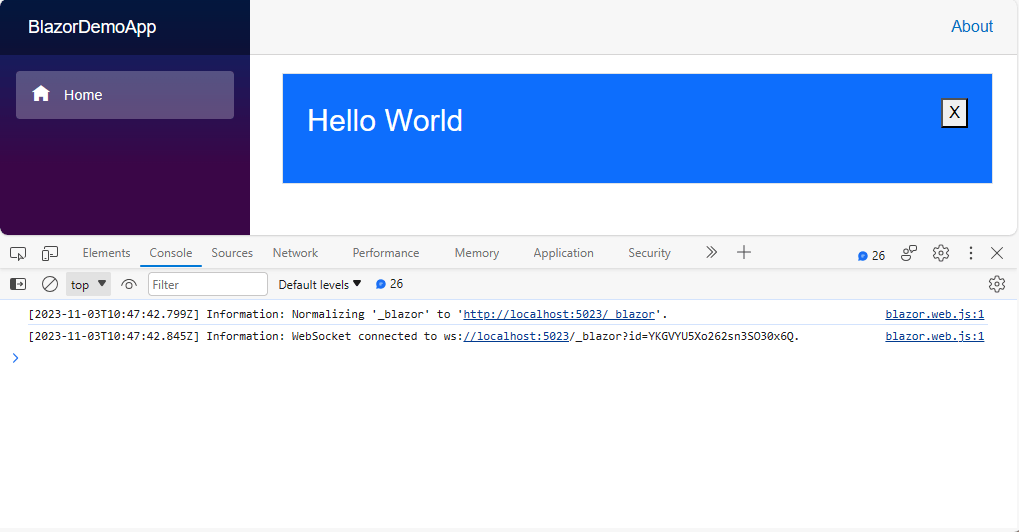
Now when we click the button to “dismiss” the banner, it will be dismissed.
How to Enable Interactive Server Rendering
As with all the render modes, we can enable Interactive Server render mode via Program.cs.
builder.Services.AddRazorComponents()
    .AddInteractiveServerComponents();

...

app.MapRazorComponents<App>()
    .AddInteractiveServerRenderMode();
How Interactive Server Mode Works
This mode works largely the same as Blazor Server always has, using socket connections to handle communication between the client (browser) and server.

- The
onclickevent will be sent over the socket connection to the server. - Blazor running on the server will route that event to the relevant component and execute the relevant handler.
- The component will be re-rendered.
- A
DOM diffwill be sent to the browser. - The browser intelligently updates the parts of the DOM that have changed.
What’s It Good for?
Interactive Server mode is an easy way to enable interactivity for your app.
Line-of-business apps, interactive reports/grids/sliders, etc. can all be handled via Interactive Server.
Advantages
It’s easy to take an existing component (that is being rendered statically) and switch it to use Interactive Server. In most cases it’s simply a case of setting the rendermode attribute for the component.
Because the component is still running on the server, you don’t need to introduce a Web API for handling requests (your components can call business logic and/or connect to data directly).
As of .NET 8, Blazor server circuits are disconnected automatically when no longer needed. In this case, if we navigated to different page with no interactive server components the underlying socket connection would be disconnected after a short time, thereby reducing the load on the server.
Trade-offs
With this mode, every interaction is sent via the web socket connection to your server, which has to keep track of all “active” components.
This means your server needs to be able to handle the load, and if your site becomes more popular you’ll potentially need to invest in more server resources.
If the connection between browser and server is lost (for any reason), an error message is displayed, and the app effectively stops working. For this reason, it’s important to consider where you’re storing application state, as any transient network issue (or redeploy) is likely to force the user to reload the app (and lose any existing state that wasn’t persisted somewhere else, like a database).
Interactive WebAssembly
The other option for enabling interactivity is to use Blazor WebAssembly (WASM). The difference is the component will run on the client (in the browser) not on the server.
We can configure it at the call site (when we render an instance of the component).
<Banner Text="Hello World" @rendermode="@RenderMode.InteractiveWebAssembly" />
Or in the component itself:
Banner.razor
@rendermode RenderMode.InteractiveWebAssembly

...
You can see this in the browser:
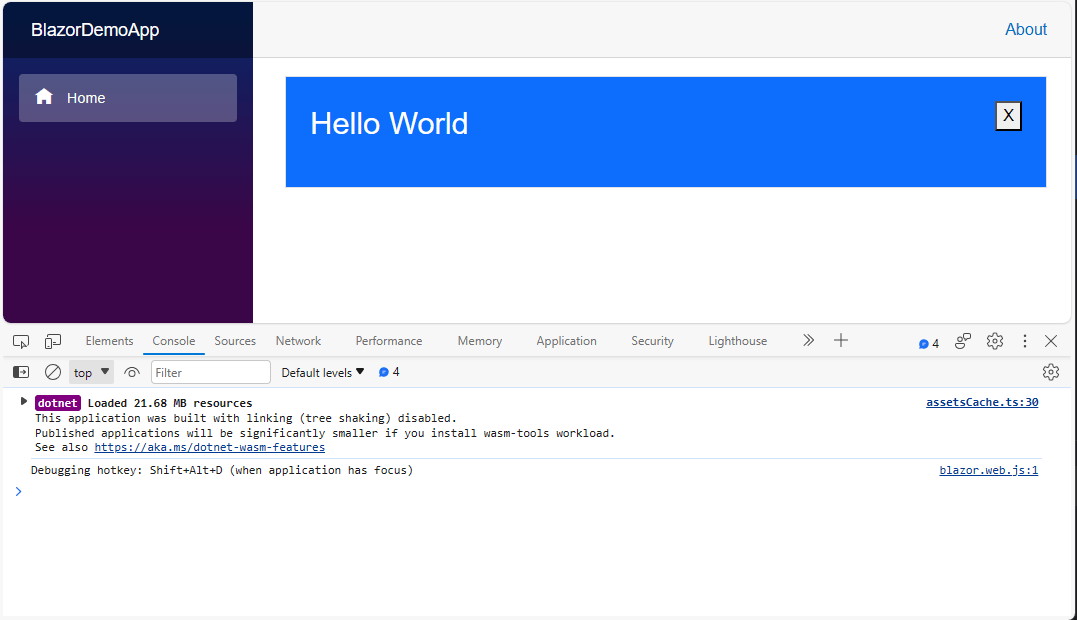
However, try this with a random component from your Blazor app and the chances are it won’t work.
That’s because Interactive WASM mode requires you to architect your app in a specific way.
How to Enable Interactive WebAssembly Rendering
As with the other render modes, you can enable it via Program.cs.
builder.Services.AddRazorComponents()
    .AddInteractiveWebAssemblyComponents();

...

app.MapRazorComponents<App>()
    .AddInteractiveWebAssemblyRenderMode();
You also need to put any components you want to run this way into a separate client project.
Logically this makes sense, as you don’t want your entire server app to be shipped to the browser (not least as it will likely have all the code and config needed to connect to your databases, etc. which makes no sense for a client application running in the browser).
When you create a new project and enable Interactive WASM mode:
dotnet new blazor -int WebAssembly
You’ll notice that the resulting solution has two projects: the main (server) project plus a separate client project.
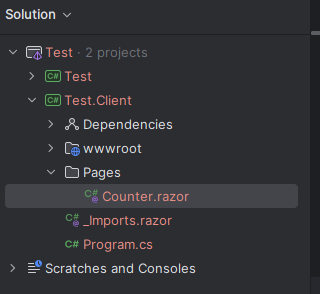
Any component you put in this separate .Client project can run in Interactive WebAssembly mode.
How Interactive WASM Mode Works
When a user requests a page that has a component set to run in Interactive WASM mode, the initial response includes the entire client application (plus the files needed to run .NET in the browser). Typically this is then cached so the client doesn’t need to download it for subsequent requests.
Here’s that initial request/response.
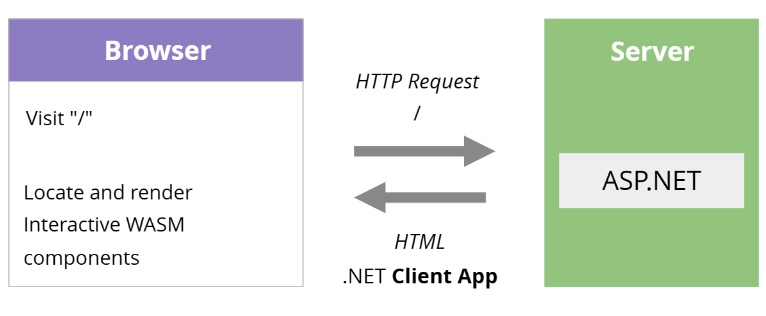
Once the browser has the application, it can locate the relevant component (Banner in this case) and render it right there in the browser.
Then, when someone clicks a button, the onclick event is handled by the component running in the browser. .NET (in the browser) intercepts the onclick event, routes it to the relevant component, re-renders and updates the DOM accordingly.
Here’s how “ongoing” interactions are handled once your app has loaded in the browser.
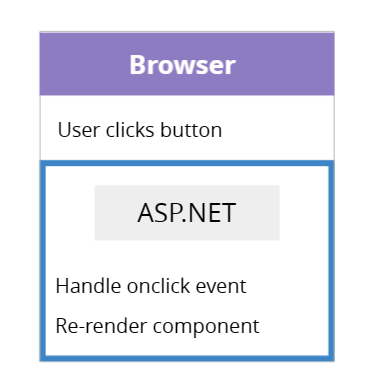
The good news is the large initial download only needs to happen once, irrespective of how many components in your app run using Interactive WASM.
What’s It Good for?
WASM’s USP is its ability to run in semi-disconnected mode (can run in the browser without constantly connecting to a server).
It’s also good for enabling interactivity in consumer-facing and other sites where interactivity is needed but the UX around dropped socket connections is best avoided.
Advantages
The big win with Interactive WASM is you get completely interactive components without the need to throw server resources at your app. With these components running in the browser, you’re letting your users take on the processing power.
Where interactions with a component rendered using Interactive Server can be subject to lag (as it takes time for requests to go to the server and back), here everything is happening in the browser and so the experience for the user is a lot smoother.
Your components can also run “offline” in this mode, as everything is running in the browser (albeit you will need that network connection to fetch or update data on the server).
Trade-offs
For some types of application, the large initial download of the .NET runtime and your app can present a challenge, as it delays the initial load of a page.
Because your app is running in the browser, you’ll need to stand up an API to handle interactions with server resources (you can’t go direct).
The requirement to store your components in a separate project adds some complexity to your app. You may also need a shared project to store models that are shared between server and client (DTOs for example).
Auto Mode
Finally, there is one more way to render your components—using auto mode.
With this, your component can use Blazor Server initially (while the Blazor Web Assembly files download in the background), then use Blazor WASM for subsequent requests.
This enables you to use the fast initial load of Blazor Server to save users waiting for WASM to load and initialize, but still use WASM for most ongoing interactions (thereby reducing load for your server, and avoiding some of the tricky UX issues with Blazor Server disconnects, etc.)
<Banner Text="Hello World" @rendermode="@RenderMode.InteractiveAuto" />
Again we can configure this at the call site or in the component itself:
Banner.razor
@rendermode RenderMode.InteractiveAuto

...
How to Enable Auto Rendering
You’ll need to have both Server and WASM modes set up in your Program.cs.
builder.Services.AddRazorComponents()
    .AddInteractiveWebAssemblyComponents()
    .AddInteractiveServerComponents();

...

app.MapRazorComponents<App>()
    .AddInteractiveServerRenderMode()
    .AddInteractiveWebAssemblyRenderMode();
Then you can go ahead and configure any component to use auto mode (so long as it’s located in your client project).
How Interactive Auto Mode Works
The first request to a page with a component set to run in this mode will use Blazor Server (see Interactive Server mode above).
In the background, the browser will download and start Blazor WebAssembly.
The next time your user visits a page with a component set to run in Interactive Auto mode, it will use Blazor WASM instead of Server (see Interactive WebAssembly mode above).
What’s It Good for?
Enabling interactivity for most types of site, such as landing pages, line-of-business apps, consumer-facing apps. Basically everything that Server/WASM are suited for when used separately.
Advantages
The big win here is you can avoid the challenge of making your users wait for Blazor WASM (by using Server initially) but still use WASM for most interactions thereafter.
The results is a much lighter load for your server and a faster UX for your users.
Trade-offs
There is more complexity inherent when designing your components to run in multiple render modes. You’ll need to make sure they can run both on the server and in the client.
You’ll need to use a Web API between the component and your backend data/logic to ensure it can run in the client. If you don’t want to then use the Web API in Server mode, you’ll need to create abstractions to handle the two different ways of interacting with your server resources (again, this adds complexity to your app).
In Summary
.NET 8’s render modes make Blazor an option for most types of web app.
For “simple” pages (landing pages, read-only views), static server-side rendering is fast, efficient and simple to implement.
For anything more interactive, Blazor Server represents the easiest “upgrade” option. You can typically take an component that runs in static SSR mode and switch it to use Interactive Server.
To give your server an easier time (and avoid UX issues around socket disconnects), you can adopt Interactive WASM mode—just be aware this has implications for your site’s architecture.
Finally, you can use Auto mode and enjoy the best parts of both Blazor Server and WASM.

Jon Hilton
Jon spends his days building applications using Microsoft technologies (plus, whisper it quietly, a little bit of JavaScript) and his spare time helping developers level up their skills and knowledge via his blog, courses and books. He's especially passionate about enabling developers to build better web applications by mastering the tools available to them. Follow him on Twitter here.

