.NET 8’s Final RC Release Ties up Some Blazor Loose Ends

Summarize with AI:
The final release candidate for .NET 8 pulls together all the promised Blazor changes and delivers in-built auth using Razor components.
Back in February 2023, Steve Sanderson took to YouTube to share Microsoft’s plans for Blazor in .NET 8. Now, some eight months later, the final Release Candidate for .NET 8 delivers one final opportunity to see what’s coming for Blazor in .NET 8 ahead of November’s GA release.
So let’s dive in and see what’s new in RC2 (including, finally, an “out-of-the-box” solution for auth).
Run Your Entire App Interactively (Like You Used to!)
Prior to .NET 8, the choices for running your Blazor app were to use either Blazor WebAssembly or Blazor Server. With these hosting models, you generally ran your entire app using your chosen hosting model.
.NET 8 makes it possible to use different render modes for different components. However, there are times you may just want to stick to one mode for everything. This is especially true if you’re migrating from .NET 7 and want your app to work as it always has.
When you create a project using the new Blazor project template in .NET 8, you’ll discover you have a file called App.razor. This acts as the starting point for your app (replacing the Razor
Pages we used to have in previous .NET versions).
App.razor contains two key components, namely HeadOutlet and Routes.
<!DOCTYPE html>
<html lang="en">

<head>
    <meta charset="utf-8" />
    <meta name="viewport" content="width=device-width, initial-scale=1.0" />
    <base href="/" />
    <link rel="stylesheet" href="bootstrap/bootstrap.min.css" />
    <link rel="stylesheet" href="app.css" />
    <link rel="stylesheet" href="BlazorApp14.styles.css" />
    <link rel="icon" type="image/png" href="favicon.png" />
    <HeadOutlet @rendermode="@RenderMode.InteractiveAuto" />
</head>

<body>
    <Routes @rendermode="@RenderMode.InteractiveAuto" />

</body>

</html>
You can set the render mode for the entire app by setting it for these two components.
In this example, these are both set to run using the new Auto render mode, whereby the components will start off using Blazor Server (while Blazor WASM downloads in the background), then switch to use Blazor WASM for subsequent visits.
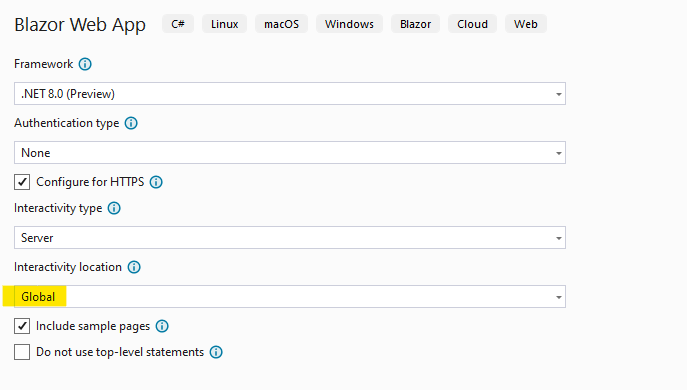
Incidentally, the option to do this is also available when you create the project, either via command line parameters or Visual Studio:

Ditch the RenderMode Attributes
In previous releases, you could also make specific components run interactively via an attribute, like this:
@attribute [RenderModeInteractiveServer]

<h1>
    Hi, I'm running in interactive server mode!
</h1>
It’s now preferred to use the @rendermode directive in your components, like this:
@rendermode InteractiveServer

<h2>
    Hi, I'm a component running in Interactive Server Mode!
</h2>
For that to work, you’ll want to add a using statement to _Imports.razor for your app.
@using static Microsoft.AspNetCore.Components.Web.RenderMode
If you’ve tried previous preview releases of .NET 8, you’ll notice that the render mode names have changed slightly too. Server becomes InteractiveServer, while WebAssembly changes to InteractiveWebAssembly.
This makes a clearer distinction between these modes and the default static server-side rendering option but does represent a breaking change if you’re upgrading from an earlier preview release.
Enhanced Navigation and Form Handling for Smoother UX
When you navigate between pages in your Blazor app in .NET 8, you might notice that the new pages load pretty quickly.
This is largely thanks to enhanced navigation, which uses the browser’s fetch API when you navigate between Blazor pages. It then updates the DOM with the statically rendered content from the server (intelligently updating the parts of the DOM that have actually changed).
This works out of the box, but sometimes you may wish to turn it off and/or control when it occurs.
Disable Enhanced Nav (for Specific Links)
Enhanced navigation only works when navigating between Blazor pages. If you follow a link to a non-Blazor page, enhanced navigation will fail, and fall back to retry the request without enhanced nav (performing a full document load).
The downside of this is that you’re effectively making two requests to the page (the first using enhanced nav, the second going direct).
To avoid this, you can apply the data-enhance-nav attribute to an anchor tag (or any ancestor element).
<a href="/not-blazor" data-enhance-nav="false">A non-Blazor page</a>
Opt in to Enhanced Form Handling
You may wish to use enhanced nav when submitting forms (to make the form use the fetch API and intelligent DOM updating mentioned above).
This is disabled by default (as performing the same form post twice could cause issues).
But if you’re satisfied the endpoint for a form is definitely a Blazor component, you can opt in to use enhanced nav via the data-enhance attribute.
<form method="post" @onsubmit="..." @formname="name" data-enhance>
	...
</form>
Leave My DOM Alone!
If you are dynamically modifying the DOM in the client (likely via JavaScript), the automatic DOM updating mechanism of enhanced navigation could well break your UI, and undo your changes.
This is because server rendering logic has no knowledge of your client-side updates.
To solve this, you can use the data-permanent attribute, and tell Blazor to leave parts of your DOM alone.
<div data-permanent>
    Leave me alone! I've been modified dynamically.
</div>
Listen for Enhanced Page Updates
If you have JS code that would benefit from knowing when an enhanced navigation event has occurred, you can use the enhancedlaod event to listen for changes.
Here, for example, is a way to write to the console for every enhanced navigation event (I put this just before the closing </body> tag in App.razor).
<script>
    Blazor.addEventListener('enhancedload', () => {
        console.log('enhanced load event occurred');
    });
</script>
An Easier Time for Your Server (Automatic Circuit Closing)
Now that it’s possible to mix and match render modes, you might be wondering what happens in the following scenario:
- A user visits a page which includes a component being rendered interactively via the server.
- The user leaves the page and goes to a new page which has no interactive components.
What happens to the open circuit that was spun up with Blazor server?
Circuits in Blazor represent the real-time connection between the server and your browser. They consume server resources and, generally speaking, the more circuits you need to keep open, the bigger server you’ll need to handle the load.
As of .NET 8 RC2, circuits are now automatically cleaned up when no longer needed.
Now, once a user has moved away from any pages which require server interactivity, the existing circuit will be closed and disposed, thereby freeing up server resources.
‘Out-of-the-Box’ Authentication
Auth in .NET and Blazor can be a confusing affair, not least because implementations vary depending on the underlying auth provider you’re using.
If you’re using Auth0, Kinde, Microsoft Entra or Azure Active Directory B2C, it’s possible to integrate these with your .NET 8 Blazor apps.
But sometimes you want to create a new app have auth available out of the box, so users can register for an account, log in, recover their password, all using a local database.
This is now possible with .NET 8 if you opt for “Individual Authentication” when creating your new Blazor app.
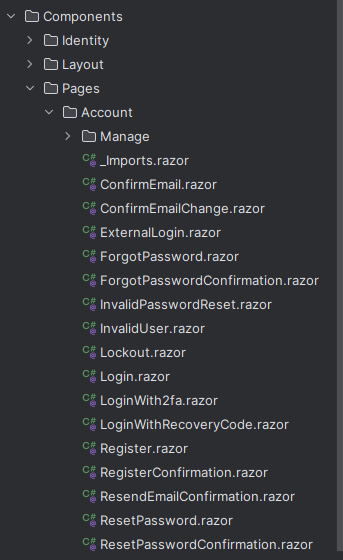
When you do, you get a number of extra components/code in your project.
One the one hand, this adds a degree of complexity up front, but it also means the entire auth system is available to you to change/tweak according to your specific app’s requirements.

The good news is the new auth is all Razor components, so you can jump in and explore/change them as you wish.
For example, here’s some of the code from Login.razor.
 public async Task LoginUser()
{
    // This doesn't count login failures towards account lockout
    // To enable password failures to trigger account lockout, set lockoutOnFailure: true
    var result = await SignInManager.PasswordSignInAsync(Input.Email, Input.Password, Input.RememberMe, lockoutOnFailure: false);
    if (result.Succeeded)
    {
        Logger.LogInformation("User logged in.");
        RedirectManager.RedirectTo(ReturnUrl);
    }
    if (result.RequiresTwoFactor)
    {
        RedirectManager.RedirectTo(
            "/Account/LoginWith2fa",
            new() { ["ReturnUrl"] = ReturnUrl, ["RememberMe"] = Input.RememberMe });
    }
    if (result.IsLockedOut)
    {
        Logger.LogWarning("User account locked out.");
        RedirectManager.RedirectTo("/Account/Lockout");
    }
    else
    {
        errorMessage = "Error: Invalid login attempt.";
    }
}
Notice how this is using Microsoft Identity’s SignInManager to actually log the user in. This in turn uses cookies for auth.
Everything is integrated with Blazor’s auth system, meaning you can use the AuthorizeView component to show content based on a user’s auth status:
<AuthorizeView>
    Hello @context.User.Identity?.Name! You are logged in.
</AuthorizeView>
And restrict pages to authorized users only.
@attribute [Authorize]

<p>
    Try to get here when not logged in and you'll be redirected to the login page.
</p>
State is Persisted Between Server and Client
At this point, you might be wondering what happens when you render a component using the InteractiveWebAssembly render mode. Given all the auth is handled on the server, how can the current user’s auth state be shared
with components running in the browser via WASM?
The answer lies in the PersistentComponentState service.
In Blazor apps, this is used to persist component state when your app is rendered on the server, such that it can then be retrieved by a component running on the client.
When you enable both auth and interactivity using Blazor WASM, you’ll find a custom AuthenticationStateProvider located at /Identity/PersistingRevalidatingAuthenticationStateProvider.razor in your
server app.
A custom auth provider is useful for invoking logic when key auth events happen (like a user logging in).
...

private void OnAuthenticationStateChanged(Task<AuthenticationState> authenticationStateTask)
{
    _authenticationStateTask = authenticationStateTask;
}
It’s particularly useful here because it provides a way to take the information about the user’s authentication status, and persist it automatically.
This happens in the OnPersistingAsync method.
private async Task OnPersistingAsync()
{
    ...

    var authenticationState = await _authenticationStateTask;
    var principal = authenticationState.User;

    if (principal.Identity?.IsAuthenticated == true)
    {
        var userId = principal.FindFirst(_options.ClaimsIdentity.UserIdClaimType)?.Value;
        var email = principal.FindFirst(_options.ClaimsIdentity.EmailClaimType)?.Value;

        if (userId != null && email != null)
        {
            _state.PersistAsJson(nameof(UserInfo), new UserInfo
            {
                UserId = userId,
                Email = email,
            });
        }
    }
}
Once server rendering is complete, this code will run and persist the current user’s info.
If you explore the client project, you’ll find a corresponding PersistentAuthenticationStateProvider.razor class.
It attempts to read the user info from persistentState:
public class PersistentAuthenticationStateProvider(PersistentComponentState persistentState) : AuthenticationStateProvider
{
    private static readonly Task<AuthenticationState> _unauthenticatedTask =
        Task.FromResult(new AuthenticationState(new ClaimsPrincipal(new ClaimsIdentity())));

    public override Task<AuthenticationState> GetAuthenticationStateAsync()
    {
        if (!persistentState.TryTakeFromJson<UserInfo>(nameof(UserInfo), out var userInfo) || userInfo is null)
        {
            return _unauthenticatedTask;
        }

        Claim[] claims = [
            new Claim(ClaimTypes.NameIdentifier, userInfo.UserId),
            new Claim(ClaimTypes.Name, userInfo.Email),
            new Claim(ClaimTypes.Email, userInfo.Email) ];

        return Task.FromResult(
            new AuthenticationState(new ClaimsPrincipal(new ClaimsIdentity(claims,
                authenticationType: nameof(PersistentAuthenticationStateProvider)))));
    }
}
The upshot of all this is that all of your components, irrespective of how they’re rendered, are aware of the current user’s logged in status.
Miscellaneous Changes
Phew, we’ve covered quite a bit of ground already, so here’s a quick rundown of the remaining Blazor changes in RC2.
You can now access HttpContext as a cascading parameter.
[CascadingParameter]
public HttpContext? HttpContext { get; set; }
This provides a convenient way to inspect and/or modify things like headers and/or other properties.
It also means you can do away with HttpContextAccessor, which was previously the only way to get to this information.
It’s possible to inject keyed services into components using the [Inject] attribute.
[Inject(Key = "ServiceA")]
public IMyService MyService { get; set; }
Keyed services are useful when you need to register multiple implementations of an interface under different names (keys).
Finally, this release of Blazor brings some form model binding improvements.
Blazor will now honor data contract attributes (like [DataMember] and [IgnoreDataMember]). These attributes are used to control the serialization of data members in a class.
For example, say you have a Person model which looks like this:
public class Person
{
    [DataMember]
    public string Name { get; set; }

    [DataMember]
    public int Age { get; set; }

    [IgnoreDataMember]
    public string SocialSecurityNumber { get; set; }
}
In this case, if we’re binding incoming form values to this model, we may not want the user to be able to change their Social Security Number (but do want to let them change their name or age).
These attributes provide one mechanism to ensure incoming form values are either accepted or ignored for specific properties.
In Summary
So there it is, the last of the .NET 8 previews.
This latest release candidate delivers built-in support for auth using individual accounts, different razor component render modes and enhanced navigation to provide a “SPA-like” experience for your Blazor apps.
With no further significant changes planned, it seems we now know precisely what to expect for the GA release, and .NET 8 will be here before you know it.
Use a component library in sync with Microsoft’s release cadence. Telerik UI for Blazor offers more than 100 truly native Blazor components to make it fast and easy to develop new Blazor apps or modernize legacy apps. Try it free for 30 days.

Jon Hilton
Jon spends his days building applications using Microsoft technologies (plus, whisper it quietly, a little bit of JavaScript) and his spare time helping developers level up their skills and knowledge via his blog, courses and books. He's especially passionate about enabling developers to build better web applications by mastering the tools available to them. Follow him on Twitter here.

