Blazor Basics: Creating a Todo App using Blazor WebAssembly

Summarize with AI:
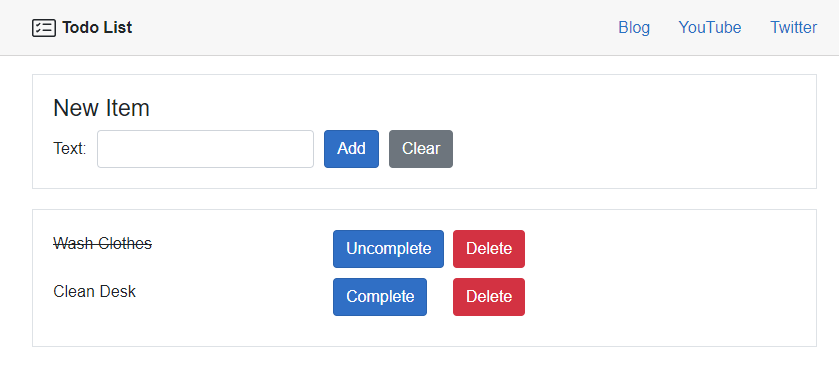
Today we'll build a simple todo list as a Blazor WebAssembly application.
Learning by doing is always more exciting than reading about theory. In this article, we will implement a basic todo list as a Blazor WebAssembly application.
Note: There is a similar article about creating a todo app implemented using Blazor Server.
Features
We will implement the following requirements for the todo app:
- Show a list of todo items
- Add a todo item to the list
- Remove a todo item from the list
- Mark a todo item as completed
- Mark a todo item as uncompleted
We will focus on Blazor development and keep the project simple.
However, a user interface library such as Telerik UI for Blazor will improve the user experience and make it look great.
How Does Blazor WebAssembly Work Again?
If it’s the first time you are hearing about Blazor WebAssembly, check out the What Is Blazor WebAssembly (WASM)? FAQ page.
A quick summary nonetheless: Blazor WebAssembly runs client-side in the browser. It doesn’t require an ASP. NET Core application to host. You can serve a Blazor WebAssembly application from any web server. You can run interaction code client-side without any HTTP calls. However, fetching data requires accessing a server using an API.
This article will show what those architectural boundaries mean for Blazor WebAssembly application development.
Setting up the Project in Visual Studio
We need to set up the project before we can start writing code. We use the default Blazor WebAssembly project template within Visual Studio.
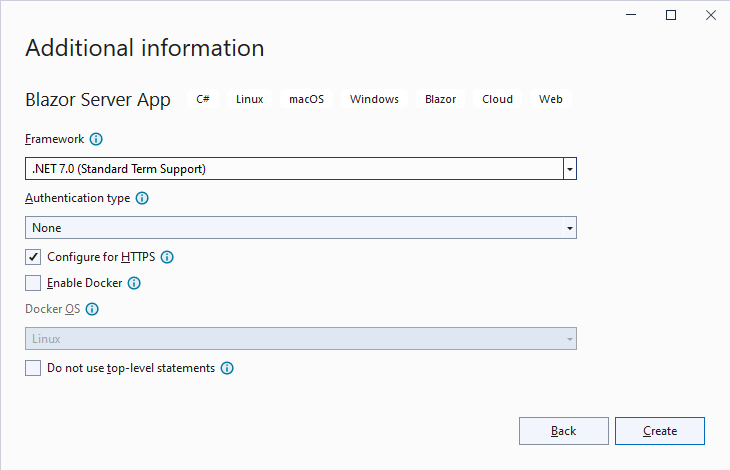
First of all, we remove all unnecessary components generated by the Blazor WebAssembly project template.
You can follow the steps described here or clone the project’s GitHub repository after the project clean-up commit.
The template comes with a few files we don’t need and quickly remove:
Removing Files from the Client Project
In the Client project, we remove the following files:
- Pages/Counter.razor
- Pages/FetchData.razor
- Shared/NavMenu.razor
- Shared/SurveyPrompt.razor
We also need to open the Index.razor page component and remove the usage of the removed SurveyPrompt component.
@page "/"

<PageTitle>Index</PageTitle>
<h1>Hello, world!</h1>
Welcome to your new app.
Next, we completely exchange the implementation of the MainLayout component. We replace the default implementation with the following:
@inherits LayoutComponentBase

<div class="page">
    <main>
         <div class="top-row px-4" style="justify-content: space-between;">
            <div style="display: flex; align-items: center;">
                <div><ChecklistIcon /></div>
                <div style="margin-left: 5px;"><b>Todo List</b></div>
            </div>
            <div>
                <a href="https://www.claudiobernasconi.ch" target="_blank">Blog</a>
                <a href="https://youtube.com/claudiobernasconi" target="_blank">YouTube</a>
                <a href="https://twitter.com/CHBernasconiC" target="_blank">Twitter</a>
            </div>
        </div>

        <article class="content px-4">
            @Body
        </article>
    </main>
</div>
Instead of using the previously removed NavMenu component, we add a ChecklistIcon component and add a few links to the header.
The ChecklistIcon component is optional, and you can copy it from the project’s GitHub repository, use your own
icon or simply use the title of the application only.
Removing Files from the Server Project
In the Server project, we remove the WeatherForecastController.cs file.
Removing Files from the Shared Project
In the Shared project, we remove the WeatherForecast.cs file.
If you want to skip the process of setting up the project template, you can clone the project’s GitHub repository and head to the first commit labeled “Cleaned-up Blazor WebAssembly project template.”
Now, we’re ready to implement the Todo App.
Listing Todo Items
First of all, we need to implement a data class representing a todo item. We add a new TodoItem.cs file in the Shared project.
The implementation consists of a Text property set in the constructor and a Completed property initialized with the default value (false).
public class TodoItem
{
    public TodoItem(string text)
    {
        Text = text;
    }

    public string Text { get; set; }
    public bool Completed { get; set; }
}
Next, we need to implement a API controller that provides the client with access to the data, usually stored in a database.
Before implementing the TodoController, we want to implement a service containing the data. In a real project, it would be a service accessing the stored data from a database.
We create a new Services folder in the Server project. We add a new ITodoService.cs file including the following interface definition:
namespace TodoAppBlazorWebAssembly.Server.Services;

public interface ITodoService
{
    public IEnumerable<TodoItem> GetAll();
}
We also place the implementation within the same folder. We create a new TodoService.cs file with the following code inside:
namespace TodoAppBlazorWebAssembly.Server.Services;

public class TodoService : ITodoService
{
    private readonly IList<TodoItem> _items;

    public TodoService()
    {
        _items = new List<TodoItem> {
            new TodoItem("Wash Clothes"),
            new TodoItem("Clean Desk")
        };
    }

    public IEnumerable<TodoItem> GetAll()
    {
        return _items.ToList();
    }
}
We use a private field to hold all the todo items and initialize the list with two pre-defined todo items.
The GetAll method returns a copy of the items list using the ToList method of the IList type.
Next, we add a new TodoController file into the Controller folder of the Server project.
The implementation defines a single HttpGet method:
using Microsoft.AspNetCore.Mvc;
using TodoAppBlazorWebAssembly.Server.Services;

namespace TodoAppBlazorWebAssembly.Server.Controllers;

[ApiController]
[Route("[Controller]")]
public class TodoController : ControllerBase
{
    private readonly ITodoService _todoService;

    public TodoController(ITodoService todoService)
    {
        _todoService = todoService;
    }

    [HttpGet]
    public IEnumerable<TodoItem> Get()
    {
        return _todoService.GetAll();
    }
}
We use default ASP. NET Core dependency injection to access a reference of the ITodoService in the controller’s constructor.
The HttpGet attribute marks the Get method as a Get endpoint. We can use all the standard ASP. NET Core WebAPI mechanisms, as the Server project is a default ASP. NET Core WebAPI project.
Lastly, we register the service to the dependency injection container in the Program.cs:
builder.Services.AddSingleton<ITodoService, TodoService>();
Now, we’re finally ready to implement the Index.razor component in the Client project. It represents the default page of the Blazor WebAssembly app that gets loaded when the web application is started.
We replace the default code with the following implementation:
@page "/"
@inject HttpClient Http

<PageTitle>Todo List</PageTitle>

@if (_todoItems == null)
{
    <p><em>Loading...</em></p>
}
else
{
    <div class="border" style="padding: 20px; margin-top: 20px;">
        <div style="display: flex; flex-direction: column">
            @foreach (var todo in _todoItems)
            {
                <div style="display: flex; margin-bottom: 10px;">
                    <div style="display: flex; align-items: center;margin-bottom: 10px;">
                        <div style="width: 280px;">@todo.Text</div>
                    </div>
                </div>
            }
        </div>
    </div>
}

@code {
    private TodoItem[]? _todoItems;

    protected override async Task OnInitializedAsync()
    {
        _todoItems = await Http.GetFromJsonAsync<TodoItem[]>("Todo");
    }
}
We use the default Blazor pattern to show a loading screen. We use the null state of the private _todoItems field to decide whether the data has been loaded.
We use the foreach iteration statement to loop through all the available todo items and render a div element for each todo item containing the Text property of the todo item.
The code section contains the private variable holding the todo items and a protected OnInitializedAsync method.
The OnInitializedAsync lifecycle method will be called by the Blazor framework when the component is ready.
We use the http client provided by dependency injection using the @inject directive to call the API and load data from the server.
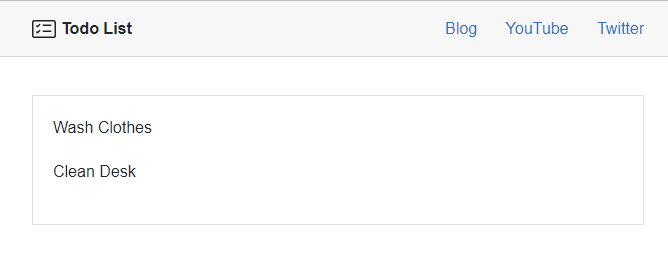
When starting the application, the todo items get loaded from the server and displayed on the webpage.
Adding a Todo Item
Adding items to the todo list requires us to implement a form. The user enters a description of the todo item into a text field and submits the form.
We create a new TodoItemForm.razor component in the Shared folder of the Client project.
@inject HttpClient Http

<EditForm Model="@NewItem" OnSubmit="@ItemAdded">
    <div style="display: flex; align-items: center; width: 400px;">
        <div style="margin-right: 10px">Text:</div>
        <InputText
            @bind-Value="NewItem.Text"
            class="form-control"
            style="margin-right: 10px"
            id="Item" />
        <input type="submit" class="btn btn-primary" style="margin-right: 10px" value="Add" />
        <input type="reset" class="btn btn-secondary" value="Clear" />
    </div>
</EditForm>

@code {
    [Parameter]
    public required Action OnItemAdded { get; set; }

    private TodoItem NewItem = new TodoItem("");

    public async Task ItemAdded()
    {
        await Http.PostAsJsonAsync("Todo", NewItem);
        NewItem.Text = "";

        if (OnItemAdded != null)
        {
            OnItemAdded();
        }
    }
}
Again, we use the @inject directive to make the HTTP client available to the component.
For the component template, we use the built-in EditForm component that generates a form component and provides events, such as OnSubmit, for form handling.
We use the built-in InputText component to render an input field of type text. The @bind-Value expression allows us to add a two-way binding for the NewItem.Text property.
We set the Model property of the EditForm component to the NewItem property defined in the code section. We also use the ItemAdded method as the callback for the OnSubmit event.
The code section contains the OnItemAdded event that we expose to the parent component. It allows the parent component to execute code whenever the event is fired.
Next, we add a private NewItem field of type TodoItem to hold the information entered in the form.
The ItemAdded method uses the injected HTTP client to post the NewItem object to the API. We use the PostAsJsonAsync method, which conveniently allows us to provide the TodoItem object as an argument.
Next, we set the Text property of the NewItem object to an empty string.
If the parent component provides a callback for the OnItemAdded event, we call it at the end of the method.
Extending the API
Before we add the TodoItemForm component to the Index.razor page, we need to extend the API. We only have a method for responding to a GET request and returning a list of todo items.
First, we open the ITodoService.cs file and add the Add method below the GetAll method:
public void Add(TodoItem item);
The implementation in the TodoService class uses the Add method of the IList interface.
public void Add(TodoItem item)
{
    _items.Add(item);
}
Next, we add a Post method to the TodoController class and apply the HttpPost attribute to make it available as a POST endpoint on the API.
[HttpPost]
public void Post(TodoItem item)
{
    _todoService.Add(item);
}
Using the TodoItemForm Component
Now that we implemented the TodoItemForm component and extended the API as well as the consumes TodoService in the Server project, we can finally use the TodoItemForm component within the Index page of the Client project.
We add the following template snippet above the listing of the todo items:
<div class="border" style="padding: 20px;">
    <h4>New Item</h4>
    <TodoItemForm OnItemAdded="@ItemsChanged" />
</div>
We use the TodoItemForm component and provide a ItemsChanged method as the callback for the OnItemAdded event.
In the code section of the Index page component, we implement the ItemsChanged method:
public async void ItemsChanged()
{
    _todoItems = await Http.GetFromJsonAsync<TodoItem[]>("Todo");
    StateHasChanged();
}
We use the HTTP client to reload the todo items from the server. We need to reload the data to get the newly created todo item from the backend. We call the StateHasChanged method at the end of the implementation to tell Blazor to re-render
the component in the browser.
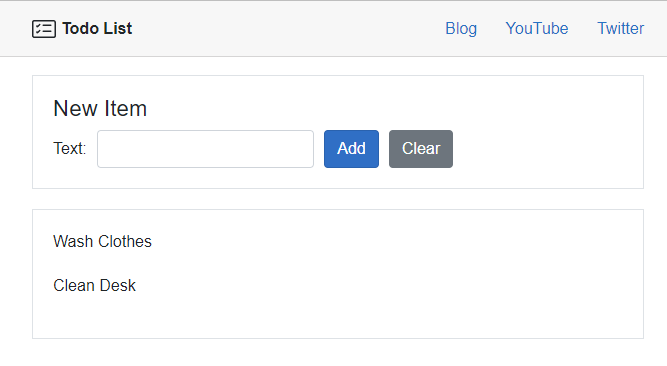
The form is placed above the list of todo items. When the user enters a text into the field and presses the submit button, a new todo item will be shown in the todo list below.
Removing a Todo Item
Now that we can add a todo item, we also want to remove existing items from the todo list.
First, we extend the ITodoService and add a Delete method:
public void Delete(string text);
For the Delete method, we use the text of the item as the identification. In a real-world application, you most likely would use the id of the object. To keep it as simple as possible and to focus on the different moving
parts, I decided against introducing an id.
The implementation in the TodoService class looks like this:
public void Delete(string text)
{
    var item = _items.Single(x => x.Text == text);
    _items.Remove(item);
}
We use the Single LINQ extension method to find the correct todo item in the list. Next, we use the Remove method to remove the todo item from the list.
Next, we extend the TodoController class. We add a Delete method:
[HttpDelete("{text}")]
public void Delete(string text)
{
    _todoService.Delete(text);
}
This time, we add a parameter for the HttpDelete attribute to make the provided text available as the sole method argument. We call the TodoService the same way we already called it in the other controller methods.
Now that the API is ready, we extend the component template of the Index component.
We add a new HTML block below the output of the Text property. The whole block inside the foreach statement looks like this:
<div style="display: flex; margin-bottom: 10px;">
    <div style="display: flex; align-items: center;margin-bottom: 10px;">
        <div style="width: 280px;">@todo.Text</div>
    </div>
    <div>
        <button class="btn btn-danger" onclick="@(() => DeleteItem(todo))">Delete</button>
    </div>
</div>
We added a button and applied a few Bootstrap CSS classes to make the button look dangerous. And we provide a DeleteItem method to the onclick event. We provide the todo item as its argument.
In the code section of the component, we implement the DeleteItem method:
public async void DeleteItem(TodoItem item)
{
    await Http.DeleteAsync($"Todo/{item.Text}");
    ItemsChanged();
}
As stated above, we send the text of the todo item as the identifying information to the API. We also call the ItemsChanged method to reload the todo items from the server and tell Blazor to re-render the component.
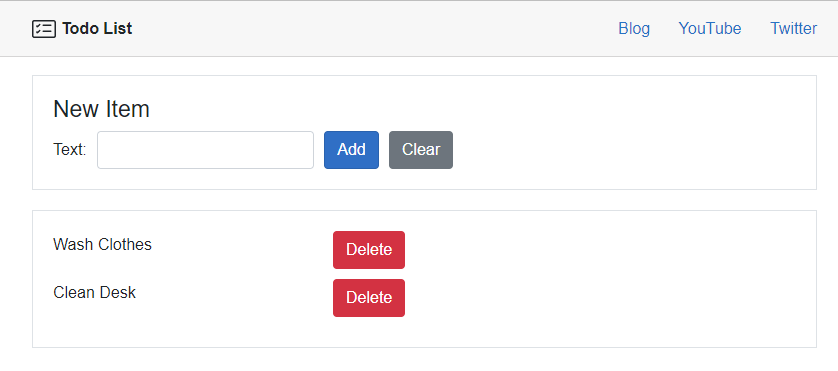
The Index page component now renders a red delete button beside each todo item. When we click the button, the item is removed from the todo list.
Completing a Todo Item
We have a list of all todo items, and we can add and remove items. We only have a single feature left. We want to complete and uncomplete todo items.
Similar to the other features, we extend the ITodoService interface in the Server project. This time, we add two methods:
public void Complete(TodoItem item);
public void Uncomplete(TodoItem item);
The implementation in the TodoService is similar to the Delete method:
public void Complete(TodoItem item)
{
    var todoItem = _items.Single(i => i.Text == item.Text);
    todoItem.Completed = true;
}

public void Uncomplete(TodoItem item)
{
    var todoItem = _items.Single(i => i.Text == item.Text);
    todoItem.Completed = false;
}
We use the LINQ Single method to get the correct item from the list.
Note: We are using Blazor WebAssembly, which means the TodoItem that gets created when the API is executed is different from the TodoItem stored in the todo list within the TodoService.
We then set the Completed property of the todo item to true for the Complete and false for the Uncomplete method.
For the TodoController class, we add two HttpPost methods:
[HttpPost("complete")]
public void Complete(TodoItem item)
{
    _todoService.Complete(item);
}

[HttpPost("uncomplete")]
public void Uncomplete(TodoItem item)
{
    _todoService.Uncomplete(item);
}
We provide a name to the HttpPost attribute to differentiate the definitions from the POST endpoint that handles adding new items.
In the Client project, we extend the Index component and add the following template snippet between the text output and the delete button:
@if (todo.Completed)
{
    <div style="width: 120px">
        <button class="btn btn-primary" onclick="@(() => UncompleteItem(todo))">Uncomplete</button>
    </div>
}
@if (!todo.Completed)
{
    <div style="width: 120px">
        <button class="btn btn-primary" onclick="@(() => CompleteItem(todo))">Complete</button>
    </div>
}
We use an if statement to conditionally render the Complete or Uncomplete button depending on the state of the Completed property of the TodoItem.
We also provide methods for the onclick action callback for each button, including the todo item as its argument.
In the code section, we add the following two methods:
public async void CompleteItem(TodoItem item)
{
    await Http.PostAsJsonAsync("Todo/complete", item);
    ItemsChanged();
}

public async void UncompleteItem(TodoItem item)
{
    await Http.PostAsJsonAsync("Todo/uncomplete", item);
    ItemsChanged();
}
We use the HTTP client to call the API using a POST request and provide the TodoItem as an argument. Again, in more advanced applications, you might want to provide the id of the object instead.
We are almost done. However, we want to change the look of the text output depending on the state of the todo item. We want to strikethrough the text for completed todo items.
We add the following method to the code section of the Index component:
public string ItemClass(TodoItem item)
{
    return item.Completed ? "item-completed" : "";
}
We can use this method within the component’s template and change the div rendering the todo items Text property like this:
<div class="@ItemClass(todo)" style="width: 280px;">@todo.Text</div>
We use the ItemClass method defined in the code section to provide a string representation of the desired CSS classes.
Note: It’s a common pattern when working with Blazor to dynamically set the CSS classes depending on the state of an object.

The completed app now renders a list of todo items. It allows adding, removing, completing and un-completing todo items.
Getting the Source Code
You can access the full source code of the completed todo app on the project’s GitHub repository. If you get stuck, you can also navigate the different files or commits to finding a solution to your problem.
Feel free to clone the repository and add the features you like to improve and practice your Blazor development skills.
To continue learning, check out Claudio’s free Blazor Crash Course video series. It is a great starting point to get you up to speed with Blazor development, from implementing your first Blazor component to handling forms, using CSS, to building a simple dashboard.
And stay tuned to the Blazor Basics series here for more articles like this!

Claudio Bernasconi
Claudio Bernasconi is a passionate software engineer and content creator writing articles and running a .NET developer YouTube channel. He has more than 10 years of experience as a .NET developer and loves sharing his knowledge about Blazor and other .NET topics with the community.

