Biometric Authentication in Angular Using Auth0

Summarize with AI:
Learn to build an authentication system that supports passkeys using the Auth0 SDK within an Angular application.
Passkeys combine both possession and inherence factors (hardware and biometrics) in a single authentication method. Basically, passkeys are public key cryptographic credentials that conform to FIDO protocols that provide strong, phishing-resistant authentication unlike regular password-based systems. They also sync across your devices, so you can easily sign in from your phone, laptop or tablet.
Building an authentication system or updating an existing one to support passkeys takes a lot of time. As a developer, you need to understand complex specs and get everything right. Identity providers like Auth0 provide an easy-to-use suite of tools that allows you to build great authentication solutions that support the latest password-based to passwordless authentication methods without writing complicated code.
The goal of this article is to show how easy it is to build an authentication system that supports passkeys using the Auth0 SDK within an Angular application.
Prerequisites
To follow along with this guide, you need to be familiar with the Angular framework, have integrated or consumed RESTful APIs, and have a basic understanding of how authentication and authorization work.
Project Setup
Let’s create an Angular project by running the following command:
ng new ng-webauthn
Follow the prompts and accept all the defaults. This creates an Angular project in a folder called ng-webauthn.
We’ll install our dependencies after we set up Auth0. Open your terminal and start your application by running the following command:
npm run start
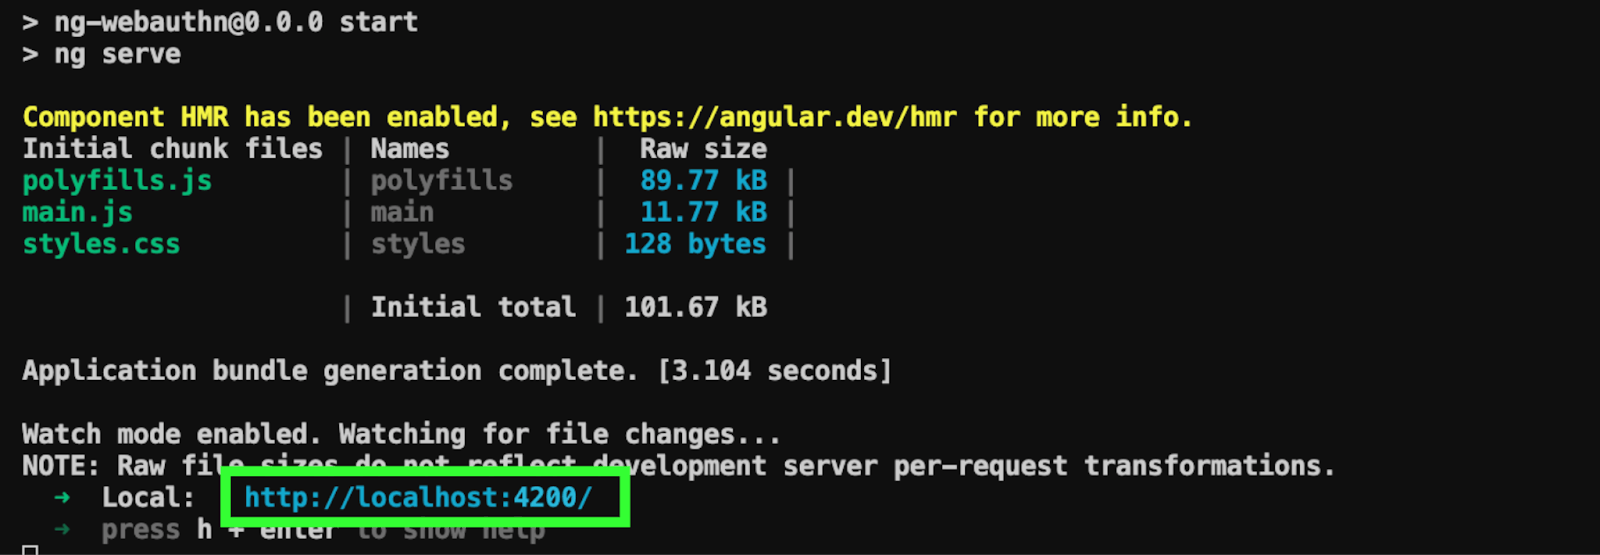
One key thing to notice here is that our application runs on localhost:4200 by default. We’ll need this information when configuring our application on the Auth0 dashboard.
Setting Up Auth0
Let’s now set up Auth0 and integrate it into our application.
Visit the Auth0 onboarding page to create an account. On the dashboard click on Applications > Create Application.
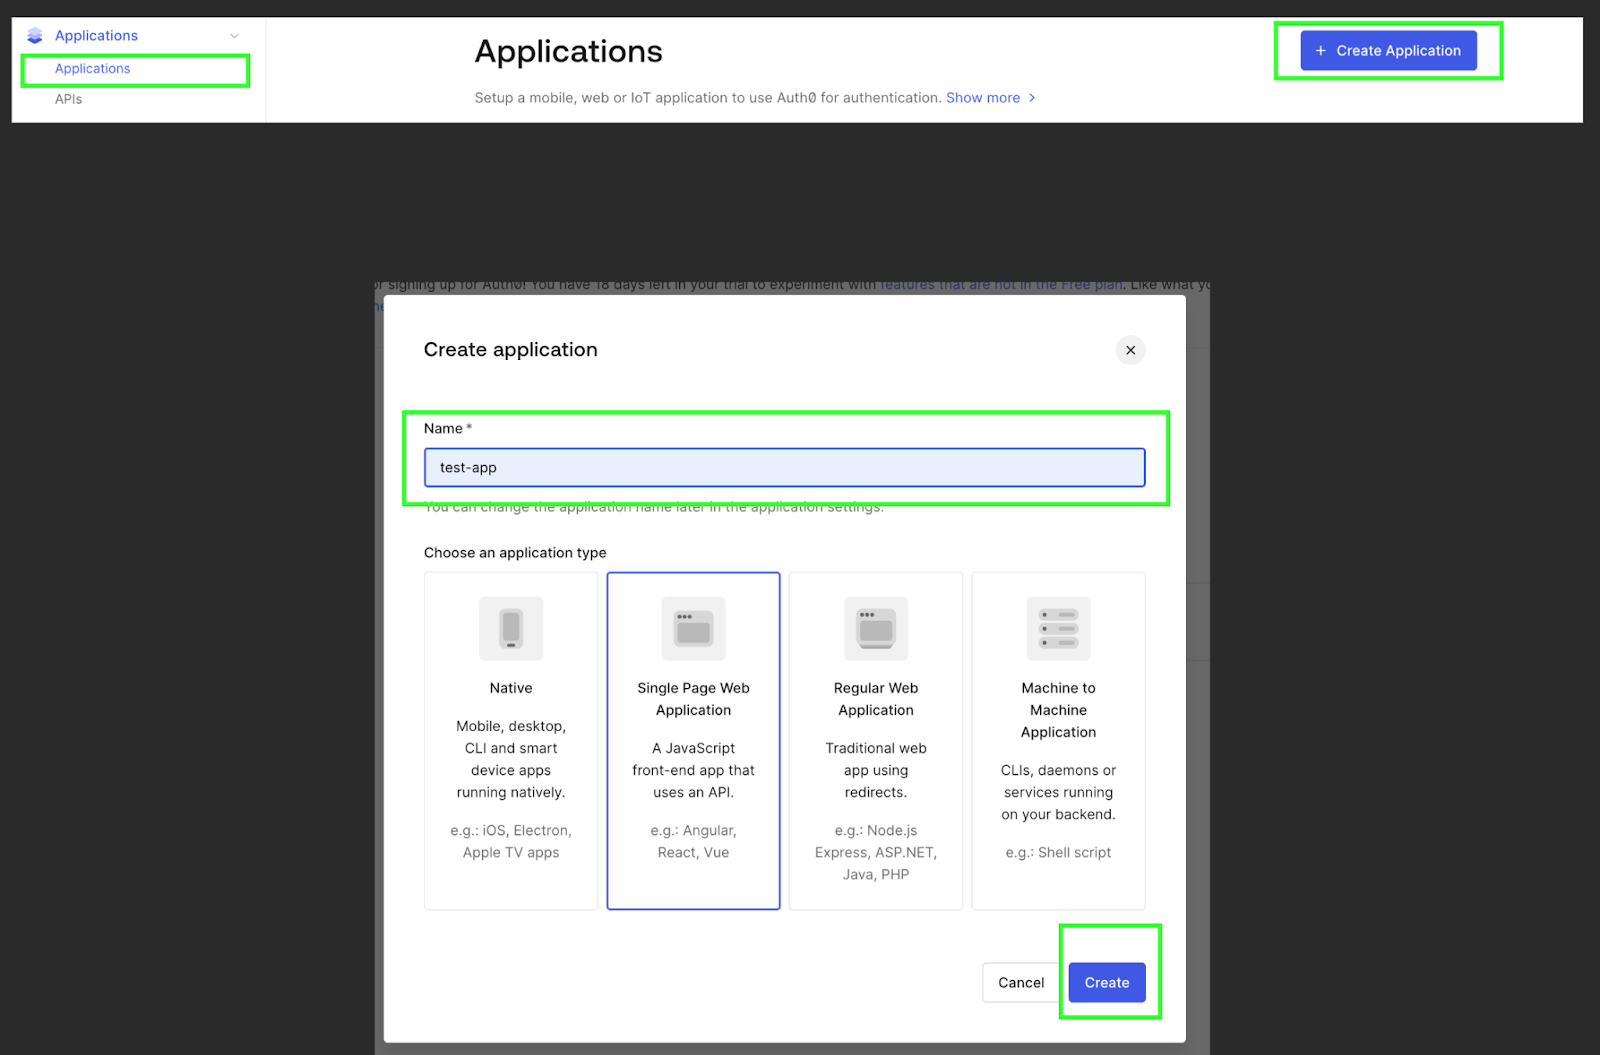
Since we’re integrating with Angular, we created a single-page application on the Auth0 dashboard with an arbitrary name: “test-app.” You can choose your preferred name.
Next, let’s click on the settings tab to configure our application.
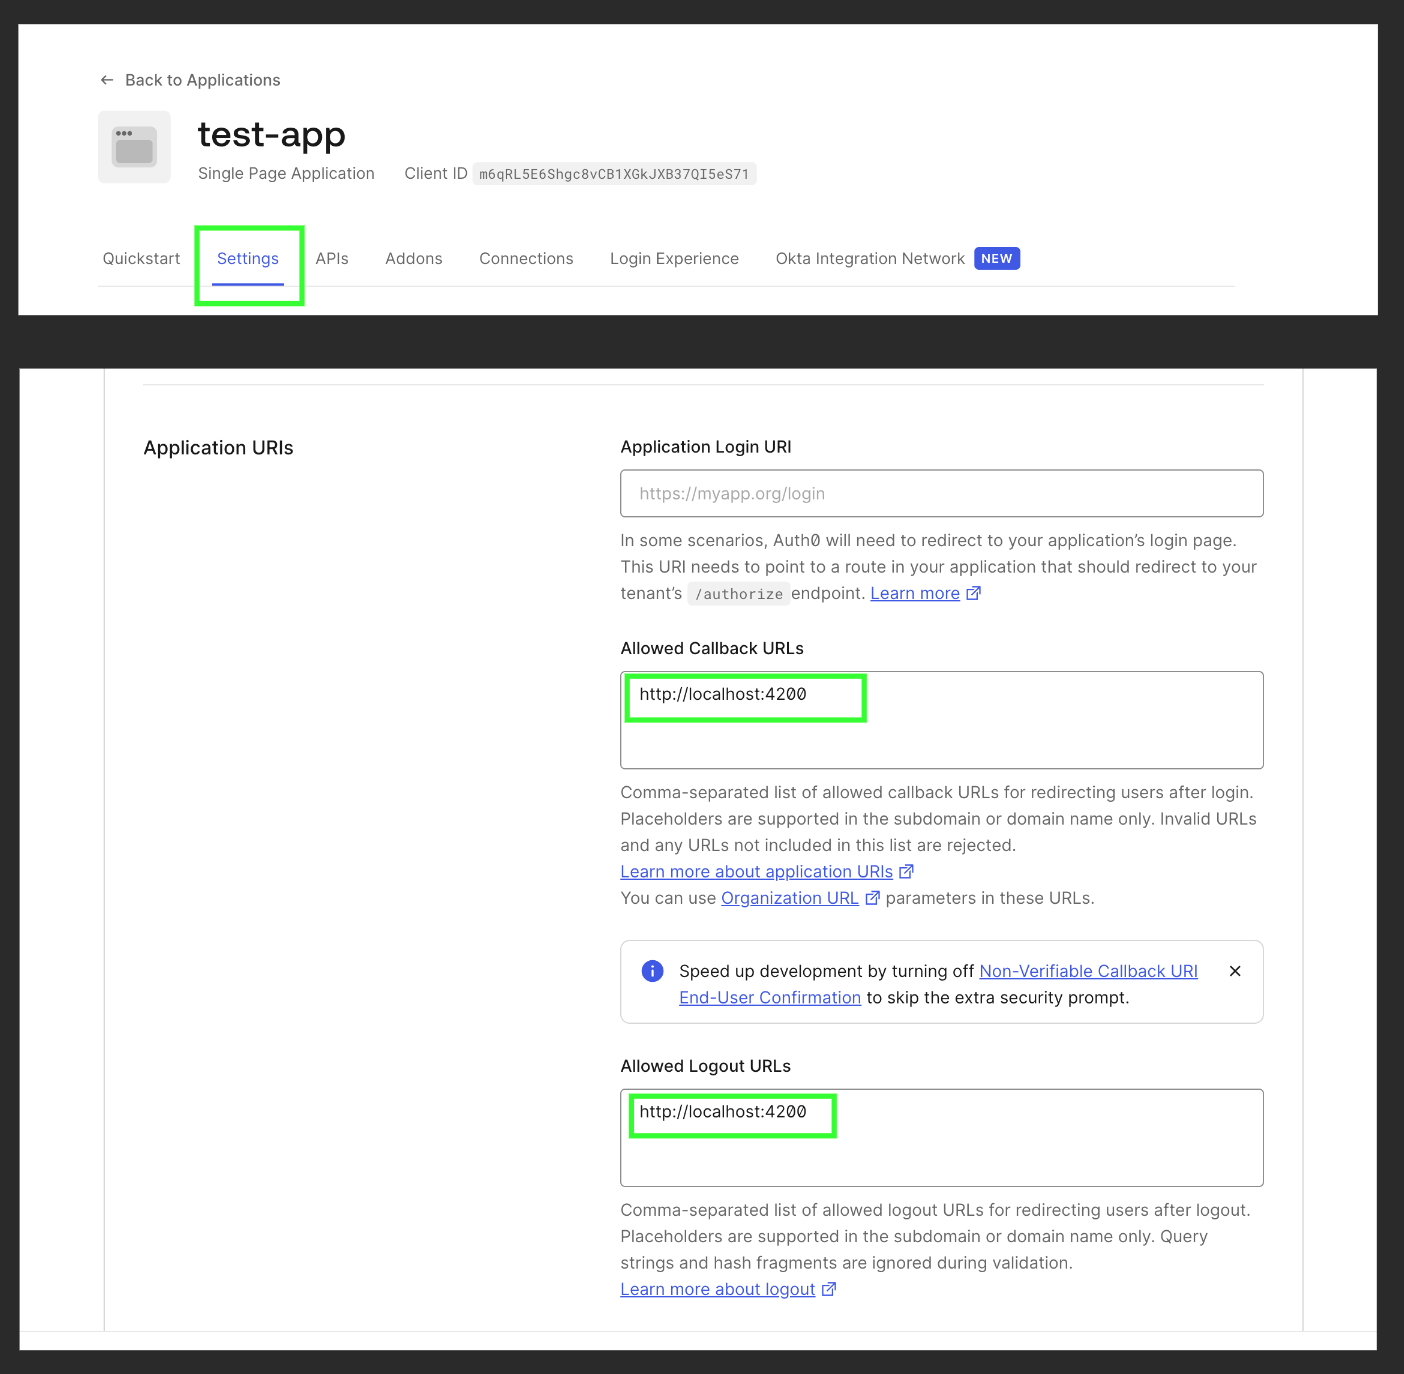
As seen above, the Callback URLs and Logout URLs input fields accept a comma-separated list of candidate URLs that we can redirect the user to after they log in, sign up or sign out, respectively.
To understand why we need this, we need to understand the default recommended authentication method when using Auth0, hosted or universal login.
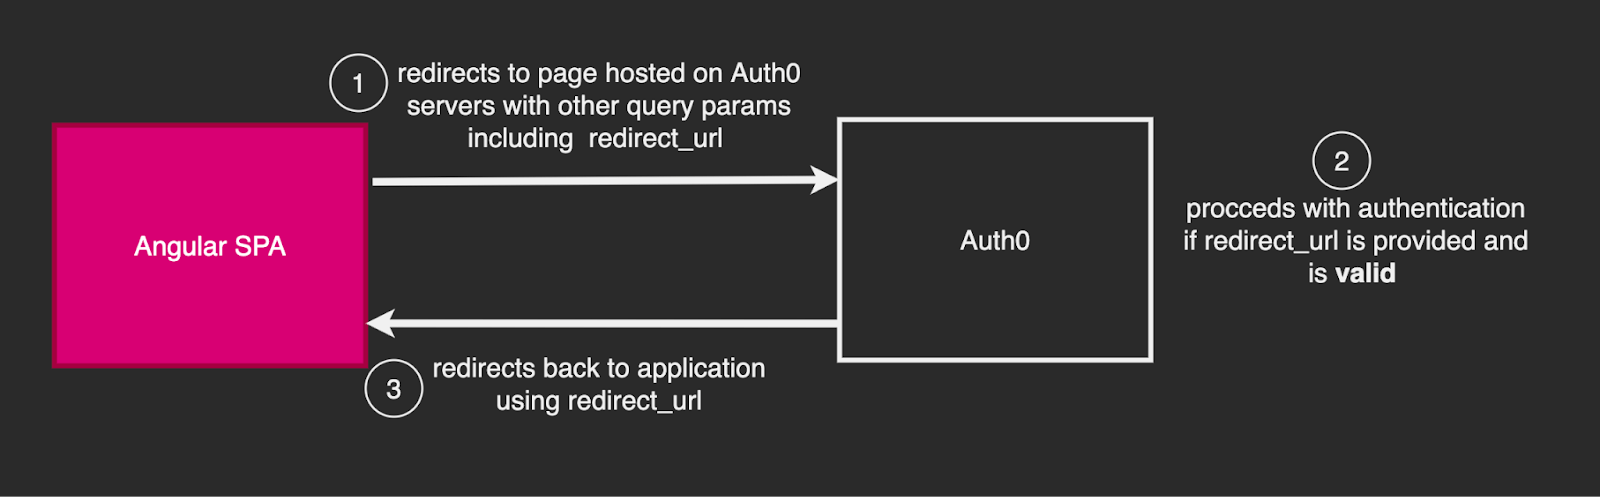
In the universal login flow, when a user wants to authenticate in an application (e.g., our Angular SPA), they are redirected to a page that is hosted and managed by Auth0 servers. This page is only accessible when a valid candidate redirect URL is provided. If authentication is successful, the user is redirected back to the Angular application.
Now, let’s install the dependencies we’ll need. From the root of your Angular project, open your terminal and run the following command:
npm install @auth0/auth0-angular@2.x
Next, let’s take some code from the Quick Start section to initialize our application. We’ll start by updating the contents of the app.config.ts file to look like this:
import { ApplicationConfig, provideZoneChangeDetection } from '@angular/core';
import { provideRouter } from '@angular/router';

import { routes } from './app.routes';
import { provideAuth0 } from '@auth0/auth0-angular';

export const appConfig: ApplicationConfig = {
  providers: [provideZoneChangeDetection({ eventCoalescing: true }), provideRouter(routes), provideAuth0({
    domain: "YOUR-DOMAIN",
    clientId: "YOUR-CLIENT-ID",
  }),]
};
The provideAuth0 function accepts an object representing the configuration for our Auth0 application, which includes our domain and client ID.
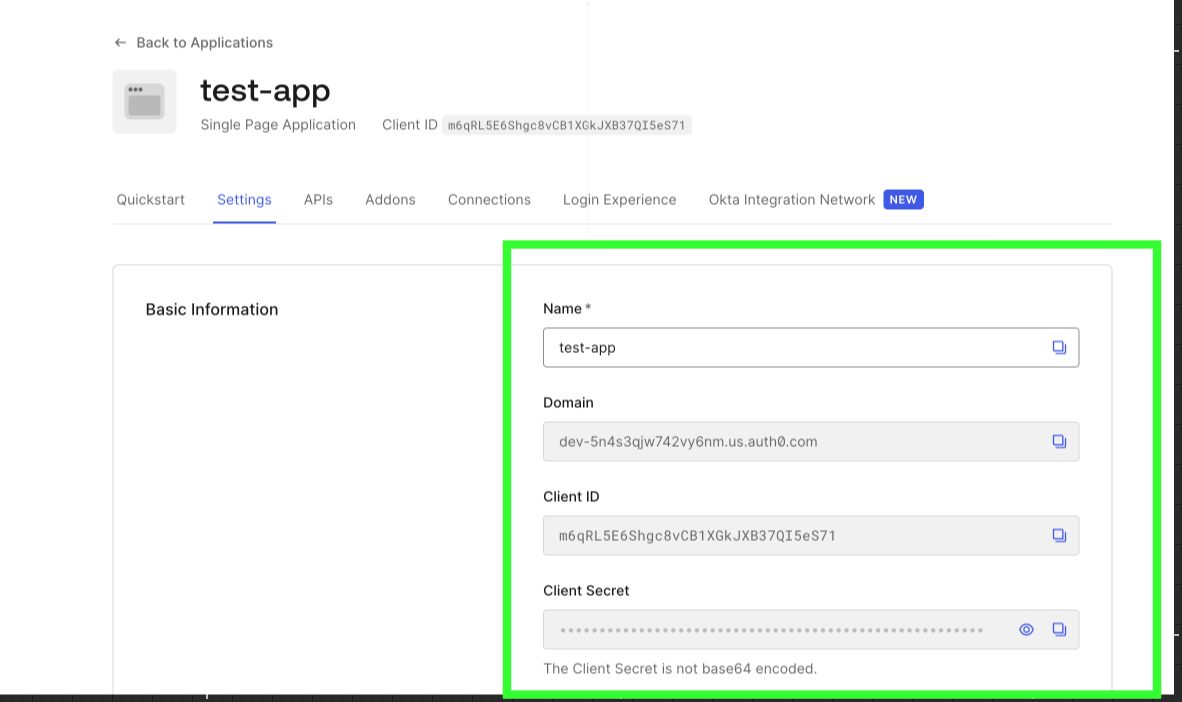
Our domain is a unique URL created for us by Auth0 when we created an account. The clientID is a unique identifier for the application. We can get these credentials in the Settings tab, as shown below.
The provideAuth0 function internally exposes a service called AuthService, which will be available globally to all the other components in our application tree.
Next, update your app.component.ts file to look like this:
import { CommonModule } from '@angular/common';
import { Component, inject } from '@angular/core';
import { AuthService } from '@auth0/auth0-angular';

@Component({
  selector: 'app-root',
  template: `
    @if (auth.isLoading$ | async) {
      <div>Loading...</div>
    } @else {
      @if ((auth.isAuthenticated$ | async) && (auth.user$ | async); as user) {
        <section class="profile">
          <h1>Profile</h1>
          @if (user.picture) {
            <img class="avatar" [src]="user.picture" [alt]="user.name || 'Profile photo'" />
          }
          <div>
            <b>Name</b>
            <p>{{ user.name || user.nickname || '--' }}</p>
            <b>Email</b>
            <p>{{ user.email || '--' }}</p>
            @if (user.email_verified !== undefined) {
              <b>Email verified</b>
              <p>{{ user.email_verified ? 'Yes' : 'No' }}</p>
            }
            @if (user.sub) {
              <b>User ID</b>
              <p>{{ user.sub }}</p>
            }
          </div>
          <button
            type="button"
            (click)="
              auth.logout({
                authorizationParams: { redirect_uri: 'http://localhost:4200' },
              })
            "
          >
            Log out
          </button>
        </section>
      } @else {
        @if (auth.error$ | async; as error) {
          <p>Error: {{ error.message }}</p>
        }
        <button
          (click)="
            auth.loginWithRedirect({
              authorizationParams: {
                screen_hint: 'signup',
                redirect_uri: 'http://localhost:4200',
              },
            })
          "
        >
          Sign Up
        </button>
        <button
          (click)="
            auth.loginWithRedirect({
              authorizationParams: { redirect_uri: 'http://localhost:4200' },
            })
          "
        >
          Log In
        </button>
      }
    }
  `,
  styles: [],
  providers: [],
  imports: [CommonModule],
})
export class AppComponent {
  auth = inject(AuthService);
}
To simplify our application, we won’t be using any routes. All the code we need will be contained in the root app component.
We start by injecting the AuthService. We also imported the CommonModule to use the async pipe, since most of the properties of AuthService are observables.
In the template, we render different pieces of UI based on the authentication state:
- When loading, we display a loading message.
- When the user is authenticated, we display the user’s details with a button to log out.
- If there is an error from the authentication flow, we display it on the screen.
- Otherwise, the user is presented with two buttons to sign up or log in.
Notice that when we trigger loginWithRedirect and logout, we additionally pass a redirect_url with a valid value as defined in the Callback URLs input field earlier when we configured our Auth0 app.
To see the running application, open your terminal and run the following command:
npm run start
Adding Support for Passkeys
In our current application, we can sign up and log in with email and password and use SSO, but passkeys are not yet supported. Thankfully, with Auth0 and its zero-code configuration, we no longer need to change any code to support passkeys. We just need to make a few tweaks in our dashboard to get it working.
Head over to the Database Connections section and choose the database connection associated with the app.
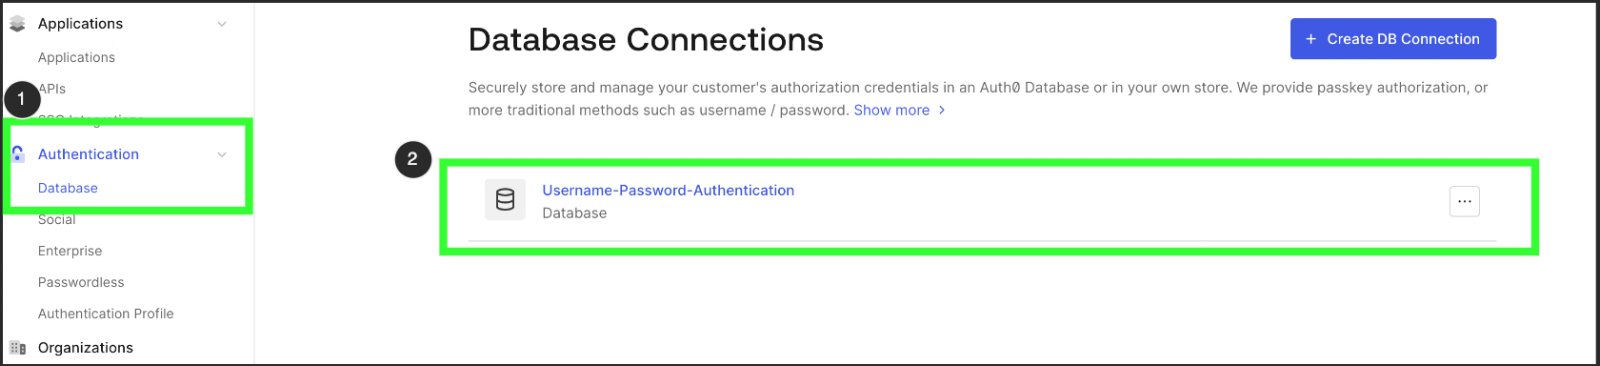
A database connection is an abstracted term in Auth0. It represents the storage layer (database) that stores all user credentials and the configuration options for how we want to identify and authenticate users. By default, a database connection is automatically created when we create an Auth0 account.
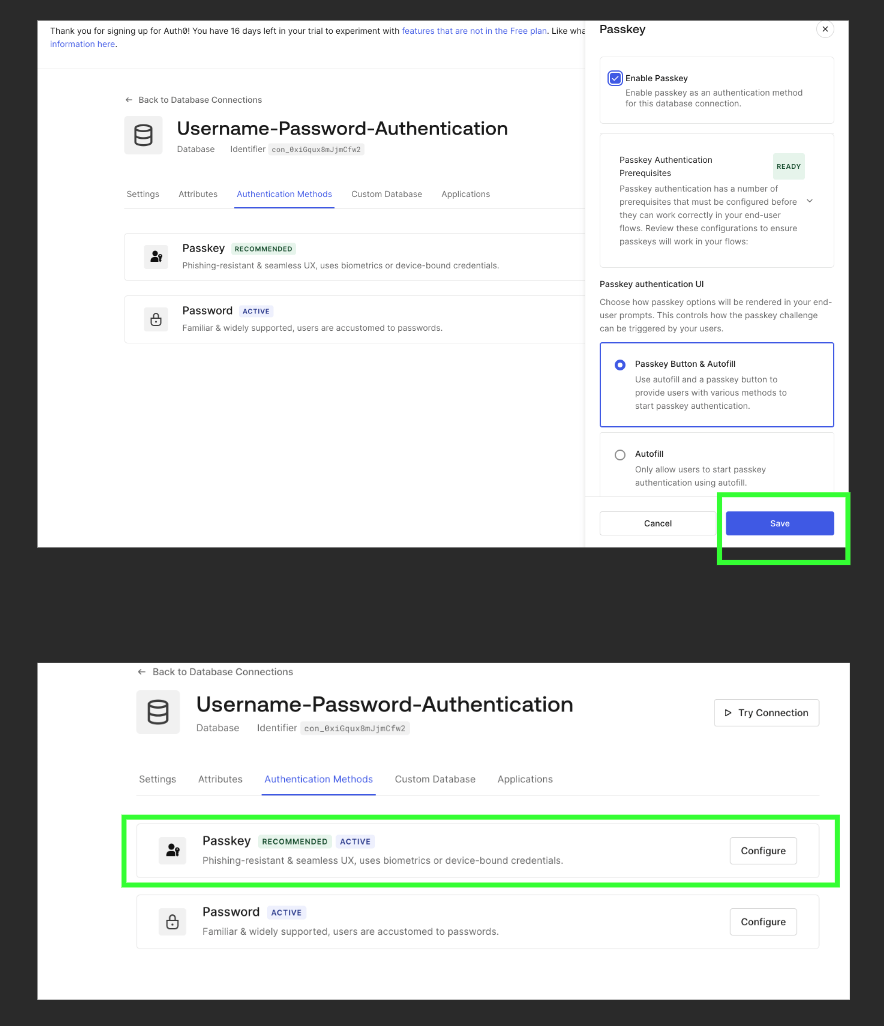
In the Authentication Methods tab, click on Passkeys and enable passkeys.
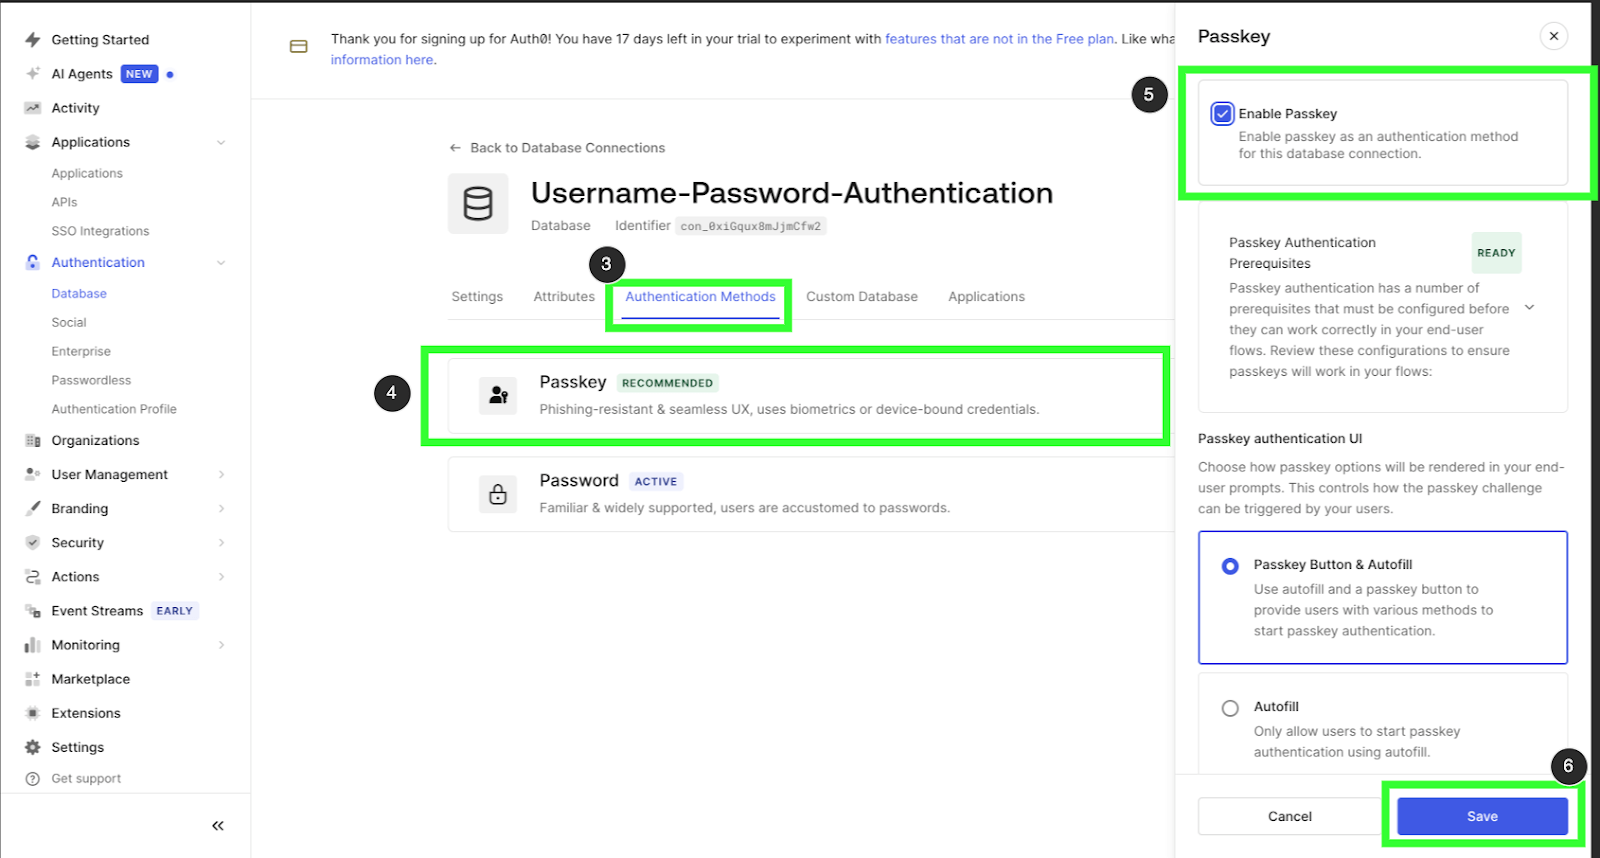
Passkey support may not be enabled immediately. Instead, you may be presented with a popup showing a checklist of tasks you need to fulfill to make it work, as shown below.
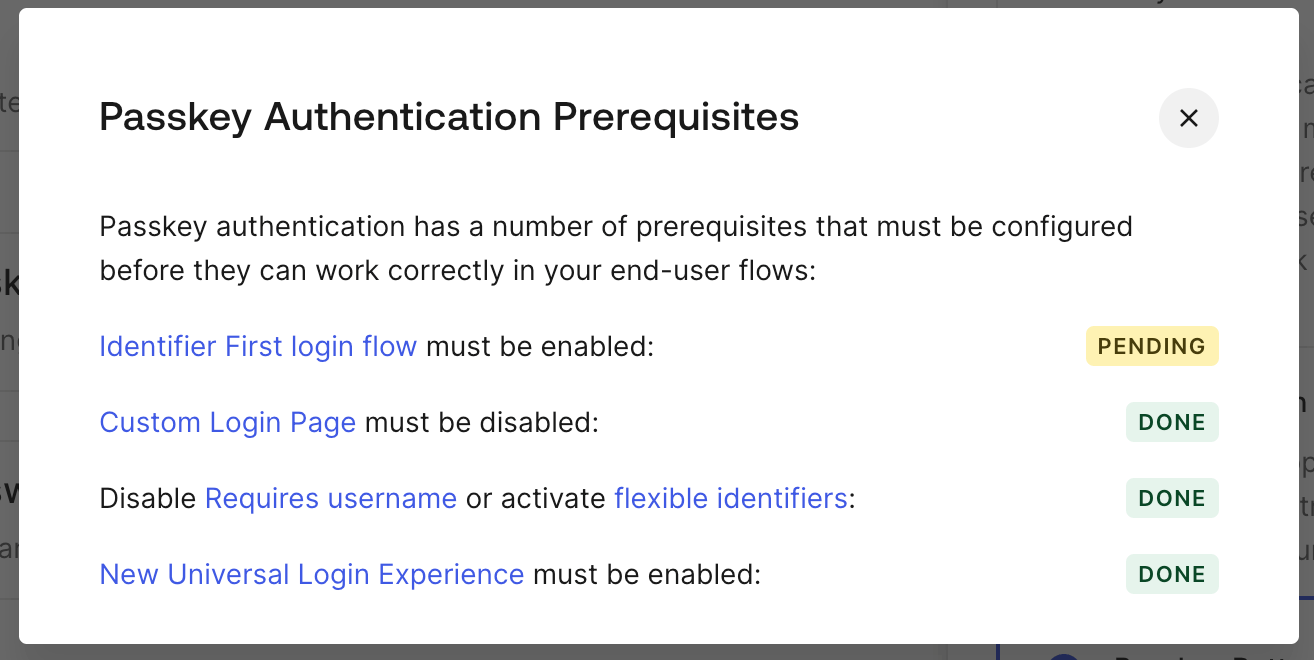
In our case, the only pending item is to enable identifier-first login flow. If you are wondering what this means, Auth0 has a concept called Authentication Profiles, which allow us to configure the universal login page’s flow when a user wants to authenticate.
In Authentication > Authentication Profile, proceed to enable identifier-first login and click Save, as shown below.
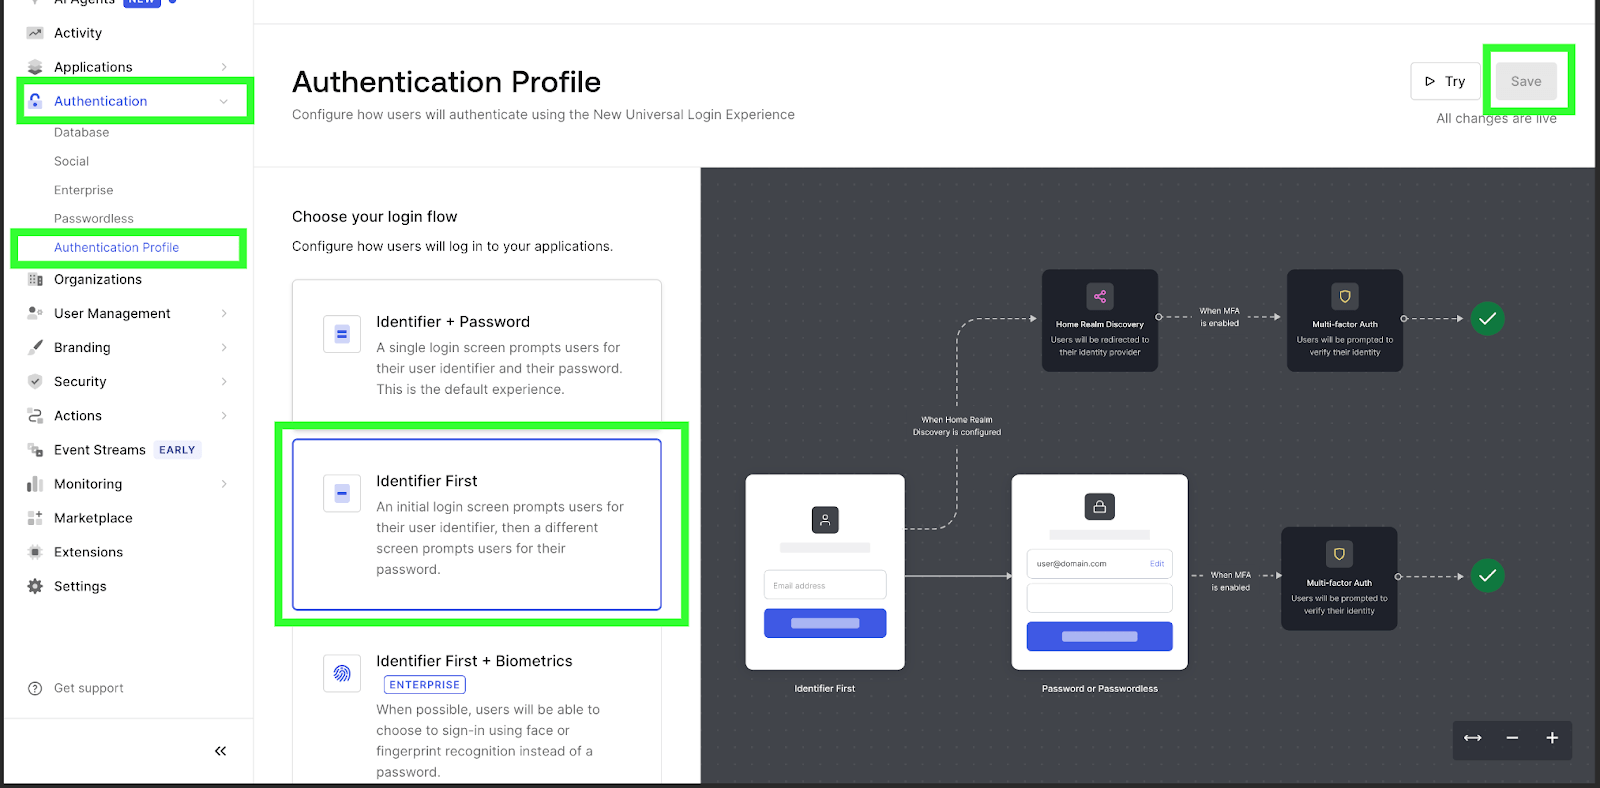
In the identifier-first authentication profile, during sign-up or login, the user is first prompted for their identifier (typically their email). Then, based on the authentication methods supported by the identifier, a decision is made whether the user needs to provide a password or proceed to use or create a passkey.
As of the time of writing, identifier-first authentication is the typical way we authenticate when signing in with Google or on Apple’s App Store Connect, just to name a few examples. We typically provide our email first, and then the system decides whether we need to provide a password or use another method to authenticate.
Now that we have all the items on the checklist sorted, we can go ahead to enable passkey support. After clicking Save, notice that we have passkeys enabled.
Using Passkeys in Our App
We now have all the configurations needed to support passkeys. Let’s head back and start our Angular application by running npm run start.
The Signup Flow
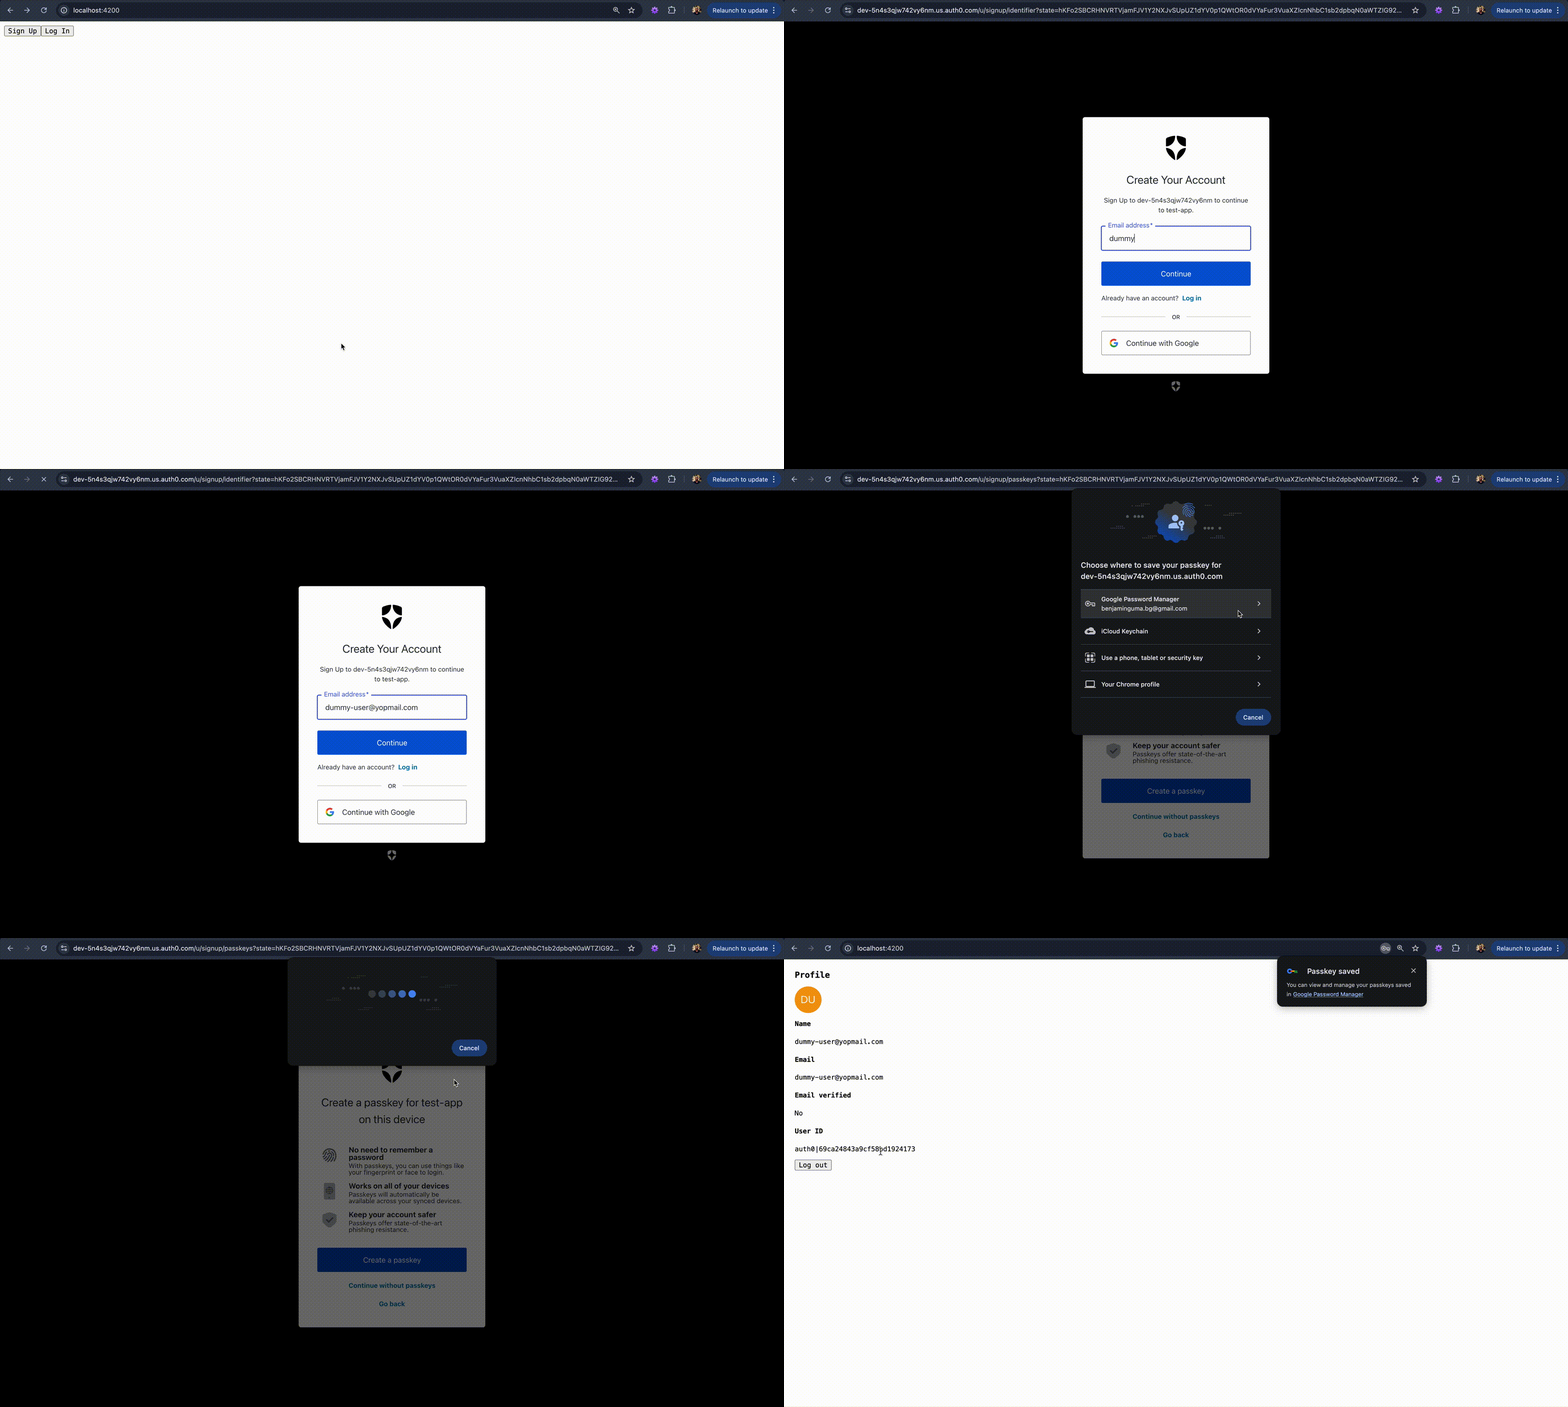
Notice that, now during sign-up, we are first prompted to enter our email. The form gives us an opportunity to create a passkey or continue with a password.
If the user agrees to create a passkey, it triggers the WebAuthn registration ceremony, which is the sequence of steps required to create a passkey, and this is handled by Auth0 automatically. To give a sneak peek of what happens during the process, we’ll also briefly discuss the three entities and the two FIDO protocols that make passkeys possible.
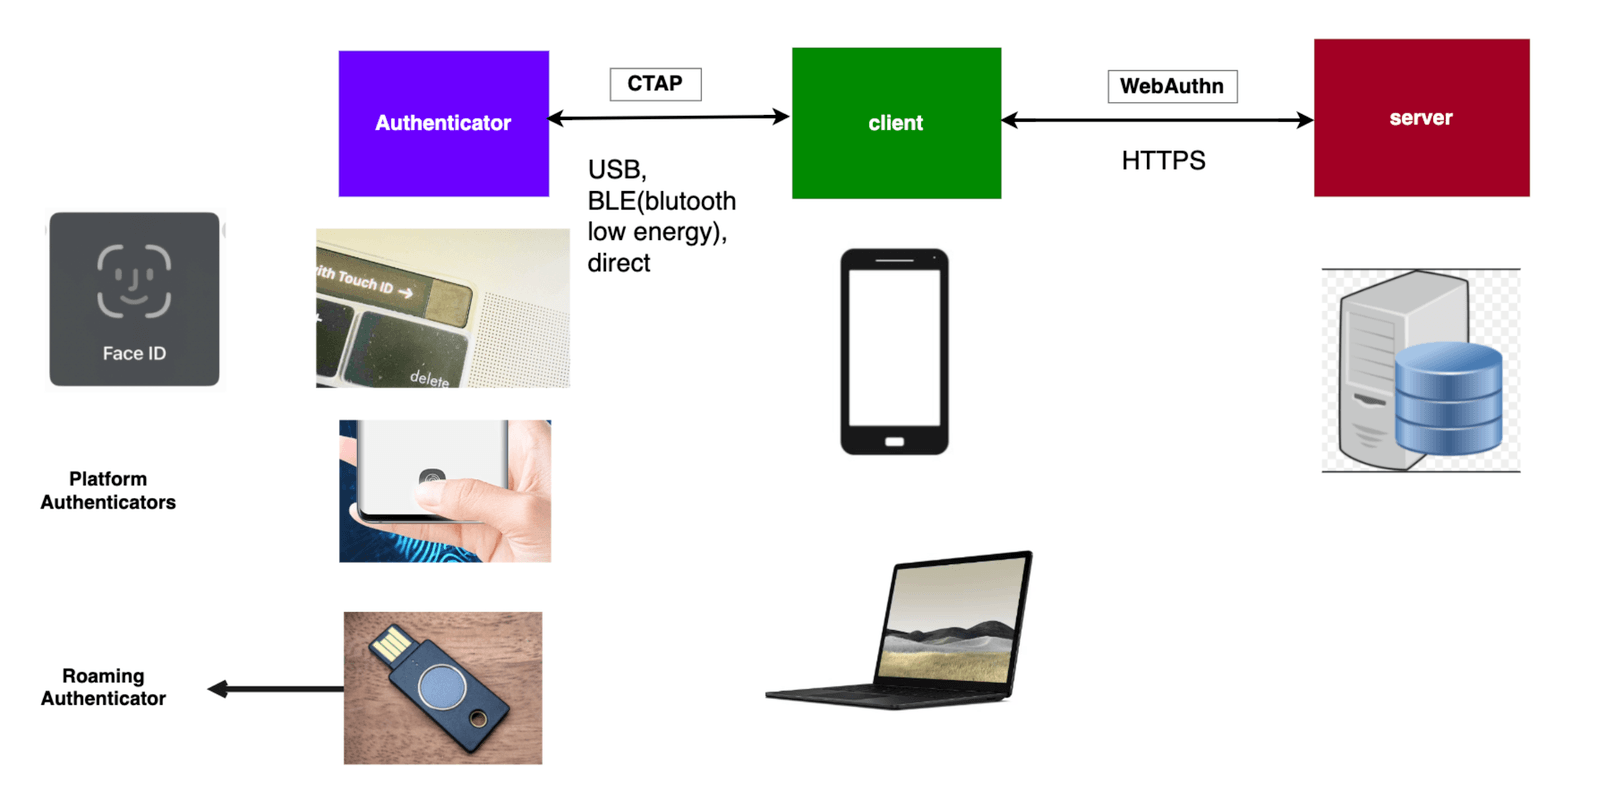
The server (relying party) in the diagram above represents the server-side application that wants to enroll users for passkeys. It communicates with the webpage running on the client’s device using the Web Authentication protocol over HTTP to send information about itself and the configuration required when creating or authenticating with passkeys. The client communicates with the authenticator following the low-level Client to Authenticator Protocol (CTAP) over USB or Bluetooth for roaming authenticators, or directly for platform authenticators.
Authenticators are hardware devices that create and persist the public key credentials representing the passkeys. Platform authenticators are authenticators built into a device (e.g., a MacBook’s Touch ID or an iPhone’s Face ID), while roaming authenticators are external to the user’s device (e.g., a YubiKey). It is important to note that the interactions between these three entities varies depending on whether the user is creating passkeys (WebAuthn registration ceremony) or using passkeys to log in (WebAuthn authentication ceremony).
The following steps are involved during registration:
- Client clicks “Continue with passkey.”
- Webpage requests credential creation options from Auth0 servers over HTTP.
- Auth0 servers respond with credential creation options.
- Client connects to authenticator by calling the
window.navigator.credentials.create()method with the provided options. - The user is presented with a modal to verify their identity.
- User verifies their identity using biometrics (Face ID, Touch ID, etc.), and the passkey is created.
- The authenticator returns an attestation to the client, which then sends it to the server for verification.
- If verification succeeds, a session is created for the user.
The Login Flow
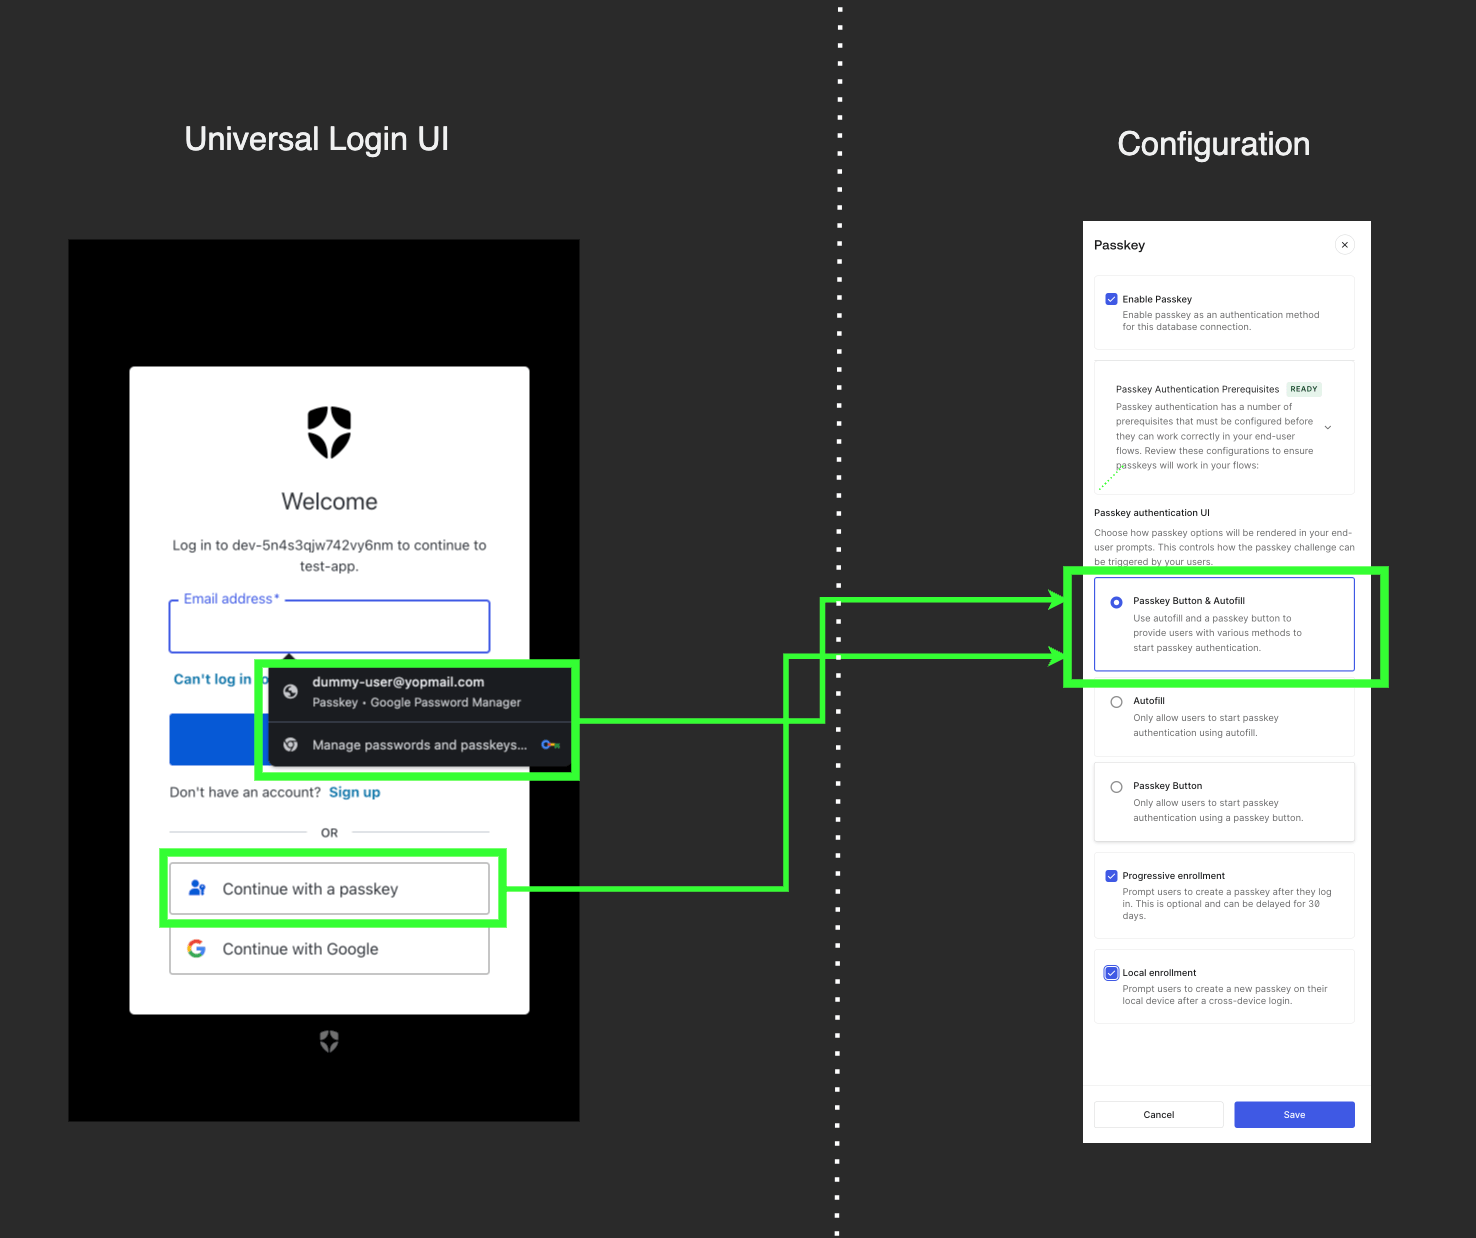
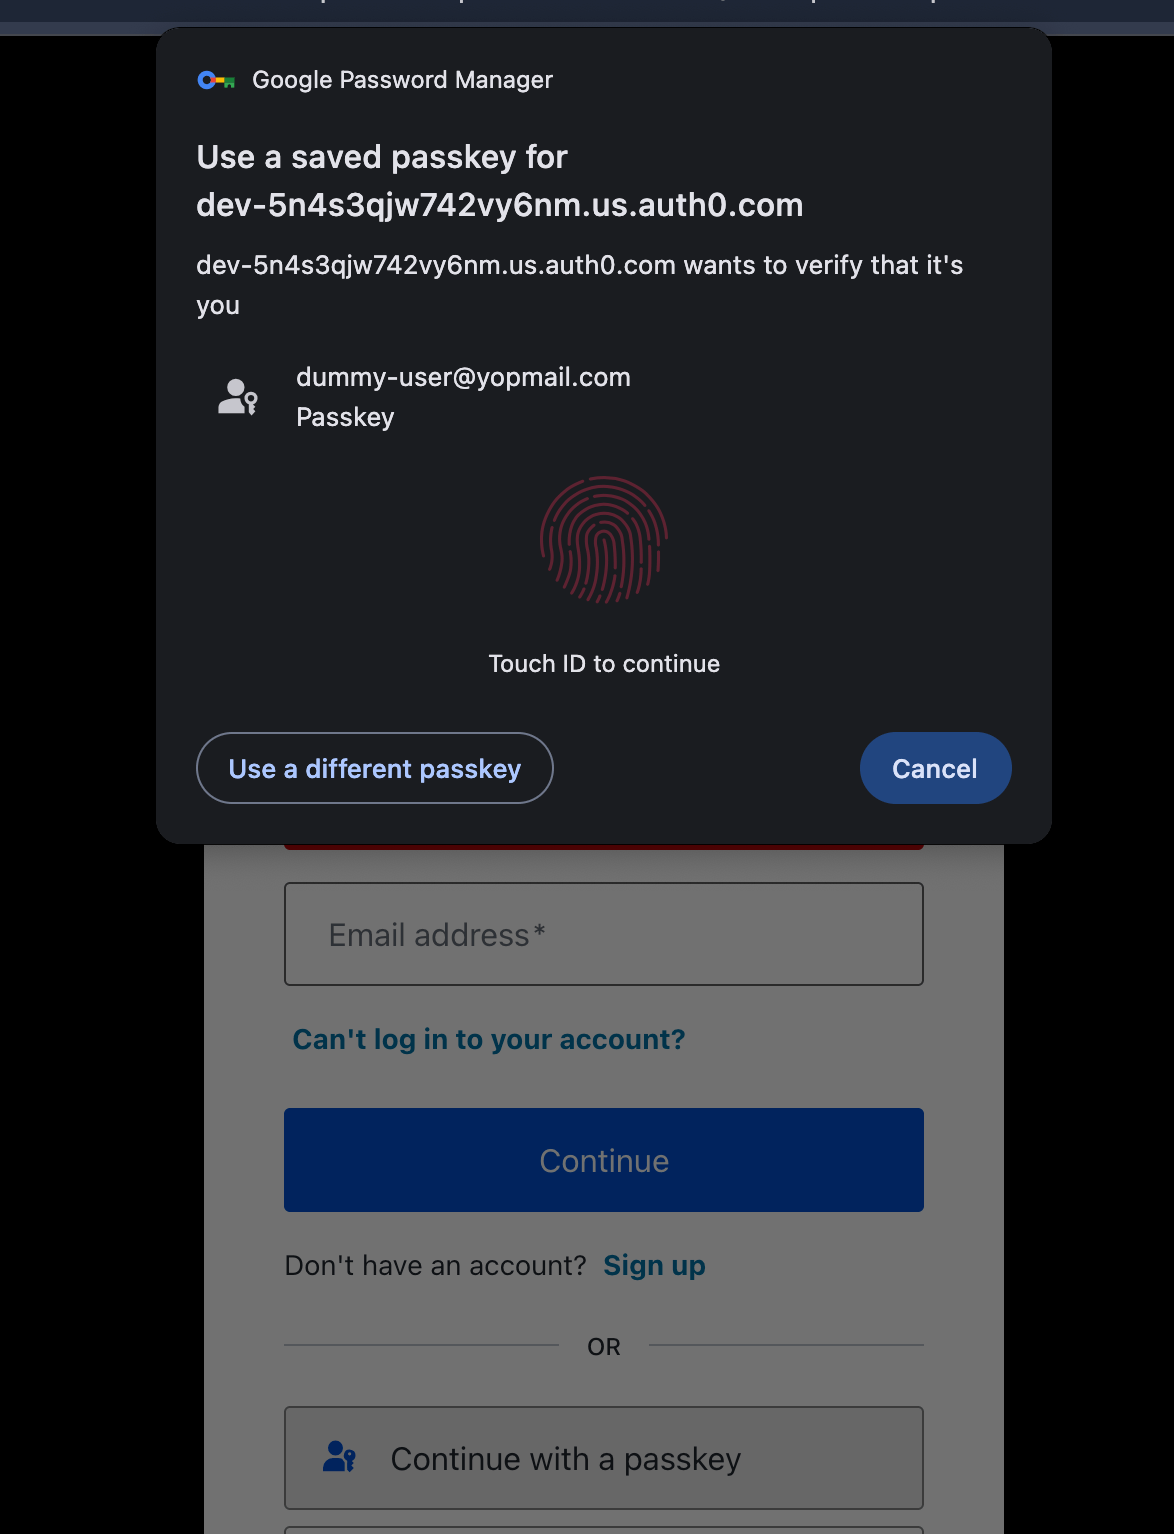
During login, notice that we get autocomplete when entering the email. When we click the “Continue with passkeys” button to log in with passkeys and choose a passkey, we verify with a biometric gesture and we’re logged in.
We need to note the following points that made this good UX possible, from both the configuration side on our Auth0 dashboard and the technical side of how passkeys work with the concept of resident keys.
First, the autocomplete and the “Continue with passkey” button are available because of the configuration we made on our dashboard earlier. This shows how simple it is to customize the authentication flow with passkeys with just a few tweaks.

Note that “webauthn” must be the entry in the autocomplete attribute, as shown above, to work correctly across different browsers.
Secondly, the autocomplete on the email input field is possible because of the autocomplete="webauthn" attribute on the input element, which allows the page to load any resident keys available for that domain.
Resident Keys
During sign-up in the last section, when we created the passkey, Auth0 favored the client-side discoverable passkeys option (also known as resident keys). Resident keys are passkeys whose availability can be detected on the client side without asking the server for any information about which passkeys are available.
This addresses the problem of using server-side discoverable keys, which require the user to provide an identifier to enable the server to determine which passkeys they own. This method placed too much dependence on the server and hurt the login experience. With client-side discoverable keys, the user is able to log in just by clicking, without having to provide any information.
Tying it all together, let’s briefly describe how the login flow works:
- Client visits the page. As soon as the page mounts, it requests authentication options from the server, and the authentication process is triggered. This loads the resident keys and enables autofill for passkeys.
- Client clicks the passkey autocomplete option on the input field from the dropdown.
window.navigator.credentials.get()is called with the options to connect to the authenticator. - User is prompted to verify using their biometrics. If it succeeds, an assertion response is generated and sent back to the client, which then sends it to the server for verification.
- If the assertion response is verified, a session is created for the user.
Best Practices When Using Passkeys
- Since passkeys created are scoped to a particular domain (also known as the relying party ID), when using passkeys in production we should try to always use a custom domain we own instead of the default domain Auth0 provides. Also note that changing domains will invalidate existing passkeys that are not scoped to the new domain.
- For users who do not have a device that supports passkeys, it is important to support other authentication methods, such as email and password, as we already have in our project.
- With progressive enrollment, which is enabled by default, users who are signed into our application with other methods will be intermittently prompted to enroll their devices and create passkeys.
- Also, passkeys should only be enabled on one database connection on our Auth0 dashboard. This keeps all passkeys stored in a central storage location to help maintain consistency and avoid fragmentation.
Conclusion
Passkeys are being adopted by major companies like Amazon, Google, Apple, GitHub and Microsoft for security and ease of use. This guide provides an easy way to use providers like Auth0 to build robust authentication systems, using passkeys. Hopefully, this will serve as a reference point when you need to use passkeys in your future projects.

Christian Nwamba
Chris Nwamba is a Senior Developer Advocate at AWS focusing on AWS Amplify. He is also a teacher with years of experience building products and communities.
Related Posts
Comments
All articles
Topics
Web MobileMobile
Desktop
Design
Productivity
People