ASP.NET Core Basics: Working with a Database

Summarize with AI:
Learn how to connect an ASP.NET Core web app to a relational database with the EF Core ORM solution, and how to use a MySQL database with Dapper.
The database is the most common form of storage in web applications, allowing applications to store and retrieve information reliably and at scale—you could consider it an essential and useful component in any project. Let’s check out how to access and use a database in an ASP.NET Core app using EF Core and Dapper.
One of the main features offered by ASP.NET Core, an open-source web development framework, is its ability to seamlessly integrate with different relational database management systems such as SQL Server, MySQL and PostgreSQL. It also integrates with non-relational databases such as MongoDB and Firebase. This provides companies with a wide variety of options to choose a database best suited to their needs.
ASP.NET Core has an excellent resource for working with databases, which already has several abstracted implementations. Developers don’t need to reinvent the wheel every time they need to create a new application. I’m talking of course about the famous Object-Relational Mapping (ORM) maintained by Microsoft, the EF Core.
The Entity Framework Core is a widely used ORM that facilitates interaction between the application and the database. It simplifies everyday tasks, such as creating tables and queries, providing a set of tools for code-based data manipulation. This speeds up development and reduces the code needed to work with databases.
In this article, you’ll learn how to implement a web application in ASP.NET Core from scratch and integrate it with a database. You’ll also learn best practices using EF Core and the micro-ORM Dapper.
Prerequisites
This article assumes that you already have a basic knowledge of working with databases such as understanding SQL and basic commands such as SELECT, INSERT, UPDATE and DELETE for manipulating and querying
data.
We’ll be using version 7 of .NET SDK, the recommended version at the time this article was written.
This article uses Visual Studio, but feel free to use another IDE of your choice.
Creating the Application
Let’s create a simple application using the native ASP.NET Core template for minimal APIs. You’ll add the EF Core dependencies and create the database through the Code First approach. Finally, you’ll create the necessary methods for manipulating the data.
You can access the full project source code here: PetManager Source Code.
In Visual Studio, follow these steps to get started quickly:
- Create a new project.
- Choose ASP.NET Core Web API.
- Name it; this article uses PetManager.
- Choose the .NET version. This articles uses version 7.
- Uncheck Use controllers.
- Click Create.
Creating the Model Class
Next, create the main entity of your application through which EF Core will design the database. When you run EF Core commands, the table is generated from the class name and the table columns will mirror the class properties.
In the root of the project, create a new folder called Models. Inside the folder, create a new class called Pet. Open the newly created class and replace the existing code with the code below:
namespace PetManager.Models;
public class Pet
{
    public Guid Id { get; set; }
    public string? Name { get; set; }
    public string? Species { get; set; }
    public string? Breed { get; set; }
    public int Age { get; set; }
    public string? Color { get; set; }
    public double Weight { get; set; }
    public bool Vaccinated { get; set; }
    public string? LastVaccinationDate { get; set; }
    public Owner? Owner { get; set; }
    public Guid OwnerId { get; set; }
}

public class Owner
{
    public Guid Id { get; set; }
    public string? Name { get; set; }
    public string? Email { get; set; }
    public string? Phone { get; set; }
}
Creating the DbContext Class and Adding the EF Core
Now let’s create the class responsible for communicating with EF Core. Through this, EF Core will create the connection to the database and also convert the entity from the database to the class you created earlier.
In order to use EF Core features, download the package for the project in Visual Studio:
- In the Project tab, click Manage NuGet packages…. A new window will appear.
- Click Browse.
- In the search field, paste the text Microsoft.EntityFrameworkCore.
- Choose the latest version available (this tutorial uses version 7.0.5).
- Click to install.
To properly run EF Core commands, download the following NuGet packages:
- Microsoft.EntityFrameworkCore.Design
- Microsoft.EntityFrameworkCore.Tools
- Microsoft.EntityFrameworkCore.Sqlite
In the root of the project, create a new folder called Data. Inside the folder, create a new class called PetDbContext and replace the generated code with the code below:
using Microsoft.EntityFrameworkCore;
using PetManager.Models;
namespace PetManager.Data;

public class PetDbContext : DbContext
{
    protected override void OnConfiguring(DbContextOptionsBuilder options) =>
       options.UseSqlite("DataSource=petManagerDb; Cache=Shared");

    public DbSet<Pet> Pets { get; set; }
    public DbSet<Owner> Owner { get; set; }
}
Note that the PetDbContext class inherits the functions of the DbContext class. Through the OnConfiguring() method, you’re passing the database settings, defining the name (petManagerDb) and confirming
that the database cache will be shared.
The Pet class is mapped to the database entity through the implementation of DbSet<Pet> Pets { get; set; } and the Owner class DbSet<Owner> Owner { get; set; }.
Creating the Database Through EF Core
EF Core can create the database based on the project entity by just running a few commands. However, in order to do that, you need to have EF installed globally on your machine:
dotnet tool install --global dotnet-ef
To run EF commands in Visual Studio, follow these steps:
- Right-click the project.
- Choose Open in the terminal.
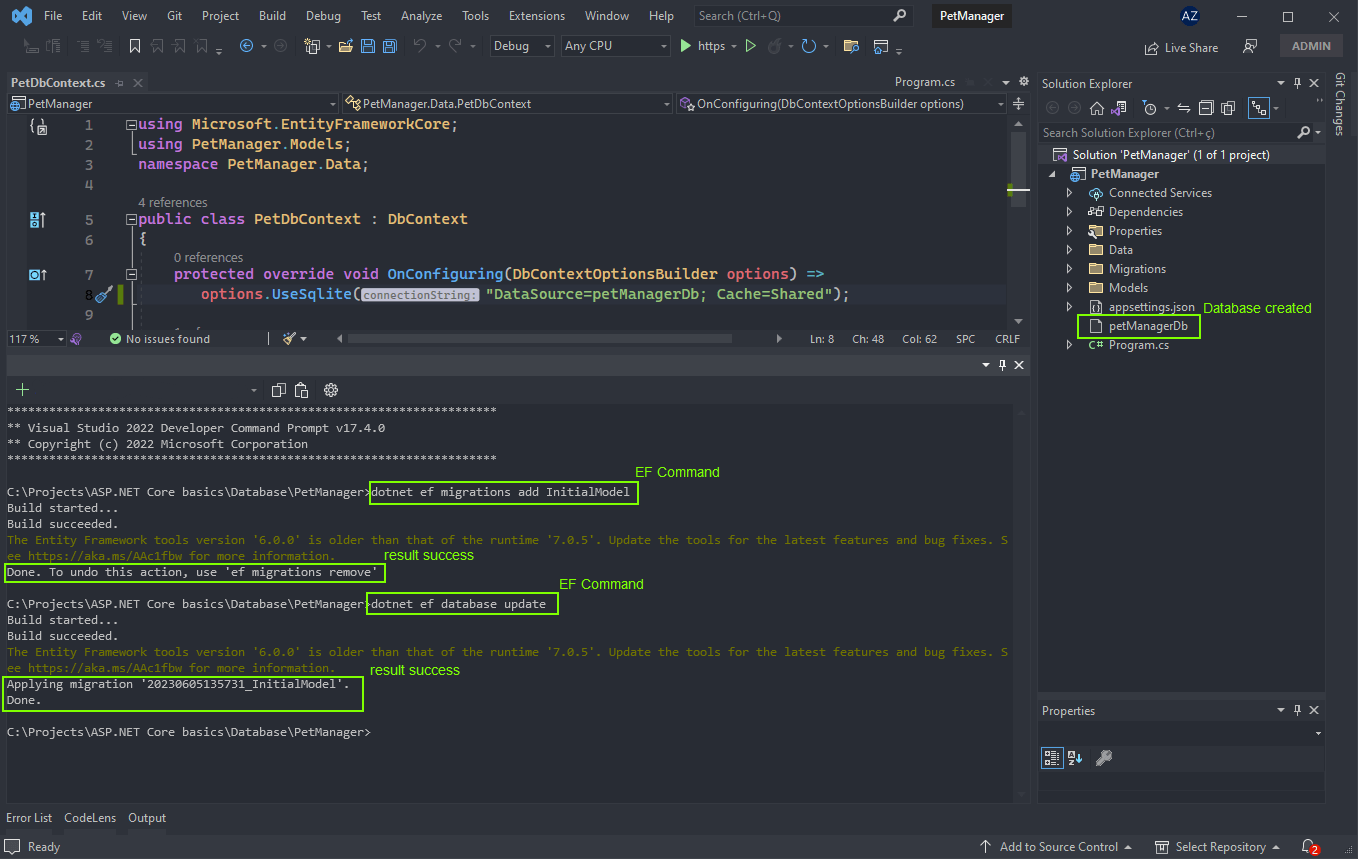
- In the terminal, run the command
dotnet ef migrations add InitialModelto create the database scripts. - Run the command
dotnet ef database updateto create the database in the root of the project.
After running the commands, you should have a result like the image below:
Creating the API Endpoints
Since the database was created at the root of the project, your next step is to create the API routes to populate the database.
Replace the code in the Program.cs file with the code below:
using Microsoft.EntityFrameworkCore;
using PetManager.Data;
using PetManager.Models;

var builder = WebApplication.CreateBuilder(args);

builder.Services.AddEndpointsApiExplorer();
builder.Services.AddSwaggerGen();
builder.Services.AddTransient<PetDbContext>();

var app = builder.Build();

if (app.Environment.IsDevelopment())
{
    app.UseSwagger();
    app.UseSwaggerUI();
}

app.MapGet("/pets", (PetDbContext db) =>
{
    var pets = db.Pets;
    var owners = db.Owner;

    foreach (var petItem in pets)
    {
        var owner = owners.SingleOrDefault(o => o.Id == petItem.OwnerId);
        petItem.Owner = owner;
    }
    return Results.Ok(pets);
});

app.MapGet("/pets/{id}", (Guid id, PetDbContext db) =>
{
    var pets = db.Pets;
    var pet = pets.SingleOrDefault(p => p.Id == id);

    if (pet == null)
        return Results.NotFound();

    var owners = db.Owner;
    var owner = owners.SingleOrDefault(o => o.Id == pet.OwnerId);
    pet.Owner = owner;

    return Results.Ok(pet);
});

app.MapPost("/pets", (PetDbContext db, Pet pet) =>
{
    var pets = db.Pets;
    db.Pets.Add(pet);
    db.SaveChanges();
    return Results.Created($"/pets/{pet.Id}", pet);
});

app.MapPut("/pets/{id}", (Guid id, Pet pet, PetDbContext db) =>
{
    db.Entry(pet).State = EntityState.Modified;
    db.Entry(pet.Owner).State = EntityState.Modified;
    db.SaveChanges();
    return Results.Ok(pet);
});

app.MapDelete("/pets/{id}", (Guid id, PetDbContext db) =>
{
    var pets = db.Pets;
    var petEntity = db.Pets.SingleOrDefault(p => p.Id == id);
    if (petEntity == null)
        return Results.NotFound();

    var owners = db.Owner;
    var owner = owners.SingleOrDefault(o => o.Id == petEntity.OwnerId);
    owners.Remove(owner);

    pets.Remove(petEntity);
    db.SaveChanges();
    return Results.NoContent();
});

app.UseHttpsRedirection();
app.Run();
The code above adds a dependency injection for the PetDbContext class through the code builder.Services.AddTransient();. You’re also implementing the API endpoints to execute the CRUD functions.
The endpoints are calling the methods you created in the database class.
Running the Application
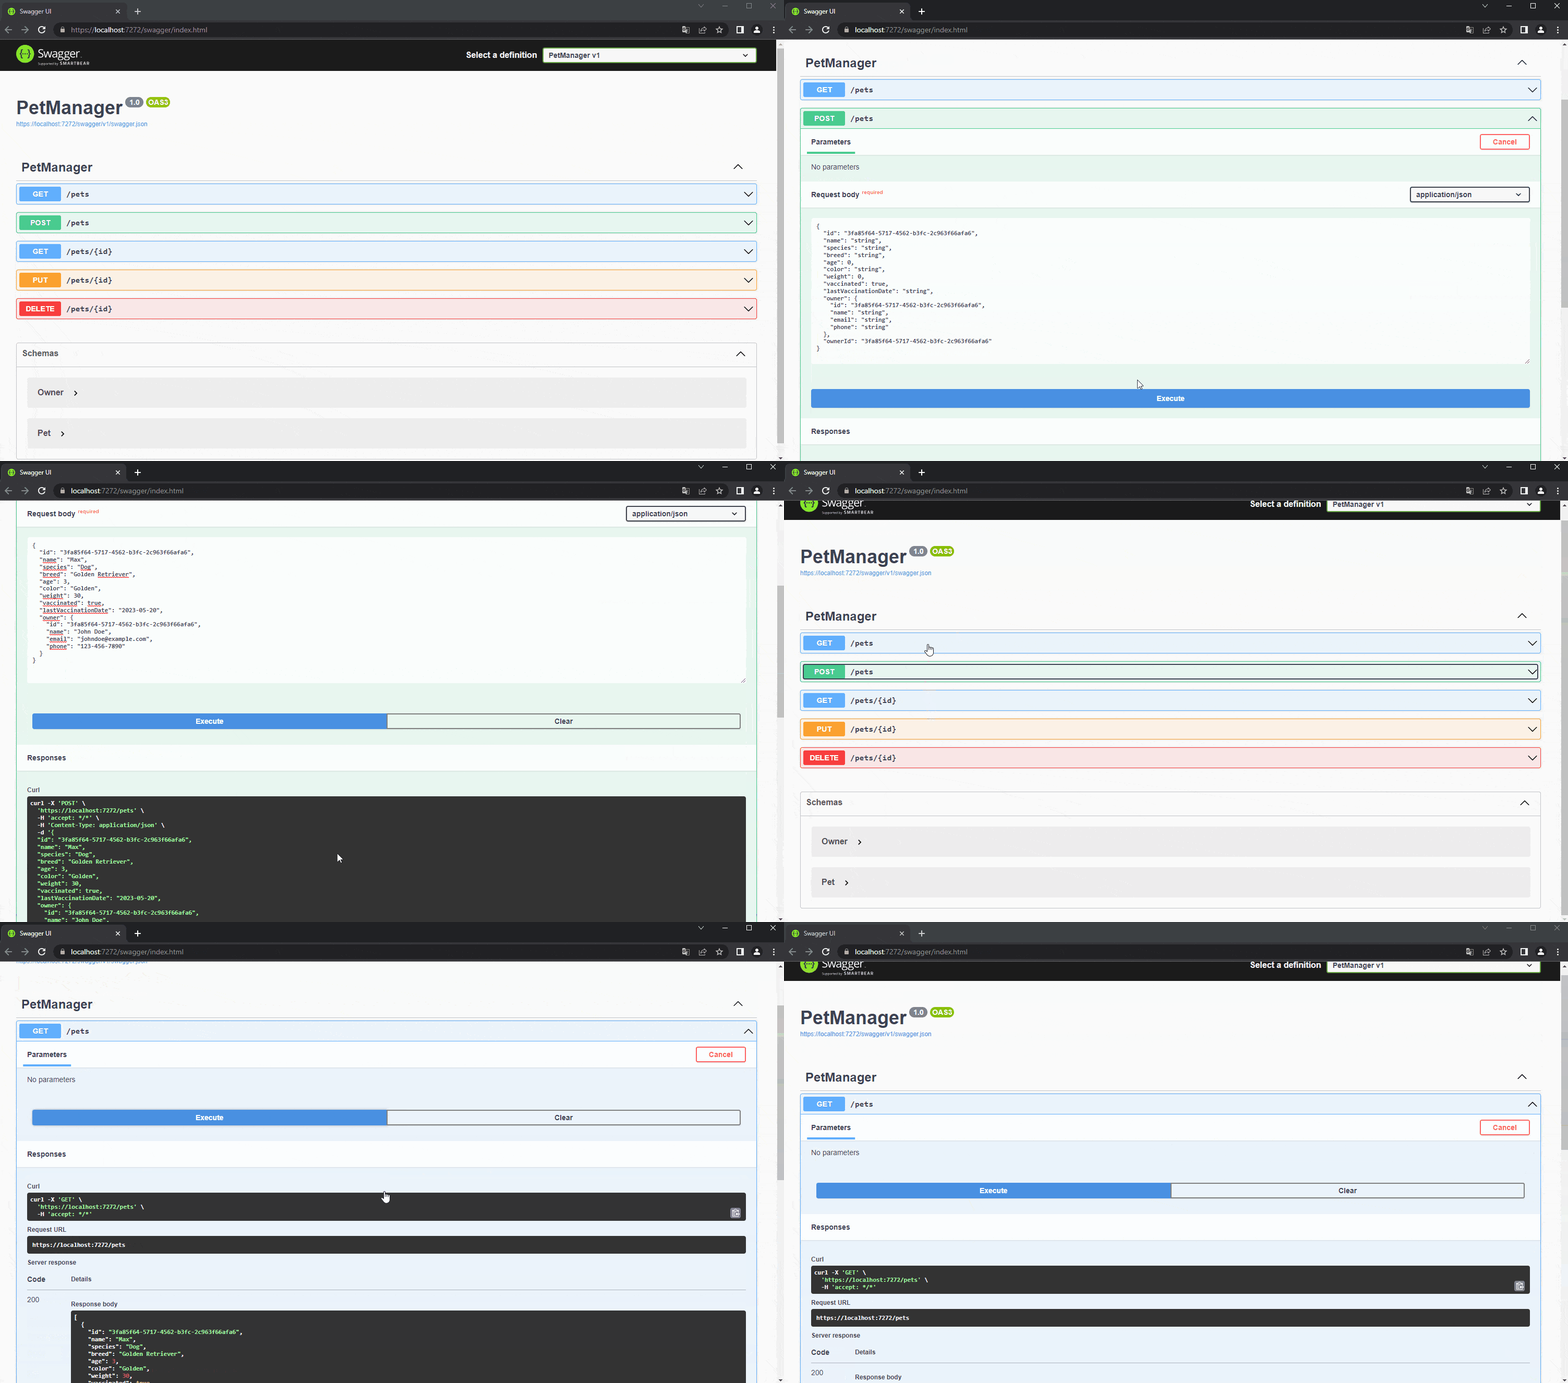
Your API is ready to run, so in Visual Studio click the Play icon. A window will open in your browser and you can now test the application through the Swagger interface.
Expand the POST tab and click Try out. In the tab that opens, paste the JSON below and click Execute.
{
  "id": "3fa85f64-5717-4562-b3fc-2c963f66afa6",
  "name": "Max",
  "species": "Dog",
  "breed": "Golden Retriever",
  "age": 3,
  "color": "Golden",
  "weight": 30,
  "vaccinated": true,
  "lastVaccinationDate": "2023-05-01",
  "owner": {
    "id": "3fa85f64-5717-4562-b3fc-2c963f66afa6",
    "name": "John Doe",
    "email": "johndoe@example.com",
    "phone": "123-456-7890"
  }
}
With this procedure, you’ve just created a record in the database. Now, go into the GET tab and click Try out > Execute to fetch the record you created.
The GIF below demonstrates the procedure for creating and searching a record.
Analyzing the Database
This article uses SQLite, a relational database well-known for its simplicity, where the file containing the database and the tables are stored in the application itself.
To view the database data, this tutorial uses the SQLite View Editor for Windows, but you can use any other software you prefer.
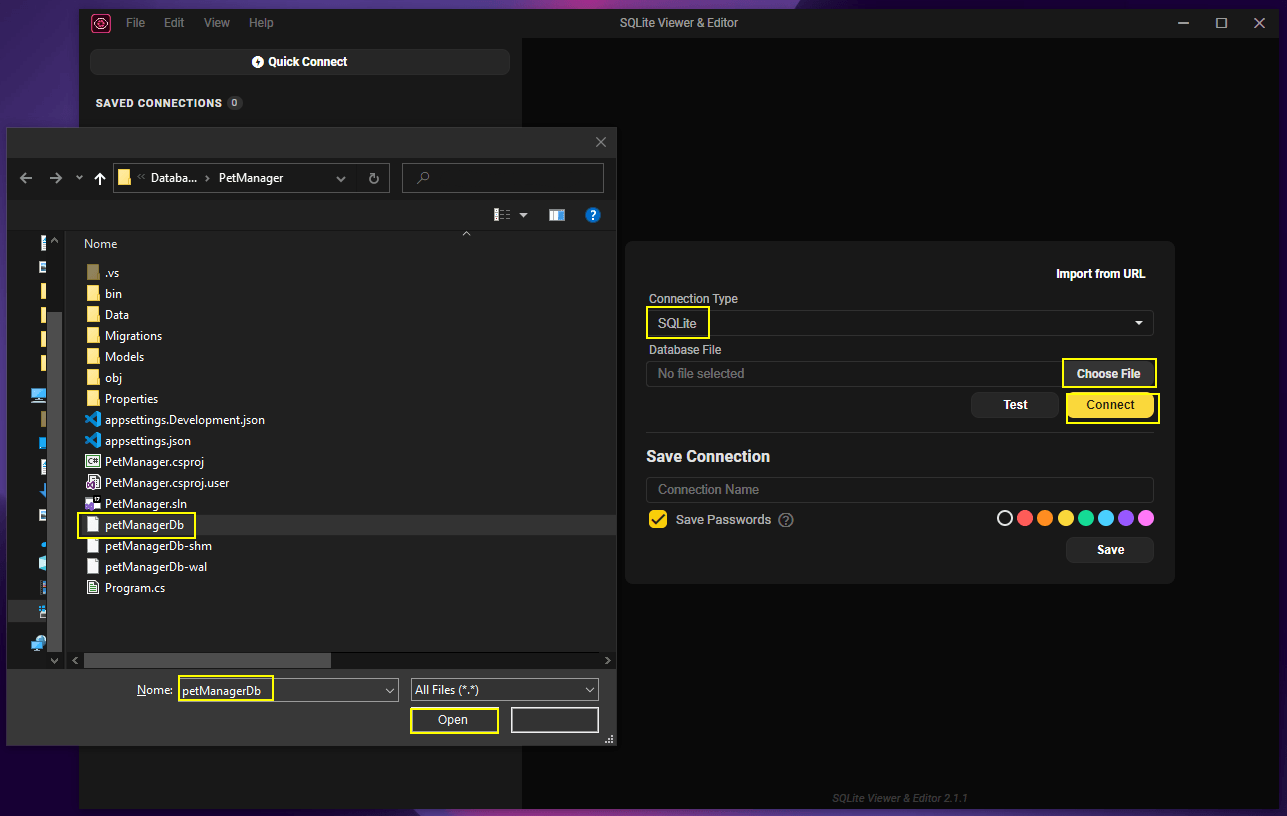
To create a connection with the database, open the SQLite Viewer, select the type SQLite and click Choose file. Select the petManagerDb file in the root of the project and click the connection. You can see
the process in the image below:
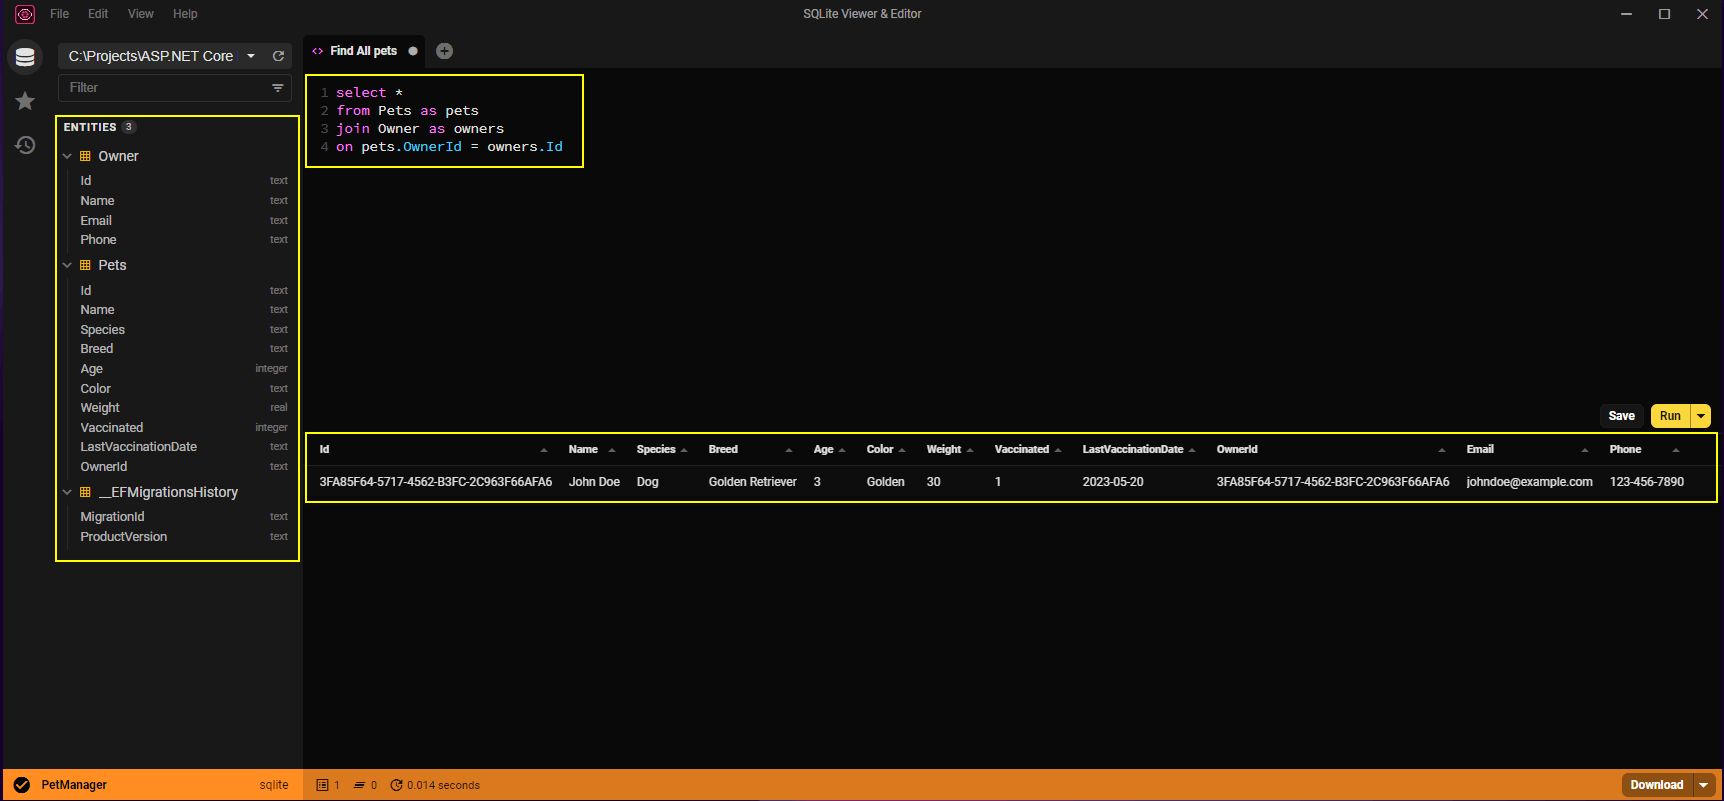
With the connection open, you can search the database, as shown in the image below:
Note that the Pets table is making a foreign key relationship with the Owner table through the OwnerId column. When you use a class as a property in another class, EF Core identifies that a relationship exists between
them. When you run the Migrations commands, the SQL scripts created are already prepared for the creation of foreign keys.
Accessing Data with Dapper and MySQL
Dapper is a .NET data access library. It was developed to simplify and streamline the process of accessing relational databases, allowing developers to write SQL queries directly and efficiently.
Unlike other more complex ORM solutions, such as the Entity Framework, Dapper is a micro-ORM. A minimalist library, Dapper focuses only on the task of mapping SQL query results into .NET objects. It delivers exceptionally fast performance due to its lightweight and straightforward approach.
To use the MySQL database, you need to have previously configured a MySQL server locally. This article does not cover how to configure MySQL, but tutorials are readily available online.
Dapper doesn’t have native resources for generating databases and tables like EF Core, so you need to create them manually. You can use the SQL commands below to create the database and tables in MySQL:
-- Create the database
CREATE DATABASE `petmanagerdb` /*!40100 DEFAULT CHARACTER SET utf8mb4 COLLATE utf8mb4_0900_ai_ci */ /*!80016 DEFAULT ENCRYPTION='N' */;

USE `petmanagerdb` ;

-- Create pet table
CREATE TABLE `pet` (
  `Id` char(36) NOT NULL,
  `Name` varchar(255) DEFAULT NULL,
  `Species` varchar(255) DEFAULT NULL,
  `Breed` varchar(255) DEFAULT NULL,
  `Age` int DEFAULT NULL,
  `Color` varchar(255) DEFAULT NULL,
  `Weight` double DEFAULT NULL,
  `Vaccinated` tinyint(1) DEFAULT NULL,
  `LastVaccinationDate` date DEFAULT NULL,
  `OwnerId` char(36) NOT NULL,
  PRIMARY KEY (`Id`),
  KEY `OwnerId` (`OwnerId`),
  CONSTRAINT `pet_ibfk_1` FOREIGN KEY (`OwnerId`) REFERENCES `owner` (`Id`)
) ENGINE=InnoDB DEFAULT CHARSET=utf8mb4 COLLATE=utf8mb4_0900_ai_ci;

-- Create owner table
CREATE TABLE `owner` (
  `Id` char(36) NOT NULL,
  `Name` varchar(255) DEFAULT NULL,
  `Email` varchar(255) DEFAULT NULL,
  `Phone` varchar(20) DEFAULT NULL,
  PRIMARY KEY (`Id`)
) ENGINE=InnoDB DEFAULT CHARSET=utf8mb4 COLLATE=utf8mb4_0900_ai_ci;
To work with Dapper, you need to download two NuGet packages:
You can also download them through Manage NuGet Packages in Visual Studio.
You need to create a new entity to represent the tables in MySQL. I nside the Models folder create a new class called PetModel and replace the generated code with the code below:
namespace PetManager.Models;
public class PetDto
{
   public string? Id { get; set; }
    public string? Name { get; set; }
    public string? Species { get; set; }
    public string? Breed { get; set; }
    public int Age { get; set; }
    public string? Color { get; set; }
    public double Weight { get; set; }
    public bool Vaccinated { get; set; }
    public string? LastVaccinationDate { get; set; }
    public string? OwnerId { get; set; }
    public OwnerDto? Owner { get; set;}
}

public class OwnerDto
{
    public string? Id { get; set; }
    public string? Name { get; set; }
    public string? Email { get; set; }
    public string? Phone { get; set; }
}
Still inside the Models folder, add a new class called ConnectionString and replace the generated code with the code below:
namespace PetManager.Models;
public class ConnectionString
{
    public string? ProjectConnection { get; set; }
}
This class will be used to store the MySQL connection string.
Now let’s create the repository class that will run the queries in MySQL. I nside the Data folder, create a new class called PetRepository and replace the generated code with the code below:
using Dapper;
using Microsoft.Extensions.Options;
using MySql.Data.MySqlClient;
using PetManager.Models;
using System.Data;

namespace PetManager.Data;
public class PetRepository
{
    private readonly IDbConnection _dbConnection;

    public PetRepository(IOptions<ConnectionString> connectionString)
    {
        _dbConnection = new MySqlConnection(connectionString.Value.ProjectConnection);
    }

    public async Task<List<PetDto>> GetAllPets()
    {
        using (_dbConnection)
        {
            string query = "select * from pet";

            var pets = await _dbConnection.QueryAsync<PetDto>(query);
            return pets.ToList();
        }
    }

    public async Task<OwnerDto> GetOwner(string ownerId)
    {
        using (_dbConnection)
        {
            string query = "select * from owner where id = @OwnerId";

            var owner = await _dbConnection.QueryAsync<OwnerDto>(query, new { OwnerId = ownerId });

            return owner.SingleOrDefault();
        }
    }
}
Note that in the code above, you’re defining methods to search for entities in the database; you’ll pass a query string, which contains the SQL code necessary to return the data.
Now let’s create the MySQL connection string. Open the appsettings.json file in the root of the project and replace the existing code with the code below:
{
  "ConnectionStrings": {
    "ProjectConnection": "host=localhost; port=YOUR_MYSQL_PORT; database=petmanagerdb; user=YOUR_MYSQL_USER; password=YOUR_MYSQL_PASSWORD;"
  },
  "Logging": {
    "LogLevel": {
      "Default": "Information",
      "Microsoft.AspNetCore": "Warning"
    }
  },
  "AllowedHosts": "*"
}
Replace
YOUR_MYSQL_PORT,YOUR_MYSQL_USERandYOUR_MYSQL_PASSWORDwith your local MySQL settings.
The last step is to add the configurations of the previously created classes. In the Program.cs file, add the lines of code below:
builder.Services.AddSingleton<PetRepository>();
builder.Services.Configure<ConnectionString>(builder.Configuration.GetSection("ConnectionStrings"));
You also need to add the endpoint that will use the MySQL database. In the Program.cs file, add the code below:
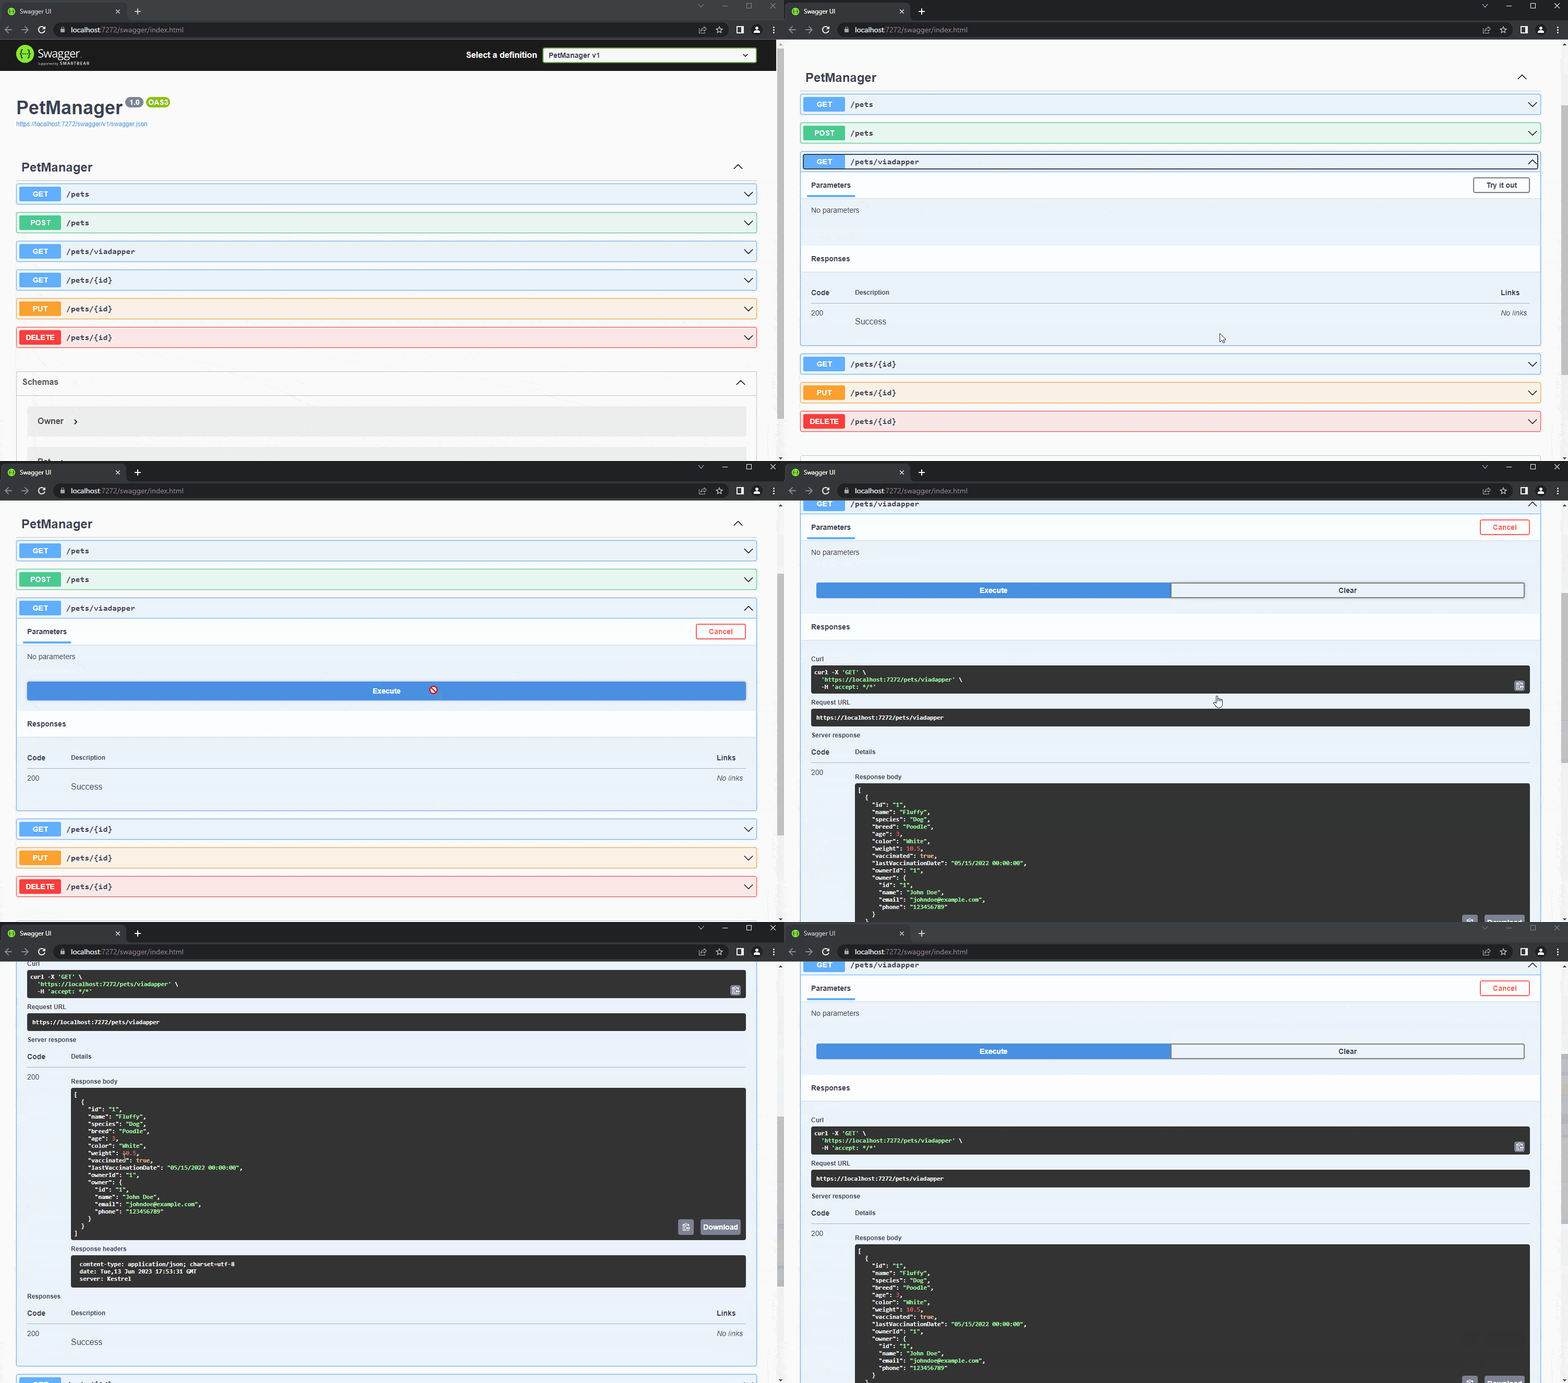
app.MapGet("/pets/viadapper", async (PetRepository db) =>
{
    var pets = await db.GetAllPets();
    foreach (var pet in pets)
        pet.Owner = await db.GetOwner(pet.OwnerId);

    return Results.Ok(pets);
});
To test it, run the application and use Swagger to run the /pets/viadapper endpoint as shown below:
Conclusion
The database is an ever-present theme in web application development, and ASP.NET Core has all the necessary features to make it easier for developers to work with them. There are many options for working with databases in ASP.NET Core; this article addressed two of the main ones.
You learned how to create a web application in ASP.NET Core and connect it to a relational database using the Code First approach with the EF Core ORM solution. You also learned how to use a MySQL database with the micro-ORM Dapper.

