ASP.NET Core Basics: Essential NuGet Packages for Beginners (Part 1)

Summarize with AI:
Wondering where to get started with ASP.NET Core? NuGet packages are a must for development, so let’s look at five of the essential packages for beginners and how to use them in an ASP.NET Core application.
ASP.NET Core has established itself as one of the most popular frameworks for developing modern, scalable web apps. The ASP.NET Core ecosystem offers a multitude of resources and tools to facilitate the process of creating high-quality web applications. Among these resources, its extensibility stands out through the NuGet package management system. NuGet is a package repository that allows developers to add extra functionality to their projects simply and efficiently.
Whether for small or large projects, most companies adopt packages to facilitate and standardize the development of their systems. Some of these packages are especially essential for those who are starting their journey in web development with ASP.NET Core.
This post will introduce five essential NuGet packages for ASP.NET Core beginners. These packages were selected based on their relevance, popularity and practical usefulness in the web development process. Each of them addresses common challenges faced by beginning developers and provides powerful and efficient solutions.
We’ll explore packages that offer features like object-relational mapping (ORM), automatic documentation generation, log handling and more. For each package, we’ll discuss its core functionality, how to integrate it into the ASP.NET Core project and how to use it to enhance your web development.
Once you know these essential NuGet packages, you’ll be ready to confidently take your first steps into web development with ASP.NET Core. From here you can expand your skills and explore other packages available to suit your specific needs.
So if you’re a beginner looking to streamline your workflow and make the most of ASP.NET Core’s potential, this article is for you. Let’s dive into this exciting world of NuGet packages and find out how they can power your web development with ASP.NET Core!
Prerequisites
- .NET SDK: To create the application, you must have the .NET SDK version 7 or higher installed.
- IDE: This post will use Visual Studio Code but you can use another IDE of your choice.
Creating the Application and Installing the Packages
For our example, we will create a minimal API to record product information from an eshop, and, throughout development, we will add NuGet packages. You can access the source code of the project here: Easy Shop source code.
To create the base application, run the command below in the terminal:
dotnet new web -o EasyShopNow let’s create the class that will represent the main entity of our application—in this case, the product. Then inside the project create a new folder called “Models”; inside it, create a new class called “Product.cs” and replace the generated code with the code below:
namespace EasyShop.Models;

public class Product
{
    public Product() { }

    public Product(Guid id, string? name, string? supplier, string? category, string? quantityPerUnit, decimal? pricePerUnit, decimal? unitsInStock, bool? available)
    {
        Id = id;
        Name = name;
        Supplier = supplier;
        Category = category;
        QuantityPerUnit = quantityPerUnit;
        PricePerUnit = pricePerUnit;
        UnitsInStock = unitsInStock;
        Available = available;
    }

    public Guid Id { get; set; }
    public string? Name { get; set; }
    public string? Supplier { get; set; }
    public string? Category { get; set; }
    public string? QuantityPerUnit { get; set; }
    public decimal? PricePerUnit { get; set; }
    public decimal? UnitsInStock { get; set; }
    public bool? Available { get; set; }
}
1. Entity Framework Core
Entity Framework Core (EF Core) is an object-relational mapping (ORM) framework developed by Microsoft. EF Core allows developers to access and manipulate data from a relational database using objects instead of manually writing SQL queries.
It supports multiple database providers including SQL Server, MySQL, SQLite, PostgreSQL and others, which means you can use the same EF Core API to interact with different databases.
EF Core uses the concept of “model first,” where you define your data model using classes and properties in your code. From these classes, EF Core can automatically create the database schema, execute queries and manage change tracking so that database updates are reflected in object instances in your application.
It offers features such as Language Integrated Query (LINQ) queries to database queries, relationship mapping, transaction support, concurrency control and many other useful features for working with data in a .NET application.
A wide range of companies uses EF Core due to its sophisticated range of features that simplify data access and increase productivity when dealing with database operations.
Before installing EF Core in the project, you need to have it installed globally in your development environment, so if you haven’t installed it yet, use the command below to run the global installation:
dotnet tool install --global dotnet-efAnd then to install EF Core in the project, use the command below:
dotnet add package Microsoft.EntityFrameworkCoreTo communicate with EF Core, we need a class that inherits from the DbContext class, which is a class that integrates EF Core and is used to create a database session and make it available for queries and operations.
Inside the project create a new folder called “Data”; inside that, create a new class called “ProductDbContext.cs” and replace the generated code with the code below:
using EasyShop.Models;
using Microsoft.EntityFrameworkCore;

namespace EasyShop.Data;

public class ProductDbContext : DbContext
{
    public ProductDbContext(DbContextOptions options) : base(options)
    {
    }

    public DbSet<Product> Products { get; set; }

    protected override void OnModelCreating(ModelBuilder modelBuilder)
    {
        modelBuilder.Entity<Product>().HasData(
                new Product(Guid.NewGuid(), "Wireless Mouse ABX", "ABX", "Electronics", "1 unit", 999.99m, 100, true),
                new Product(Guid.NewGuid(), "Computer Monitor FHD 1080P", "NewHD", "Electronics", "1 unit", 899.99m, 50, true),
                new Product(Guid.NewGuid(), "Athletic Running Tennis Shoes", "BestShoes", "Shoes", "1 pair", 129.99m, 200, true)
        );
    }
}
Note that the class ProductDbContext is inheriting from the EF Core class (DbContext) and is also defining an object of type Product through the code public DbSet<Product> Products { get; set; } and that will receive database records from the Products table. There is also the OnModelCreating() method, which will insert some sample records when the database and tables are created.
The next step is to define the connection string and database configuration. Then in the “appsettings.json” file that is at the root of the project, add the code below:
"ConnectionStrings": {
     "DefaultConnection": "DataSource=product_db.db;Cache=Shared"
   },
Now in the “Program.cs” file right after where the builder variable is created, add the code below:
var connectionString = builder.Configuration.GetConnectionString("DefaultConnection");
builder.Services.AddDbContext<ProductDbContext>(x => x.UseSqlite(connectionString));
Note that in the code above we are creating a string to store the database connection string. This example uses SQLite, an embedded, open-source, serverless relational database management system (RDBMS), and it is stored in the same directory as the application. We are also doing the dependency injection configuration through the AddDbContext() extension method.
The last step with EF Core is to run the commands that will create the database based on the Product entity. So, open a terminal and run the command below:
dotnet ef migrations add IntialModelThis command will create a folder called “Migrations” which will contain the files with the instructions for creating the database and tables.
Then run the second command in the terminal:
dotnet ef database updateThis command will run the Migrations files created earlier and create the database and tables.
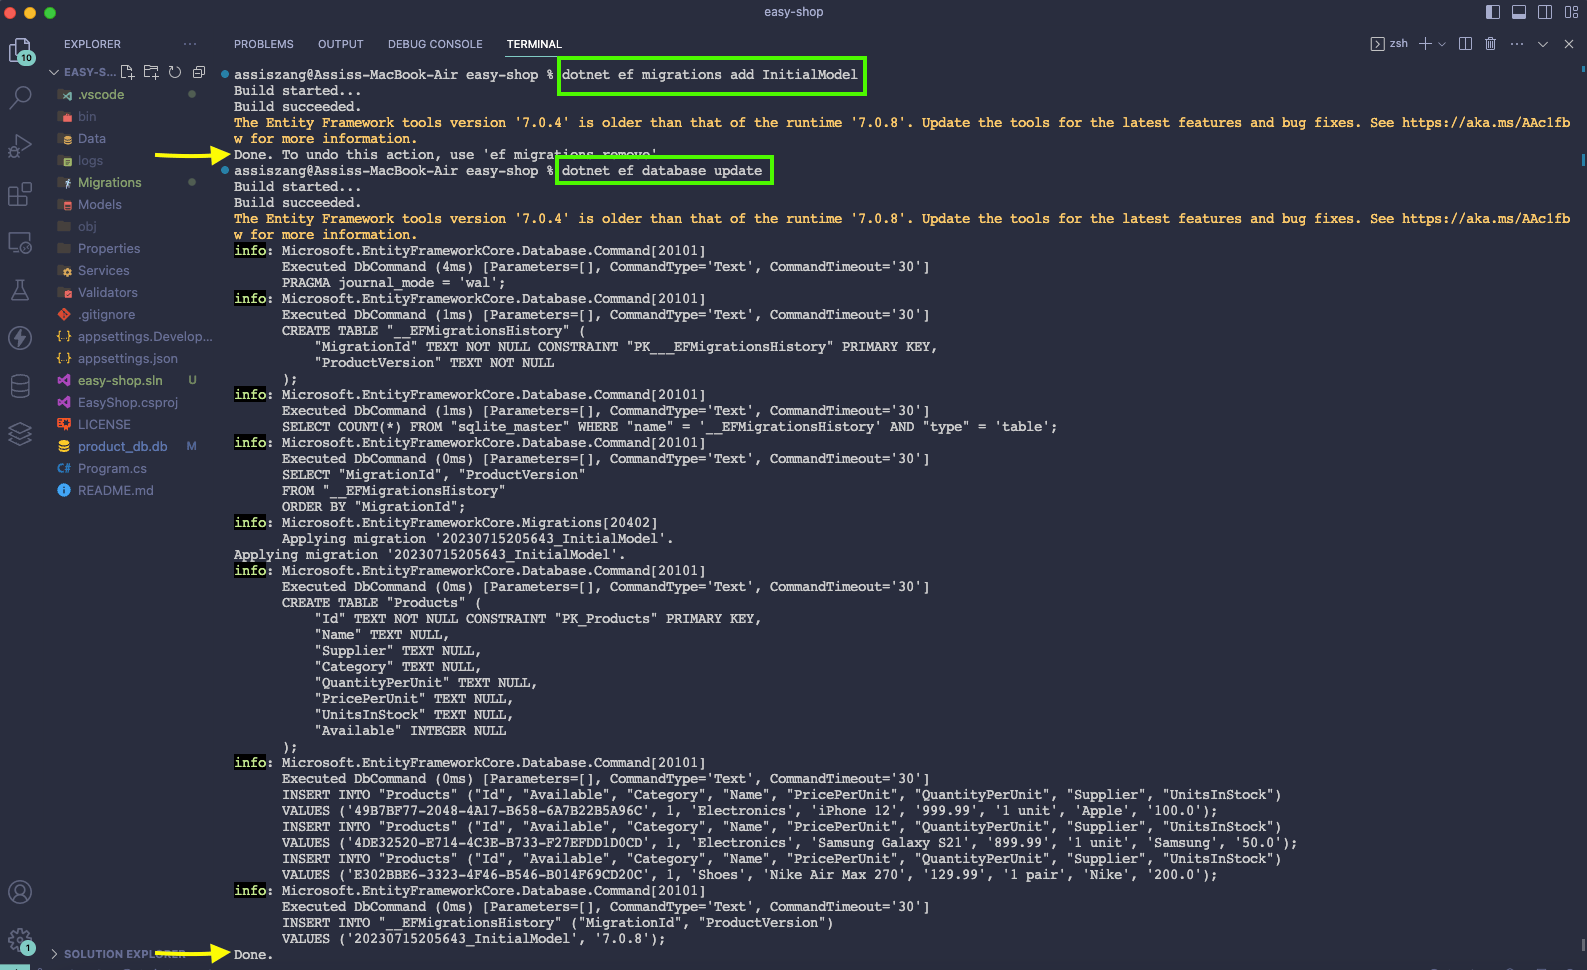
If everything went well, you should have a result similar to the image below:
The database access layer is ready. The next step is to expose the database records without directly exposing the entity, which in this case is the Product class. For this, it is necessary to use Data Transfer Objects (DTOs) that will share and secure the information contained in the database. But to transform the Product object into another ProductDto object, we need an object mapper, and one of the most used nowadays is AutoMapper.
2. AutoMapper
AutoMappper is a library that aims to simplify the mapping process between objects of different types, allowing the developer to define custom mapping rules to automatically transfer data from one object to another.
With AutoMapper, you can avoid writing repetitive code to copy property values from one object to another. It allows you to define mapping settings in one place and then use those settings to perform mapping automatically.
To download AutoMapper in the project, use the command below in the terminal:
dotnet add package AutoMapperNow inside the “Models” folder, create a new folder called “Dtos”; inside it, create a new class called “ProductDto.cs” and replace the existing code with the code below:
namespace EasyShop.Models.Dtos;

public class ProductDto
{
    public Guid? Id { get; set; }
    public string? Identifier { get; set; }
    public string? Seller { get; set; }
    public string? Category { get; set; }
    public string? QuantityPerUnit { get; set; }
    public decimal? PricePerUnit { get; set; }
    public decimal? UnitsInStock { get; set; }
    public bool? Available { get; set; }
}
The ProductDto class will be used to return data when requested. Note that the ProductDto class has the same properties as the Product class because in this context all data will be returned. But imagine that there were sensitive data such as emails and addresses, among others. In that case, it would be essential to use a DTO to not expose this information openly. For best practice, always avoid exposing the database entity directly without the use of a DTO.
The next step is to configure the classes that will be mapped, informing which value each property will receive. For this, it is common to use the profiles pattern, where we create a class to execute the configurations. Inside the “Dtos” folder, create a new folder called “Profiles” and, inside that folder, create a new class called “ProductProfile.cs” and replace the existing code with the code below:
namespace EasyShop.Models.Dtos.Profiles;
using AutoMapper;
using EasyShop.Models.Dtos;
using EasyShop.Models;

public class ProductProfile : Profile
{
    public ProductProfile()
    {
        CreateMap<Product, ProductDto>()
        .ForMember(des => des.Identifier, opt => opt.MapFrom(src => src.Name))
        .ForMember(des => des.Seller, opt => opt.MapFrom(src => src.Supplier))
        .ReverseMap();
    }
}
Note that in the code above, the “ProductProfile” class inherits from the “Profile” AutoMapper class and, through the constructor, defines the mapping of the properties of the Product and Product Dto classes. It is important to highlight that this configuration is done only once, each time. If the mapping is necessary, we can just use the AutoMapper resources. In addition, properties that have the same names in both classes, such as “Category,” will be mapped automatically, without the need to declare the mapping.
Another resource used is “.ReverseMap()” which will do the reverse mapping, from the Dto class to the base class.
To make use of object mapping, in the root of the project create a new folder called “Services” and inside it create a new class called “ProductService.cs” and replace the existing code with the code below:
using EasyShop.Data;
using EasyShop.Models.Dtos;
using EasyShop.Models;
using Microsoft.EntityFrameworkCore;
using AutoMapper;
using Serilog;

namespace EasyShop.Services;

public class ProductService
{
    private readonly ProductDbContext _db;
    private readonly IMapper _mapper;

    public ProductService(ProductDbContext db, IMapper mapper)
    {
        _db = db;
        _mapper = mapper;
    }

    public async Task<List<ProductDto>> FindAll()
    {
        var products = await _db.Products.ToListAsync();
        var productsDto = _mapper.Map<IEnumerable<ProductDto>>(products).ToList();

        Log.Logger = new LoggerConfiguration()
                            .MinimumLevel.Debug()
                            .WriteTo.Console()
                            .WriteTo.File("logs/product_service_log.txt", rollingInterval: RollingInterval.Day)
                            .CreateLogger();

        Log.Information("Total products quantity: {count}", productsDto.Count());
        Log.CloseAndFlush();
        return productsDto;
    }

    public async Task<ProductDto> FindById(Guid id)
    {
        var product = await _db.Products.FirstOrDefaultAsync(p => p.Id == id);
        var productDto = _mapper.Map<ProductDto>(product);
        return productDto;
    }

    public async Task<Guid> Create(CreateUpdateProduct productDto)
    {
        var productEntity = new Product(Guid.NewGuid(),
                                    productDto.Identifier,
                                    productDto.Seller,
                                    productDto.Category,
                                    productDto.QuantityPerUnit,
                                    productDto.PricePerUnit,
                                    productDto.UnitsInStock,
                                    productDto.Available);

        await _db.AddAsync(productEntity);
        await _db.SaveChangesAsync();
        return productEntity.Id;
    }

    public async Task Update(CreateUpdateProduct productDto, Guid id)
    {
        var productEntity = await _db.Products.SingleOrDefaultAsync(t => t.Id == id);
        productEntity.Name = productDto.Identifier;
        productEntity.Supplier = productDto.Seller;
        productEntity.Category = productDto.Category;
        productEntity.QuantityPerUnit = productDto.QuantityPerUnit;
        productEntity.PricePerUnit = productDto.PricePerUnit;
        productEntity.UnitsInStock = productDto.UnitsInStock;

        _db.Update(productEntity);
        await _db.SaveChangesAsync();
    }

    public async Task Delete(Guid id)
    {
        var productEntity = await _db.Products.SingleOrDefaultAsync(t => t.Id == id);
        _db.Remove(productEntity);
        await _db.SaveChangesAsync();
    }
}
Note that the ProductService class is doing the dependency injection of the IMapper interface and mapping the Product entity to the DTO class through the code Map<IEnumerable<ProductDto>>(products).ToList();.
Thus, every time it is necessary to map objects, just invoke the Map method and pass the classes to be mapped as a parameter. Otherwise, we would have to do mapping manually, which could be done as follows:
var productsDto = new List<ProductDto>();
        foreach (var item in products)
        {
            var productDto = new ProductDto(item.Id, item.Name, item.Supplier, item.Category, item.QuantityPerUnit, item.PricePerUnit, item.UnitsInStock, item.Available);
            productsDto.Add(productDto);
        }
Imagine the time it would take to create manual mappings dozens of times, plus the repetitive code that would be created. That’s why AutoMapper is a great tool to streamline and simplify mapping processes.
Finally, a configuration is missing for the mapping to work, so in the Program.cs file add the code snippet below:
builder.Services.AddAutoMapper(AppDomain.CurrentDomain.GetAssemblies());
Now let’s make the API functional by adding the endpoints. Still in the Program.cs file just above the code snippet app.Run(); add the code below:
app.MapGet("/v1/products", async (ProductService service) =>
{
    var products = await service.FindAll();
    return products.Any() ? Results.Ok(products) : Results.NotFound();
});

app.MapGet("/v1/products/{id}", async (ProductService service, Guid id) =>
{
    var product = await service.FindById(id);
    return product is not null ? Results.Ok(product) : Results.NotFound();
});
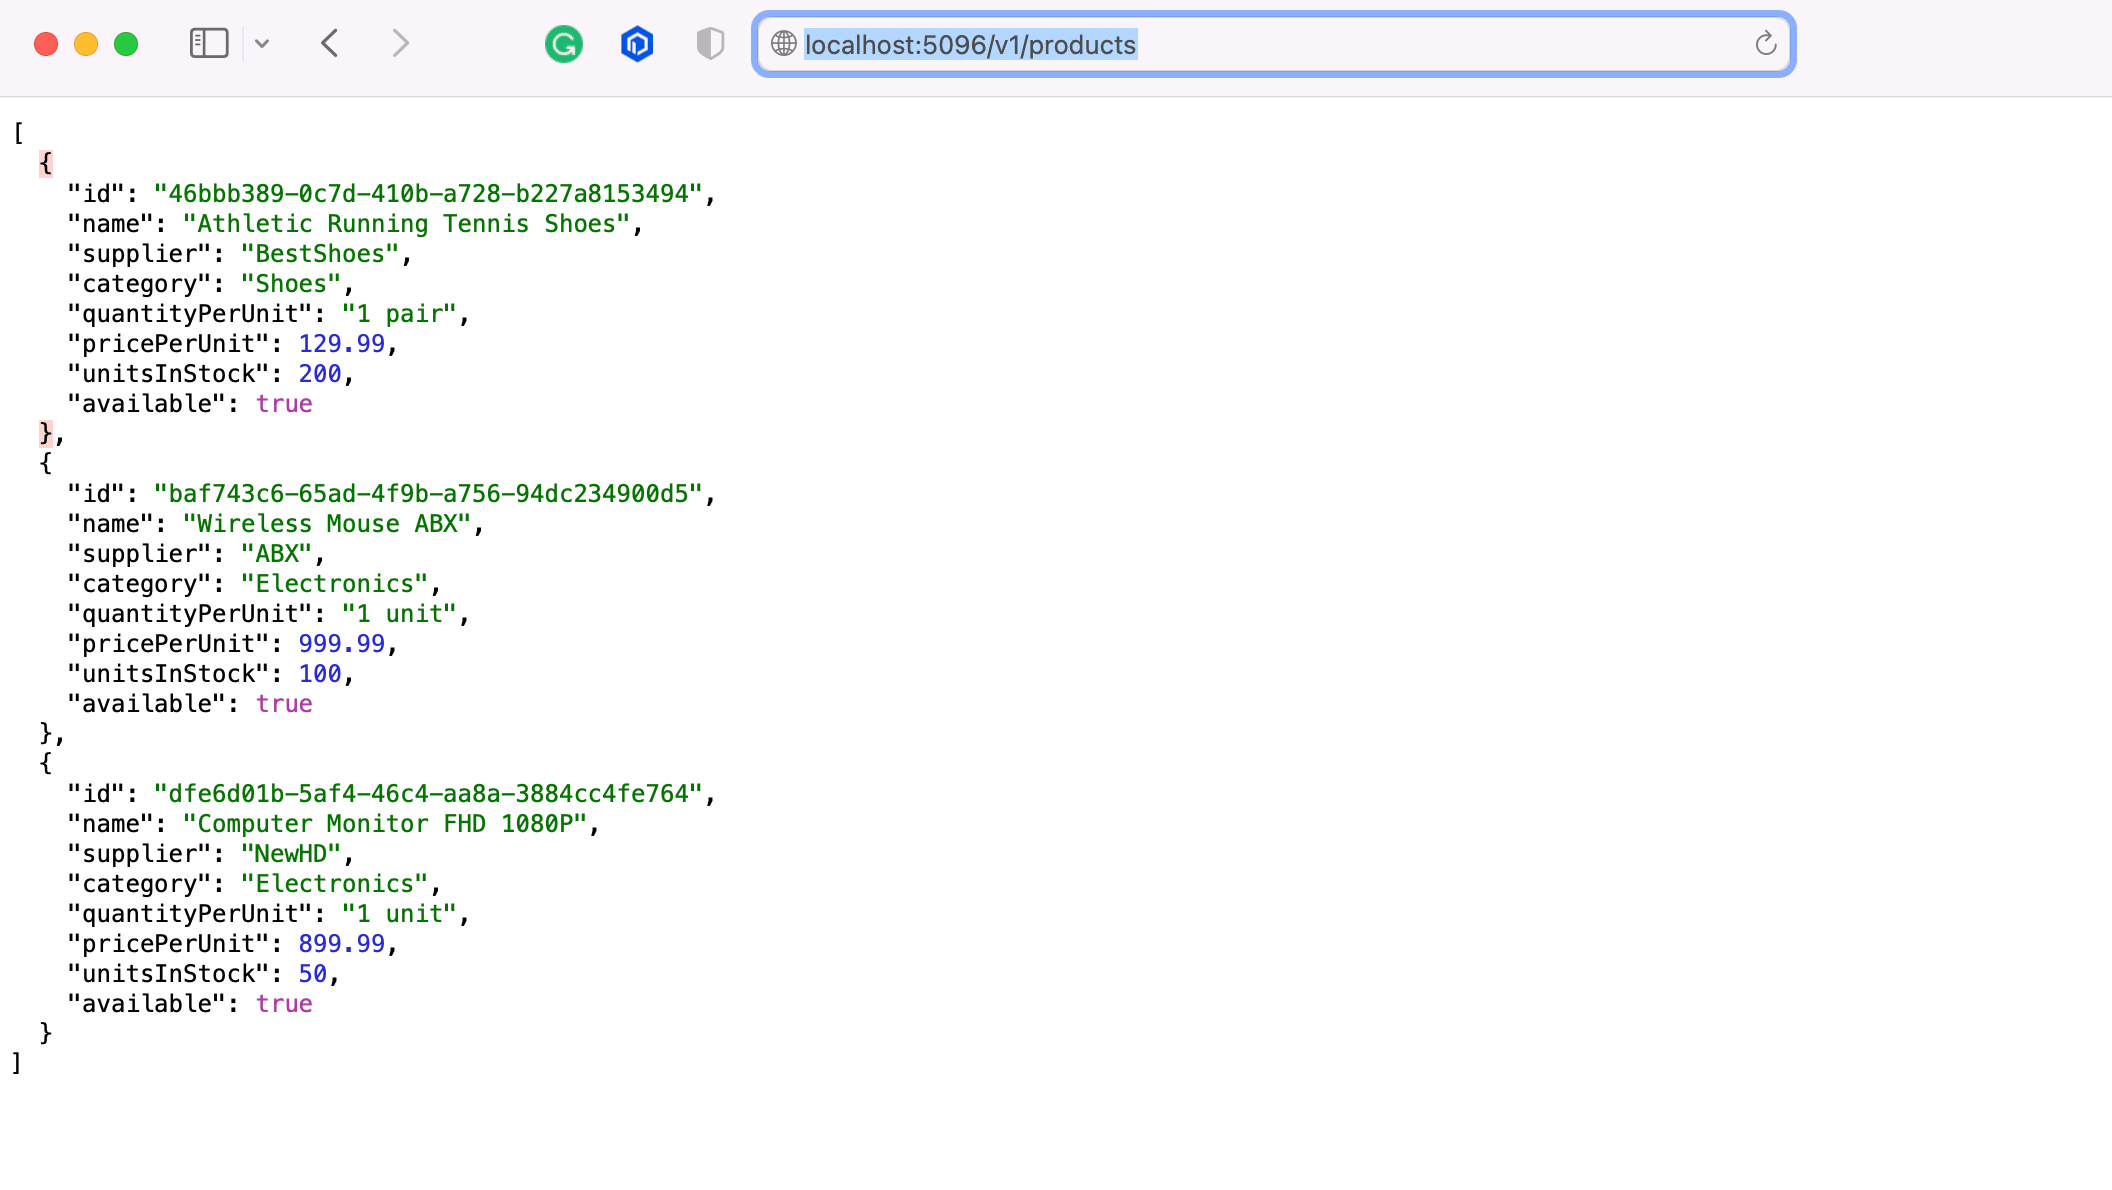
To run the application, just type the command dotnet run in the terminal and access the address http://localhost:PORT/v1/products in the browser. You should have something similar to the GIF below:
The next step is to register the processes executed by the application so that it is possible to monitor and analyze the information.
3. Serilog
NuGet Serilog package is a logging library for .NET applications that provides a flexible and extensible approach to event logging, allowing developers to capture information on application behavior.
Serilog supports various ways of outputting logs such as text files, databases, cloud storage services and even integration with real-time monitoring systems. It also supports advanced features such as filtering based on logs, custom formatting, enriching logs with contextual information and support for external logging providers.
Run the commands below to download Serilog and its dependencies into the project:
dotnet add package Serilog
dotnet add package Serilog.Extensions.Logging
dotnet add package Serilog.Sinks.Console
dotnet add package Serilog.Sinks.File
To configure the logs is very simple. In the ProductService class in the FindAll() method, just below where the productsDto variable is created, add the following code:
       Log.Logger = new LoggerConfiguration().MinimumLevel.Debug()
                .WriteTo.Console()
                .WriteTo.File("logs/product_service_log.txt", rollingInterval: RollingInterval.Day)
                .CreateLogger();

        Log.Information("Total products quantity: {count}", productsDto.Count());
        Log.CloseAndFlush();
The above code is creating a new instance of the LoggerConfiguration class, which is the base class of Serilog. This class is using some extension methods to do the log level settings—.MinimumLevel.Debug()—in which places these logs will be written: .WriteTo.Console() and .WriteTo.File("logs/product_service_log.txt", rollingInterval: RollingInterval.Day). Note that the logs will be stored in the application’s console and in text inside the logs folder, which will be created after the first run.
We also declare a method with the information to be recorded, which in this case will be the total number of products found in the database.
To test it, just run the command dotnet run in the console and access the address http://localhost:PORT/v1/products.
By doing this, the console where the application is running will display the log message and a folder called “logs” will be created at the root of the application and a file with the information will be generated, as in the image below:
In this post, only some features of Serilog were addressed, but there are several others, so feel free to explore them.
The next step is to add validation to our API input data. To do this, we will use FluentValidation.
4. Fluent Validation
FluentValidation is a data validation library for .NET, which allows validations in an easy and fluent way by creating rules in a declarative way.
With FluentValidation, you can easily define complex validation rules for object properties, such as validating required values, minimum or maximum string length, email formats, numbers within certain ranges and more.
FluentValidation is widely used in the .NET community and is supported by most .NET versions.
To download FluentValidation in the project, use the commands below:
dotnet add package FluentValidationdotnet add package FluentValidation.DependencyInjectionExtensions
So far we’ve only created methods to return data from the database. To validate with FluentValidation, we need to create methods to insert data.
For this, we will create a new DTO called “CreateUpdateProduct” that will be used to create and update records.
Inside the “Dtos” folder, create a new file called “CreateUpdateProduct.cs” and put the code below in it:
namespace EasyShop.Models.Dtos;

public record CreateUpdateProduct(string? Identifier, string? Seller, string? Category, string? QuantityPerUnit, decimal? PricePerUnit, decimal? UnitsInStock, bool Available);
Now, in the root of the project, create a new folder called “Validators” and inside it, create a new class called “ProductValidator” and put the code below in it.
using FluentValidation;
using EasyShop.Models.Dtos;

namespace EasyShop.Validators;

public class ProductValidator : AbstractValidator<CreateUpdateProduct>
{
    public ProductValidator()
    {
        RuleFor(product => product.Identifier).NotEmpty().WithMessage("Identifier is required.");
        RuleFor(product => product.Seller).NotEmpty().WithMessage("Seller is required.");
        RuleFor(product => product.Category).NotEmpty().WithMessage("Category is required.");
        RuleFor(product => product.QuantityPerUnit).NotEmpty().WithMessage("QuantityPerUnit is required.");
        RuleFor(product => product.PricePerUnit).NotEmpty().WithMessage("PricePerUnit is required.");
        RuleFor(product => product.UnitsInStock).NotEmpty().WithMessage("UnitsInStock is required.");
    }
}
Note that in the code above we are passing the class to be validated to the “AbstractValidator” class. Then within the constructor we are creating validation methods for each of the properties that are mandatory, where, if they are null or empty, a message of error says they are mandatory.
Here we are just doing simple validations, but FluentValidation has resources for the most varied types of validation.
Next, let’s create a method to insert a new product. In the “ProductService.cs” class add the code below:
    public async Task<Guid> Create(CreateUpdateProduct productDto)
    {
        var productEntity = new Product(Guid.NewGuid(),
                                    productDto.Name,
                                    productDto.Supplier,
                                    productDto.Category,
                                    productDto.QuantityPerUnit,
                                    productDto.PricePerUnit,
                                    productDto.UnitsInStock,
                                    productDto.Available);

        await _db.AddAsync(productEntity);
        await _db.SaveChangesAsync();
        return productEntity.Id;
    }
The next step is to add the FluentValidation settings and the new endpoint in the Program class. In the “Program.cs” file just below where the “AddAutoMapper” configuration is made, add the line of code below:
builder.Services.AddScoped<IValidator<CreateUpdateProduct>, ProductValidator>();
And below the Get endpoints add the new endpoint:
app.MapPost("/v1/products", async (ProductService service, CreateUpdateProduct product, IValidator<CreateUpdateProduct> validator) =>
{
    var validationResult = validator.Validate(product);

    if (!validationResult.IsValid)
        return Results.BadRequest(validationResult.Errors);

    var resultId = await service.Create(product);
    return Results.Created($"/v1/product/{resultId}", product);
});
Note that in the code above we are passing the product received in the request to the Validate method that will carry out the validations and return a FluentValidation object. If the “IsValid” property is false, a “BadRequest” will be returned with the errors; if true, the record will be created in the database.
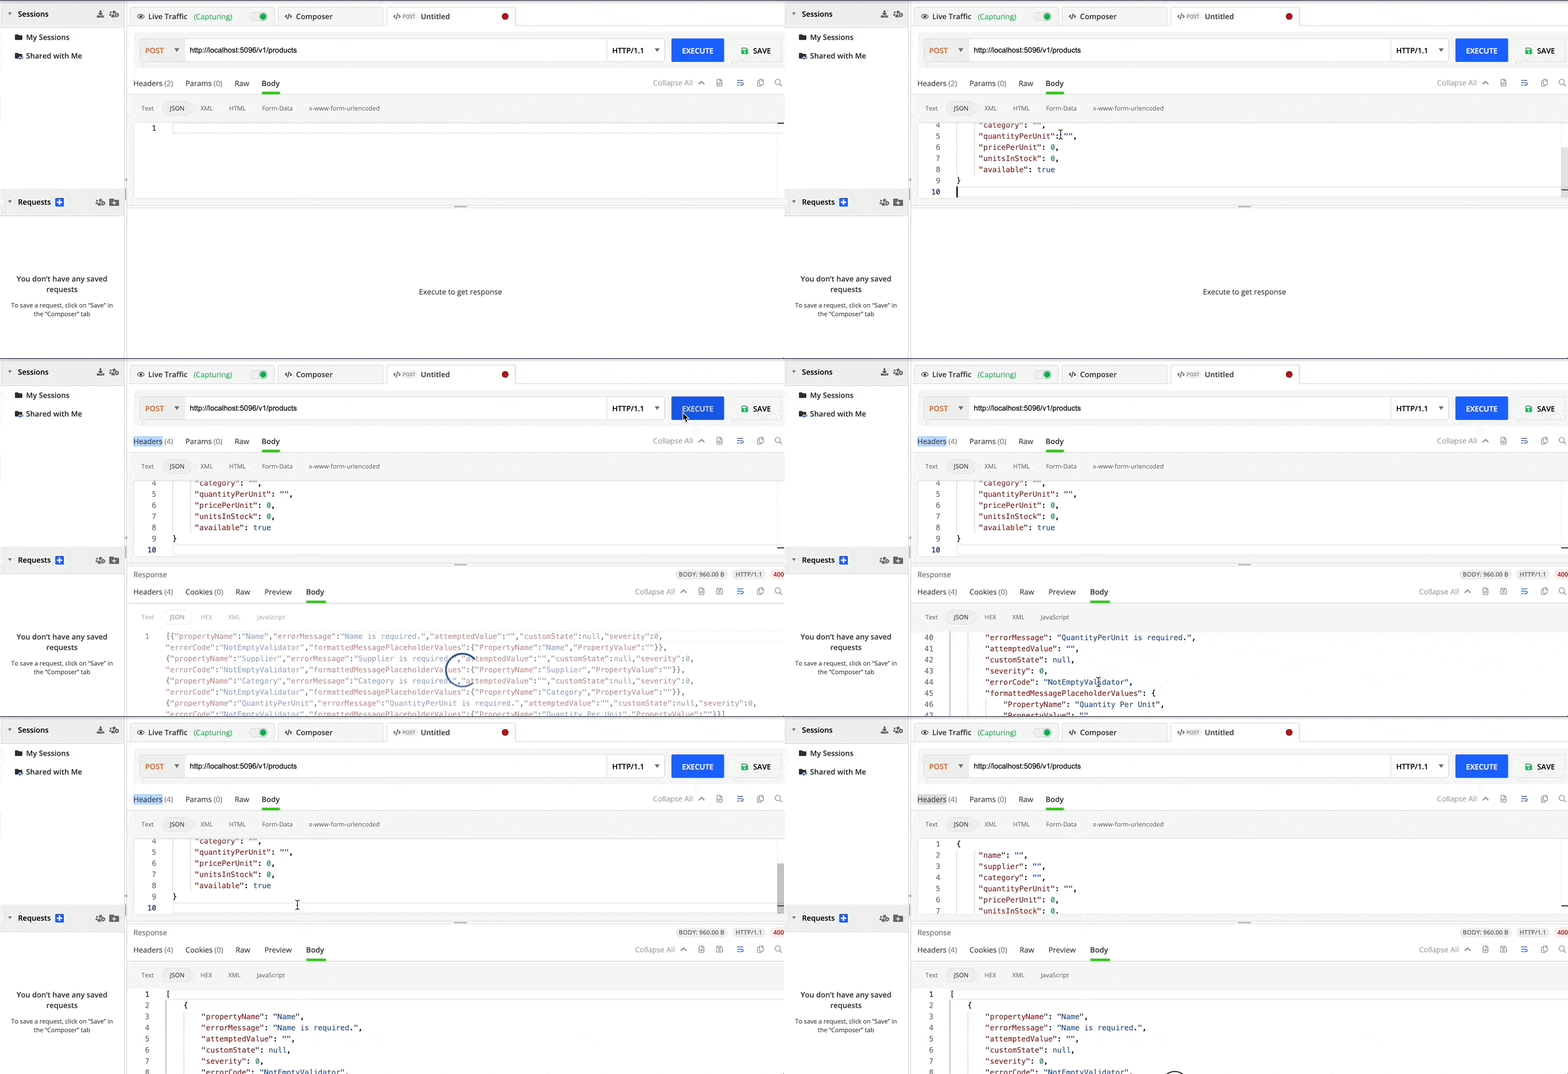
Now let’s test the validation we just implemented. In this tutorial, Fiddler Everywhere will be used to make requests to the API.
Create a new request for the route: http://localhost:PORT/v1/products and send the following JSON in the body:
{
     "name": "",
     "supplier": "",
     "category": "",
     "quantityPerUnit": "",
     "pricePerUnit": 0,
     "unitsInStock": 0,
     "available": true
}
The result will be a 400 Bad Request status, and the validation errors will be displayed in the body of the response, as shown in the image below:
5. Swagger
Swagger is an open-source tool used to create, document and test RESTful APIs. It provides an interactive interface where you can access and interact with API endpoints directly in your browser. Additionally, Swagger automatically generates API documentation based on source code attributes and comments.
In the context of ASP.NET Core, Swagger is commonly used to document APIs, allowing developers to easily and intuitively visualize and test the API.
To download Swagger packages, use the commands below:
dotnet add package Swashbuckle.AspNetCoredotnet add package Swashbuckle.AspNetCore.SwaggerGendotnet add package Swashbuckle.AspNetCore.SwaggerUI
Now let’s create a controller that will contain a get endpoint where the comments will be added. In the root of the project, create a new folder called “Controllers” and inside it create a new class called “ProductController.cs” and put the code below in it:
using EasyShop.Models.Dtos;
using EasyShop.Services;
using Microsoft.AspNetCore.Mvc;

namespace EasyShop.Endpoints;

[ApiController]
[Route("[controller]")]
public class ProductController : ControllerBase
{
    private readonly ProductService _service;

    public ProductController(ProductService service)
    {
        _service = service;
    }

    /// <summary>
    /// Complete list of products
    /// </summary>
    /// <returns>List of products</returns>
    /// <response code="200">Returns the complete list of products</response>
    [HttpGet(Name = "GetProducts")]
    public async Task<ActionResult<List<ProductDto>>> Get()
    {
        var products = await _service.FindAll();
        return Ok(products);
    }
}
Note that in the above code, we are telling Swagger to read the code comments from an XML file.
To generate the comments in the file, open the “EasyShop.csproj” file and add the code below:
<PropertyGroup>
   <GenerateDocumentationFile>true</GenerateDocumentationFile>
   <NoWarn>$(NoWarn);1591</NoWarn>
</PropertyGroup>
The <NoWarn> setting is set so that the IDE does not display a warning about codes without documentation comments.
The next step is to add the Swagger settings so in the Program.cs file. Just above where the “app” variable is created, add the following code:
builder.Services.AddEndpointsApiExplorer();
builder.Services.AddSwaggerGen(c =>
{
     c.SwaggerDoc("v1", new OpenApiInfo { Title = "EasyShop", Description = "EasyShop", Version = "v1" });
 var xmlFile = $"{Assembly.GetExecutingAssembly().GetName().Name}.xml";
 var xmlPath = Path.Combine(AppContext.BaseDirectory, xmlFile);
 c.IncludeXmlComments(xmlPath);
});
builder.Services.AddControllers()
And below the “app” variable add the following code:
app.UseSwagger();
app.UseSwaggerUI(c =>
{
    c.SwaggerEndpoint("/swagger/v1/swagger.json", "EasyShop V1");
});
app.MapControllers();
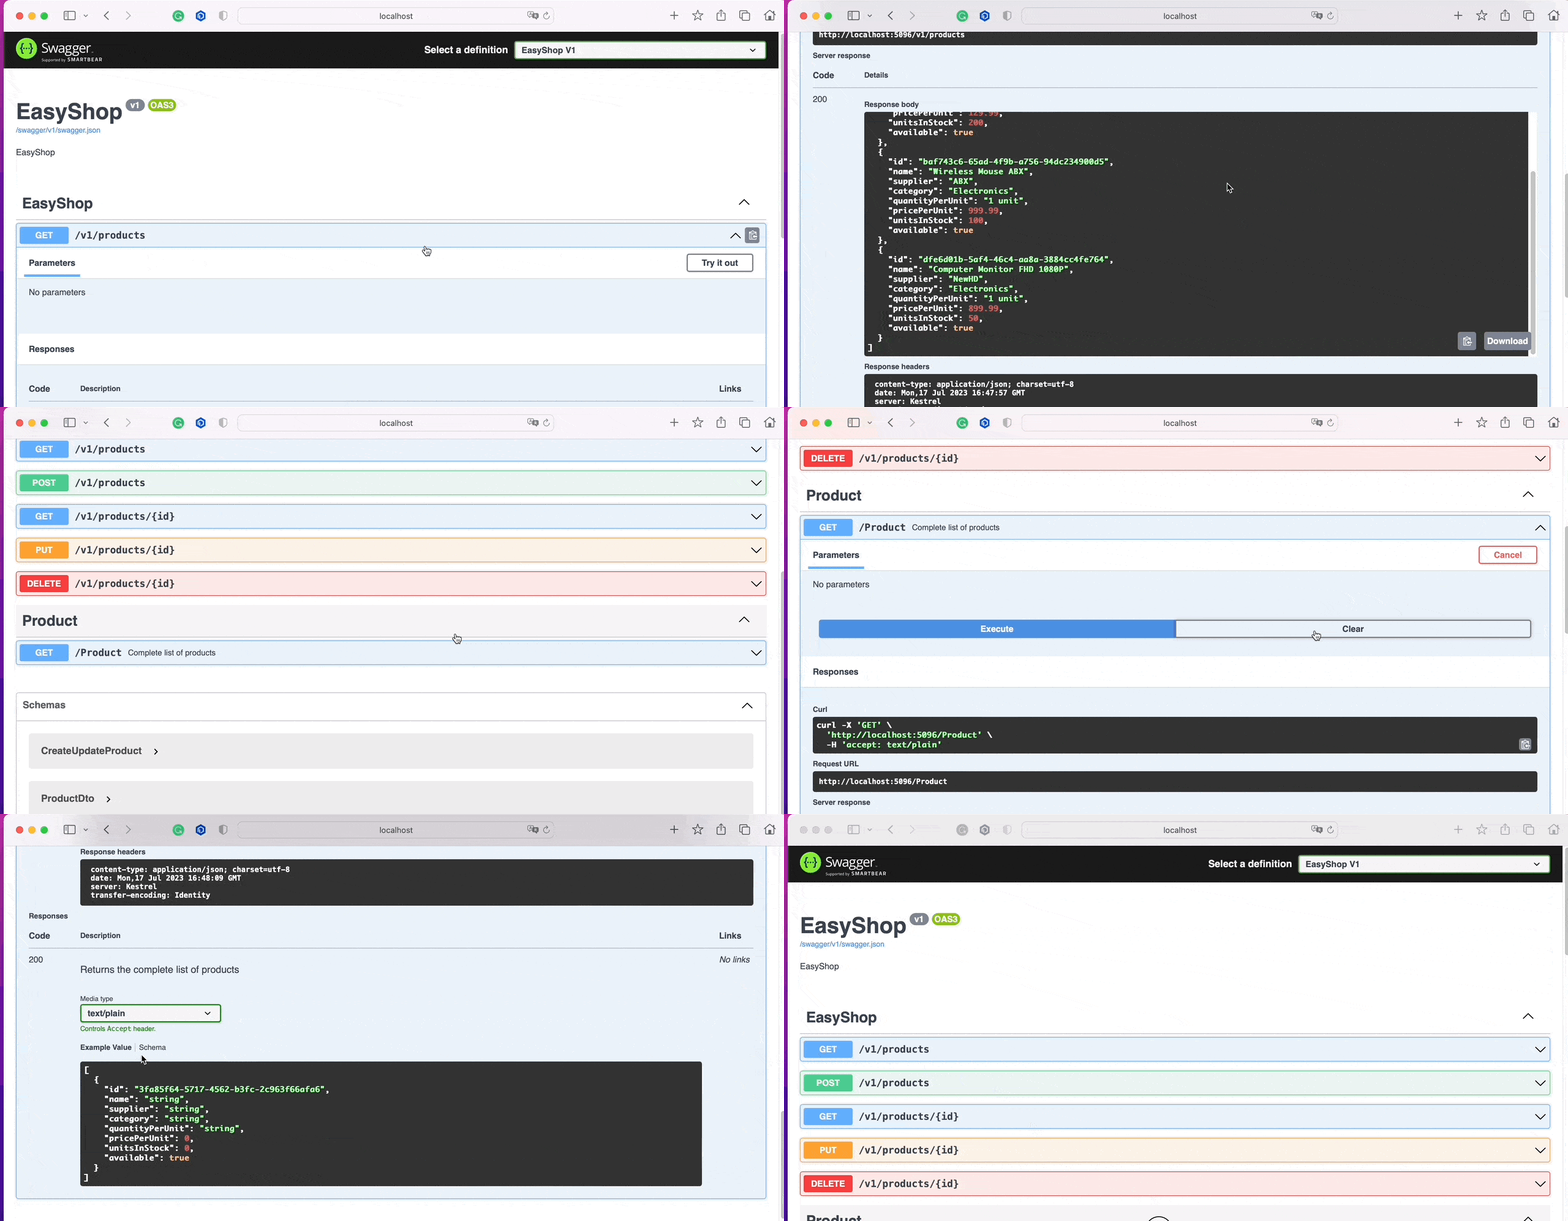
Now run the command dotnet run in the terminal and access http://localhost:PORT/swagger/index.html in the browser to display the Swagger interface.
Note in the GIF below how it is possible to execute requests directly through Swagger. And if you run the GET - Product route through Swagger, you can see the comments appearing as documentation in the Swagger interface.
Conclusion
As we saw throughout the post, NuGet packages are extremely useful to facilitate and accelerate the development of web applications—so it is vital that beginners know which are the most important ones and how to use them.
In this first part, we saw five packages normally found in small and large ASP.NET Core projects and how to implement them in practice. The second part will show five more packages so you can create a complete application and gain incredible knowledge to face the challenges of a developer’s day.


