.NET Basics: DTO (Data Transfer Object)

Summarize with AI:
Something common in ASP.NET Core development is data transfer. In this context, we must take special care to avoid future problems. A good practice is to use DTOs that will define how the data will be sent over the network.
In an application in .NET, an API for example, the data contained in the database is mapped and sent to the client. If this is done directly, many problems can arise, especially if you want to manipulate the way this data is sent and received. To solve these problems, you can define a DTO.
In this article, we’ll look at the basics of DTOs and how to implement them in practice by creating a web API in .NET 6.
What Is a DTO?
A DTO (Data Transfer Object) is an object that defines how data will be sent between applications.
It’s used only to send and receive data and does not contain in itself any business logic.
Why Use DTOs?
The use of DTOs is very common in web development with ASP.NET Core as they provide solutions for many needs. Below are some of them:
- Separate the service layer from the database layer
- Hide specific properties that clients don’t need to receive
- Omit properties to reduce the payload size
- Manipulate nested objects to make them more convenient for clients
- Avoid “overpost” vulnerabilities
DTOs provide an efficient way to separate domain objects from the presentation layer. This way, you can change the presentation layer without affecting the existing domain layers, and vice versa.
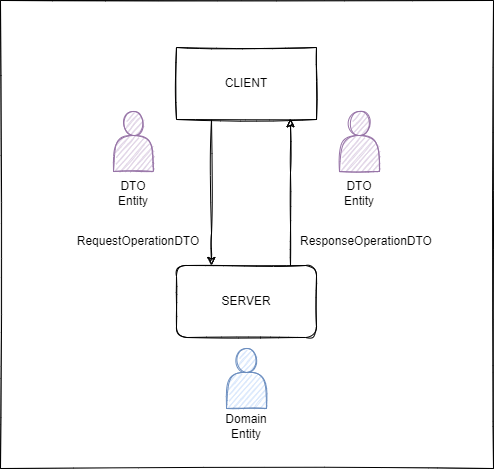
In the flowchart below, the client requests the server the DTO entity, the server gets the domain entity and returns the DTO entity in the response.

Practical Approach
Creating the Project
Next, we will create a simple web application in .NET 6 to demonstrate the use of DTOs. You can access the full source code at this link: Source code.
In the terminal, run the following command to create the base app, which will be a minimal API.
dotnet new web -o SellerManagerCreating the Models
Let’s create the domain class (Seller) which will be the class that will reflect the database table entity, both for fetching data and persisting, and also the class that will be the DTO (SellerDto) that will only expose the data that may be public.
So, create a folder called “Models,” and inside it create a new class called “Seller,” and put this code in it:
public record Seller(Guid Id, string Name, DateTime CreatedAt, string Email, string Address, decimal DiscountFactor);
And also a new class called “SellerDto” and put the code below in it:
public record SellerDto(string Name, string Email);
Entity Framework Packages
Now we will add to the project the libraries that we will need to implement the database objects. Then, through Nuget Package Manager (Visual Studio) or through the terminal, add the following packages:
- Microsoft.EntityFrameworkCore.Sqlite
- Microsoft.EntityFrameworkCore.Design
Creating the Data Context
Next, let’s create the Data Context, which is the representation of the database. We’ll use SQLite in this example.
So, create a new folder called “Data,” and inside it add a new class called “AppDbContext.” Inside that put the code below.
using Microsoft.EntityFrameworkCore;

public class AppDbContext : DbContext
{
    public DbSet<Seller>? Sellers { get; set; }

    protected override void OnConfiguring(DbContextOptionsBuilder options)
        => options.UseSqlite("DataSource = app.db; Cache=Shared");

    protected override void OnModelCreating(ModelBuilder modelBuilder)
    {
        modelBuilder.Entity<Seller>().HasData(
            new Seller(Guid.NewGuid(),"John Smith", DateTime.UtcNow, "John@mail.com","947 Heritage Road", 10),
                 new Seller(Guid.NewGuid(), "Violet Marshall", DateTime.UtcNow, "vmarshall@mail.com", "360 Bates Brothers Road", 10)
        );
    }
}
In the class AppDbContext, we are creating a “Sellers” entity that represents the table that will be created when executing the Migrations commands later on.
We also have the “OnConfiguring” method that defines the database settings, such as the name of the file that will be generated “app.db.”
Finally, we have the “OnModelCreating” method responsible for inserting sample data when the database is generated.
Running Entity Framework Commands
Now that the data mapping is ready, we can execute the commands that will create the database and add the initial data that were implemented in the previous steps.
First, before executing the commands, you must click with the right button on the project (solution), and click on the option “Rebuild Solution”—this will avoid errors when executing the commands.
Then in Visual Studio click Tools -> Nuget Package Manager -> Package Manager Console and run the commands below:
dotnet ef migrations add InitialModel
dotnet ef database update
These commands will create the database at the root of the project in the app.db file and will populate the “seller” table with the data we prepared in the “OnModelCreating” method.
Using DTO To Return Data
In the Program.cs file, right after where the “builder” variable is created, add the following code to create the DB Context configuration:
builder.Services.AddDbContext<AppDbContext>();
And after creating the variable “app” add the following code:
app.MapGet("/v1/sellers", (AppDbContext context) =>
{
    var sellers = context.Sellers;

    var sellersDtoList = new List<SellerDto>();

    if (sellers is not null)
    {
        sellersDtoList = sellers.Select(c => new SellerDto(c.Name, c.Email)).ToList();
    }

    return sellersDtoList.Any() ? Results.Ok(sellersDtoList) : Results.NotFound();

}).Produces<Seller>();
In this method we are creating an endpoint to query the database. The variable “sellers” will receive the list of records returned, but it will not be sent directly to the client, as it contains all the seller’s data, such as the “DiscountFactor,” which in this context should not be exposed. Instead, the items in this list will be forwarded to the DTO (sellerDto), which will return the data to the client.
Running the Project
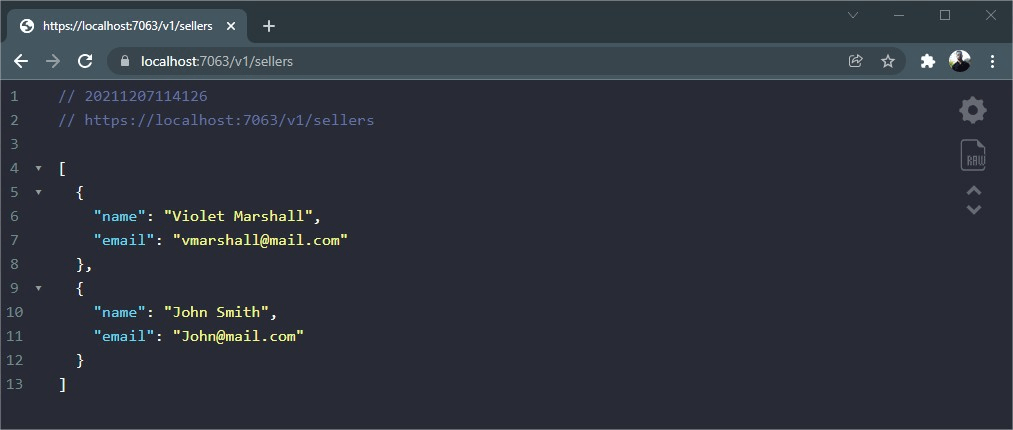
If you run the project and access the address: https://localhost:<PORT>/v1/sellers, you will have the list of sellers returned from the database, as in the image below:

Conclusion
The use of DTOs is highly recommended, as it becomes very advantageous to the applications, principally if the data exposed are sensitive—beyond the possibility of personalization of entities, you can avoid excessive use of queries to the APIs.
Therefore, whenever possible, try to use DTOs in your applications—besides being a good practice, it can avoid future problems.
In this article, we looked at the concept of DTO and its advantages. We created an application that has a domain entity and that exposes only the necessary data through the DTO entity.
If you want to learn more about this content, I suggest a great article on the official Microsoft website: Pros and cons of DTO.

