ASP.NET Core Basics: Data Structures—Part 2

Summarize with AI:
Data structures play a key role in computer science and software engineering, providing efficient solutions for various computational challenges. In this second part, we’ll cover advanced topics in data structures, but in an easy way to understand.
In Part 1 of Data Structures, we saw some examples of basic structures in the ASP.NET Core context, what each one means and how it can be implemented. In this second part, we’ll cover the main advanced topics in data structures.
Let’s see the meaning of each of them and understand how they work through practical examples.
What are Advanced Data Structures?
They are complex, specialized data organizations that provide efficient methods for storing and manipulating data across a variety of computational tasks. These frameworks are designed to optimize specific operations such as retrieval, insertion and deletion, and generally have applications in a wide variety of scenarios.
Below are some examples of advanced data structures:
Tree data structures
Examples: Binary trees, AVL trees, red-black trees, B trees and othersHeap data structures
Examples: Binary heaps, Fibonacci heaps and binomial heapsHashing
Examples: Hash tables, hash functions
These advanced data structures are essential in diverse computer science and software engineering applications where data management, efficient search and algorithm optimization are key concerns.
They provide the foundation for solving complex problems and improving the performance of software systems in areas such as databases, operating systems, networks and many others. Understanding when and how to apply these frameworks is crucial to designing efficient algorithms and data management systems.
Tree Data Structures
Trees are a type of data structure used to represent hierarchical relationships between elements. Trees are widely used in programming for various purposes, and C# offers the flexibility to work with different types of trees.
Next, let’s check out the main types of trees in C# and implement an example of each.
Binary Trees
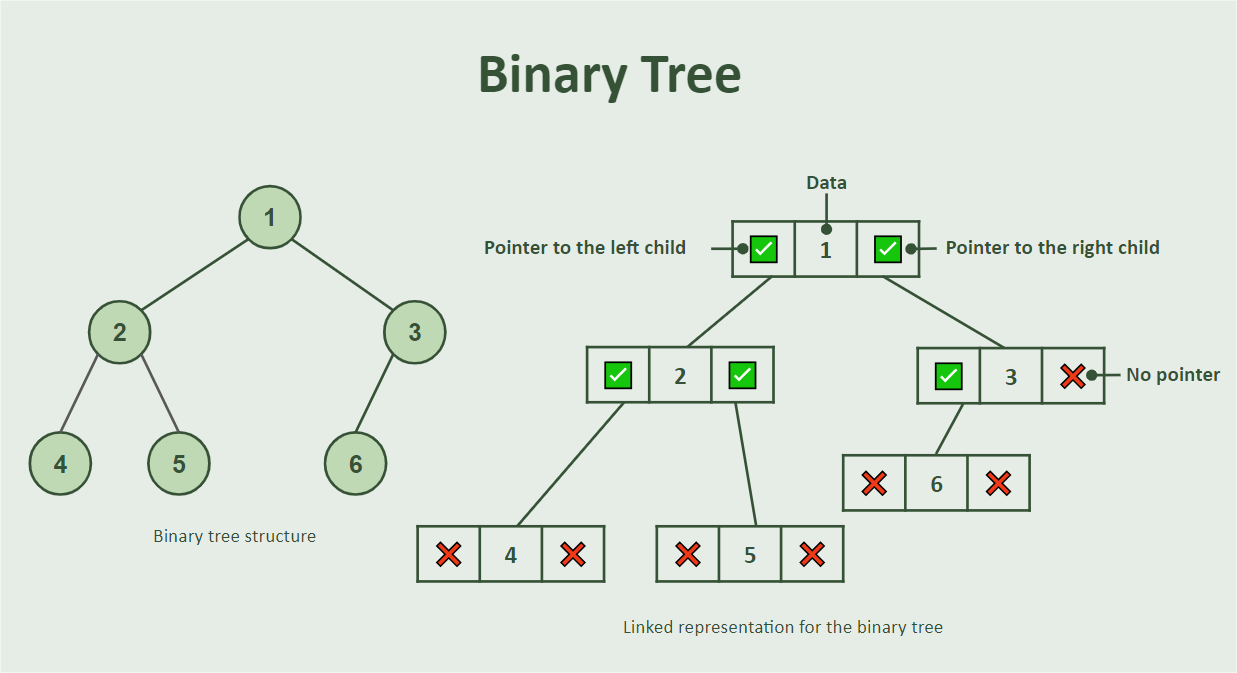
Binary trees are data structures where each node has at most two child nodes, typically referred to as the left and right child. Binary trees can be used in various applications, including binary search and expression trees.
Below is a representation of a binary tree structure:

To practice the post examples, let’s create a new application in ASP.NET Core. So, execute in the terminal the following command:
dotnet new web -o PracticingDataStructurePartTwoThis command will create a folder called “PracticingDataStructurePartTwo” and inside it will be a basic web project using the Minimal API template. You can open the project with the IDE of your choice, in this example Visual Studio Code will be used.
You can access all code examples here: Sample source code.
Defining the Binary Tree Node Class
Next, let’s create a class that represents a binary tree node. Each node must have data and references to its left and right children. So, in the root of the project, create a new folder called “Models” and inside it create the class below:
- TreeNode
namespace PracticingDataStructurePartTwo.Models;

public class TreeNode
{
    public int Data { get; set; }
    public TreeNode Left { get; set; }
    public TreeNode Right { get; set; }

    public TreeNode(int data)
    {
        Data = data;
        Left = null;
        Right = null;
    }
}
Note that in the class above we defined a class to represent each node in the tree, which has data and its left and right pointers, as represented in the previous image.
We can perform the following operations on binary trees:
- Insert an element
- Remove an element
- Search for an element
- Delete from an element
- Traversing an element
Binary Tree Traversals
Tree traversal algorithms can be classified into two main categories:
- Depth-first search (DFS) algorithms
- Breadth-first search (BFS) algorithms
Traversing a binary tree means visiting each tree node in a specific order. There are different ways to traverse a binary tree, and the choice of traversal method depends on the specific task you want to perform. The three most common binary tree traversal methods are:
- In-Order Traversal
- In an in-order traversal, you visit the nodes of the tree in the following order:
- Visit the left subtree.
- Visit the current node.
- Visit the right subtree.
- In a binary search tree (BST), an in-order traversal will visit the nodes in ascending order, which is useful for tasks like retrieving elements in sorted order.
- Pre-Order Traversal
- In a pre-order traversal, you visit the nodes of the tree in the following order:
- Visit the current node.
- Visit the left subtree.
- Visit the right subtree.
- Pre-order traversal is useful for creating a copy of the tree or serializing it into a format that can be easily reconstructed.
- Post-Order Traversal
- In a post-order traversal, you visit the nodes of the tree in the following order:
- Visit the left subtree.
- Visit the right subtree.
- Visit the current node.
- Post-order traversal is commonly used for deleting all nodes in the tree or for evaluating expressions in a mathematical expression tree.
Implementing an In-Order Traversal Binary Tree
To implement an in-order traversal binary tree, let’s create a binary tree class. Inside the Model folder create the class below:
namespace PracticingDataStructurePartTwo.Models;

public class BinaryTree
{
    public TreeNode Root { get; set; } // Reference to the root node

    public BinaryTree()
    {
        Root = null;
    }

    // Insert a node with the specified data
    public void Insert(int data)
    {
        Root = InsertRecursive(Root, data);
    }

    // Recursive method to insert a node
    private TreeNode InsertRecursive(TreeNode root, int data)
    {
        // If the current node is null, create a new node with the data
        if (root == null)
        {
            root = new TreeNode(data);
            return root;
        }

        // If the data is less than the current node's data, insert on the left
        if (data < root.Data)
        {
            root.Left = InsertRecursive(root.Left, data); // Left child
        }
        // If the data is greater, insert on the right
        else if (data > root.Data)
        {
            root.Right = InsertRecursive(root.Right, data); // Right child
        }

        return root;
    }

    // In-order traversal of the binary tree
    public void InorderTraversal(TreeNode node)
    {
        if (node != null)
        {
            InorderTraversal(node.Left); // Traverse left subtree
            Console.Write(node.Data + " "); // Print current node's data
            InorderTraversal(node.Right); // Traverse right subtree
        }
    }
}
In the code above we defined the BinaryTree class, which is responsible for representing a binary tree data structure. It manages the root node of the tree and provides methods for inserting nodes into the tree and performing in-order traversal. Below is a detailed explanation of each element of the code:
Root property
Rootis a property of theBinaryTreeclass. It contains a reference to the root node of the binary tree.Builder
The constructor of theBinaryTreeclass initializes theRootproperty tonull, indicating that the tree is initially empty.Insert Method
- The
Insertmethod is used to insert a new node with a specific integer value into the binary tree. - It takes the value to be entered as a parameter.
- The method delegates the actual insertion to the “InsertRecursive” method, which is a private helper method that handles the recursive insertion process.
- InsertRecursive Method
- The “InsertRecursive” method is a private recursive method used to insert nodes into the binary tree.
- Two parameters are required: the current node (subtree) being considered and the value to be inserted.
- It checks whether the current node is “null” (indicating an empty location in the tree). If it is
null, it creates a new node with the given data and returns it. - If the current node is not
null, the method calls itself recursively on the left or right child depending on whether the data is smaller or larger than the current node’s data, ensuring that the new node is inserted correctly. - The method returns the updated node to maintain the tree structure.
- InorderTraversal Method
- The “InorderTraversal” method is used to perform an ordered traversal of the binary tree.
- It takes a “TreeNode” as a parameter (typically the root node from which the traversal starts).
- In-order traversal involves visiting the left subtree, then the current node, and finally the right subtree.
- This method uses a recursive approach to perform the traversal, printing the data for each node visited to the console in sorted order.
Overall, the “BinaryTree” class encapsulates the core functionality of a binary tree, including creating the tree, inserting nodes and traversing the tree in order.
Now in the Program class file add the code below before the code snippet app.run();:
BinaryTree tree = new BinaryTree();

// Insert nodes into the binary tree
tree.Insert(5);
tree.Insert(3);
tree.Insert(2);
tree.Insert(4);
tree.Insert(1);
tree.Insert(6);

Console.WriteLine("Inorder Traversal:");
tree.InorderTraversal(tree.Root);
Then, execute the application with the command dotnet run, and you will have the following output in the console:

Note that even though the list of numbers is unordered, it was sorted in increasing order in the InorderTraversal() method.
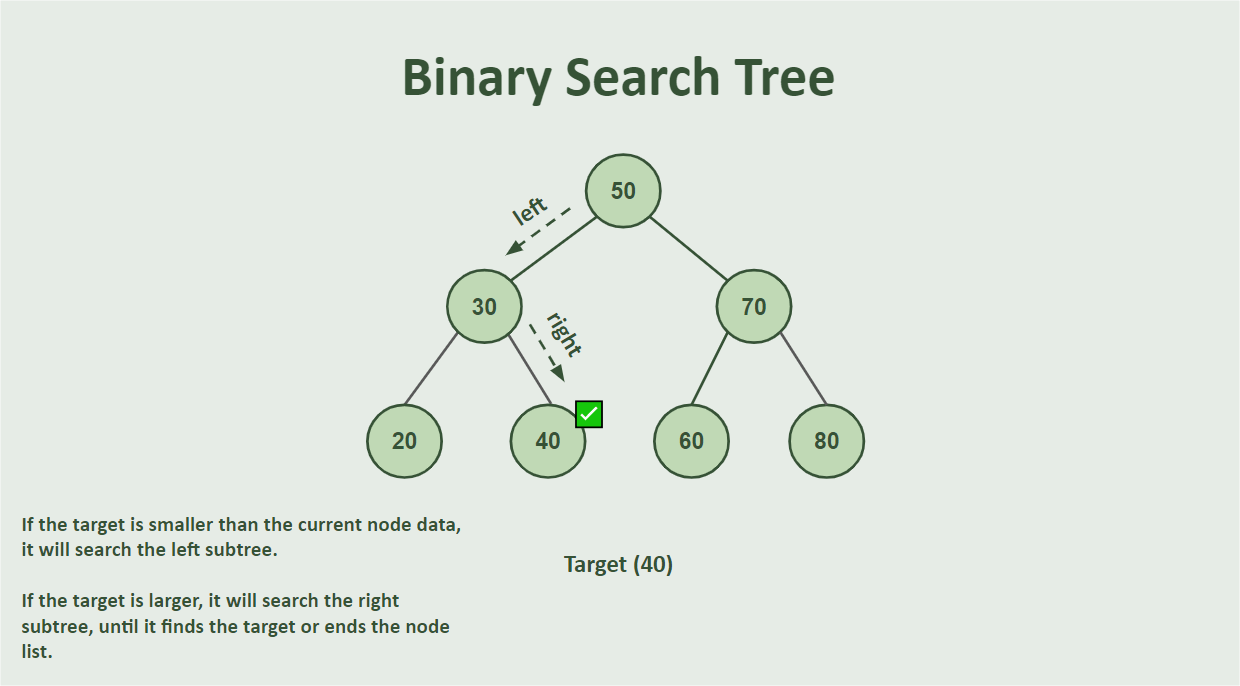
Binary Search Tree
Binary search is a search algorithm that can be applied to a sorted array or a binary search tree (BST). To demonstrate binary search in the binary tree created above, simply add the method below to the “BinaryTree” class:
public bool BinarySearch(TreeNode node, int target)
    {
        // Base case: If the node is null, the target is not found.
        if (node == null)
        {
            return false;
        }
        // Compare the target value with the current node's data.
        if (target == node.Data)
        {
            return true;  // Found the target value.
        }
        else if (target < node.Data)
        {
            // If the target is smaller, search in the left subtree.
            return BinarySearch(node.Left, target);
        }
        else
        {
            // If the target is larger, search in the right subtree.
            return BinarySearch(node.Right, target);
        }
    }
And in the Program.cs file replace the code snippet:
tree.Insert(1);
tree.Insert(2);
tree.Insert(3);
tree.Insert(4);
tree.Insert(5);
tree.Insert(6);
by the following:
tree.Insert(50);
tree.Insert(30);
tree.Insert(70);
tree.Insert(20);
tree.Insert(40);
tree.Insert(60);
tree.Insert(80);
and add the following code:
int target = 40;
bool found = tree.BinarySearch(tree.Root, target);

if (found)
    Console.WriteLine($"Value {target} found in the tree.");
else
    Console.WriteLine($"Value {target} not found in the tree.");
Then, execute in the terminal the command dotnet run and you’ll have the following result:

In the code above, we defined the BinarySearch() method that searches for a target value in the binary search tree recursively.
The base if checks if the current node is null, which means the target value was not found and returns false.
If the current node’s data matches the target value, it returns true, indicating that the target value has been found. If the target is smaller than the current node’s data, it searches the left subtree. If the target is larger, it searches in the right subtree.
When calling the method, we passed as target the value 40 which is part of our tree that has the values = 50,30,70,20,40,60 and 80, so as expected the console output was: “Value 40 found in the tree.” As shown in the image below:

Heap Data Structures
A heap in data structures refers to a specialized data structure that is used to store and manage elements in a way that allows the highest priority element to be easily accessed and removed.
There are two main types of heaps: the “binary heap” and the “Fibonacci heap.” In this post, we will talk about the binary heap, which is the most common.
In C#, a binary heap is often implemented using a class called PriorityQueue in the System.Collections.Generic library.
Next, let’s see how it works and how to implement a binary heap:
Binary Heap
A binary heap is a special binary tree that meets two main properties:
- Partial order property: For each node in the tree, the key (value) stored in the node is greater (or smaller, depending on the heap type) than the keys stored in its children. This means that the highest priority element will be at the root of the tree.
- Complete tree structure: The tree is filled from left to right at all levels, except possibly the last level, which is filled from left to right.
In binary heaps, we have two main types:
- Max-heap: In a max-heap, the element with the highest value (key) has the highest priority. This means that the root of the tree is the highest valued element and all elements are smaller than the parent. Therefore, as you remove elements from the max-heap, the largest elements are processed first.
- Min-heap: In a min-heap, the element with the lowest value (key) has the highest priority. This means that the root of the tree is the element with the lowest value and all elements are greater than the parent. Therefore, as you remove elements from the min-heap, the smaller elements are processed first.
The choice between using a max-heap or a min-heap depends on the needs of your algorithm or application. Here are some typical scenarios for each of the two types:
Max-heap:
- It is used when you need to find the highest value element quickly, such as when implementing priority queues for task scheduling in an operating system.
- It is also useful in sorting algorithms like Heapsort where you need to sort in descending order.
Min-heap:
- It is used when you need to find the lowest value element quickly, such as when implementing priority queues for shortest path algorithms such as Dijkstra’s algorithm.
Implementing a max-heap or min-heap in C# can be accomplished using a class like PriorityQueue from the System.Collections.Generic library, as mentioned previously. However, note that by default PriorityQueue creates a min-heap. If you want a max-heap, you can provide a custom comparison that reverses the order of priorities.
Next, let’s implement a min-heap using the C# native class PriorityQueue. So in the Program.cs class, add the code below:
var queue = new PriorityQueue<string, int>();

// Add elements with their associated priorities
queue.Enqueue("Red", 0);
queue.Enqueue("Blue", 4);
queue.Enqueue("Green", 2);
queue.Enqueue("Gray", 1);

// Dequeue and print elements based on their priorities
while (queue.TryDequeue(out var color, out var priority))
    Console.WriteLine($"Color: {color} - Priority: {priority}");
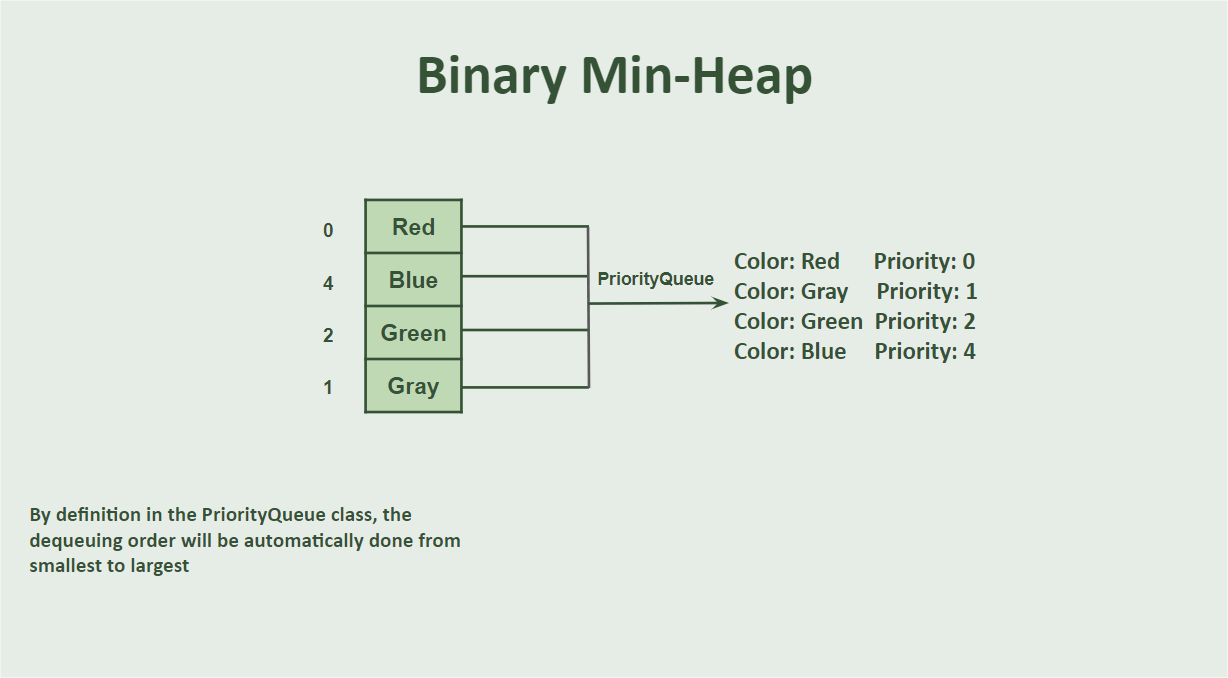
The code above is an example of how to use a priority queue in C# to store elements with associated priorities. First, we create an instance of a priority queue (or PriorityQueue) that is capable of storing string values (colors) with integer-valued priorities.
Then we add some elements to the priority queue. Each element represents a color, such as Red, Blue, Green and Gray, and each element has an associated priority, which is an integer, such as 0, 4, 2 and 1.
We then enter a loop (while) that will continue until the priority queue is empty. Inside the loop, we dequeue (or “dequeue”) elements from the priority queue using queue.TryDequeue() returning the value and priority.
Something important is that, in the “PriorityQueue” class, elements with the lowest priority are removed from the queue first.
Finally, we print the removed element to the screen. If you run the application you will have the following result:

Below you can see a representation of a binary min-heap

Hashing Data Structures
Hashing is a fundamental process in computer science, which involves transforming input data into a fixed-size value, often called a “hash” or “hash code,” using a mathematical function known as a hash function.
The main feature of hash functions is that they produce a fixed-size output regardless of the size of the input. This hash is used to represent the original input in a compact way, facilitating efficient searching and storing of data in data structures such as hash tables.
The biggest advantage of using hashing data structures is that they allow you to store data and search it in constant time, that is, in O(1) time.
Hash functions must meet some important properties:
- Deterministic: For the same input, a hash function must always produce the same hash.
- Efficient: The hash function must be computationally efficient to calculate the hash of an input.
- Uniform distribution: The hash function must distribute the hash values evenly, to minimize collisions (when two different inputs have the same hash).
- Irreversible: It must be difficult or impossible to regenerate the original input from the hash (this is important for cryptographic hash functions).
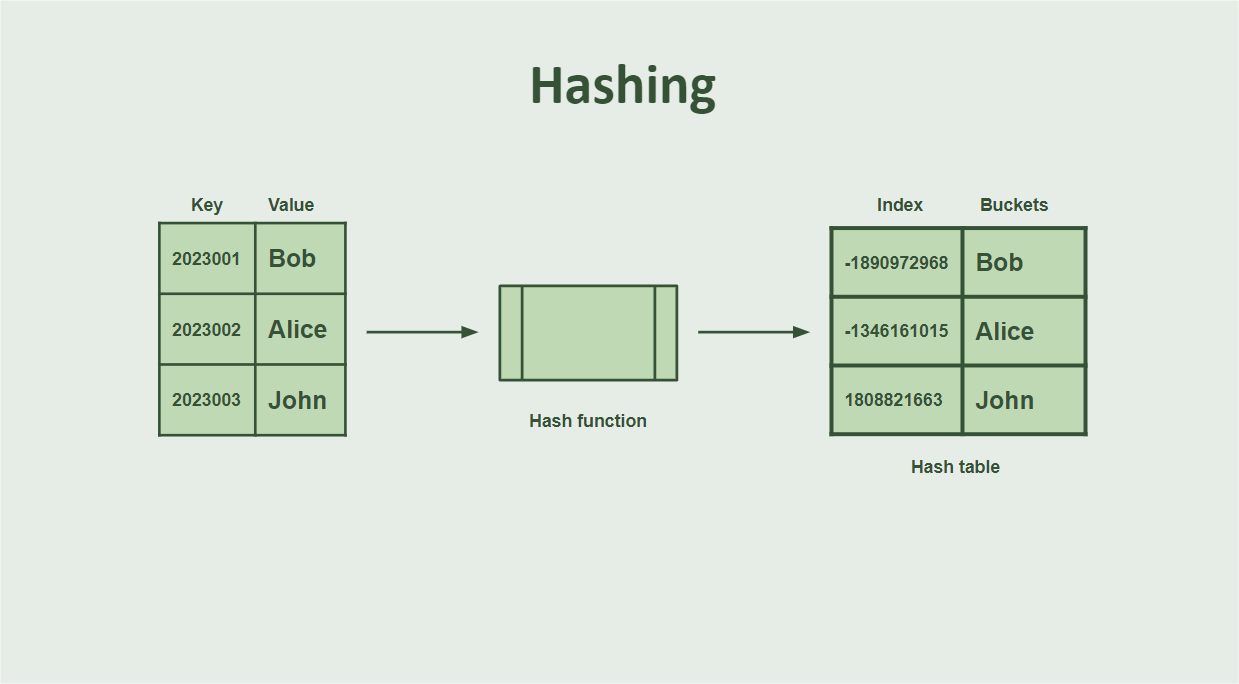
The hash is basically made up of three components:
- Key: The key is the value you want to store or fetch from the hash data structure. It is used as input to the hash function to calculate the index where the associated value will be stored or looked up in the hash table.
- Hash function: The hash function is the mathematical formula or algorithm that transforms the key into a hash value (index) in the hash table. This function is designed to be deterministic and to distribute keys in order to minimize collisions evenly.
- Hash table: The hash table is the data structure that stores the values associated with the keys. It consists of an array of lists, where each list is associated with an index generated by the hash function. When you want to store or look up a value, the hash function is used to determine which list of the hash table the value should be stored or looked up in.
To implement the creation of a hash table in C#, we can use the “Hashtable” class which is part of the “System.Collections” set.
So, in the Program.cs file add the code below:
Hashtable hashtable = new Hashtable();

// Implementation a hash function using SHA256
int HashFunction(string key)
{
     using (SHA256 sha256 = SHA256.Create())
     {
         byte[] inputBytes = Encoding.UTF8.GetBytes(key);
         byte[] hashBytes = sha256.ComputeHash(inputBytes);
         return BitConverter.ToInt32(hashBytes, 0); // Convert the first 4 bytes of the hash to an integer
     }
}

//Add key-value pairs to the table
hashtable[HashFunction("2023001")] = "Bob";
hashtable[HashFunction("2023002")] = "Alice";
hashtable[HashFunction("2023003")] = "John";

// Retrieve values using keys
int key1 = HashFunction("2023001");
int key2 = HashFunction("2023002");
int key3 = HashFunction("2023003");

string value1 = (string)hashtable[key1];
string value2 = (string)hashtable[key2];
string value3 = (string)hashtable[key3];

Console.WriteLine("Index associated with key 2023001: " + key1);
Console.WriteLine("Index associated with key 2023002: " + key2);
Console.WriteLine("Index associated with key 2023003: " + key3);

Console.WriteLine("Value associated with key 2023001: " + value1);
Console.WriteLine("Value associated with key 2023002: " + value2);
Console.WriteLine("Value associated with key 2023003: " + value3);
Then, if you run the application, the following result will be displayed in the console:

In the code above we create an instance of a hash table (Hashtable) then create a method HashFunction(string key) that accepts a key (string) as input and returns an integer value. This method uses the SHA-256 hash function to calculate the hash value of the key.
Inside the HashFunction method, an instance of SHA256, a cryptographic hash algorithm, is created.
The key (string) is then converted to a byte array using UTF-8 encoding.
The ComputeHash function of the SHA256 object is used to calculate the hash of the key bytes.
The first 4 bytes of the hash are converted to an integer value using BitConverter.ToInt32, which is then returned.
We then add key-value pairs to the hash table, where the keys are the outputs of the HashFunction applied to the strings “2023001”, “2023002” and “2023003”, and the associated values are “Bob”, “Alice” and “John”.
The code then retrieves the values from the hash table using the keys calculated with the HashFunction function. The values associated with the keys are stored in the variables value1, value2 and value3.
Finally, we print to the console the indices associated with the keys and the values associated with these keys in the hash table.
In this way, the code demonstrates how hash tables are used to map keys to values using a hash function, illustrating the concept of hashing, which is one of the main subjects when we talk about complex data structures.

Conclusion
In this post, we learned about three types of complex data structures: binary trees, heap and hashing. These concepts are very common in web applications, where there is a need to deal with a large amount of data, and in scenarios like these, it is common to have problems with optimizations that can be easily solved by data structures.
In addition to these, there are several other types of data structures that you may know, but these three are already a starting point for you to familiarize yourself with the subject.
Something important to remember is that C# has many features for working with data structures such as the “Hashtable” class, for example, so consider using native ASP.NET Core structures whenever possible.


