ASP.NET Core Basics: Knowing and Applying Design Patterns

Summarize with AI:
Design patterns are reusable solutions to common problems developers face when designing and developing applications. Learn how to implement one well-known design pattern in an ASP.NET Core application.
Design patterns help developers solve common problems when building applications and features. In the context of ASP.NET Core, it is essential to know design patterns—after all, the ASP.NET ecosystem itself is based on many of these patterns, such as the MVC pattern.
In this post, we will learn about some of the main patterns and implement one of them in an ASP.NET Core application, so at the end of the post, you will be familiar with design patterns and can apply them whenever there is an opportunity.
What are Design Patterns?
Design patterns are reusable, proven solutions to common problems that arise during software design and development.
They are not specific to a specific programming language or technology, but rather provide general guidelines and templates that aim to achieve various software design objectives such as flexibility, maintainability and scalability.
Design patterns help developers create more efficient, organized and maintainable code by encapsulating best practices and promoting code reuse.
These design patterns are not rigid models that must be followed at all costs, but rather principles and guidelines that can be adapted and customized to meet the specific needs of a software project. Proper use of design patterns can lead to more extensible and efficient software systems.
There are several categories of design patterns, among which four stand out:
1. Creational Patterns
These patterns deal with mechanisms for creating objects in a way that is appropriate to the situation. They often involve the use of builders, factories and prototypes.
Among the creational patterns are:
- Singleton pattern
- Factory method pattern
- Abstract factory pattern
- Builder pattern
- Prototype pattern
2. Structural Standards
These patterns deal with the composition of objects, generally defining their relationships to form larger structures. They help design a flexible and efficient system.
Among the structural patterns are:
- Adapter standard
- Decorator pattern
- Composite pattern
- Proxy pattern
- Bridge pattern
3. Behavioral Patterns
These patterns address interaction and communication between objects, focusing on how objects distribute responsibilities and collaborate with each other.
Among the behavioral patterns are:
- Observer pattern
- Strategy pattern
- Command pattern
- State standard
- Chain of responsibility standard
4. Architectural Patterns
These high-level patterns provide a model for a software application’s overall structure and organization. They guide the architectural design of entire systems or subsystems.
Among the architectural standards are:
- MVC (Model-View-Controller)
- MVVM (Model-View-ViewModel)
- Dependency injection
- Repository pattern
Knowing and Applying the Abstract Factory Pattern
The abstract factory design pattern in the context of ASP.NET Core is an approach used to create families of related or dependent objects in a flexible and extensible way. It is especially useful when you need to ensure that a set of objects are compatible and consistent, but want to maintain the flexibility to swap these object families easily.
In this post, we will create an example where we need to calculate a student’s payment amount, where, depending on the due date, a discount or an extra fee will be applied.
In this example, we will have an abstract class that will have a method called “CalculateFeeAmount” and two derived classes that will be responsible for applying the discount or extra fee.
Each design pattern contains some degree of complexity, so this post will focus on a single design pattern. We will explore its meaning and how to implement it in practice in a real-world application in ASP.NET Core, so let’s get started!
Creating the Sample Application
In this post, we will create an ASP.NET Core minimal API that is responsible for registering student fees.
Below are three prerequisites to implement the application:
- Recent version of the .NET – This post uses Version 7, though Version 8 is out now.
- An Integrated Development Environment (IDE) – This post uses the Visual Studio Code.
- MySQL pre-configured locally – This post uses MySQL as a database, so you need to have a local server of MySQL. You can use another database, but in such configurations aren’t covered in this post.
To create the base application via terminal, use the following command:
dotnet new web -o StudentFeesTracker
You can access the complete source code here: Student Fees Tracker source code.
Adding the NuGet Packages
Now let’s install the NuGet packages that we will need later in the project. In the terminal, execute the following commands:
dotnet add package Swashbuckle.AspNetCoredotnet add package Dapper --version 2.0.151dotnet add package MySql.Data --version 8.1.0
Creating the Models
To create the entity classes, go inside the project and create a folder called “Models.” Inside it, create the following classes:
- EntityDto
namespace StudentFeesTracker.Models;

public class EntityDto
{
    public Guid Id { get; set; }
}
- StudentFee
namespace StudentFeesTracker.Models;

public class StudentFee : EntityDto
{
    public Guid StudentId { get; set; }
    public decimal Amount { get; set; }
    public DateTime DueDate { get; set; }
    public bool IsPaid { get; set; }
}
- ConnectionString
namespace StudentFeesTracker.Models;

public class ConnectionString
{
    public string? ProjectConnection { get; set; }
}
Creating the Repository
In ASP.NET Core and software development in general, a repository is a design technique used to separate the logic that retrieves and stores data from the rest of the application, which helps improve the maintainability, testability and scalability of the database.
Create a new folder called “Repositories,” and inside it create the class and interface below:
- IStudentFeeRepository
using StudentFeesTracker.Models;

namespace StudentFeesTracker.Repositories;

public interface IStudentFeeRepository
{
    Task<List<StudentFee>> FindAll();
    Task Create(StudentFee studentFee);
}
- StudentFeeRepository
using System.Data;
using Dapper;
using Microsoft.Extensions.Options;
using MySql.Data.MySqlClient;
using StudentFeesTracker.Models;

namespace StudentFeesTracker.Repositories;

public class StudentFeeRepository : IStudentFeeRepository
{
    private readonly IDbConnection _dbConnection;

    public StudentFeeRepository(IOptions<ConnectionString> connectionString)
    {
        _dbConnection = new MySqlConnection(connectionString.Value.ProjectConnection);
    }

    public async Task<List<StudentFee>> FindAll()
    {
        string query = @"select
                            id Id,
                            student_id StudentId,
                            amount Amount,
                            due_date DueDate,
                            is_paid IsPaid
                        from student_fees";

        var projects = await _dbConnection.QueryAsync<StudentFee>(query);
        return projects.ToList();
    }

    public async Task Create(StudentFee studentFee)
    {
        string query = @"insert into student_fees(id, student_id, amount, due_date, is_paid)
                         values(@Id, @StudentId, @Amount, @DueDate, @IsPaid)";

        await _dbConnection.ExecuteAsync(query, studentFee);
    }
}
MySQL Code
Below is the SQL code needed to create the database and table used in the post example:
-- Create the database
CREATE DATABASE student_fee_management;

-- Switch to the newly created database
USE student_fee_management;

-- Create the table to store student fee information
CREATE TABLE student_fees (
    id CHAR(36) PRIMARY KEY,
    student_id CHAR(36),
    amount DECIMAL(10, 2),
    due_date DATETIME,
    is_paid BOOLEAN
);
Creating the Abstract Factory
Note that the code above has a method for inserting records into the database, but imagine that before inserting them we must calculate the discount or extra fee on the fee amount, depending on the due date.
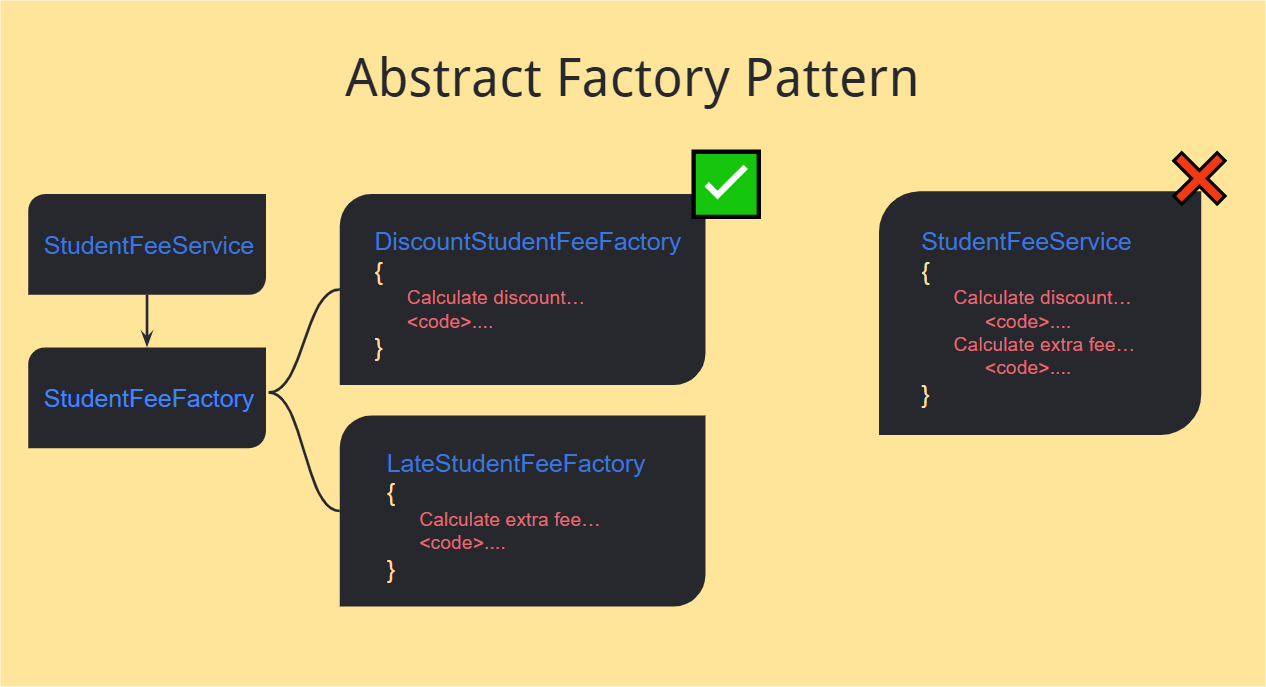
To follow a good practice pattern, we can use the abstract factory pattern to deal with this. To do this, we can create a base factory class that will contain a method called “CalculateAmount()” and two derived classes, one to calculate the discount and the other to calculate the extra late fee.
In the root of the project, create a new folder called “Factories” and inside it create the classes below:
- StudentFeeFactory
namespace StudentFeesTracker.Factories;
public abstract class StudentFeeFactory
{
    public abstract decimal CalculateFeeAmount(decimal amount);
}
- DiscountStudentFeeFactory
namespace StudentFeesTracker.Factories;
public class DiscountStudentFeeFactory : StudentFeeFactory
{
    public override decimal CalculateFeeAmount(decimal amount)
    {
        return amount * 0.9m; // Apply a 10% discount
    }
}
- LateStudentFeeFactory
namespace StudentFeesTracker.Factories;
public class LateStudentFeeFactory : StudentFeeFactory
{
    public override decimal CalculateFeeAmount(decimal amount)
    {
        return amount * 1.1m; // Apply a 10% late fee
    }
}
Note that the StudentFeeFactory class is defining a method (CalculateFeeAmount()) which is implemented by the two factory classes LateStudentFeeFactory and DiscountStudentFeeFactory.
It is important to note that the CalculateFeeAmount() method only defines input and output values—it does not define behavior. Therefore, each derived class can handle the rate calculation independently.
In this scenario, we use a simple calculation of discount or addition of fees that could be created in the project’s service class itself, but imagine if there were more business rules in the calculation, such as communication with external APIs. It would be difficult to keep everything in a single class. That’s why it’s very important to separate the logic into distinct classes, even if the actual calculation is simple. This way you’re preparing the system so that it can be scaled if necessary, making code maintenance easier.

Creating the Service Class
The service class will be used to contain the application’s business rules and to access the repository’s methods. It is in this class that the dependencies on the previously created factory classes will be injected.
So, create a new folder called “Services” and inside it create the following class:
- StudentFeeService
using StudentFeesTracker.Factories;
using StudentFeesTracker.Models;
using StudentFeesTracker.Repositories;

namespace StudentFeesTracker.Services;

public class StudentFeeService
{
    private readonly IStudentFeeRepository _repository;
    private readonly StudentFeeFactory _lateStudentFeeFactory;
    private readonly StudentFeeFactory _discountStudentFeeFactory;

    public StudentFeeService(IStudentFeeRepository repository, LateStudentFeeFactory lateStudentFeeFactory, DiscountStudentFeeFactory discountStudentFeeFactory)
    {
        _repository = repository;
        _lateStudentFeeFactory = lateStudentFeeFactory;
        _discountStudentFeeFactory = discountStudentFeeFactory;
    }

    public async Task<List<StudentFee>> FindAll()
    {
        var studentFees = await _repository.FindAll();
        return studentFees;
    }

    public async Task<Guid> Create(StudentFee studentFee)
    {
        CalculateFee(studentFee);
        GenerateId(studentFee);
        await _repository.Create(studentFee);
        return studentFee.Id;
    }

    private void CalculateFee(StudentFee studentFee)
    {
        if (IsLate(studentFee.DueDate))
        {
            studentFee.Amount = _lateStudentFeeFactory.CalculateFeeAmount(studentFee.Amount);
        }
        else if (IsDiscount(studentFee.DueDate))
        {
            studentFee.Amount = _discountStudentFeeFactory.CalculateFeeAmount(studentFee.Amount);
        }
    }

    private bool IsLate(DateTime dueDate)
    {
        const int lateDayThreshold = 10;
        return dueDate.Day > lateDayThreshold;
    }

    private bool IsDiscount(DateTime dueDate)
    {
        const int discountDayThreshold = 5;
        return dueDate.Day < discountDayThreshold;
    }

    private void GenerateId(StudentFee studentFee)
    {
        studentFee.Id = Guid.NewGuid();
    }
}
Note that in the code above, both factory classes are being passed via the constructor, and their methods are being used to calculate the discount or late fee depending on the date entered. This way, if we had more methods or factory classes, they would be ready to be used by the service class, making the application modular and flexible.
Creating the Endpoints and Making the Application Functional
For the application to be functional, it is necessary to create the API endpoints and inject dependencies of the service, repository and factory classes, in addition to making the connection string with the database.
Replace the code in the “Program.cs” file with the following code:
using StudentFeesTracker.Factories;
using StudentFeesTracker.Models;
using StudentFeesTracker.Repositories;
using StudentFeesTracker.Services;

var builder = WebApplication.CreateBuilder(args);
builder.Services.AddEndpointsApiExplorer();
builder.Services.AddSwaggerGen();
builder.Services.AddTransient<IStudentFeeRepository, StudentFeeRepository>();
builder.Services.AddSingleton<StudentFeeService>();
builder.Services.Configure<ConnectionString>(builder.Configuration.GetSection("ConnectionStrings"));
builder.Services.AddTransient<LateStudentFeeFactory>();
builder.Services.AddTransient<DiscountStudentFeeFactory>();
var app = builder.Build();

if (app.Environment.IsDevelopment())
{
    app.UseSwagger();
    app.UseSwaggerUI();
}

app.UseHttpsRedirection();

app.MapGet("/v1/student/fees", async (StudentFeeService service) =>
{
    var fees = await service.FindAll();
    return fees.Any() ? Results.Ok(fees) : Results.NotFound("No fees found");
})
.WithName("FindAllFees");

app.MapPost("/v1/student/fees", async (StudentFeeService service, StudentFee newStudentFee) =>
{
    var createdId = await service.Create(newStudentFee);
    return Results.Created($"/v1/contacts/{createdId}", createdId);
})
.WithName("CreateNewFee");

app.Run();
And in the “appsettings.json” file, add the code snippet below, replacing the capitalized keywords with your local MySQL settings.
"ConnectionStrings": {
  "ProjectConnection": "host=localhost; port=PORT; database=student_fee_management; user=USER; password=PASSWORD;"
  },
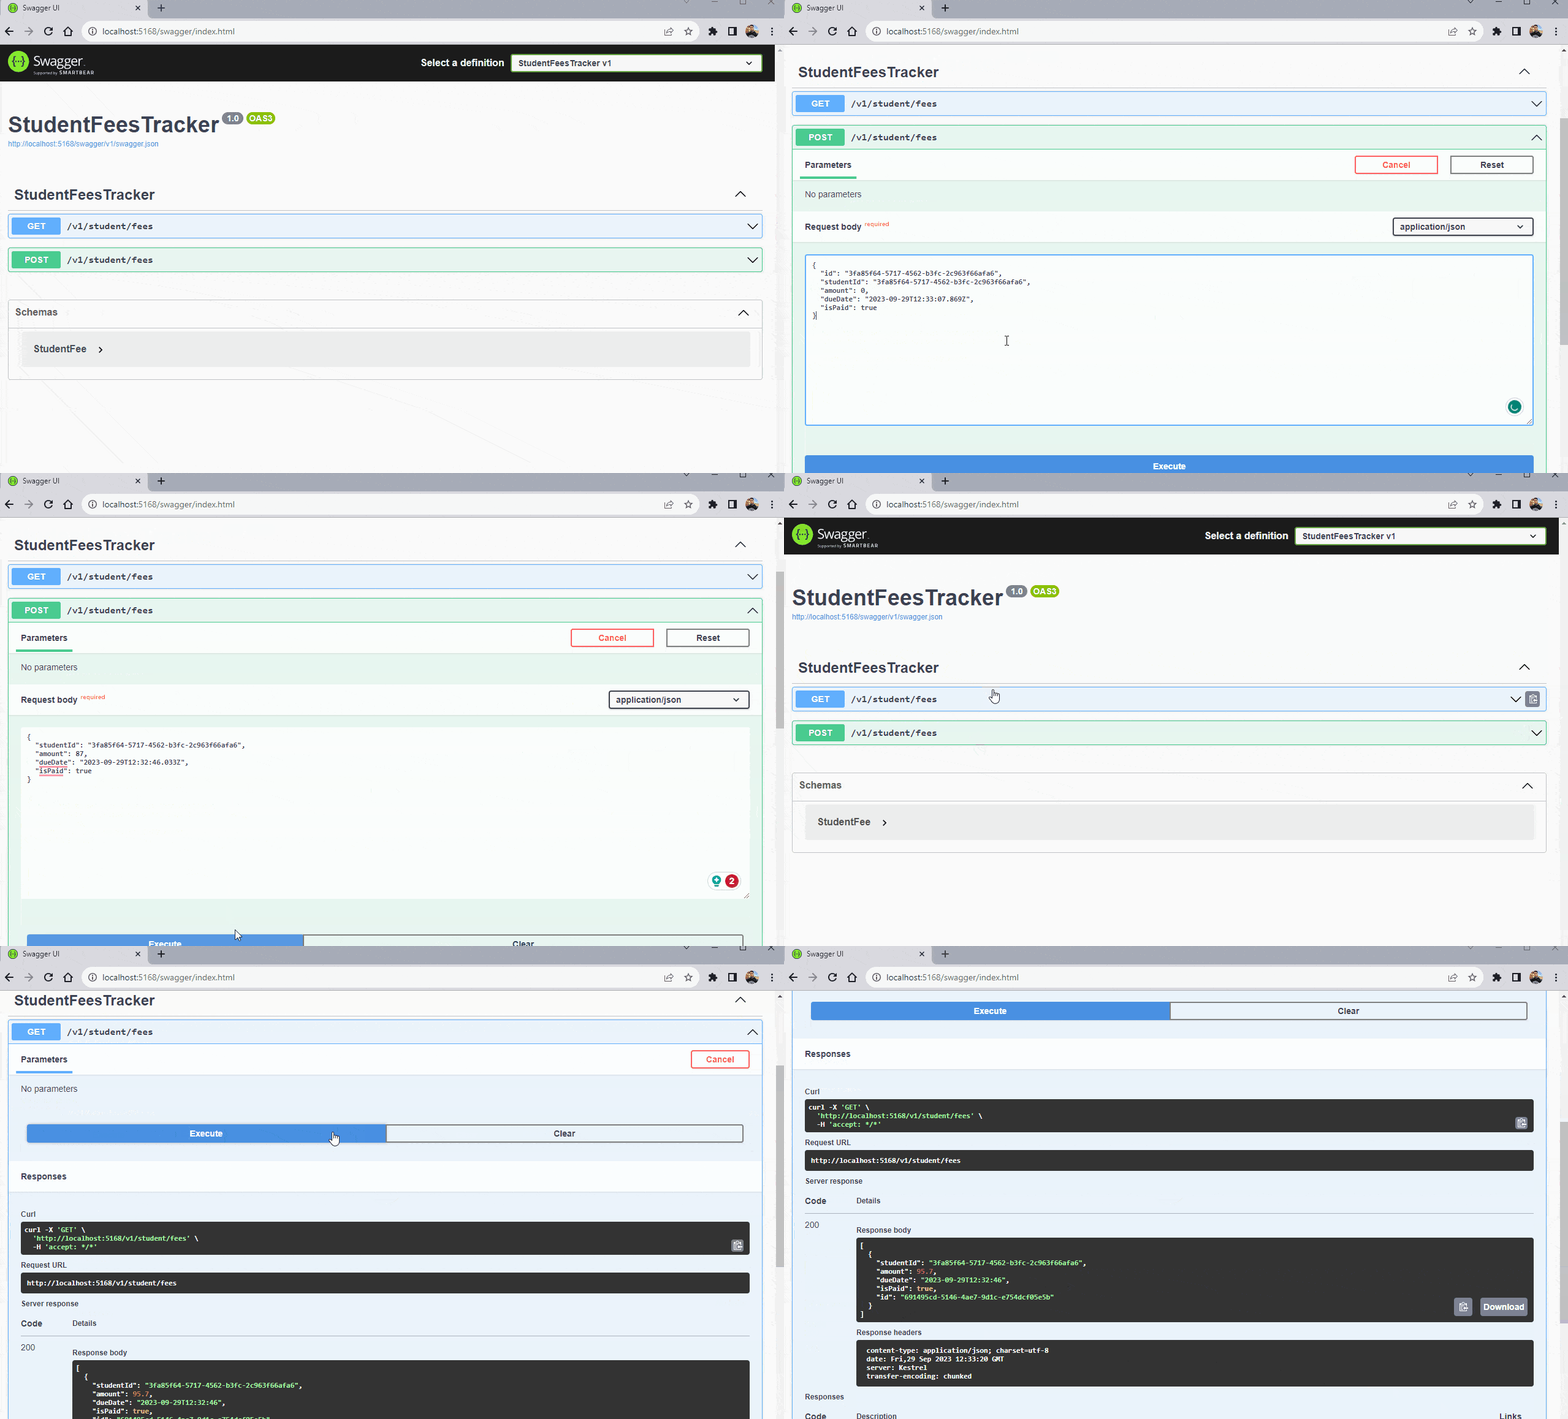
Once this is done, we can run the application and test its functions. To do this, simply run the command in the terminal: dotnet run and in the browser access the address http://localhost:5168/swagger/index.html.
Then you will see the Swagger page and can perform the defined operations, as shown in the GIF below:

Conclusion
Design patterns are extremely useful, as in addition to solving many problems they also help developers and designers create robust applications, prepared to be scaled using good practices.
Something important to say is that design patterns should be implemented when there is a problem to be solved, not used just to use them no matter the cost.
In this post, we saw a very well-known pattern, abstract factory, which is normally used to decouple components in an application, as it encourages the creation of abstract interfaces for the creation of logic and business rules.
So always consider using design patterns when creating a new application or refactoring an existing application.


