ASP.NET Core Basics: Build a Complete CRUD Application with VS Code

Summarize with AI:
Check out this blog post on how to develop and run an ASP.NET Core app using Visual Studio Code and learn the best extensions to program with C#.
Visual Studio is an incredible tool for creating applications in ASP.NET Core, but even so, other options may be more attractive depending on the need. Visual Studio Code is certainly one of the most recommended.
Visual Studio Code (VS Code) is one of the most used IDEs by the vast majority of web developers due to its extensive range of libraries that cover most of the programming languages available in the current technology scenario. It is developed and maintained by Microsoft, the same owner of .NET, which means that VS Code is perfectly adaptable to .NET technologies such as ASP.NET Core.
In this article, we’ll learn how to create an application from scratch using VS Code and check out which are the best extensions to program with C#.
What is VS Code and Why Use It?
VS Code (Visual Studio Code) is an IDE (Integrated Development Environment) that combines the simplicity of a source code editor with powerful developer tools. It is open-source and very popular among most web developers.
The following is a list of reasons why to use VS Code:
- Open-source, so it’s completely free for individual or commercial use
- Support for hundreds of languages such as C#, JavaScript, Java and many more
- Customizable with hundreds of ready-made downloadable themes
- Thousands of community-built extensions
- Resources for development, debugging, testing and deploying
- Can be used on low-performance machines due to its simplicity
Downloading and Preparing VS Code
VS Code is compatible with Windows, macOS and Linux. You can download it through this link: Download VS Code.
Installing Main Extensions
If you are using VS Code for the first time, know that it originally comes with only the necessary basics. To develop in some programming language, you need to download compatible extensions.
The extensions are available in the “Extensions” menu of VS Code, which can be accessed through the icon of a block with a piece undocked, located on the left bar, as shown in the image below. Or if you use Windows, just press Ctrl + Shift + X. (Mac users: Command + Shift + X.)
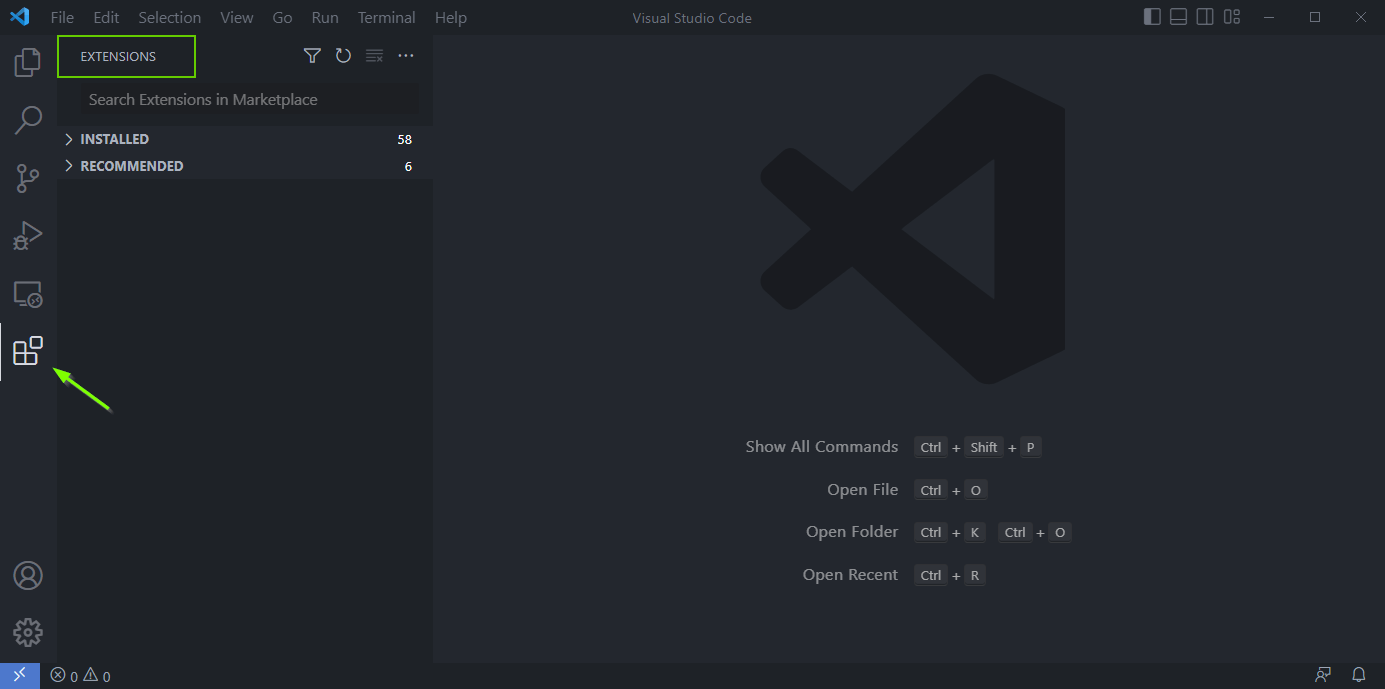
Search in the search bar of the extensions menu for the name of the desired extension and click on it and hit Install. Below is the list of extensions for you to download.
- C# by Microsoft: Used to develop with the C# language.
- Auto-Using for C#: Auto-imports and provides IntelliSense for references that still needed to be imported in a C# file.
- NuGet Gallery: Used to install and uninstall NuGet packages more easily.
Creating the Application
What Are We Going to Develop?
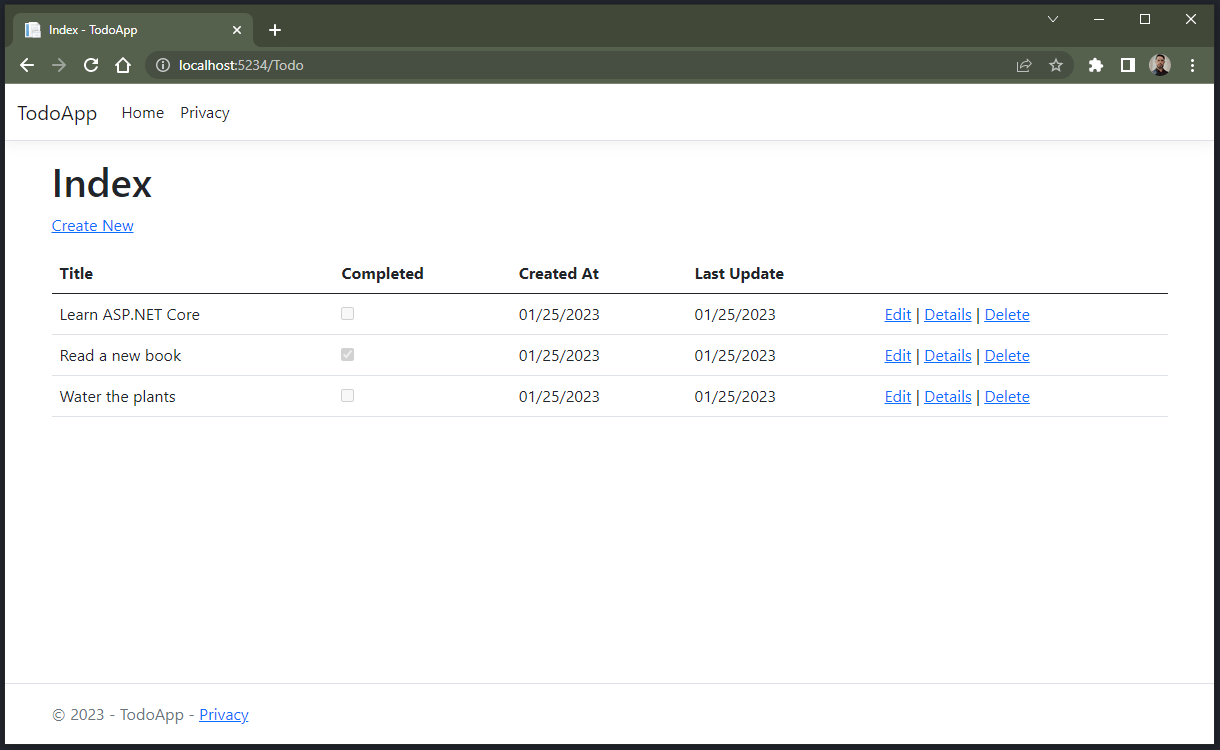
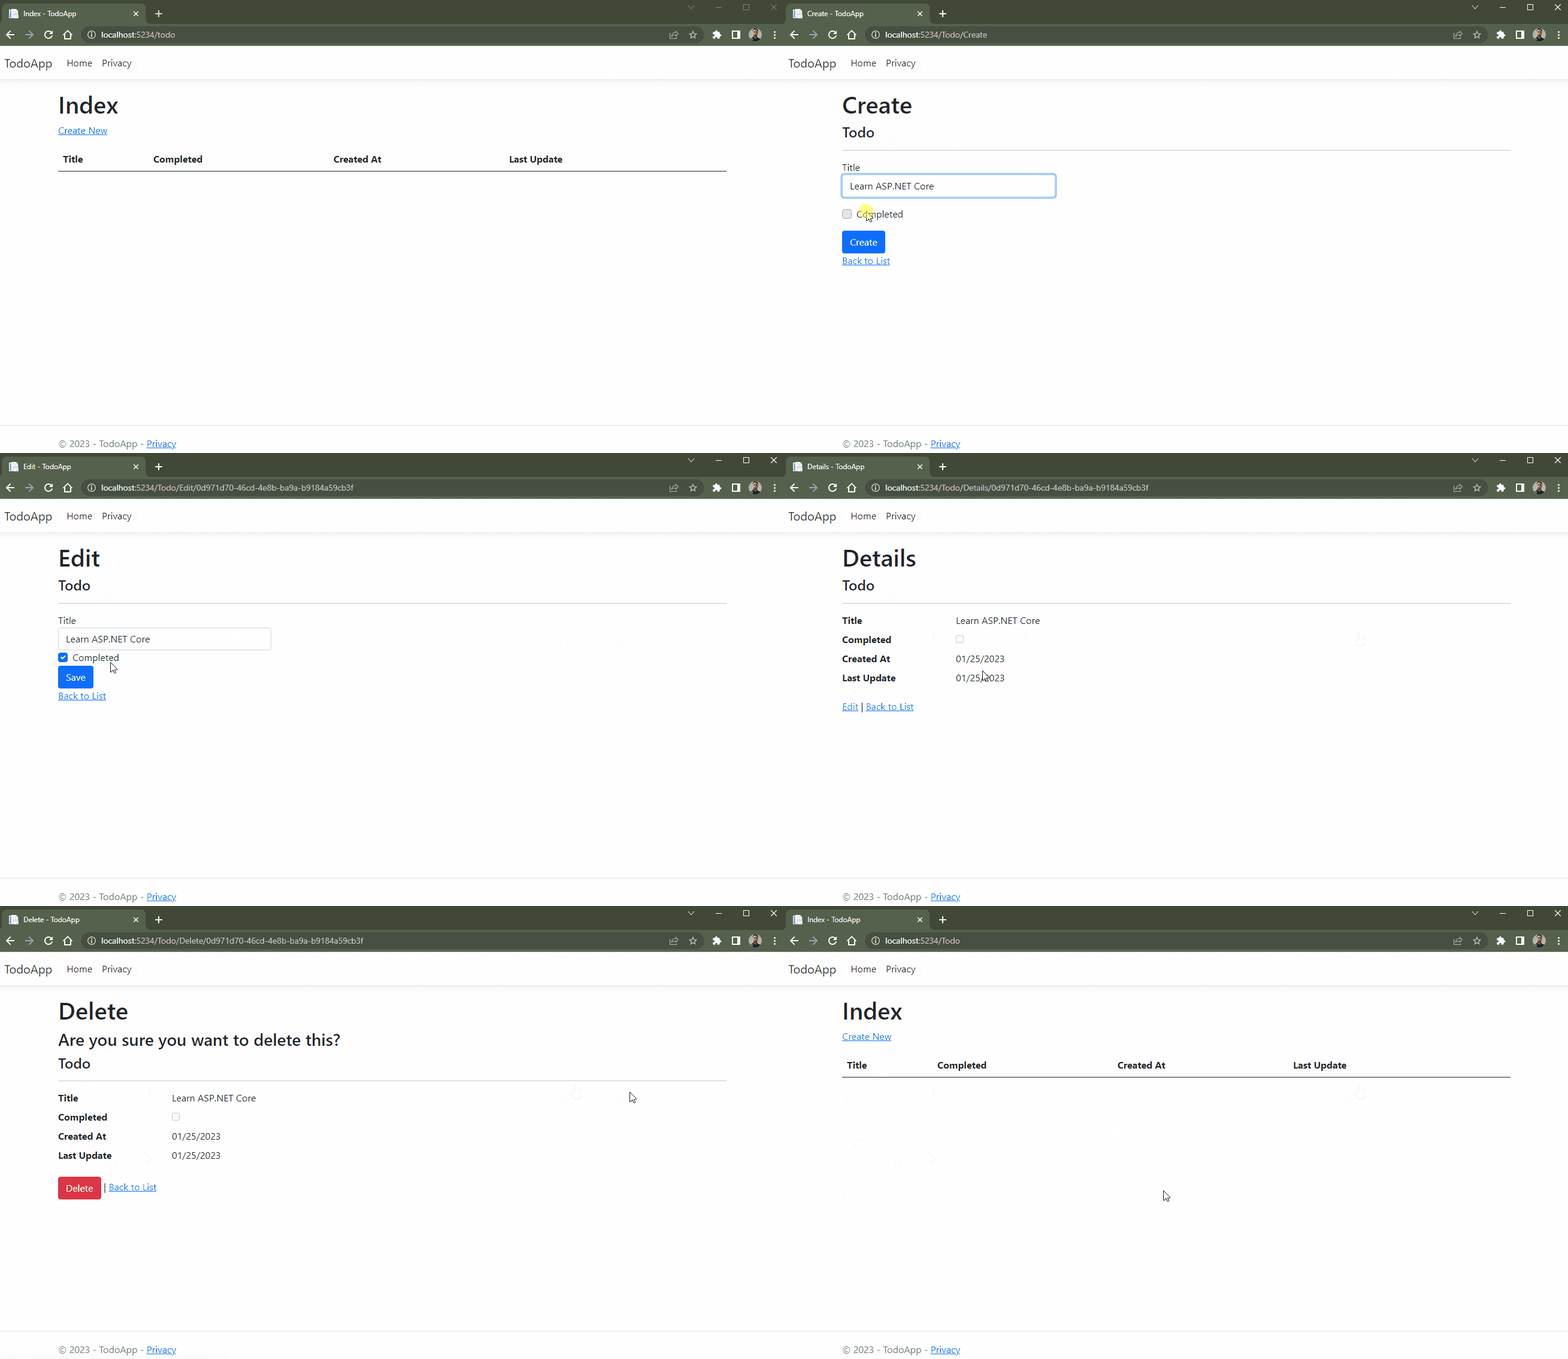
The application that we are going to create is a simple but well-known task list, which serves to record task reminders, with completion status. In the end, it will look like this:
Prerequisites
To develop in .NET, it is necessary to have the .NET SDK (Software Development Kit) installed. You can download the .NET SDK here. In this article, we’ll use version 7.0. (You’ll need to reopen VS Code after you install SDK.)
It is also necessary to have EF Core installed globally. If you don’t already have it, you’ll use the command below in the VS Code terminal. The shortcut to open a new terminal is Ctrl (or Command)
+ Shift + backtick (`), or access it by clicking on the top menu Terminal –> New Terminal. Then execute the following command:
dotnet tool install --global dotnet-ef
It is also necessary to install the code generator globally, which will be used later. So, run the command below in the terminal:
dotnet tool install -g dotnet-aspnet-codegenerator
Creating the Base Application
To create the application, inside the VS Code terminal, execute the following command:
dotnet new mvc -o TodoApp
The application will be created inside the “TodoApp” folder, so in the terminal, navigate to that folder.
The base application has been created—now let’s download the dependencies that we need to proceed.
💡 You can access the full source code of the project here: Todo App.
Using the NuGet Package Gallery
In VS Code, go to the top menu “View” and click on “Command Palette…” or use the shortcut Ctrl (or Command) + Shift +
P. In the bar that opens, type “NuGet Gallery” and click on the option that appears with “NuGet: Open NuGet Gallery.” This will open the NuGet Gallery tab to download the dependencies.
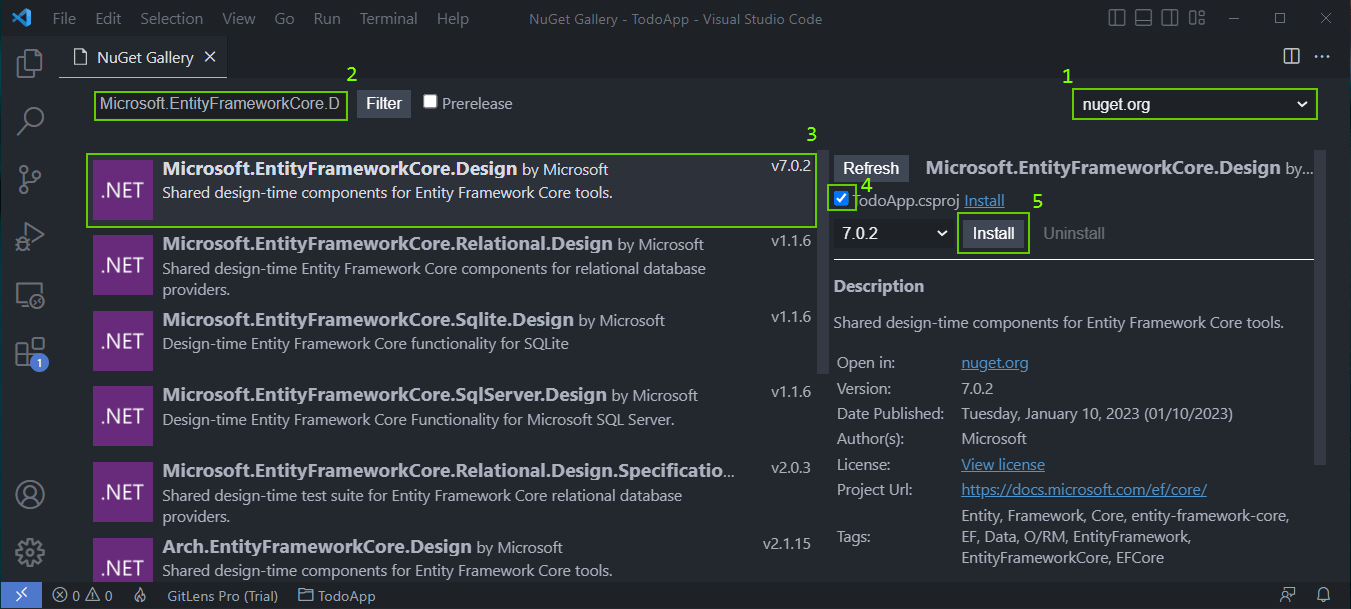
Then in the search bar, search for libraries:
- Microsoft.EntityFrameworkCore.Design
- Microsoft.EntityFrameworkCore.Sqlite
- Microsoft.VisualStudio.Web.CodeGeneration.Design
For each library, click on the library option that appears, then check the “TodoApp.csproj” checkbox and Install. The library will be downloaded in the project. You can check the step-by-step in the image below:
Creating the Model Class
We need to create a model class, which will represent the Todo entity and will be used later on to generate the database and other EF Core functions.
Navigate to the Models folder by going to File > Open Folder. Find your TodoApp folder, which should have a Models folder in it. Hit Select Folder, and then inside the Models folder, add a new file called Todo.cs. This creates a class, to which we will add:
- Todo.cs
using System.ComponentModel.DataAnnotations;
using System.ComponentModel;
namespace TodoApp.Models;

public class Todo {
    public Guid Id { get; set; }

    [DisplayName("Title")]
    [Required(ErrorMessage = "Title is required")]
    public string? Title { get; set; }

    [DisplayName("Completed")]
    public bool Done { get; set; }

    [DisplayName("Created At")]
    public DateTime CreatedAt { get; set; } = DateTime.Now;

    [DisplayName("Last Update")]
    public DateTime LastUpdate { get; set; } = DateTime.Now;
}
Generating the New Controller and CRUD Functions
Through ASP.NET Core MVC using just a few commands it is possible to:
- Create .cshtml pages for all functions (Create, Edit, Delete and Details).
- Create the Database and the context class.
- Create the controller with all CRUD functions.
- Make the communication between .cshtml pages and the API.
To do this, we must execute some commands executed in an open terminal inside the “TodoApp” folder, which is where the project files are—otherwise an error will result.
So, in the terminal, run the following commands:
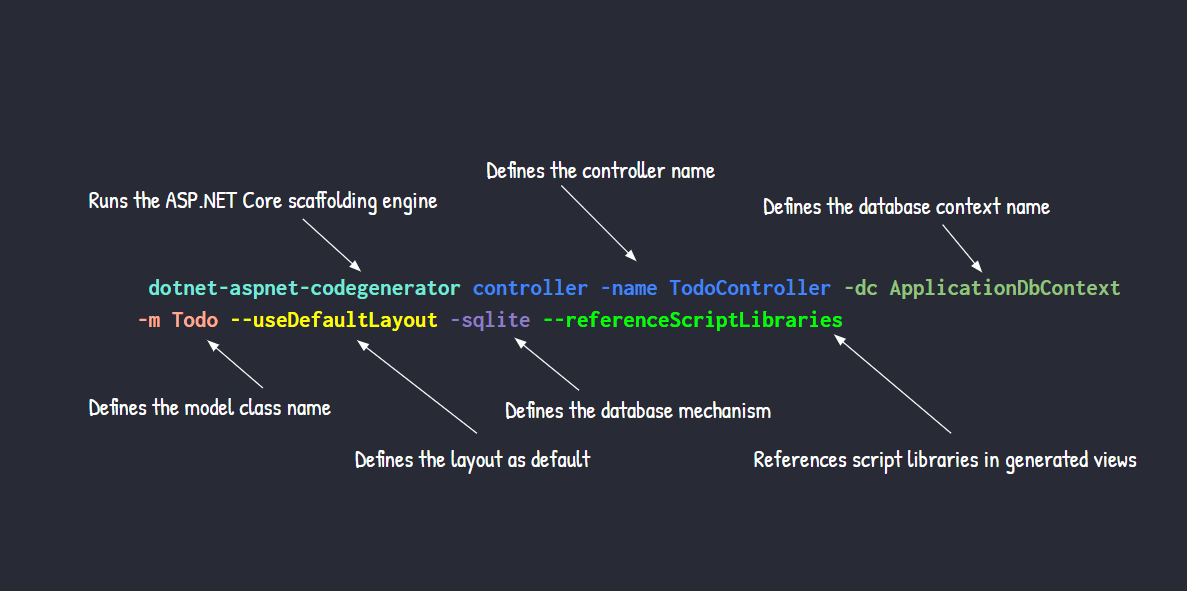
dotnet-aspnet-codegenerator controller -name TodoController -dc ApplicationDbContext -m Todo --useDefaultLayout -sqlite --referenceScriptLibraries
In the following image you can check the function of each of the executed commands:
If the commands were executed successfully, you can see that some files were created, among them the TodoController and the .cshtml pages in the TodoApp -> Views -> Todo folder.
💡 The “TodoController.cs” file is created at the root of the project, you must move it into the “Controllers” folder. In VS Code just click on the file and drag it.
Running the EF Core Commands
EF Core commands will create the table we need for the application based on the model class. In the terminal run the following commands:
To create the migration files:
dotnet ef migrations add InitialModel
To run the migration commands:
dotnet ef database update
Note that after running the commands, the migration files can be found inside the Migrations folder.
Removing Unnecessary Fields
We need to remove the date fields from the .cshtml pages from the creation and editing functions, as their values are set automatically. So in the folder “Views” -> “Todo” remove the snippet below from the files “Create.cshtml” and “Edit.cshtml”:
 <div class="form-group">
      <label asp-for="CreatedAt" class="control-label"></label>
      <input asp-for="CreatedAt" class="form-control" />
      <span asp-validation-for="CreatedAt" class="text-danger"></span>
 </div>
      <div class="form-group">
      <label asp-for="LastUpdate" class="control-label"></label>
      <input asp-for="LastUpdate" class="form-control" />
      <span asp-validation-for="LastUpdate" class="text-danger"></span>
</div>
Running the Application
Now we have everything we need to run the app locally. In the terminal, run the following command:
dotnet run
Our application is ready! So, in your browser, access the address http://localhost:[PORT]/Todo (replace [PORT] with the localhost port that appears in your terminal after running the command), and use the available functions.
The GIF below demonstrates the CRUD actions being executed in the application.
Conclusion
VS Code is undoubtedly an incredible tool to develop in the vast majority of technologies and as seen throughout the article, it works perfectly with ASP.NET Core.
By using the right extensions, we can squeeze the most out of what VS Code has to offer and have the same features as Visual Studio and more.
So consider using it in your next projects!


