How to Integrate Blazor WebAssembly into an Existing ASP.NET Core Web Application

Summarize with AI:
See how to integrate a Blazor WebAssembly project into an existing ASP.NET Core web application, using familiar C# code files and Razor syntax to implement your web UI.
When you think of developing a user interface for the interactive web, your thoughts may immediately turn to JavaScript. Consequently, for many C# developers, this would mean learning the ins and outs of an entirely new programming language.
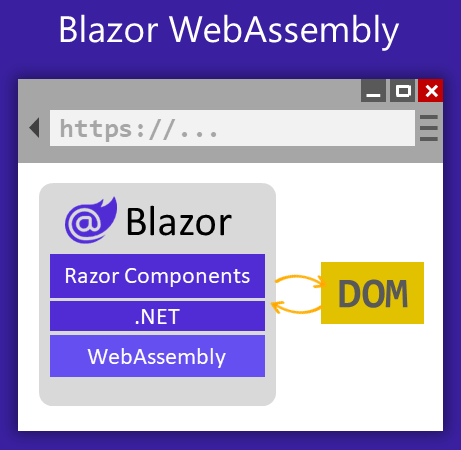
However, this doesn’t have to be the case! Blazor WASM (aka Blazor WebAssembly) allows developers to implement web user interfaces using familiar C# code files and Razor syntax. These source files are then compiled into byte code for download to run atop the WebAssembly runtime in the client browser, yielding improved runtime performance due to the compilation.
Blazor WebAssembly is a prevalent solution for single-page web applications (or SPAs) that adheres to the typical n-layer pattern of web application development. In the n-layer design, the user interface is implemented separately from the business logic and data access, with the latter two typically deployed as an API service.
Getting started with Blazor WASM in new greenfield projects is simplified as Visual Studio includes templates for Blazor WebAssembly projects, but what happens when you want to integrate Blazor WASM with an existing ASP.NET Core web application? How do we slowly migrate and modernize existing web applications to harness the power of Blazor WASM?
In this article, you will learn how to integrate a Blazor WebAssembly project into an existing ASP.NET Core web application. Furthermore, you’ll learn how to incorporate Progress Telerik UI for Blazor, which provides ready-to-use components for building compelling web user interface experiences with Blazor WebAssembly.
Step 1. Set up the Web Application and Blazor WASM Projects
In this demonstration, we’ll create two projects. The first project is an ASP.NET Core Web Application representing our existing web application. The second project is a Blazor WebAssembly project where we’ll build new Blazor components to integrate into our existing web application.
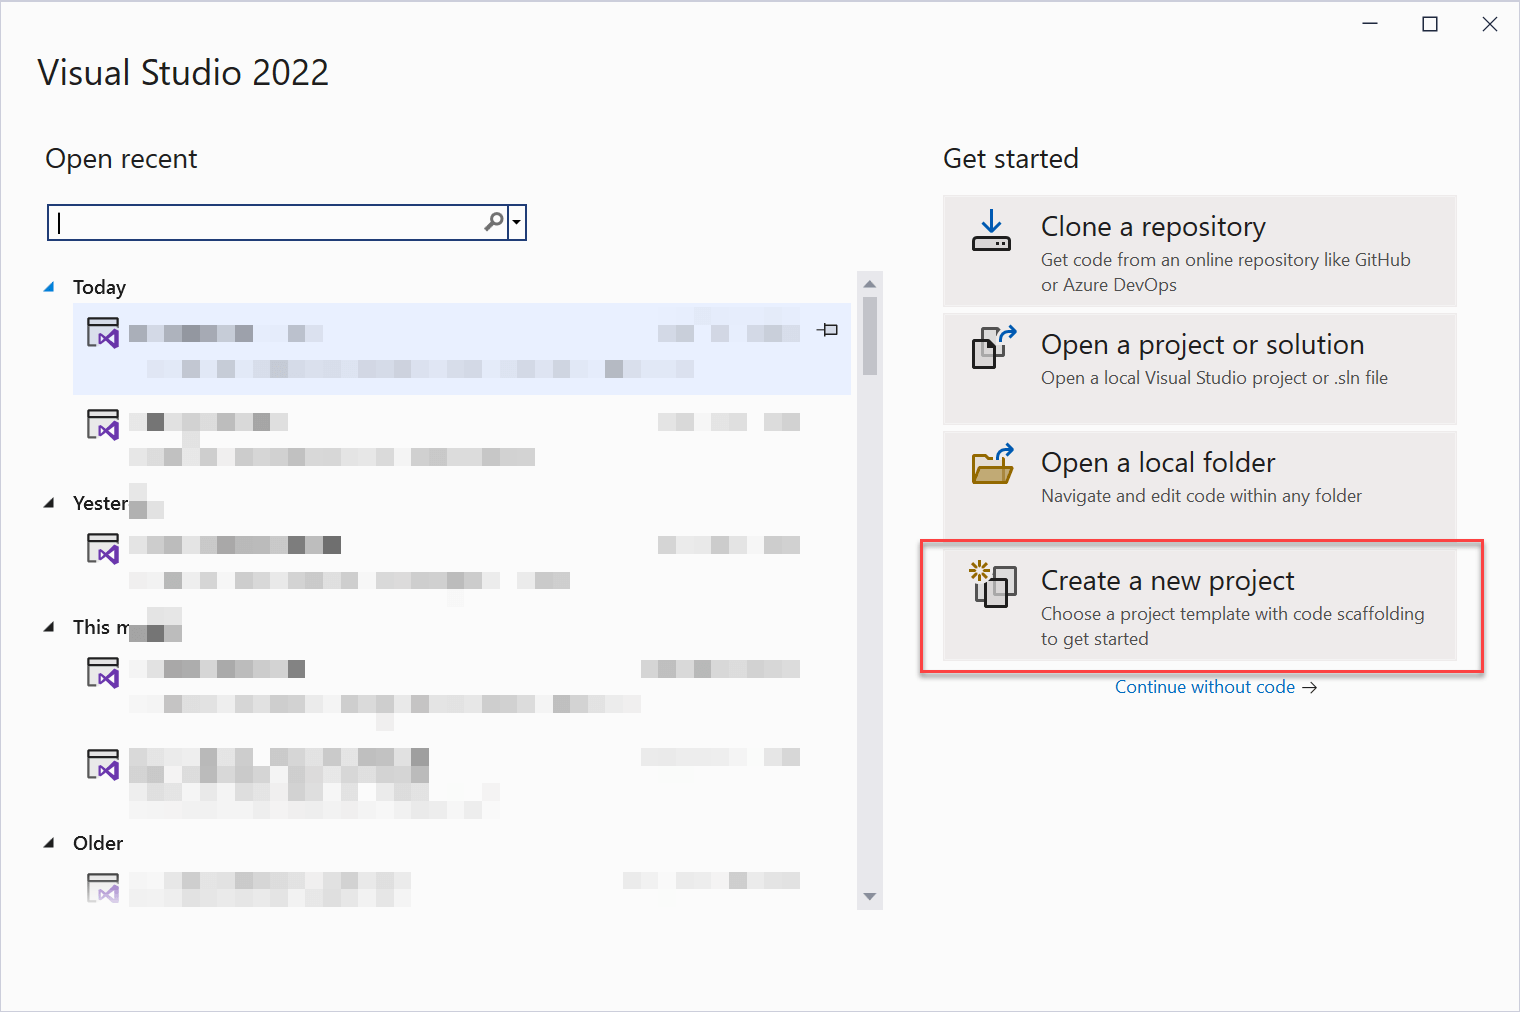
- Open Visual Studio 2022 and choose to
Create a new project.
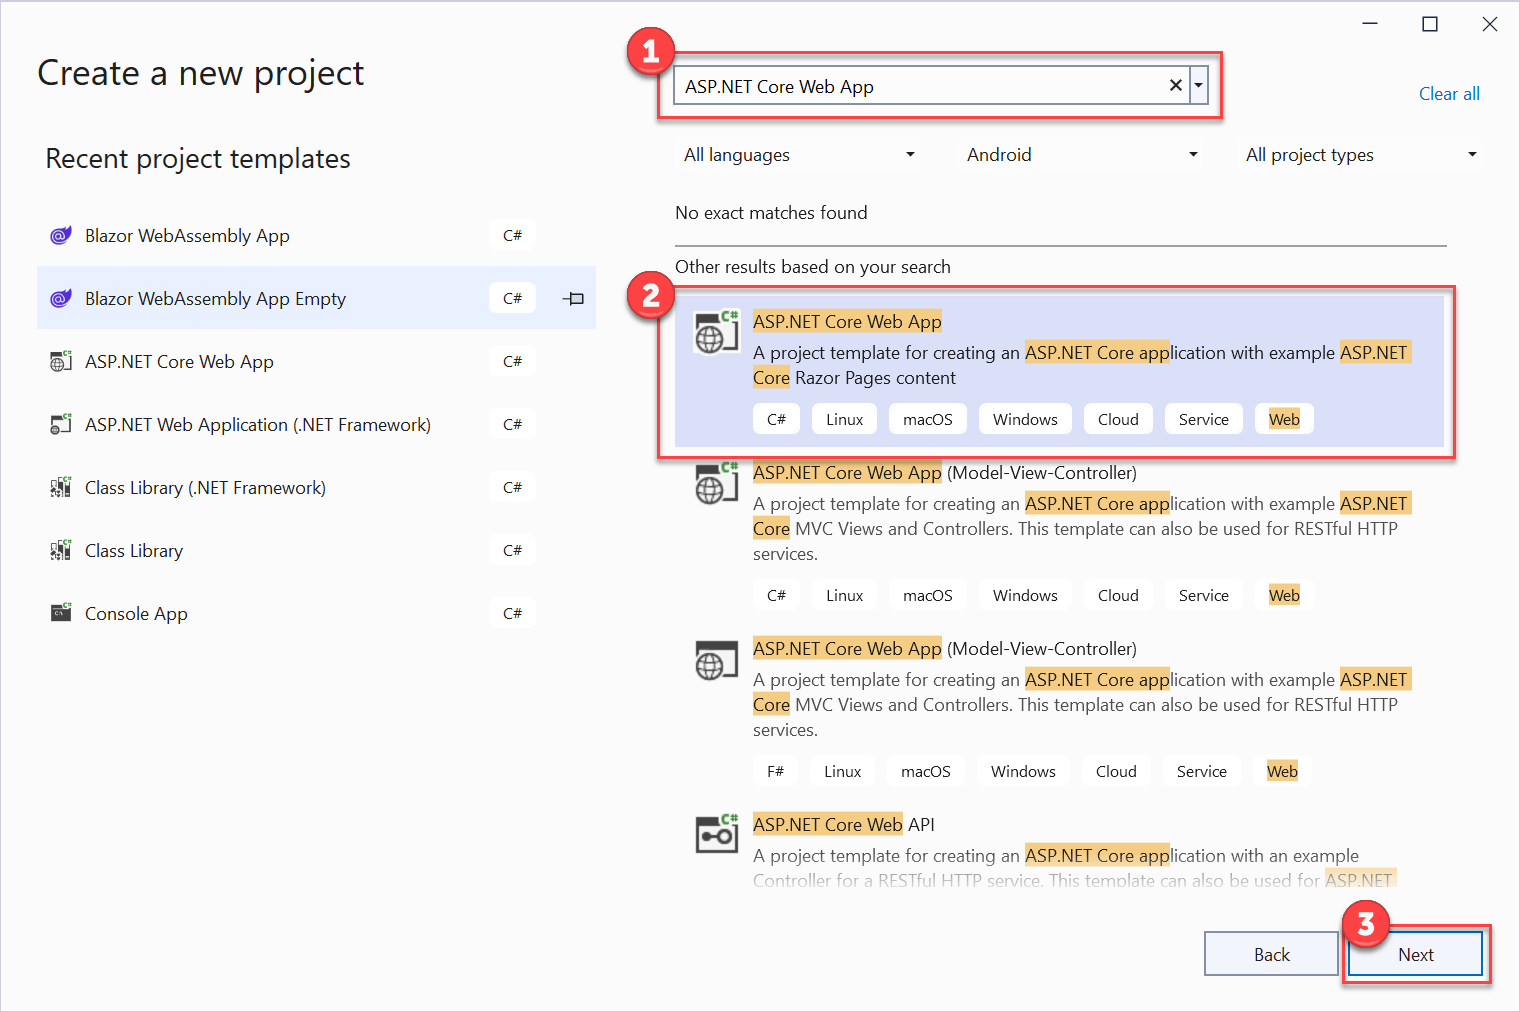
- On the Create a new project dialog, search for and select
ASP.NET Core Web App. Press Next.
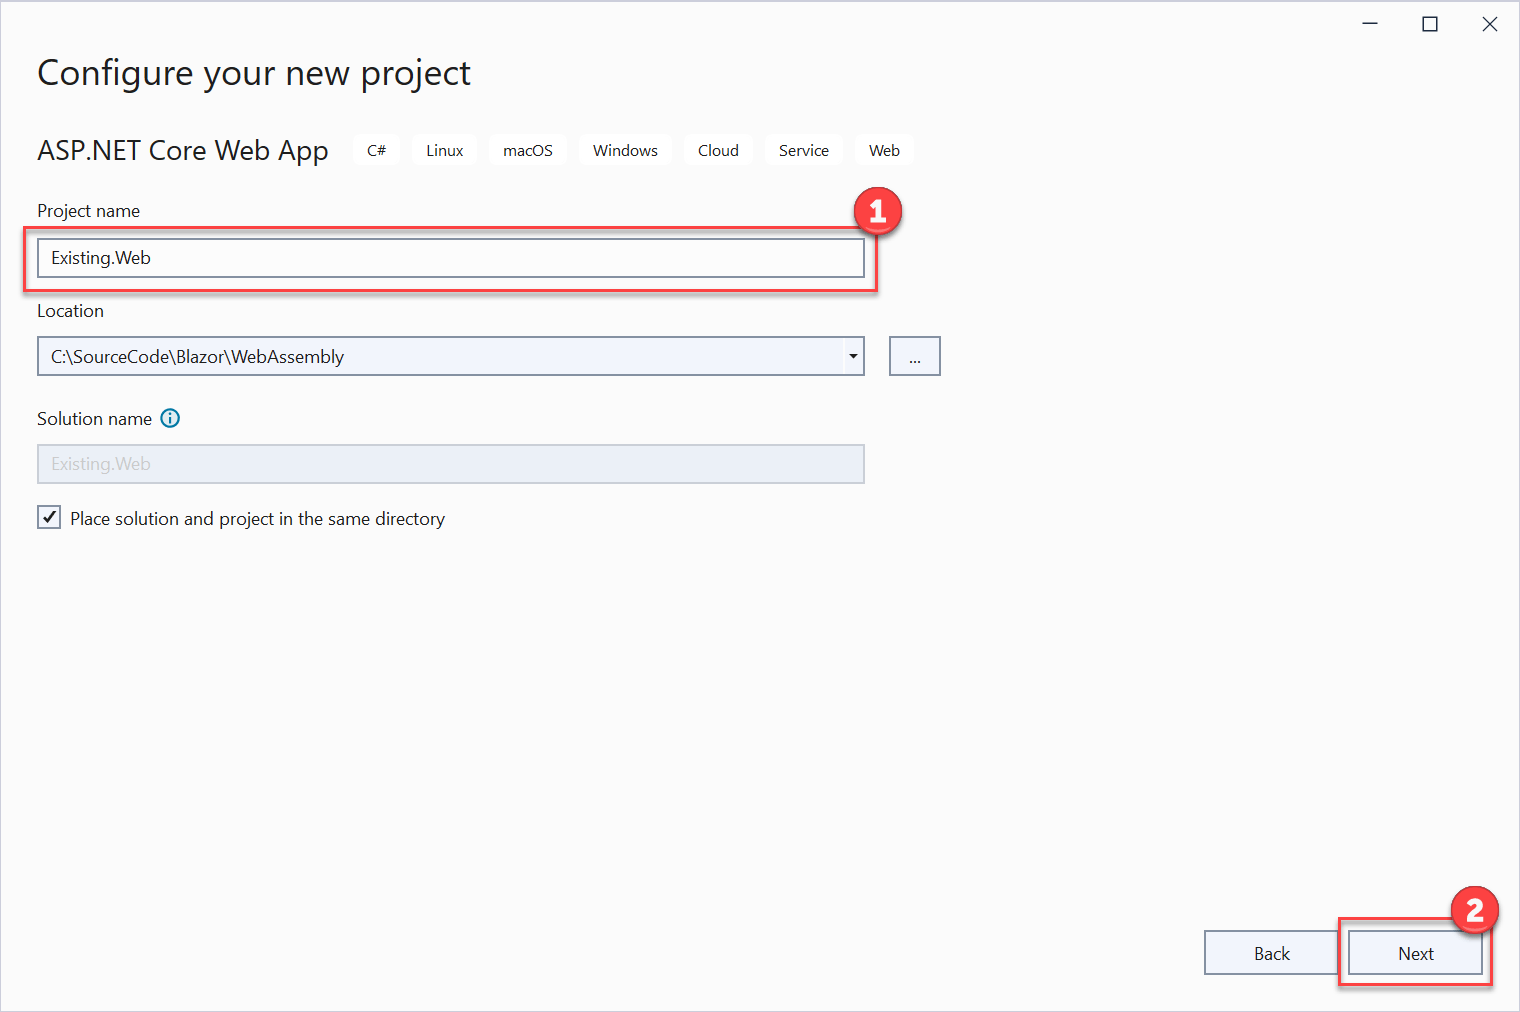
- On the Configure your new project dialog, name the project
Existing.Web, optionally choose the file system location and press Next.
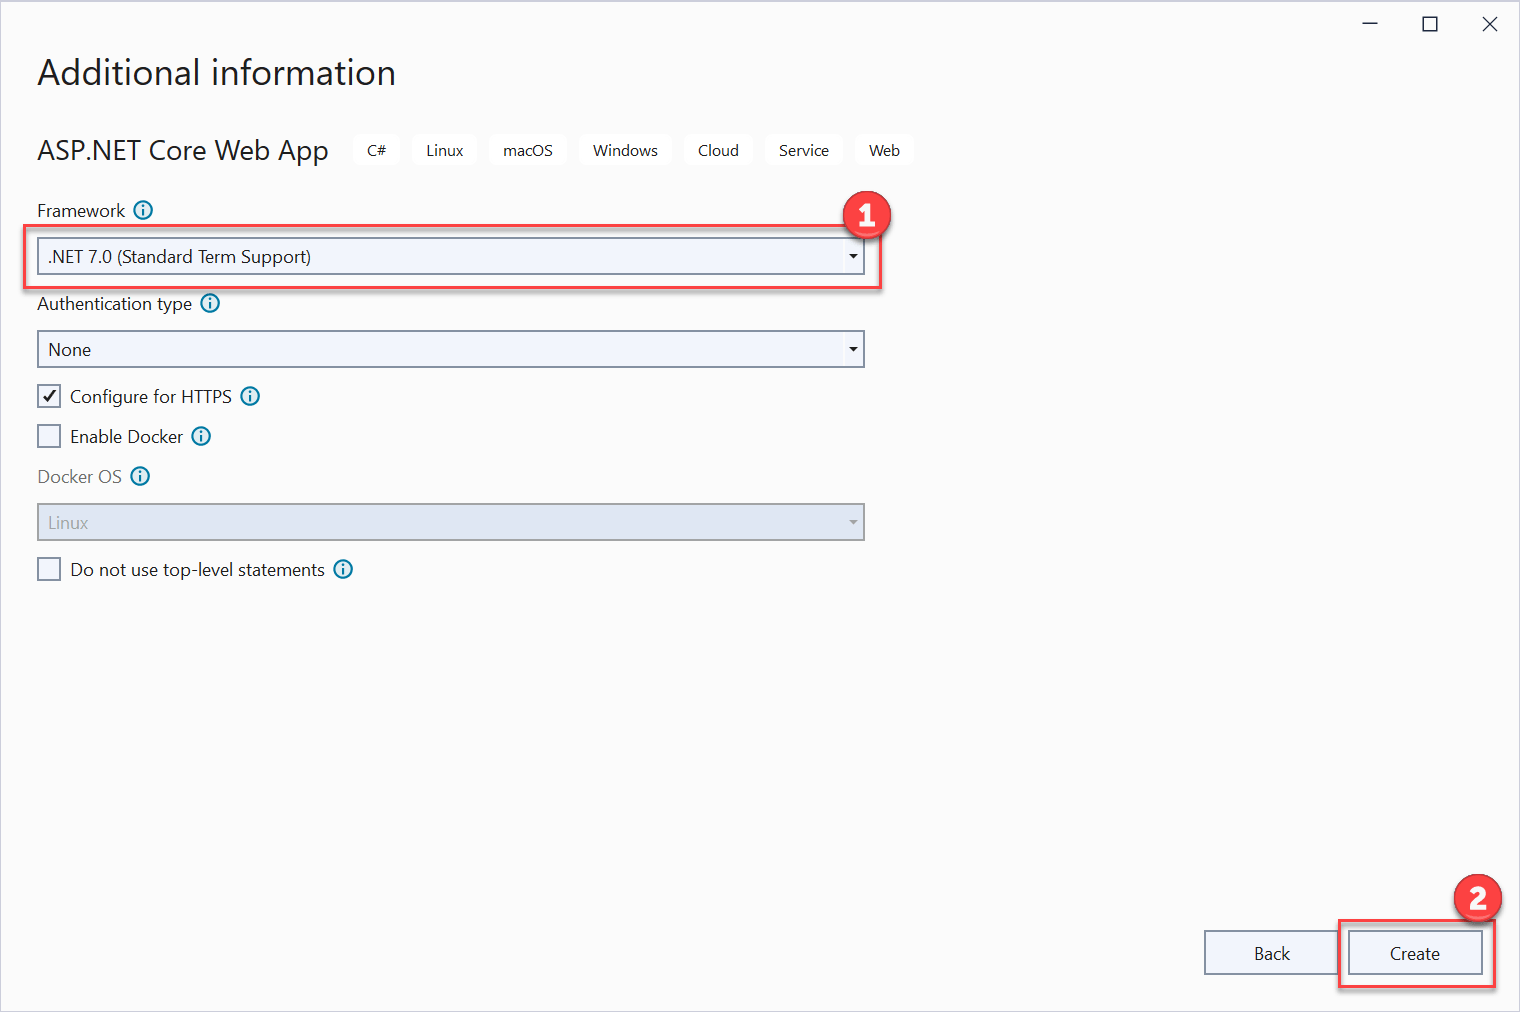
- On the Additional information dialog, select .NET 7.0 (Standard Term Support) for the Framework then press Create.
Note: The guidance in this article will also work with .NET 6.0 projects. .NET 5 is out of support, so it is recommended to upgrade existing applications to at least .NET 6.0 first.
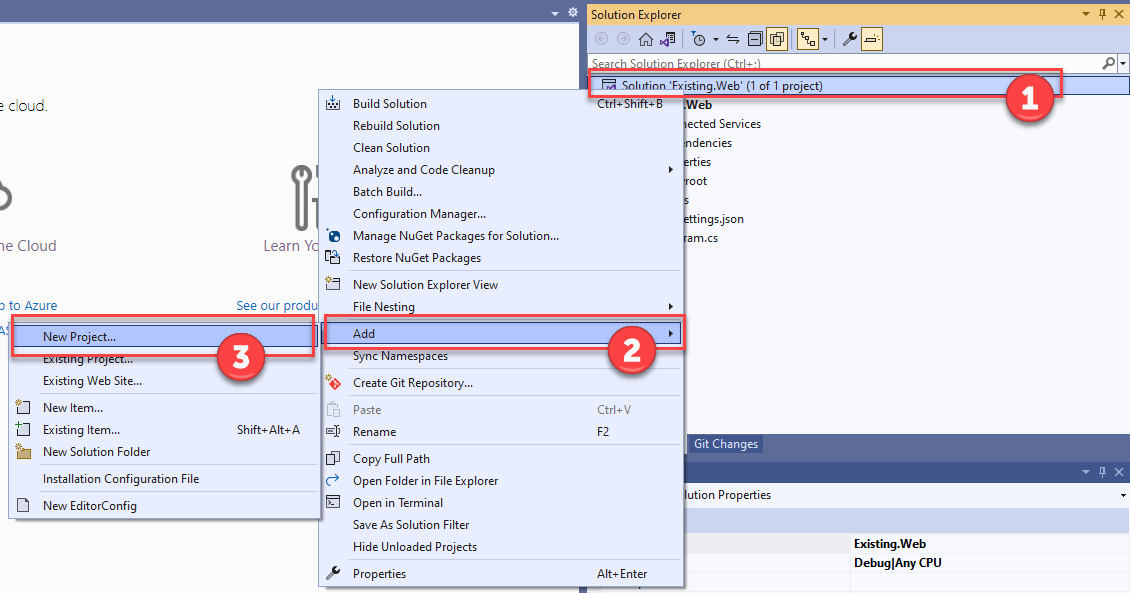
- In the Solution Explorer panel, right-click the solution and expand the Add menu. Select New Project.
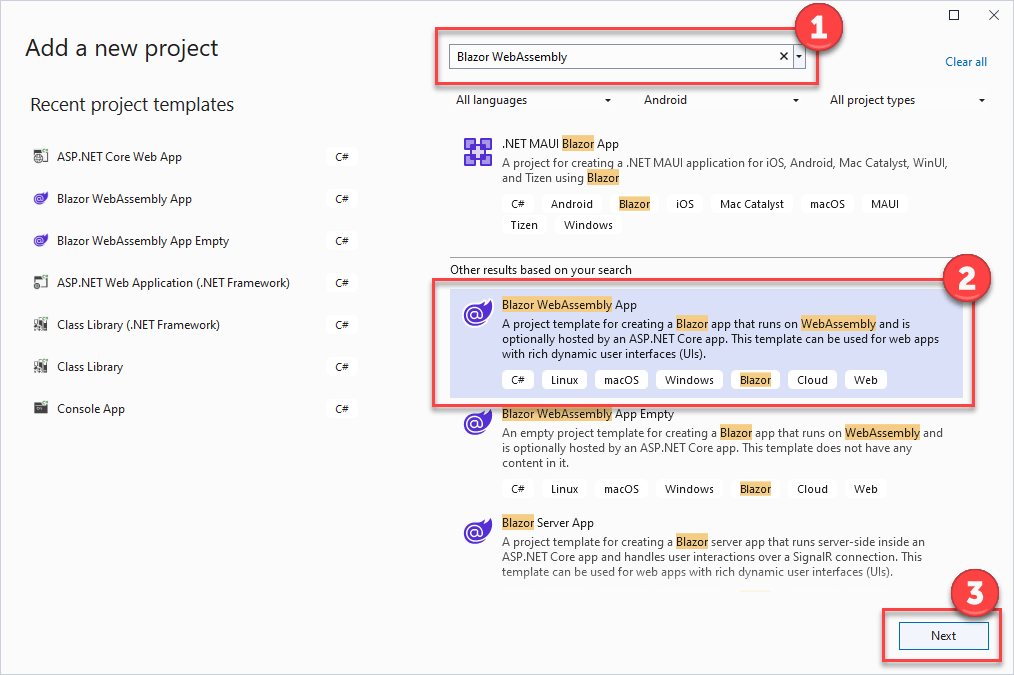
- In the Add new project dialog, search for
Blazor WebAssemblyand select Blazor WebAssembly App from the search results. Press Next.
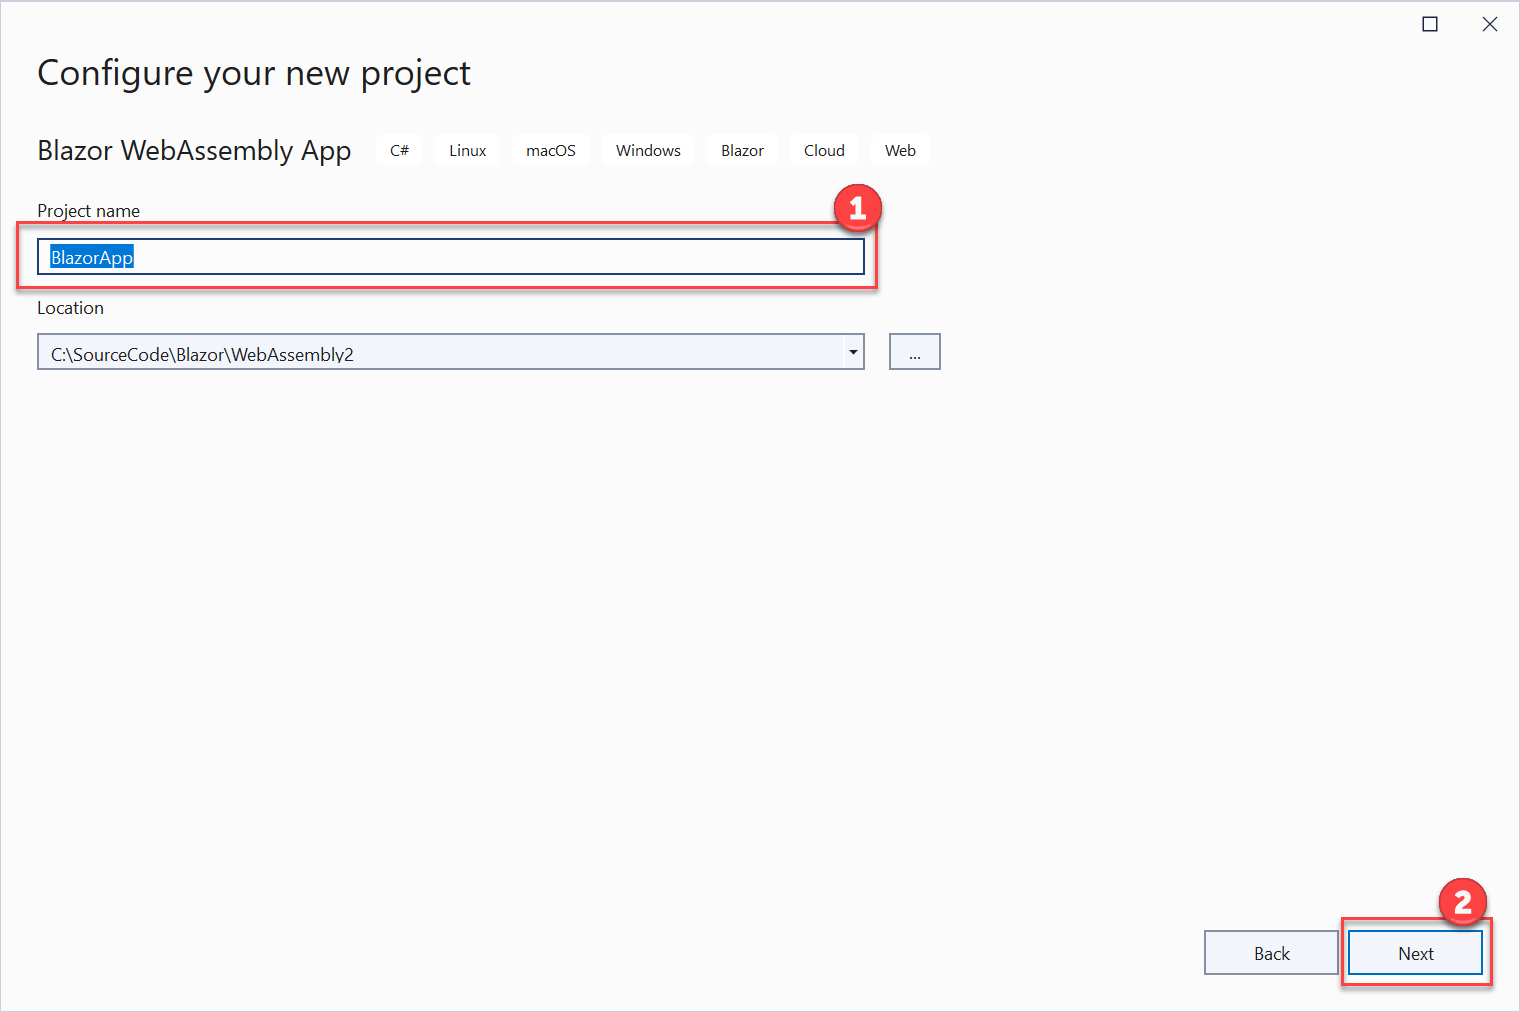
- In the Configure your new project dialog, name the project
BlazorAppand press Next.
- On the Additional information dialog, select .NET 7.0 (Standard Term Support) for the Framework then press Create.
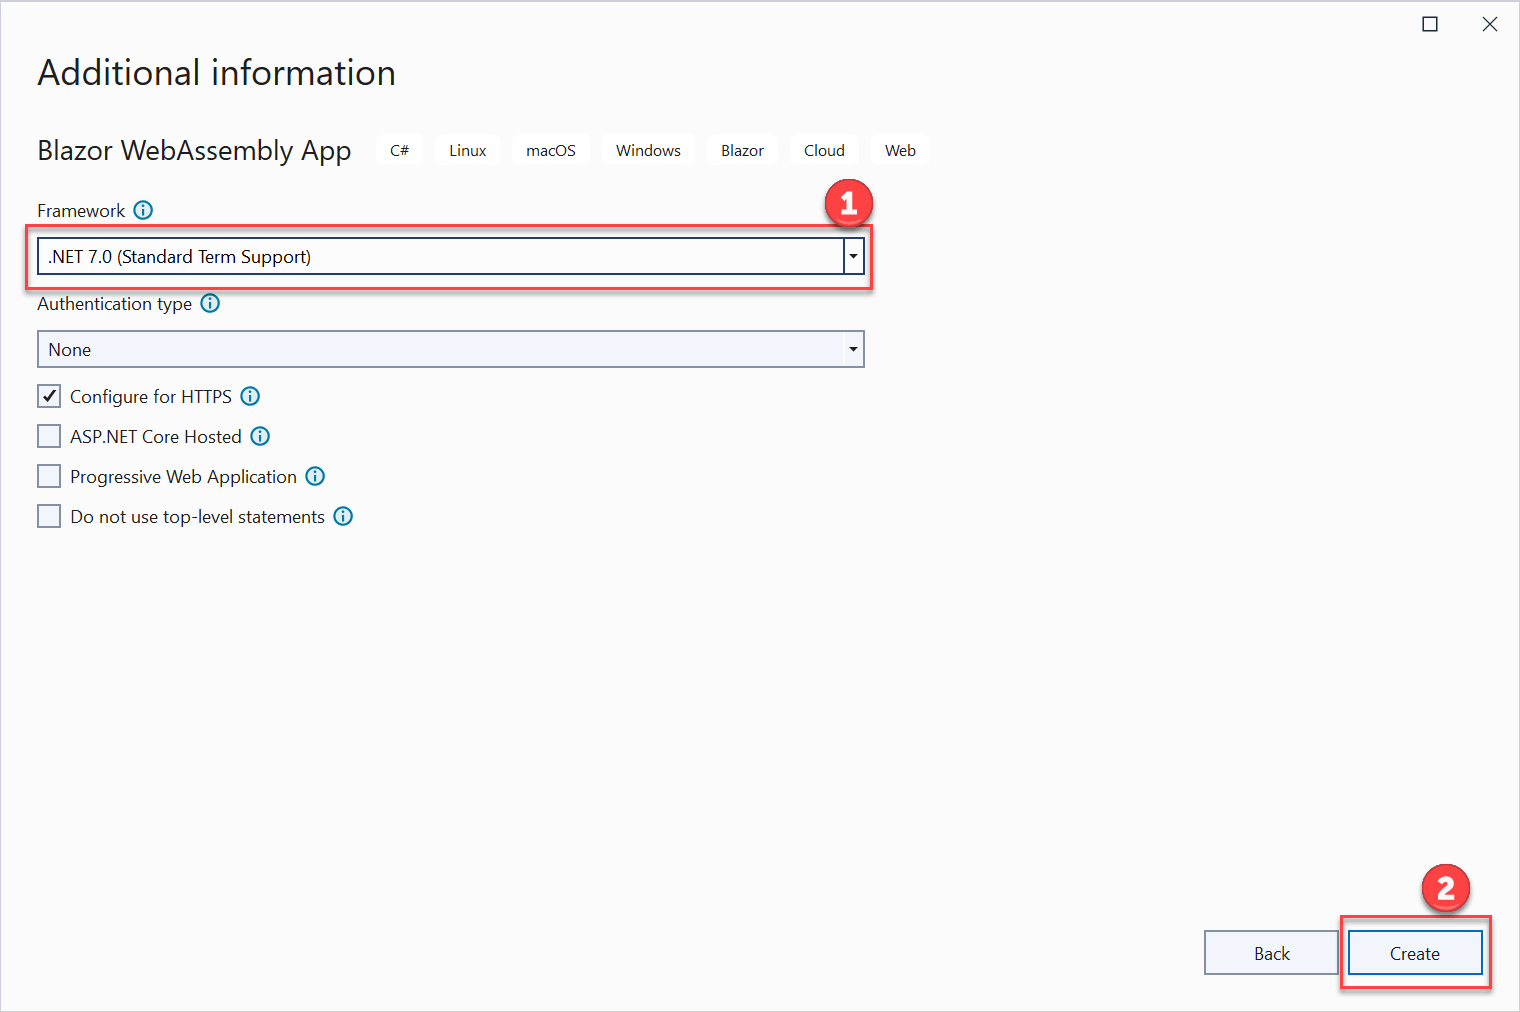
Note: The guidance in this article will also work with .NET 6.0 projects. .NET 5 is out of support, so it is recommended to upgrade existing applications to at least .NET 6.0 first.
Step 2. Prepare the Blazor WebAssembly Application
The Blazor WebAssembly App template generates a single-page application (SPA). Therefore, when the Blazor application runs, it looks for an HTML element with the ID of app to contain and display the running application.
This functionality needs to be disabled as, in this case, we want the existing web application to provide the overall user experience while allowing us to incorporate Blazor components developed in the Blazor WASM project.
In the Solution Explorer panel, locate the BlazorApp project and open the Program.cs file.
In the Program.cs file, comment out the following line of code and save the file:
builder.RootComponents.Add<App>("#app");

Step 3. Prepare the Existing Web Application Project
In order for the existing ASP.NET Core web application to make use of the Blazor Web Assembly components, we will need a project reference, NuGet package and some infrastructure code.
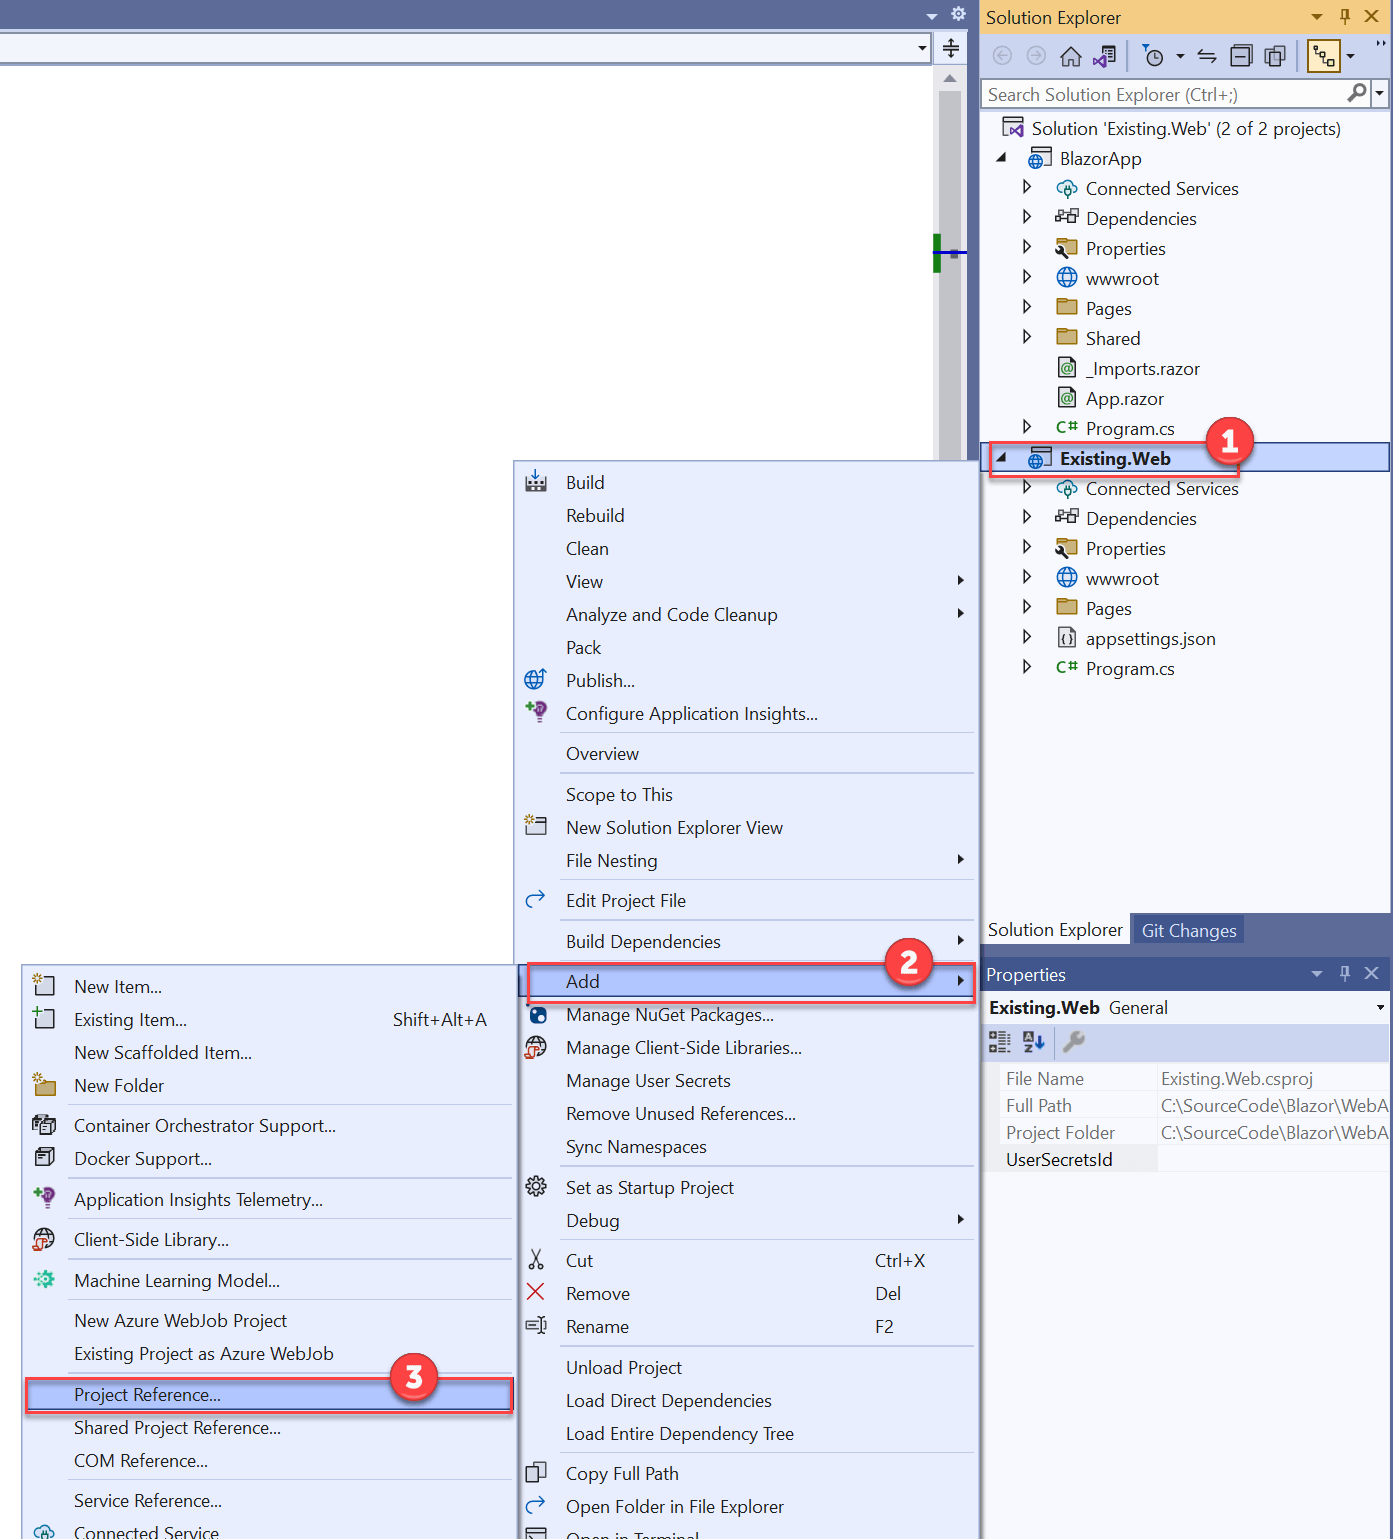
- In the Solution Explorer panel, locate the Existing.Web project then right-click and expand the Add item. Select Project Reference.
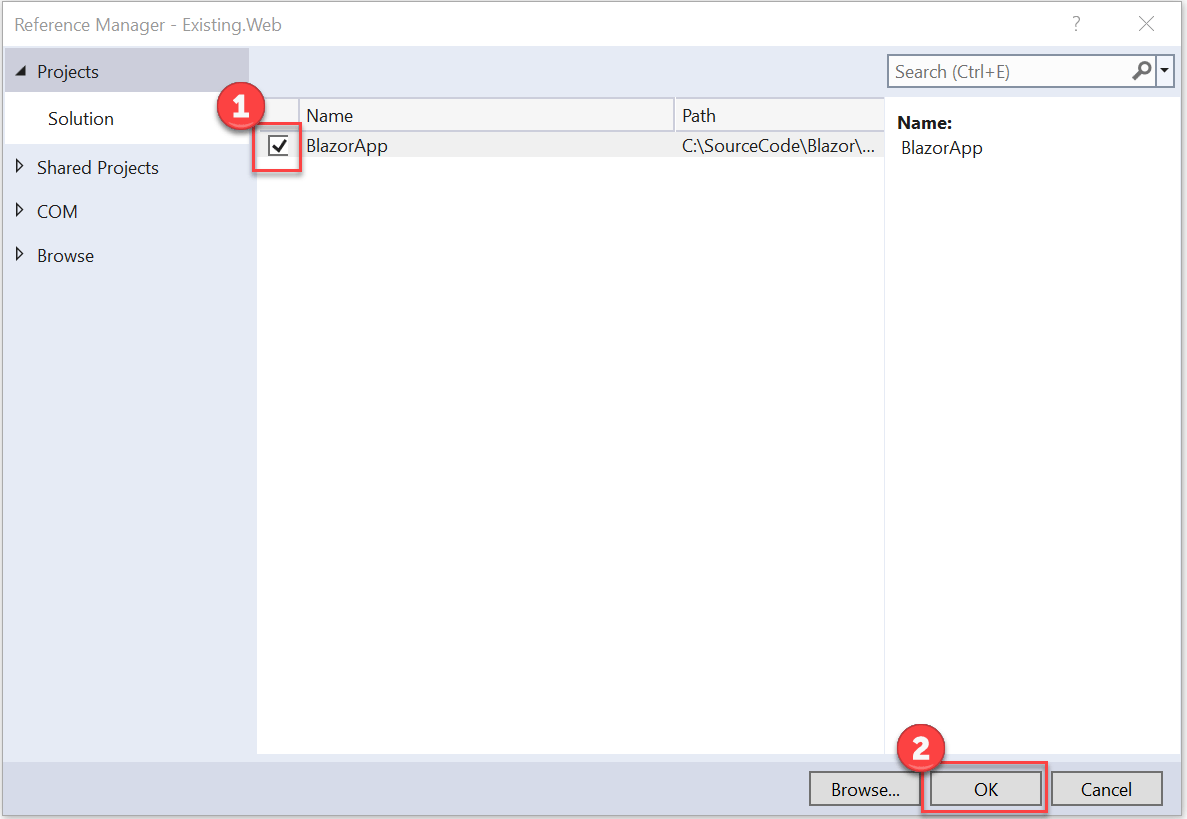
- In the Reference Manager dialog, check the box next to BlazorApp and press OK.
- Right-click the Existing.Web project once more and select Manage NuGet Packages.
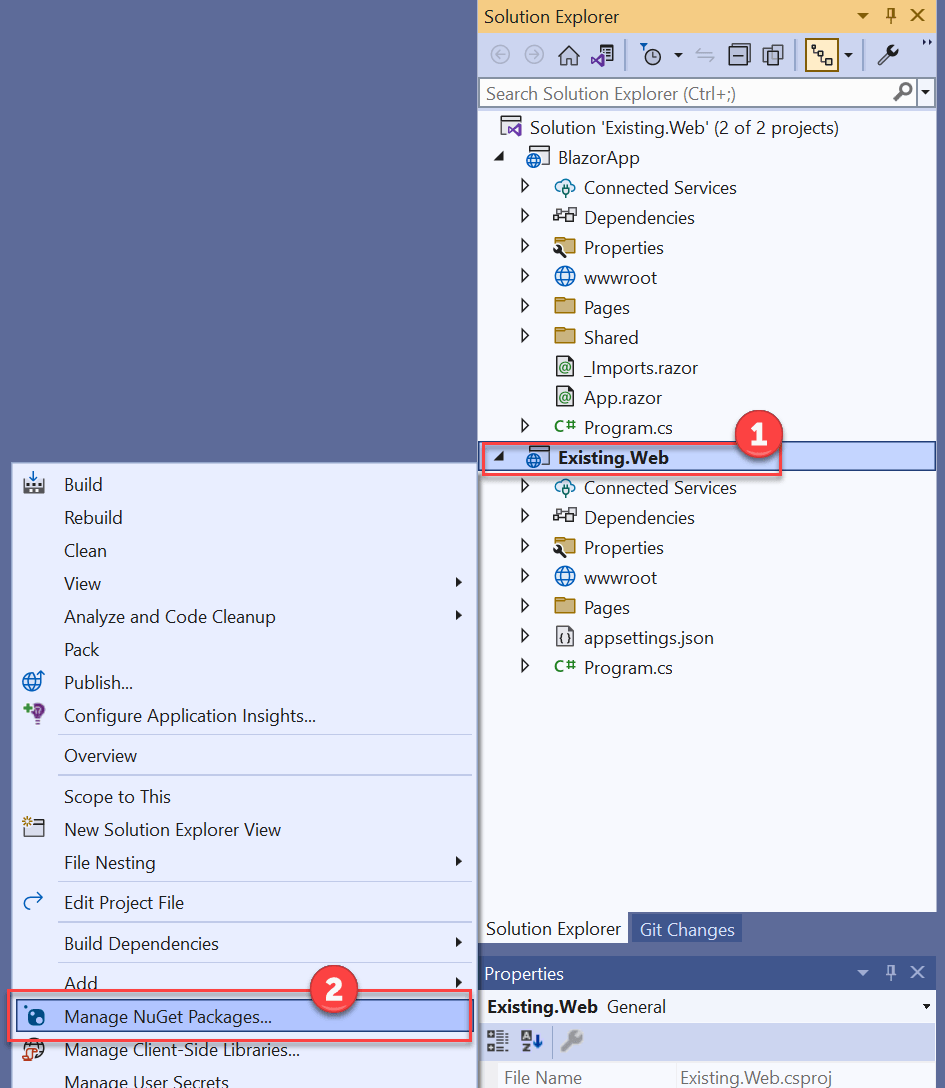
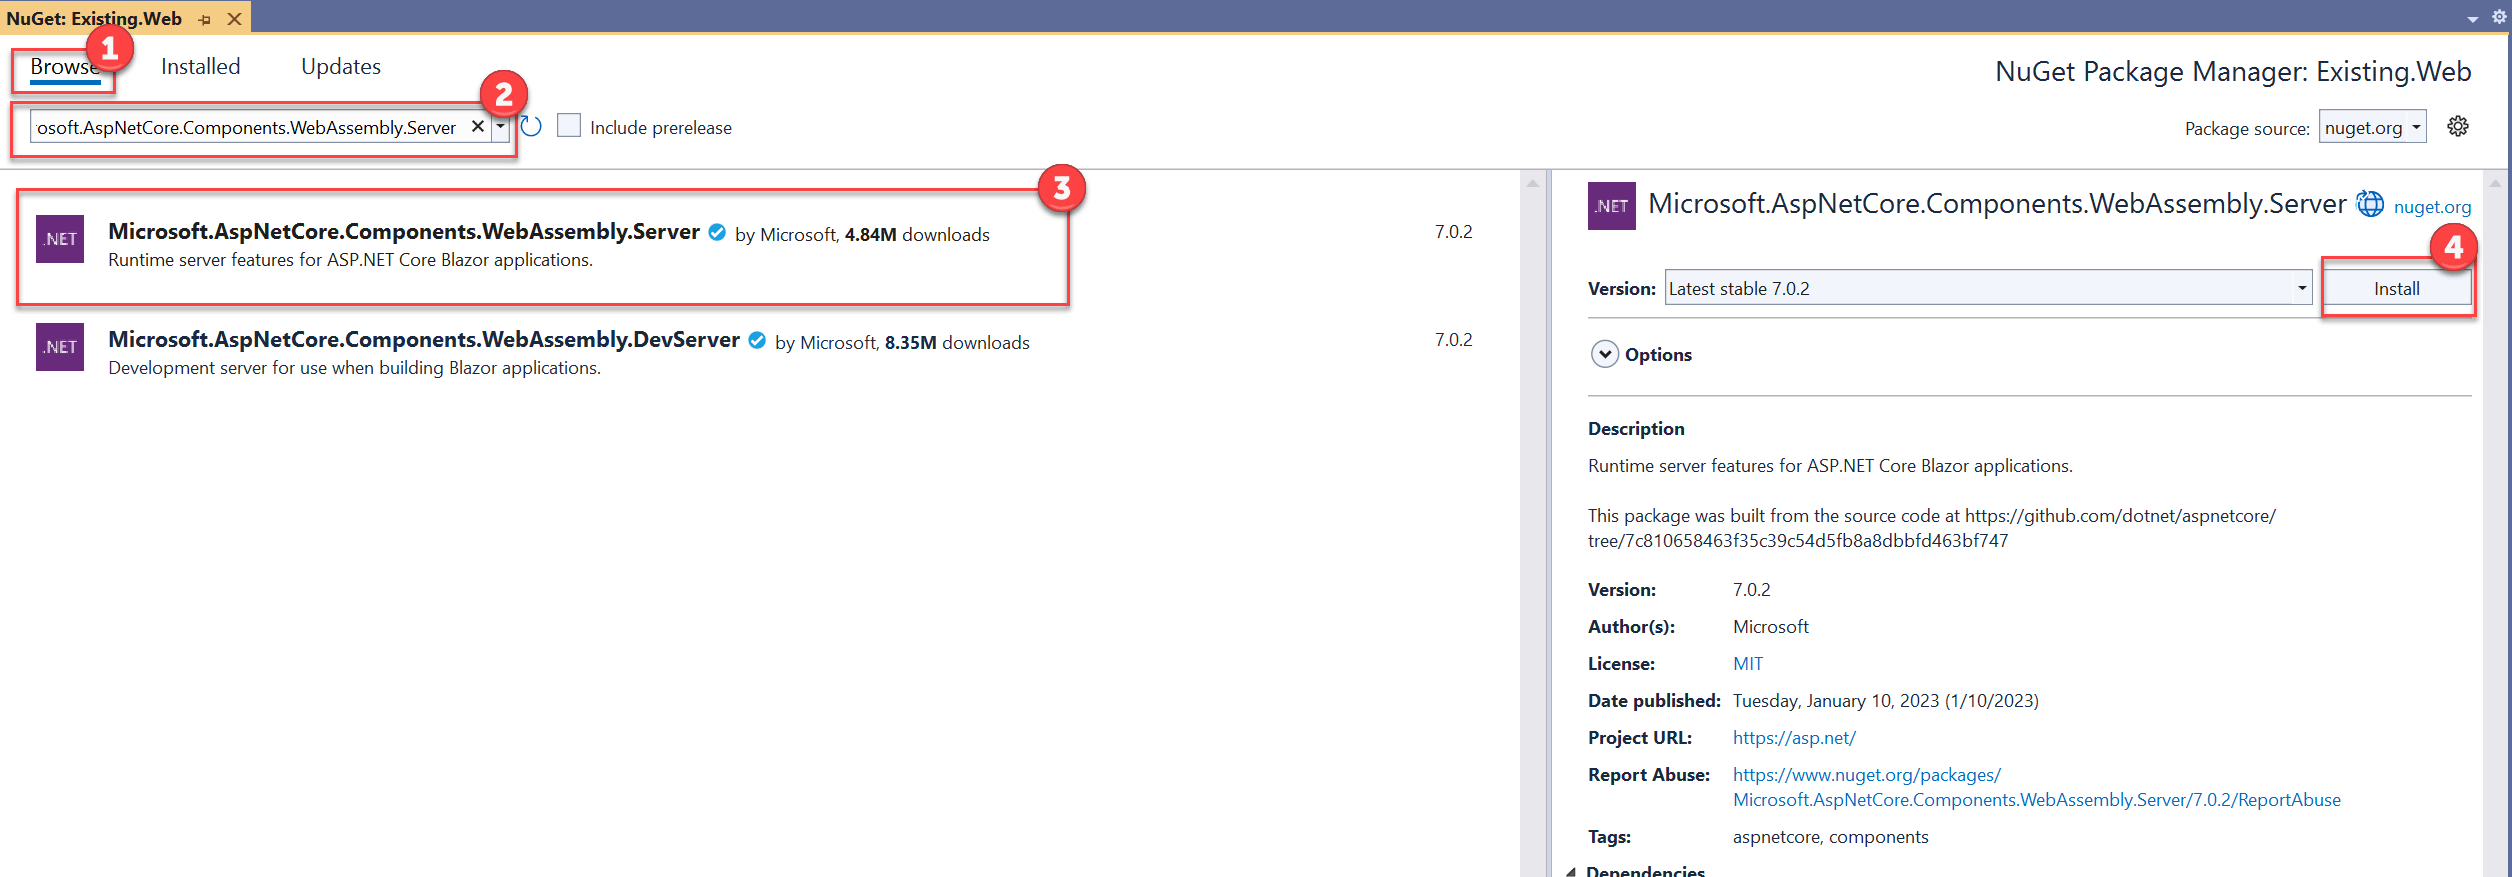
- On the NuGet screen, select the Browse tab and enter
Microsoft.AspNetCore.Components.WebAssembly.Serverinto the search box. Select Microsoft.AspNetCore.Components.WebAssembly.Server from the search results and press Install. Accept any Licenses.
- In the Solution Explorer panel, locate the Existing.Web project and open the Program.cs file.
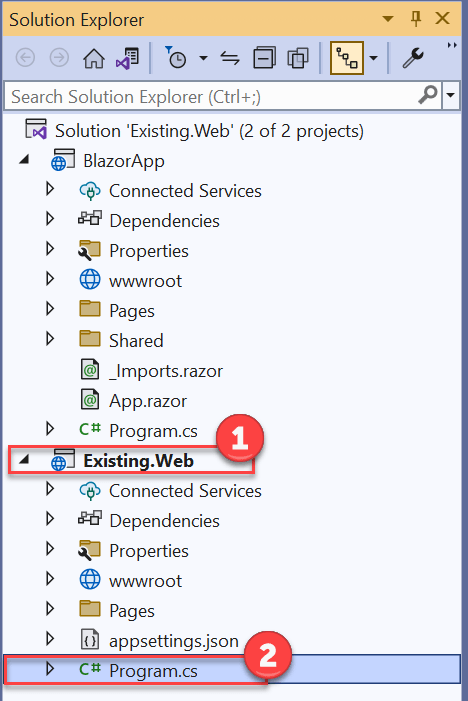
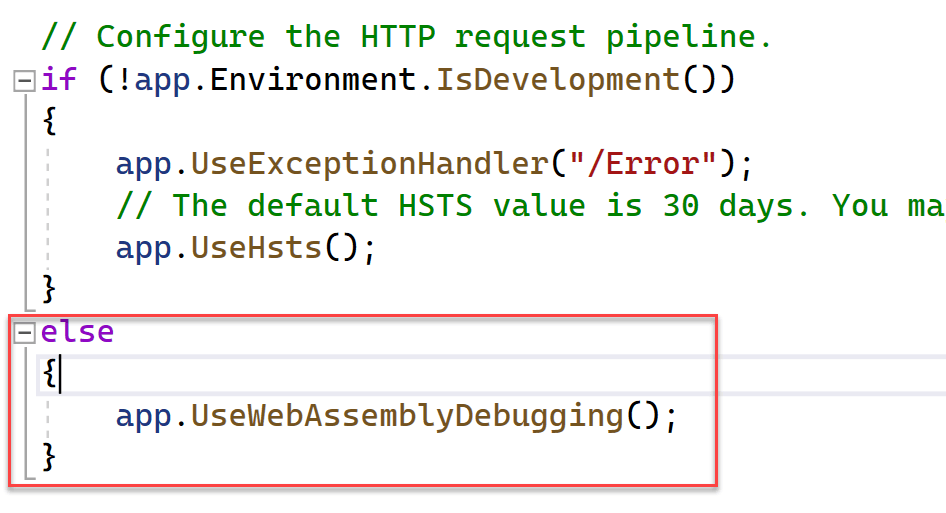
- Add an else condition to the if (!app.Environment.IsDevelopment()) code block with the following code:
else
{
    app.UseWebAssemblyDebugging();
}
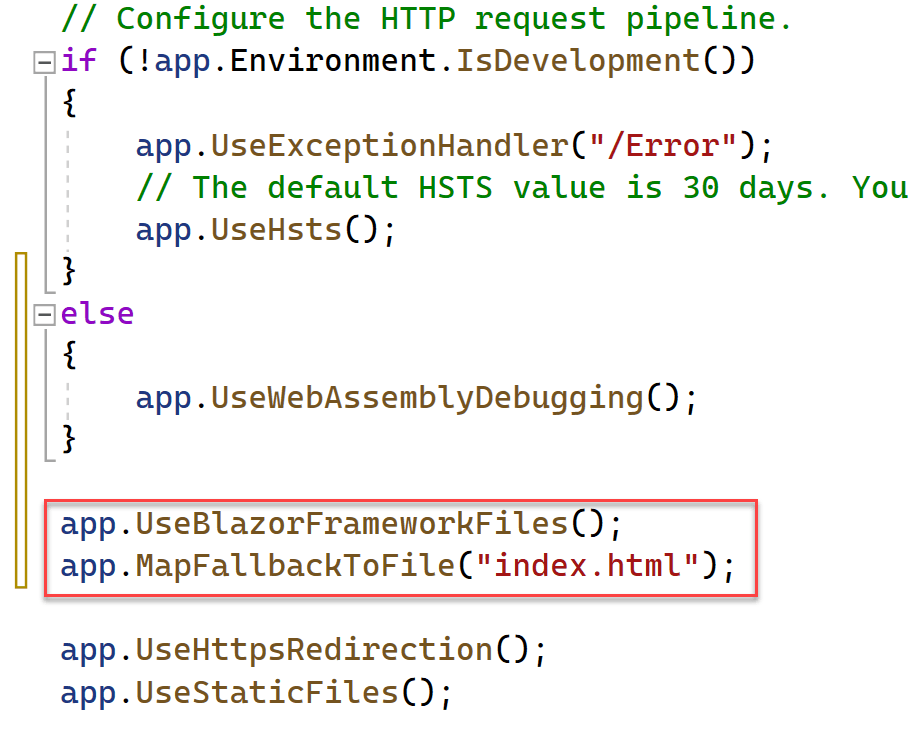
- Directly below the if (!app.Environment.IsDevelopment()) code block, add the following code and save the file:
app.UseBlazorFrameworkFiles();
app.MapFallbackToFile("index.html");
- In the Existing.Web project, expand the Pages folder. Expand the Shared folder, locate and open the _Layout.cshtml file.
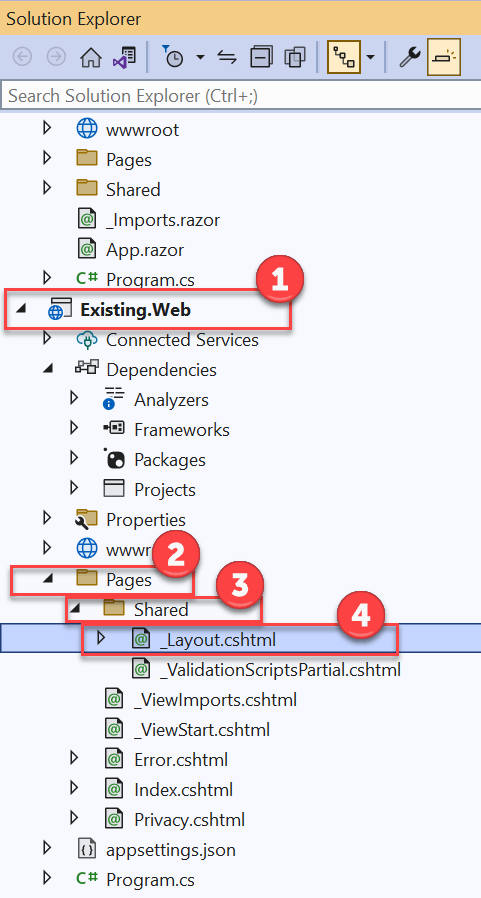
- Locate the script references close to the bottom of the page. Add the following script reference, and save the file:
<script src="_framework/blazor.webassembly.js"></script>

Note: Adding the script to _Layout.cs will allow you to add Blazor components to any view. Alternatively, you can choose to only include the script on each specific view that Blazor components are needed.
Step 4. Add a Blazor Component to a View in the Existing Web Application
The Blazor WebAssembly App project comes with a Counter component scaffolded. We’ll now add this component to a view in our existing ASP.NET Core Web Application (Existing.Web).
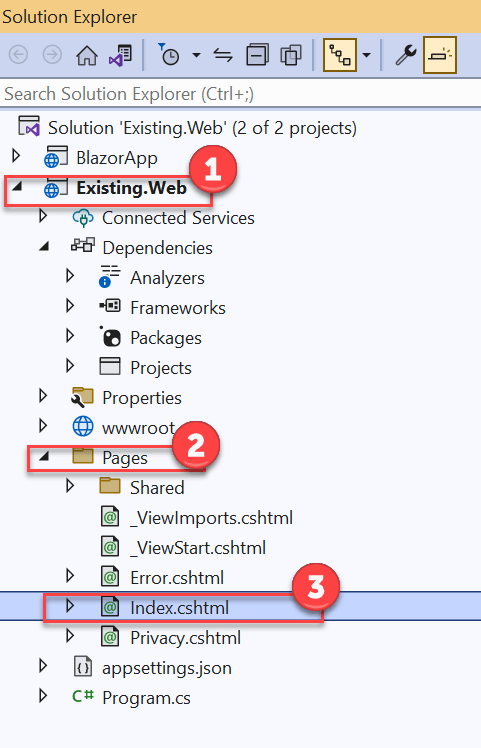
- In Solution Explorer, locate the Existing.Web project and expand the Pages folder. Open the Index.cshtml file. This is the default view that displays when the Existing.Web application is run.
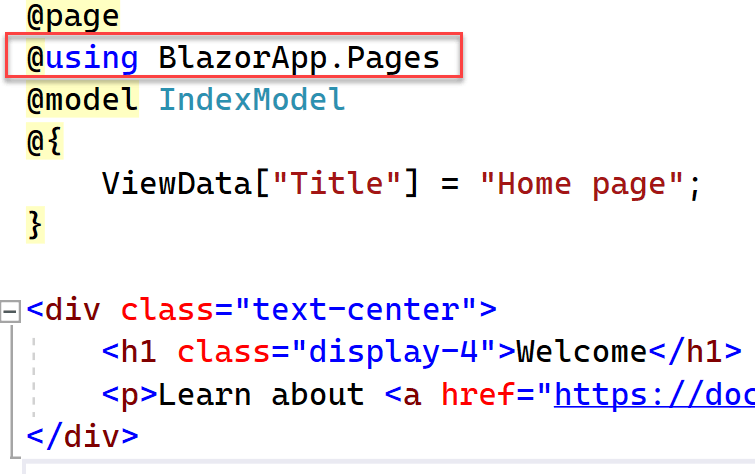
- Directly beneath the @page annotation, add the following using statement to give us access to the Counter component:
@using BlazorApp.Pages
- Beneath the div element, add the following code to include the Counter component in the view:
<component type="typeof(Counter)" render-mode="WebAssemblyPrerendered" />

Step 5. Run the Existing Web Application
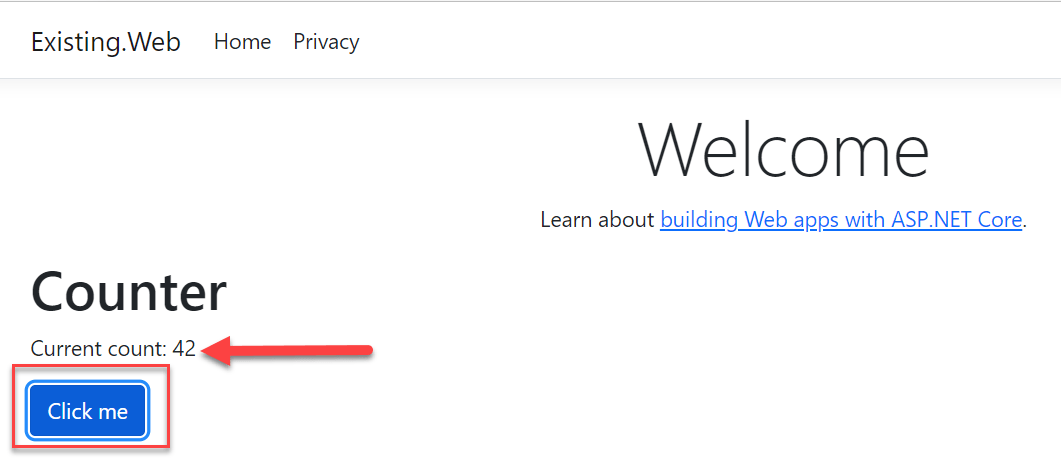
Run the existing web application project and notice how you can interact with the Counter component from the Blazor WebAssembly project.
- In Solution Explorer, right-click the Existing.Web project and select the Set as Startup Project item.
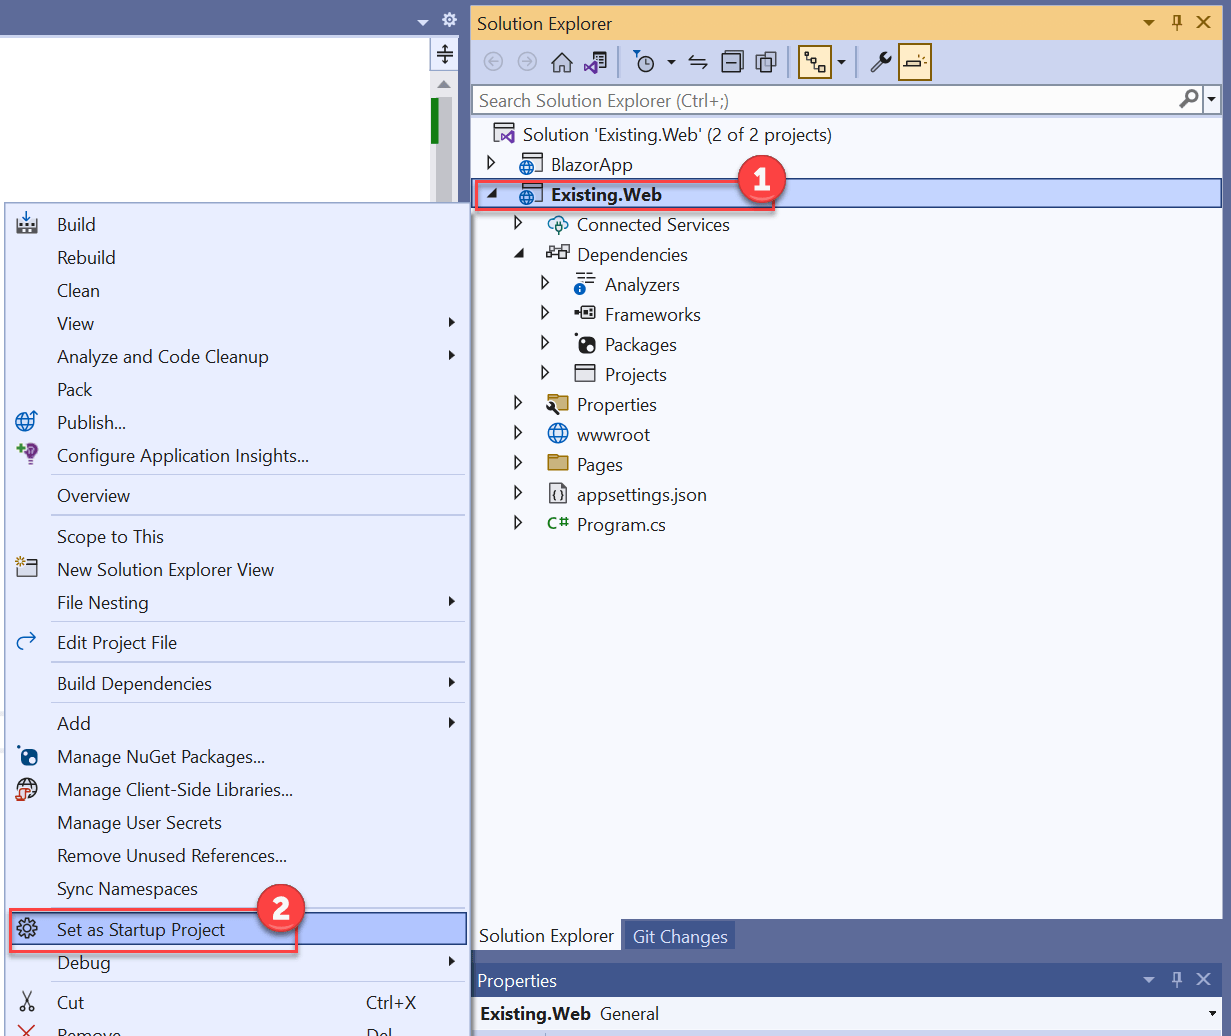
- Right-click the Existing.Web project once more and expand the Debug item. Select Start Without Debugging. This will run the existing web application project.
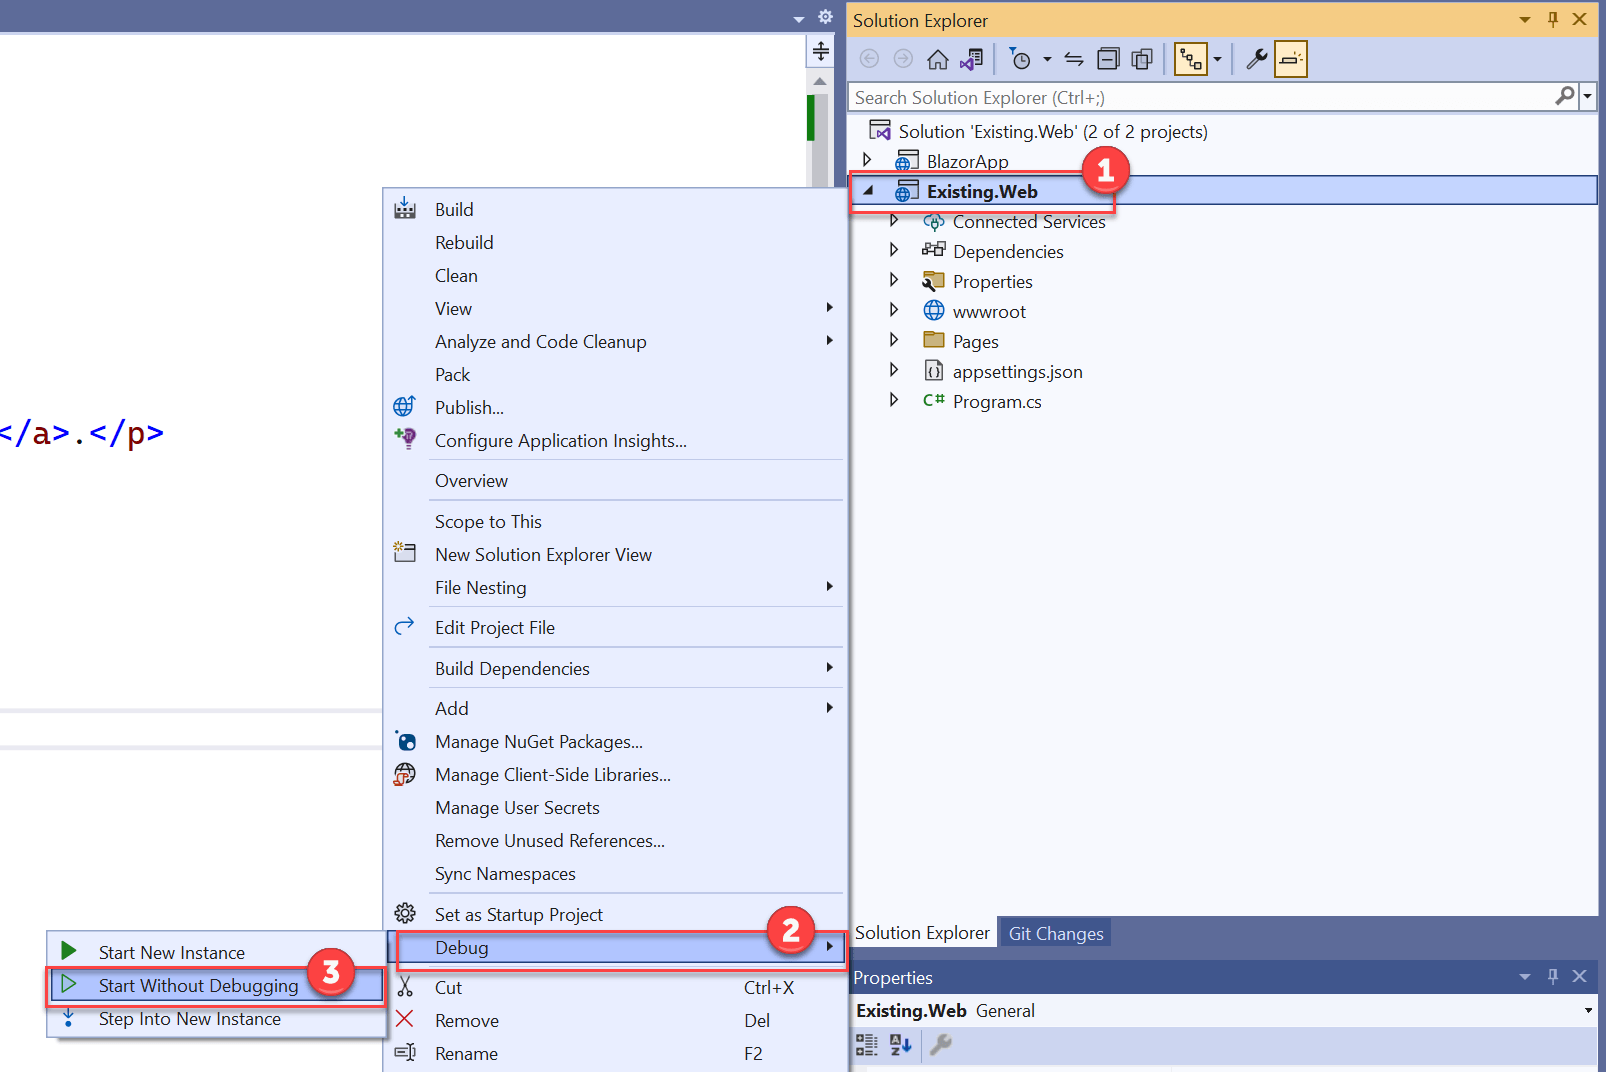
Note: Alternatively, since we set the startup project you can also start an instance (with or without debugging) from the toolbar menu.
- In the browser window, press the Counter component’s Click me button multiple times and notice how the counter increases.
Step 6. Incorporate Telerik UI for Blazor
Now that we’ve successfully used a Blazor WebAssembly component in our existing ASP.NET Core Web Application, we can take advantage of the components provided by Progress Telerik UI for Blazor. This component library is compatible with both Blazor WebAssembly and Blazor Server projects.
- Follow the guidance to add Telerik UI for Blazor in the BlazorApp project, follow Steps 2 through 4.
Note: The Server project in our case is the Existing.Web project, and we’ve already added the app.UseStaticFiles() code, so this step can be skipped (Step 4, item #2 in the article linked).
- Now we’ll add a Telerik UI for Blazor component to the existing Counter component. In the BlazorApp project, locate and open the Pages/Counter.razor file.
- Replace the code in the file with the following and save the file:
@page "/counter"

<PageTitle>Counter</PageTitle>

<h1>Counter</h1>

<p role="status">Current count: @currentCount</p>

<button class="btn btn-primary" @onclick="IncrementCount">Click me</button>

<br/>

<hr />

<TelerikButton OnClick="@SayHelloHandler" ThemeColor="primary">Say Hello</TelerikButton>

<br />

@helloString


@code {
    private int currentCount = 0;

    private void IncrementCount()
    {
        currentCount++;
    }

    MarkupString helloString;

    void SayHelloHandler()
    {
        string msg = string.Format("Hello from <strong>Telerik Blazor</strong> at {0}.<br /> Now you can use C# to write front-end!", DateTime.Now);
        helloString = new MarkupString(msg);
    }
}
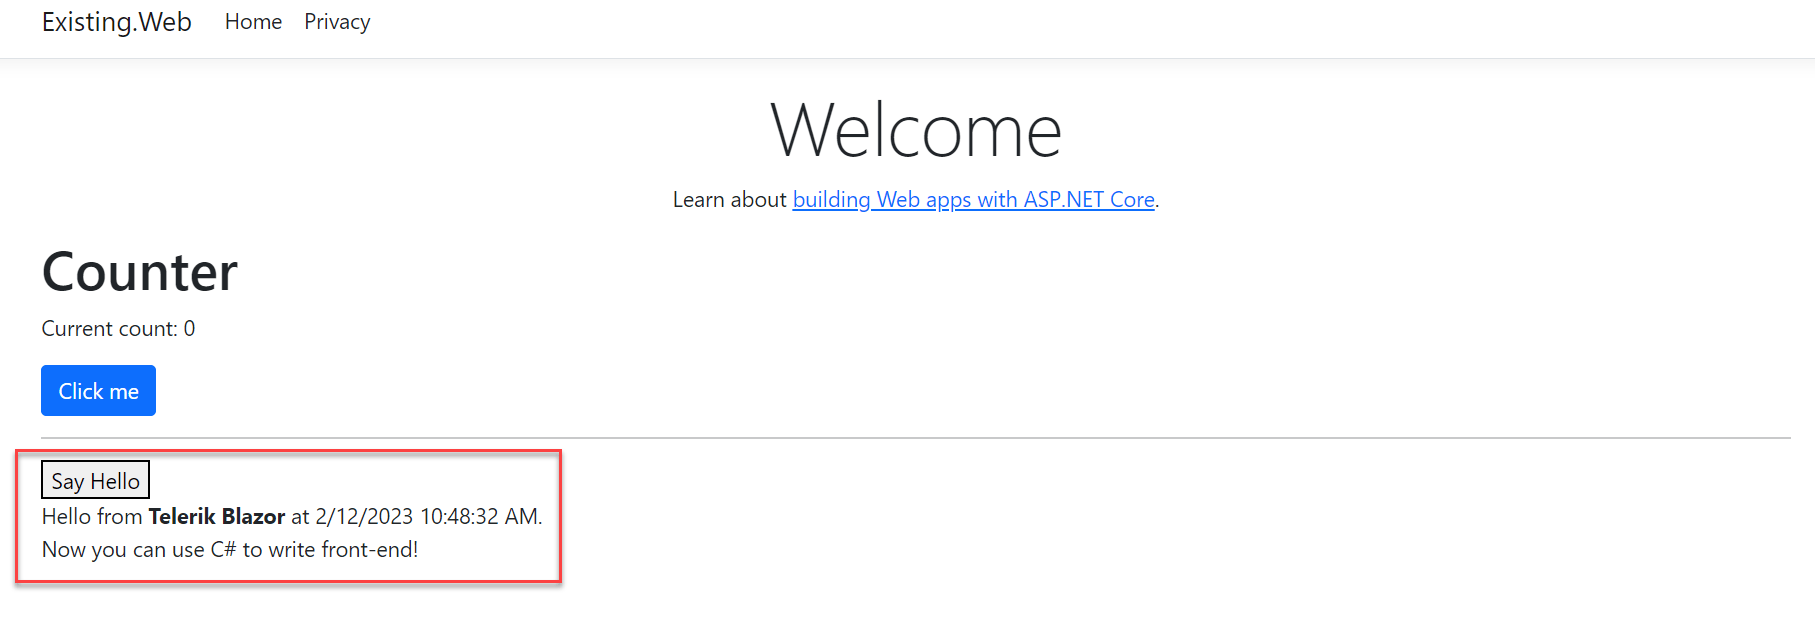
- Run the application once more, and press the Say Hello button to use the TelerikButton component!
Conclusion
In this article, we integrated Blazor components into an existing ASP.NET Core web application. This opens up a less disruptive migration path for moving existing projects to Blazor WebAssembly.
Try Telerik UI for Blazor
Develop new Blazor apps and modernize legacy web projects in half the time with a high-performing Grid and 100+ truly native, easy-to-customize Blazor components to cover any requirement. Try it for free with our 30-day trial and enjoy our industry-leading support.
Feel free to share your feedback or questions in the comments section below. Your input makes a difference.

Carey Payette
Carey Payette is a Senior Software Engineer with Trillium Innovations (a Solliance partner), an ASPInsider, a Progress Ninja, a Microsoft Certified Trainer and a Microsoft Azure MVP. Her primary focus is cloud integration and deployment for the web, mobile, big data, AI, machine learning and IoT spaces. Always eager to learn, she regularly tinkers with various sensors, microcontrollers, programming languages and frameworks. Carey is also a wife and mom to three fabulous boys.

