
Embed Reporting in Native Blazor Applications

Summarize with AI:
Check out the customization features of the newest Progress Telerik Reporting viewer, implemented natively with Telerik UI for Blazor controls. Get started with its setup in both Blazor WebAssembly and Blazor Server applications.
With R1 2023, we elevated further our Progress Telerik Reporting native Blazor viewer. The familiar features from our other web and desktop viewers are already baked in. This includes (without being an exhaustive list) searching, exporting, printing, sending email, report history navigation, localization, infinite scrolling, and “freezing” table rows and columns. Furthermore, we improved extensibility with tooltips, parameters and toolbar customization features.
I will walk you through the initial setup of a Telerik Reporting native Blazor viewer in Blazor Server and Blazor WebAssembly applications. Additionally, I will demonstrate how you can adapt the Telerik Reporting native Blazor component to your requirements. Prepare for examples with code, a lot of pictures, tips and resources.
Up to release R3 2022, our customers who wanted to embed our viewer in a Blazor application could use only a Blazor wrapper of our HTML5 viewer. It is a mature and battle-tested JavaScript/jQuery widget with a dependency on jQuery and Kendo UI for jQuery. If you prefer this Blazor viewer flavor, it is supported, and its configuration can also be performed using our Visual Studio item templates.
On top of that, since R3 2022, you can embed Telerik Reporting using the new native Blazor viewer. The native experience, implemented with Telerik UI for Blazor, blends with the rest of your Blazor application using the same input controls and stylization mechanism. If you choose our feature-rich native Blazor report viewer component, you will need Telerik UI for Blazor or Telerik DevCraft license.
Our documentation and example projects will surely help you to embed the component yourself. You will also need a configured REST service. The demos are available after the installation in a path similar to the following (R1 2023 should be replaced with your Telerik Reporting release version):
C:\Program Files (x86)\Progress\Telerik Reporting R1 2023\Examples\CSharp
Alternatively, if you have installed Visual Studio, the easiest and our recommended approach to start with Telerik Reporting is to use our item or project Visual Studio templates.
The native Blazor viewer item template, released in R1 2023, can both embed the component and configure a new or reuse an existing REST service. Currently, the template is targeting .NET 6 and .NET 7 Blazor Server and Blazor WebAssembly projects. The two new templates that Microsoft introduced with .NET 7 release are also supported (Blazor Server Empty and Blazor WebAssembly Empty—shipped without demonstration code and Bootstrap). .NET Core and .NET 5 are not supported in this item template. We plan to add support for .NET 8 this year, similar to what we did with .NET 7, following our Day-Zero support policy.
Let’s get started.
Set up Blazor Server App
- Start your Visual Studio 2022.
- Select “Create a new project.”
- Type “Blazor.”
- Select “Blazor Server App.”
- Click “Next.”
- Type your project name and location. Later, the Reporting Blazor viewer template will use your project name as a HostAppId (you can change it anytime). The HostAppId is a unique constant name of the application hosting the reports service.
- Click “Next.” Select your target framework (I’m selecting .NET 7 target framework).
- Click “Create.”
Embed Native Blazor Viewer in Blazor Server Application
- Now select the Pages folder in the solution explorer and invoke the context menu command “Add -> New Item.”

- Type “Blazor.”
- Select “Telerik Native Blazor Report Viewer Page {Release}” (Updated to “Telerik Blazor Report Viewer (Native) Page {Release}” since version 17.0.23.315 (R1 2023 SP1). Your installed Telerik Reporting version will be displayed at the end of the template name (R1 2023 in the screenshot below). You can modify the file name of the generated razor page file.
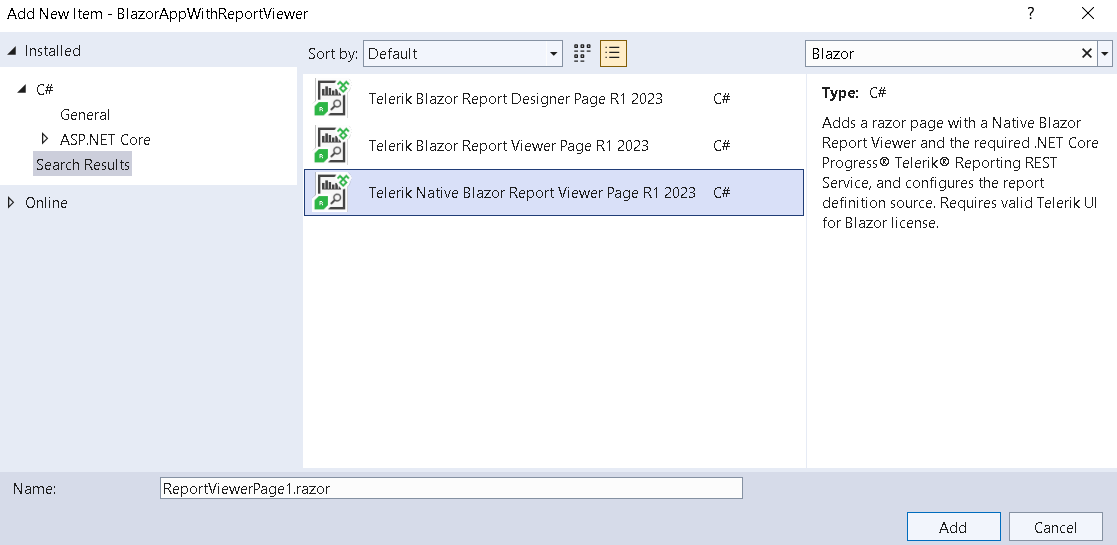
- Click “Add.”
- Click “OK.” (If the project was not built, you will have to confirm you want to build it.)
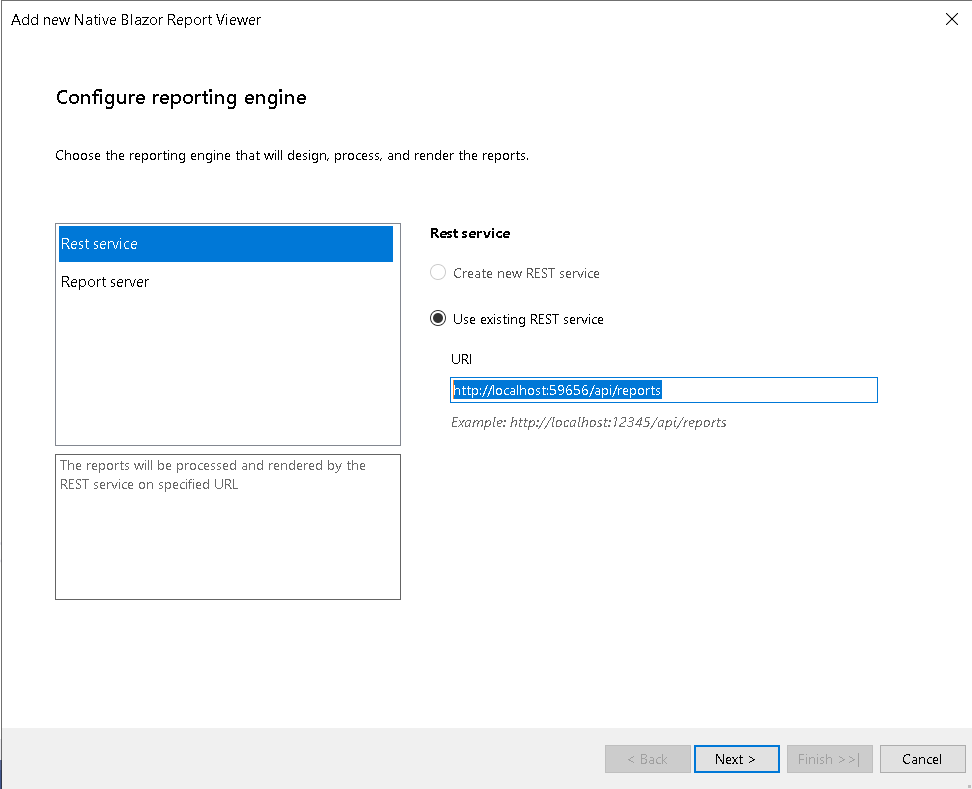
- Once you have completed the previous steps, the wizard starts. The first step is to select where your REST service will be hosted. There are three options. I will select new REST service and it will be created in the same project. You can choose the existing REST service or Report Server option. I will show you an example with an existing REST service and Report Server in a Blazor WebAssembly project later in this article.

- Click “Next.”
- A Sample report will be added so that you can test the viewer.
- Click “Next.”
- Click “Finish.”
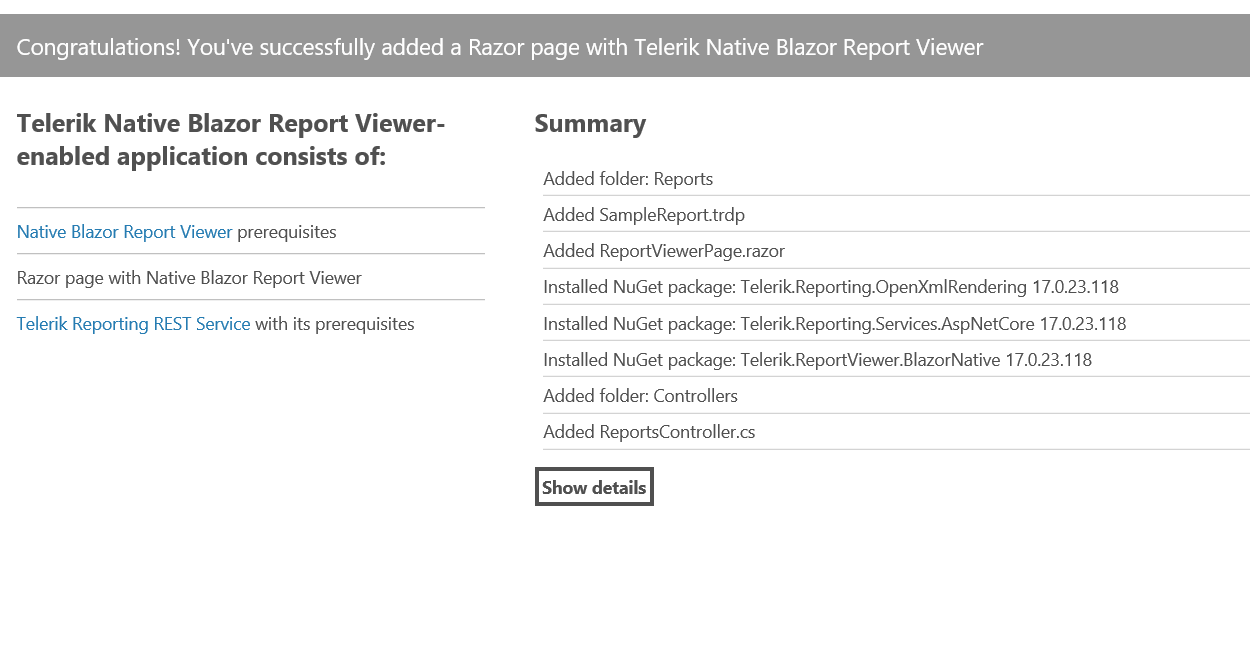
You will see the summary page with useful links and the executed configuration steps. In the picture below, the installed NuGet packages are Dev version. If you are a Trial user, the item template will add Trial NuGet packages, for example Telerik.ReportViewer.BlazorNative.Trial.17.0.23.118.nupkg.
Let’s have a look at the report viewer initialization in the generated razor page. I will briefly mention some of the most popular properties and later we will compare gradually some of them with the existing REST service and Report Server reporting engine configuration.
@page "/reportviewer"

<PageTitle>Report Viewer</PageTitle>

<ReportViewer ServiceUrl="/api/reports"
              @bind-ReportSource="@ReportSource"
              @bind-ScaleMode="@ScaleMode"
              @bind-ViewMode="@ViewMode"
              @bind-ParametersAreaVisible="@ParametersAreaVisible"
              @bind-DocumentMapVisible="@DocumentMapVisible"
              @bind-Scale="@Scale"
              PageMode="@PageMode.ContinuousScroll"
              PrintMode="@PrintMode.AutoSelect"
              KeepClientAlive="true"
              EnableSendEmail="true"
              ServiceType="@ReportViewerServiceType.REST"
              Height="900px"
              Width="100%">
    <ReportViewerSettings>
        <SendEmailDialogSettings
            From="from@example.com"
            To="to@example.com"
            Cc="cc@example.com"
            Subject="Report sent"
            Format="CSV"
            Body="Attached report. <br/> <br/> Best regards, </br> ABC">
        </SendEmailDialogSettings>
    </ReportViewerSettings>
</ReportViewer>

@code {
    public ScaleMode ScaleMode { get; set; } = ScaleMode.Specific;
    public ViewMode ViewMode { get; set; } = ViewMode.Interactive;
    public bool ParametersAreaVisible { get; set; }
    public bool DocumentMapVisible { get; set; }
    public double Scale { get; set; } = 1.0;

    public ReportSourceOptions ReportSource { get; set; } = new ReportSourceOptions("SampleReport.trdp", new Dictionary<string, object>
    {
        // Add parameters if applicable
    });
}
One of the most important settings is the REST Service URI, which in our case is set to ServiceUrl="/api/reports". The ServiceType is REST ServiceType="@ReportViewerServiceType.REST".
By default, the viewer opens in an interactive view mode. You can switch it to open in print preview, if this complies with your needs.
public ViewMode ViewMode { get; set; } = ViewMode.PrintPreview;
Examples of when you may prefer print preview mode include:
- You want to see how the actual print layout will look without pressing the toggle button for switching between modes.
- To reduce the waiting time for rendering the first page in large reports.
Page mode can be changed from ContinuousScroll to SinglePage if this is your preference: PageMode="@PageMode.SinglePage".
EnableSendEmail configures the visibility of the send email button in the toolbar. The form fields can be prepopulated using the SendEmailDialogSettings.
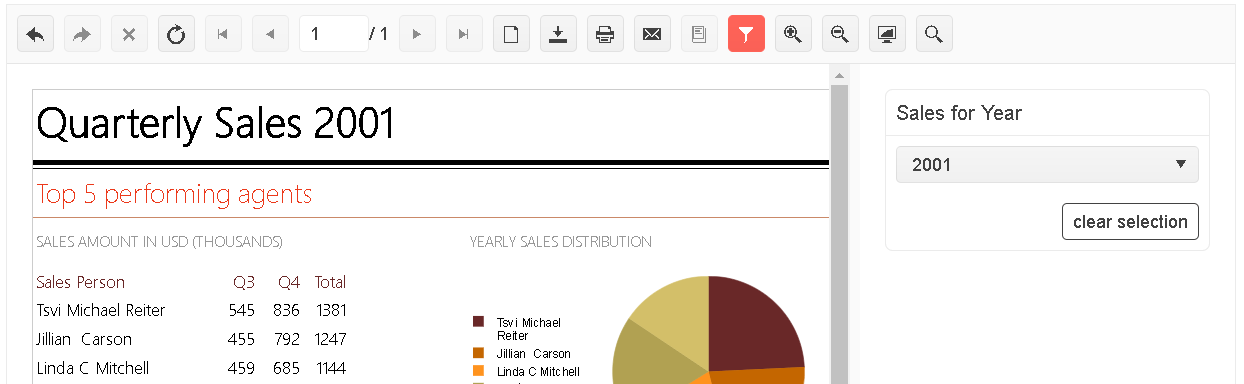
The sample report is set to be displayed when you open the viewer:
public  ReportSourceOptions ReportSource { get; set; } = new  ReportSourceOptions("SampleReport.trdp", new  Dictionary<string, object>
{
  // Add parameters if applicable
});
If you want to set a type definition of a report instead, it is possible. You can find out more details about this and the other properties in our documentation.
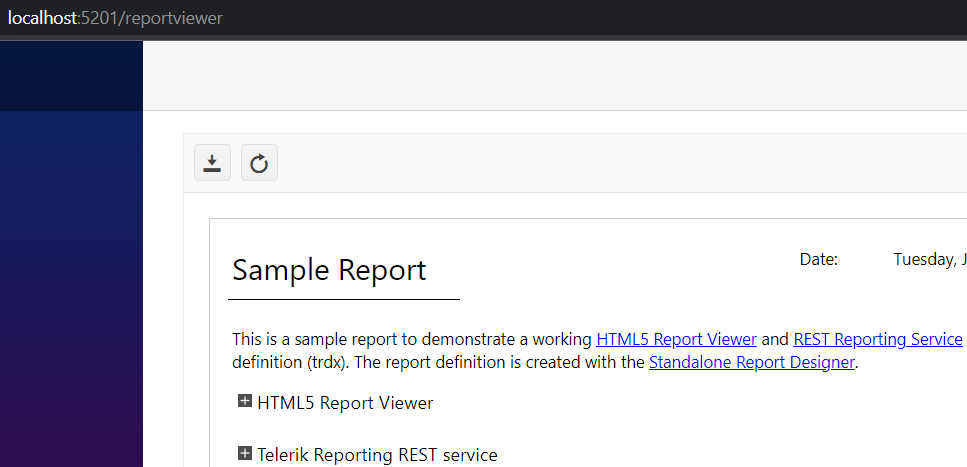
The default page route is /reportviewer, so to test the viewer, you can start the application and open the viewer in the browser. If this route is not unique to your application, an exception will be thrown.
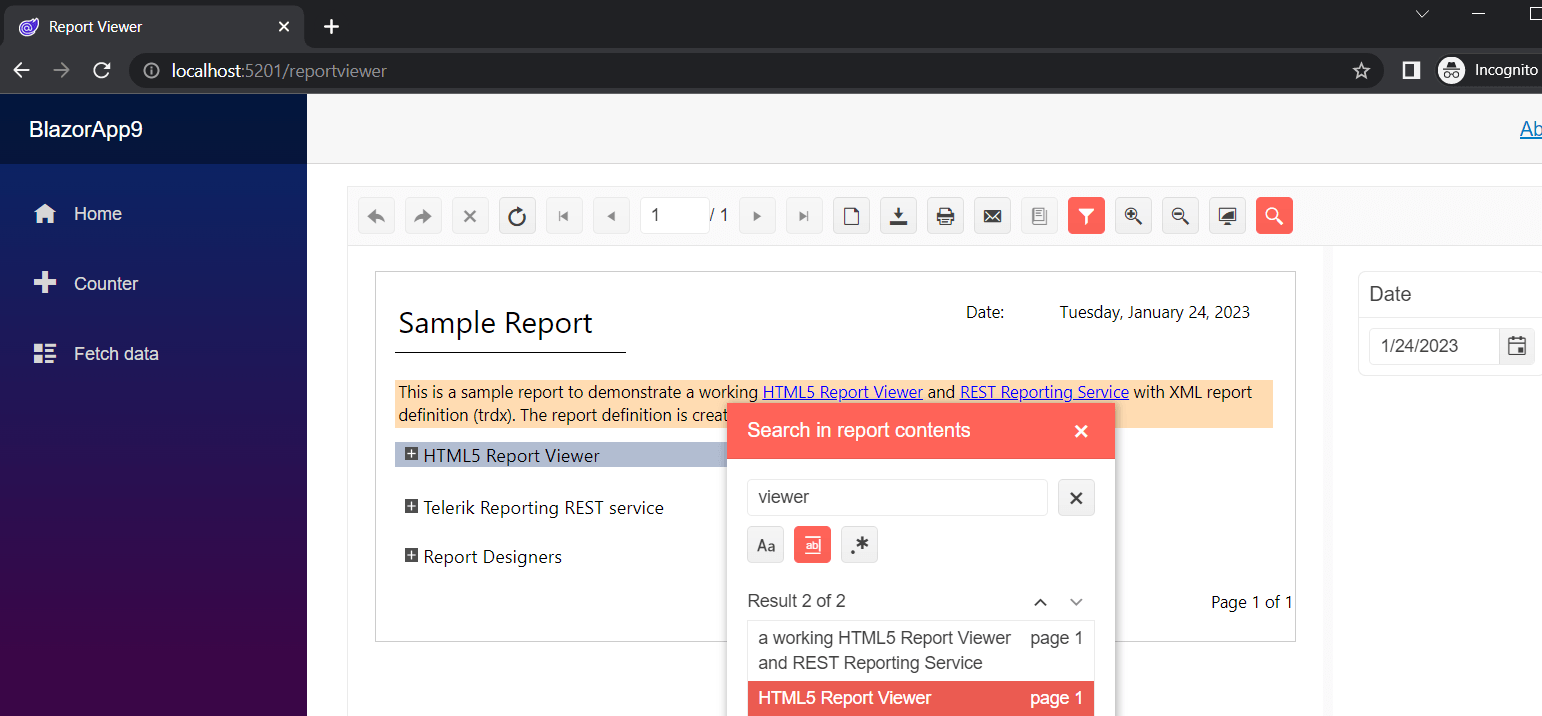
In the screenshot above I have performed a search that returned two results. If the results were more than 250, for performance reasons only the first 250 would be shown.
Embed Native Blazor Viewer in Blazor WebAssembly App
Existing REST service
I want to also demonstrate the existing REST service option in the native Blazor viewer item template. For this purpose, I need a running reports service. If you want to setup the REST service separately, there is a Visual Studio project template for this purpose. For this demo, I will start the existing REST service project from Telerik Reporting installation folder C:\Program Files (x86)\Progress\Telerik Reporting R1 2023\Examples\CSharp\.NET 7\ReportingRestServiceCorsDemo:
dotnet run --project "C:\Program Files (x86)\Progress\Telerik Reporting R1 2023\Examples\CSharp\.NET 7\ReportingRestServiceCorsDemo\CSharp.Net7.ReportingRestServiceCorsDemo.csprojYou can test whether the service is accessible by typing http://localhost:59656/api/reports/version in the browser. If results are returned (example for R1 2023—“17.0.23.118”), the REST service is up and running. You can add the existing service project to the solution containing the viewer component and set as “Multiple Startup” projects both viewer and REST service projects.
- This time I will create a Blazor WebAssembly project targeting .NET 7.
- Execute in your Client project steps 1-5 from Embed Native Blazor Viewer in Blazor Server Application section so that the wizard Telerik Native Blazor Report Viewer starts.
- Select the radio button for existing REST service. Creating new REST service is not supported in WebAssembly project, this option is displayed as disabled. Set the URI of the service reports route, e.g., http://localhost:59656/api/reports.
- Click “Next.”
- Type the name of the report definition that is available on the service—for example, Dashboard.trdp.
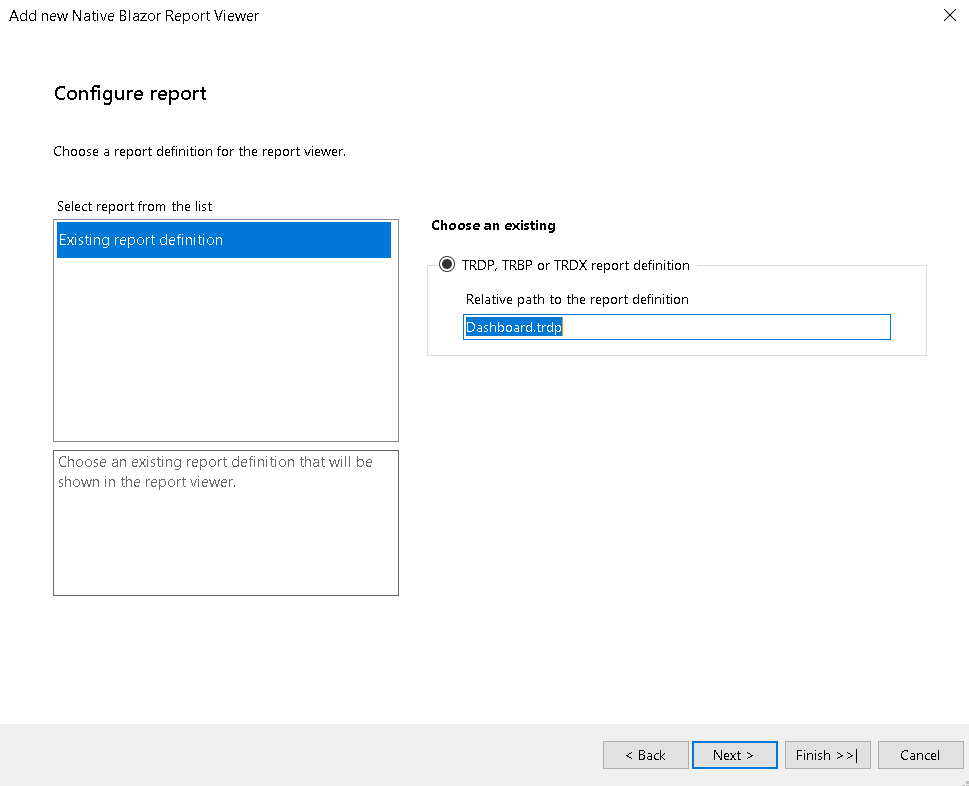
- Click “Finish.”
- You will see the summary page.
- Test the viewer is functional in the browser.
Let’s inspect the generated razor page. This time, the ServiceUrl is set to the existing REST service URI reports’ route:<ReportViewer ServiceUrl="http://localhost:59656/api/reports".
The service type is again REST ServiceType="@ReportViewerServiceType.REST".
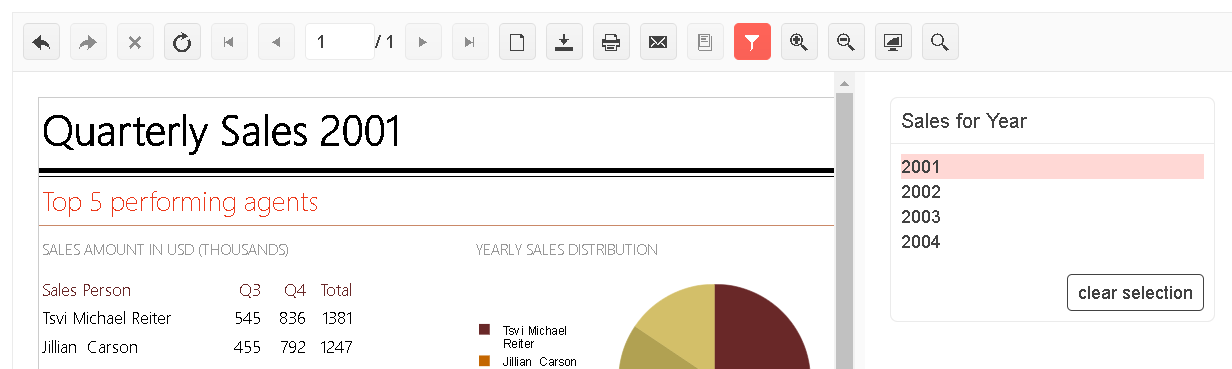
The report source is declared in the same fashion as in our previous project with the new REST service. Dashboard report has an integer parameter named ReportYear, so we can specify its value in the
razor page. As key we set the parameter name, and as value we add one of the available values of the parameter (2004):
public  ReportSourceOptions ReportSource { get; set; } = new  ReportSourceOptions("Dashboard.trdp", new  Dictionary<string, object>
{
  {"ReportYear", 2004}
});
Report Server
If you want to use Telerik Report Server, the steps are similar. Set report server URL and user credentials to access it.
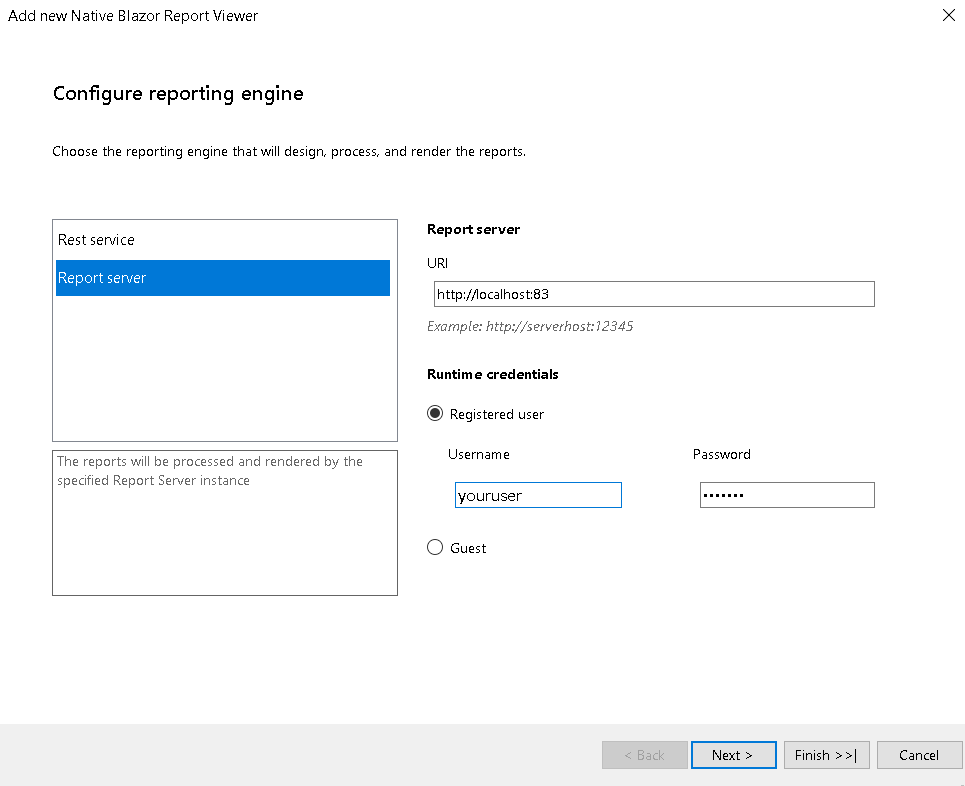
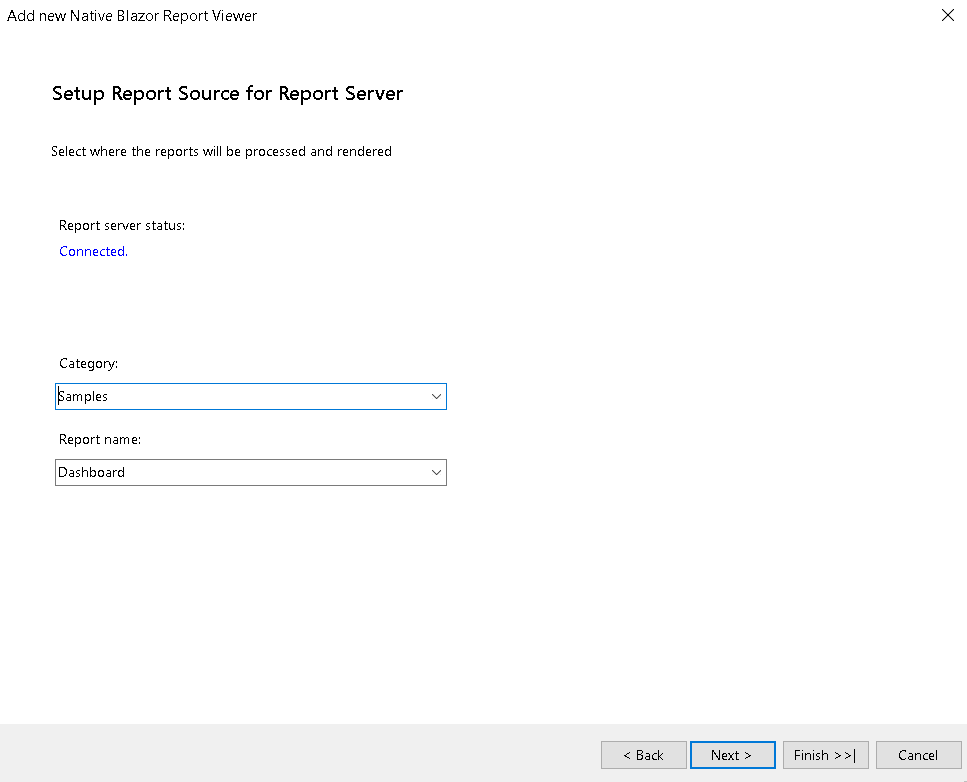
If the connection is successful, you will be able to choose a category and a report.
Let’s have a look at the generated razor page. In the Report Server case, there is no ServiceUrl present. Instead, the ReportServerSettings are configured.
<ReportServerSettings Url="http://localhost:83" Username="youruser" Password="yourpass"></ReportServerSettings>Another difference in the razor page is that the ServiceType is ReportServer, instead of REST:
ServiceType="@ReportViewerServiceType.ReportServer"The report source should specify both the category and the report name. You are able to pass parameters also.
public  ReportSourceOptions ReportSource { get; set; } = new  ReportSourceOptions("Samples/Dashboard", new  Dictionary<string, object>
{
  {"ReportYear", 2003}
});
Customization
You are able to change the appearance of the toolbar, tooltips and parameters editors, and select different Telerik Blazor themes and theme variations. Accessibility is still in development.
Toolbar
You can customize the toolbar using the Tools property. You are able to modify the order and the visibility of the toolbar buttons. In the example below, only the export and refresh buttons are visible.
public  List<IReportViewerTool> Tools = new  List<IReportViewerTool>
{
  new  Export(),
  new  Refresh(),
};
You can also create your own buttons and call the exposed toolbar commands.
Equivalently to our other viewers, you can hide or change the description of a particular export option per application or per report. The report setting has precedence over the application one.
By default, you can export to seven different file formats (rendering extensions)—PDF, CSV, Excel, PowerPoint, RTF, TIFF and Word.
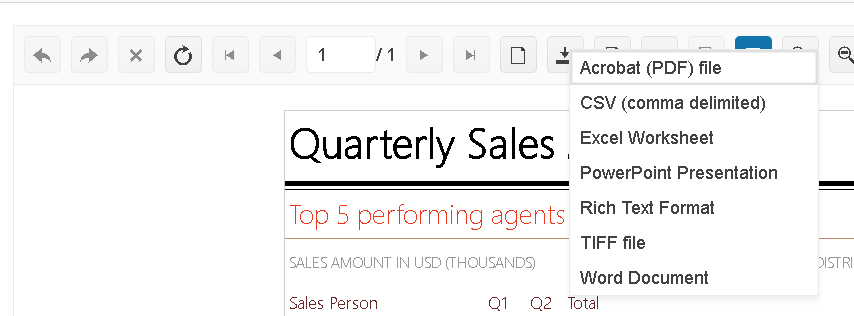
On application level, for hiding all options except PDF and Word and changing the PDF and Word description, set in the appsetting.json of the REST service project:
"telerikReporting": {
    "extensions": [
      {
        "name": "CSV",
        "visible": "false"
      },
      {
        "name": "IMAGE",
        "visible": "false"
      },
      {
        "name": "PPTX",
        "visible": "false"
      },
      {
        "name": "RTF",
        "visible": "false"
      },
      {
        "name": "XLSX",
        "visible": "false"
      },
      {
        "name": "PDF",
        "description": "PDF"
      },
      {
        "name": "DOCX",
        "description": "Word (DOCX)"
      }
    ]
  }
As expected, only two export options are present with their modified descriptions.
Although we do not consider this a viewer customization, I want to mention that you can change the connection string to your database in the same appsettings.json file. The example below is with the AdventureWorks database that is created with the Telerik Reporting installation (if not already present):
"ConnectionStrings": {
  "Telerik.Reporting.Examples.CSharp.Properties.Settings.TelerikConnectionString": {
    "connectionString": "Data Source=(local)\\SQLEXPRESS;Initial Catalog=AdventureWorks;Integrated Security=SSPI",
    "providerName": "System.Data.SqlClient"
  }
},
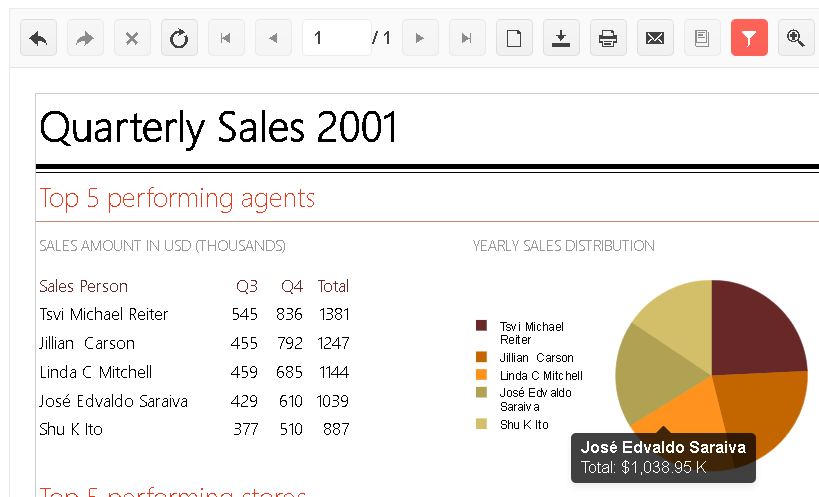
Tooltips
The customization of the tooltips and the parameters editors can be done through templates, added in the report viewer razor page.
You don’t need to specify the default tooltip template, I am adding it here just for comparison:
<TooltipTemplate>
    <div class="trv-pages-area-kendo-tooltip">
        <div class="trv-pages-area-kendo-tooltip-title">@context.DataAttributes["tooltipTitle"]</div>
        <div class="trv-pages-area-kendo-tooltip-text">@context.DataAttributes["tooltipText"]</div>
    </div>
</TooltipTemplate>
In the screenshot below both the tooltip title and text are shown.
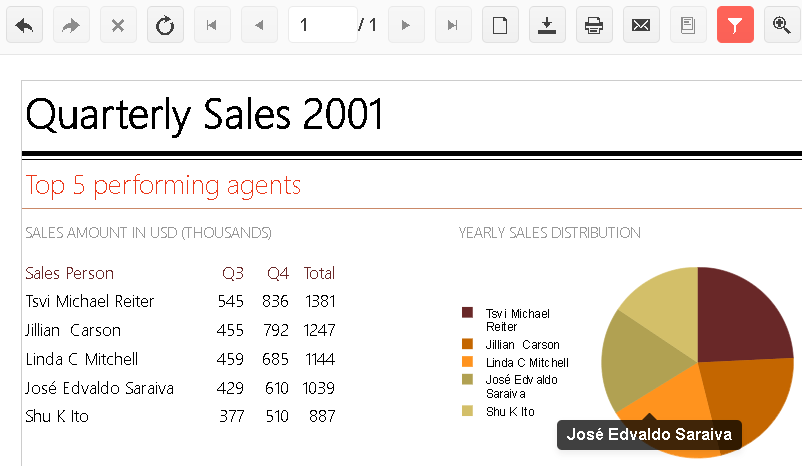
Let’s display only the tooltip title:
<TooltipTemplate>
  <div  class="trv-pages-area-kendo-tooltip">
    <div  class="trv-pages-area-kendo-tooltip-title">@context.DataAttributes["tooltipTitle"]</div>
  </div>
</TooltipTemplate>
The tooltip now shows only the title, as expected.
Parameter Editors
Let’s focus on multi-value single-select parameters. By default, for the native Blazor viewer, their available values’ visualization is in a dropdown list. You don’t need to specify a parameter template if you like the default parameter appearance.
Using a custom parameter template, it is possible to visualize the available values in a TelerikListView.
<ParameterSingleSelectTemplate>
  <TelerikListView Data="@context.Parameter.AvailableValues">
      <Template Context="listViewContext">
          @{
              var isSelected = context.Value?.Equals(listViewContext.Value) ?? false;
              var className = isSelected ? "k-state-selected" : string.Empty;
            }
          <div class="@className" @onclick="@(()=> context.Value = listViewContext.Value)">@listViewContext.Name</div>
      </Template>
  </TelerikListView>
</ParameterSingleSelectTemplate>
The change is applied as expected.
Themes and Swatches
The default Telerik Blazor theme can be changed easily. Simply set the theme URL or a theme swatch URL.
So, if the item template has included in your _Host.chtml or _Layout.cshtml (or in the index.html if the application is Blazor WebAssembly) the following reference:
<link rel="stylesheet" href="https://blazor.cdn.telerik.com/blazor/3.7.0/kendo-theme-default/all.css" />You can replace it with Ocean Blue variation of the default theme:
<link href="https://blazor.cdn.telerik.com/blazor/3.7.0/kendo-theme-default/swatches/default-ocean-blue.css" rel="stylesheet" type="text/css" />In the screenshot below there are elements styled in blue, instead of red:

We can try a swatch of another Telerik Blazor theme. Let’s reduce the eye fatigue with the Bootstrap Dark theme.
<link href="https://blazor.cdn.telerik.com/blazor/3.7.0/kendo-theme-bootstrap/swatches/bootstrap-main-dark.css" rel="stylesheet" type="text/css" />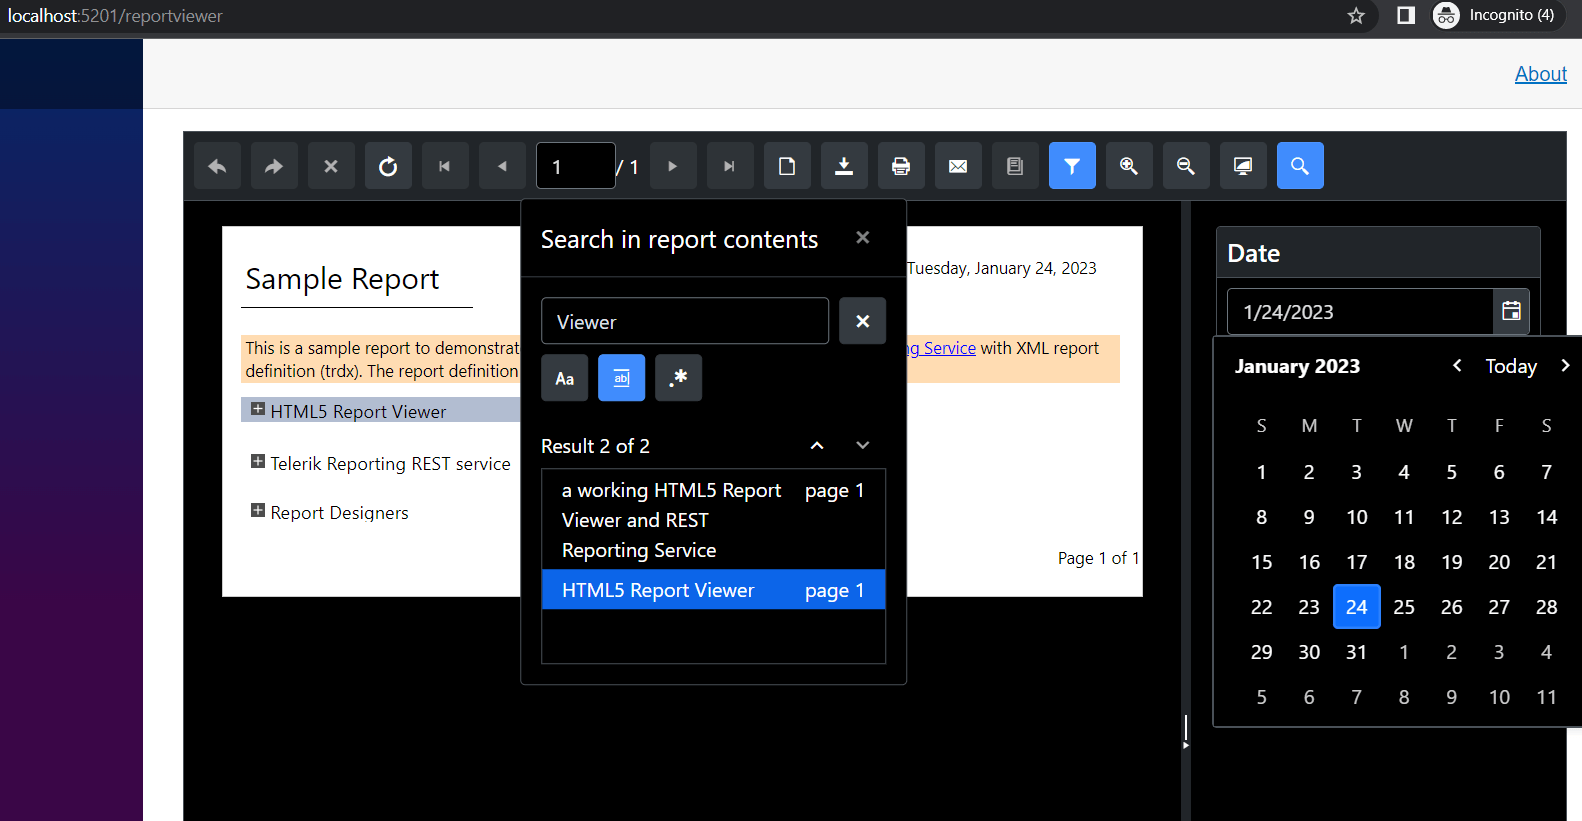
Localization
If you need to localize your viewer, of course you can do so. We have prepared a demo of a localized viewer in a Blazor Server app targeting .NET6 and .NET7. It is installed with Telerik Reporting (replace R1 2023 in the path below with your Telerik Reporting release version):
C:\Program Files (x86)\Progress\Telerik Reporting R1 2023\Examples\CSharp\CSharp.BlazorNativeExample.VS2022.sln
On top of that, our localization article can guide you through the configuration steps.
We plan to add the setup of a localized native Blazor viewer in the Visual Studio item template for both Blazor Server and Blazor WebAssembly projects in one of our next releases.
Using Newer Versions of Telerik UI for Blazor Controls
With R1 2023, we upgraded the minimum required version of Telerik UI for Blazor to 3.7.0. This is the version I have used while authoring this article. As with every actively developed product, Telerik UI for Blazor occasionally introduces breaking changes that affect our native Blazor viewer. Usually, these changes are included in the first release (R1) of the year.
In R1 2023, such a breaking change affected the display of the icons on the viewer toolbar buttons. We plan to address this change (Telerik UI for Blazor 4.0.0 and above) and upgrade the minimum required version of Telerik UI for Blazor in our R1 2023 SP1. In the meantime, there is a Knowledge Base article that provides a workaround. In the future, we will do our best to resolve such breaking changes in the same release they have been introduced so that they will not affect you.
Summary
I walked you through the setup and customization of the newest Telerik Reporting viewer, implemented with Telerik UI for Blazor controls. Start benefiting from the native Blazor user experience, numerous ready-to-use themes and the Blazor programming model. Make the most of your existing development resources, write C# code instead of JavaScript, leverage .NET reliability and security, use two-way bindings instead of events. Benefit from the Blazor native localization approach and the customizability implemented with multiple pluggable templates.
Want To Try Telerik Reporting?
Telerik Reporting is a complete, easy-to-use, and powerful .NET embedded reporting tool for web and desktop applications that supports: Blazor, ASP.NET Core, ASP.NET MVC, ASP.NET AJAX, HTML5/JS, Angular, React, Vue, WPF, WinForms and UWP.
Also available as a part of our Telerik DevCraft bundle, Telerik Reporting allows you to create, style, view and export rich, interactive, and reusable reports to attractively present analytical and any business data. Add reports to any business application through report viewer controls. Export the ready reports to more than 15 formats.
If you still have not tried it, you can start a free trial to take a closer look. We also provide a support service we are proud of and resources that will help you along the way.

Kristina Velikova-Bankova
Kristina is a Principal QA Engineer in the Telerik Reporting division. She joined the company in 2013—part of the division since 2020. Her everyday activities include meticulously chasing the ghosts of implementation errors and missing or incorrect requirements. Outside of work, she enjoys music, traditional Bulgarian folk dances and reading.
Related Posts
Comments
All articles
Topics
Web MobileMobile
Desktop
Design
Productivity
People
