
5 Open-Source Projects to Boost Your Productivity in Blazor

Summarize with AI:
In this post, I will show you some open-source projects that you can integrate into your Blazor-based development or use as a starting point to accelerate development.
Working with Screen Dimensions Using BlazorSize
BlazorSize is an open-source project that makes life easier for Blazor developers by allowing them to obtain the browser size, detecting changes in it, as well as testing media queries. To integrate this utility into your solution, you must install the NuGet package BlazorPro.BlazorSize.
Once this is done, add these two lines to your Program.cs file:
var builder = WebApplication.CreateBuilder(args);
...
builder.Services.AddMediaQueryService();
builder.Services.AddScoped<IResizeListener, ResizeListener>();

var app = builder.Build();
Then, go to the component where you want to use the utility, adding an injection of type IResizeListener. It is also recommended to implement the IDisposable interface to avoid memory leaks, as follows:
@page "/counter"
@using BlazorPro.BlazorSize
@rendermode InteractiveServer

@inject IResizeListener listener
@implements IDisposable
The next step is to define a variable of type BrowserWindowSize, which allows obtaining information such as the browser’s width and height.
Similarly, we define a method called WindowResized where we specify actions such as updating the browser object and assigning a boolean value to the IsSmallMedia variable, depending on whether a SmallDown media query with a max-width of 767.98px has been found on the page.
Finally, we subscribe and unsubscribe to the OnResized event at the appropriate time, as in the following example:
@code {
    private int currentCount = 0;
    BrowserWindowSize browser = new BrowserWindowSize();
    bool IsSmallMedia = false;

    private async Task IncrementCount()
    {
        currentCount++;
    }

    protected override void OnAfterRender(bool firstRender)
    {
        if (firstRender)
        {
            listener.OnResized += WindowResized;
        }
    }

    void IDisposable.Dispose()
    {
        listener.OnResized -= WindowResized;
    }

    async void WindowResized(object _, BrowserWindowSize window)
    {
        browser = window;
        IsSmallMedia = await listener.MatchMedia(Breakpoints.SmallDown);
        StateHasChanged();
    }
}
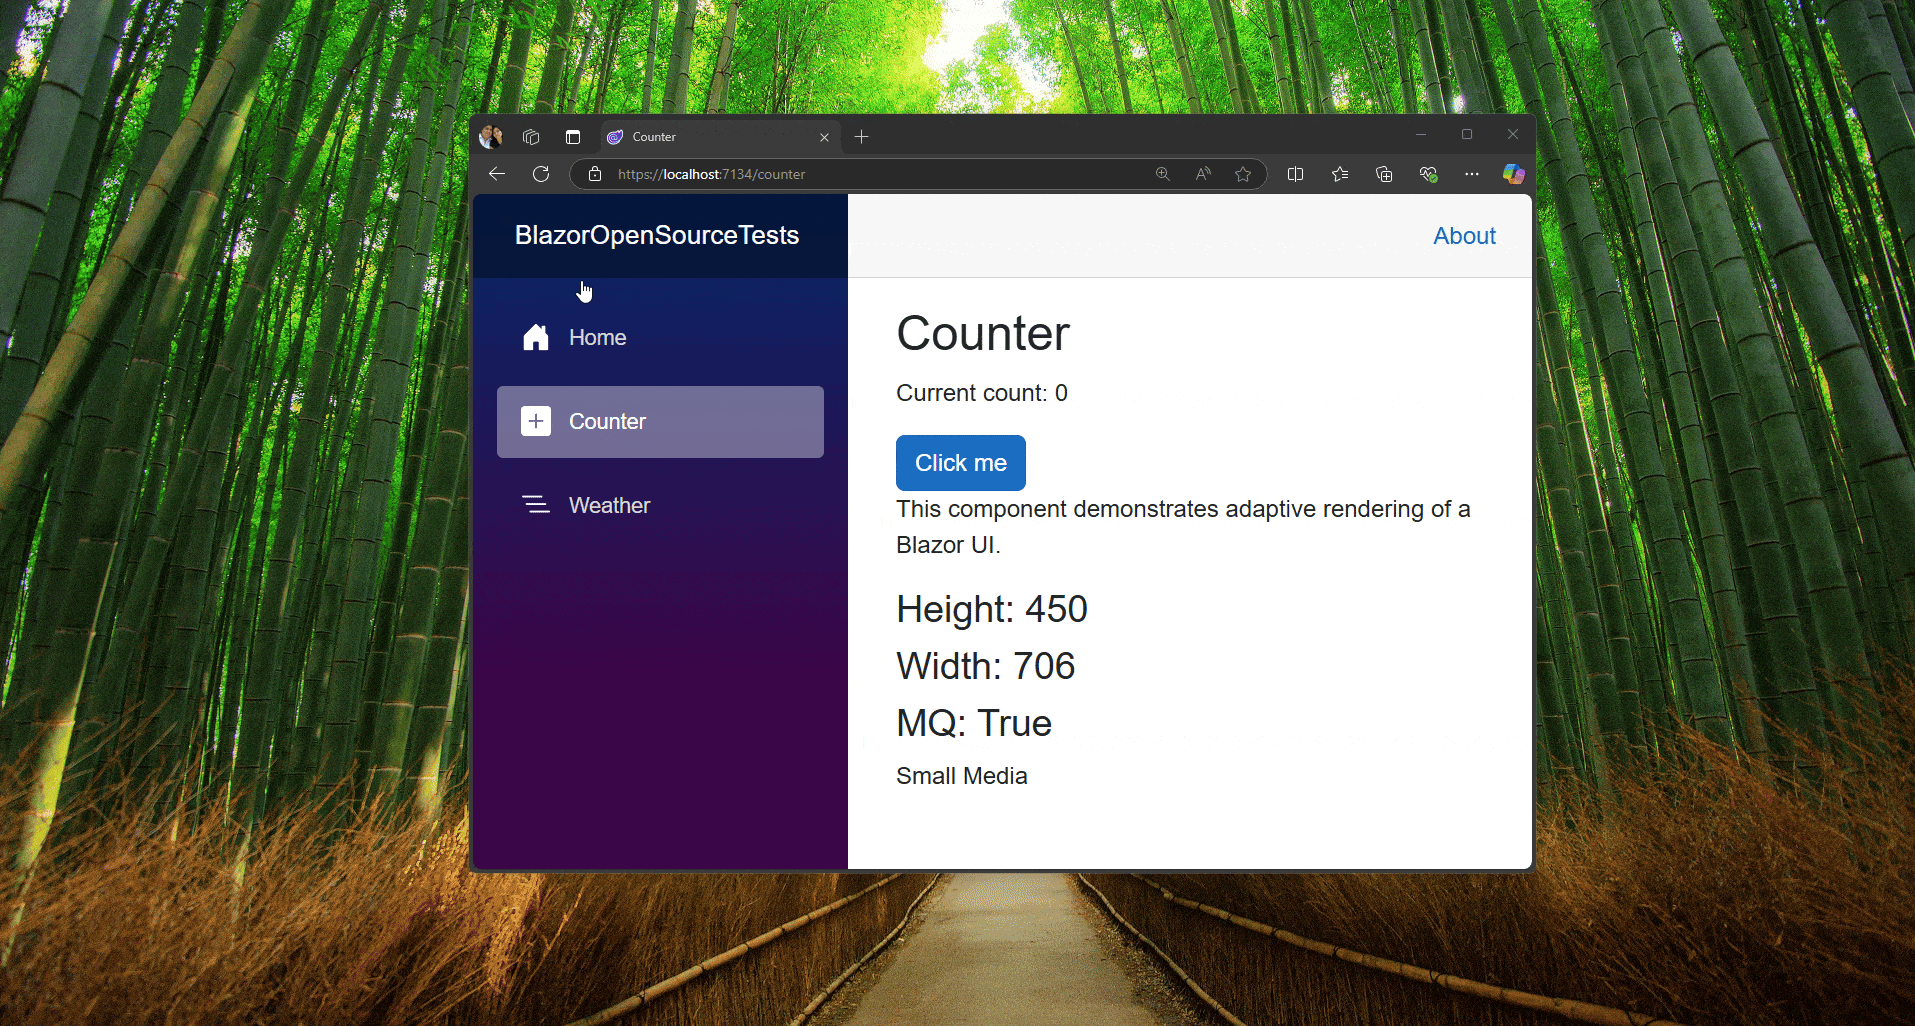
With the above code implemented, we can use the objects to display the browser size and even show different layouts according to the detected size:
<p>This component demonstrates adaptive rendering of a Blazor UI.</p>

<h3>Height: @browser.Height</h3>
<h3>Width: @browser.Width</h3>
<h3>MQ: @IsSmallMedia</h3>

@if (IsSmallMedia)
{
    <p>Small Media</p>
}
else
{
    <p>Large Media</p>
}
Running the application will allow us to obtain size changes in the browser as shown below:
If you are looking for a simpler solution to work with browser sizes, you can use the Blazor MediaQuery component from Progress Telerik UI for Blazor, which provides many more functions, is easier to manage and is constantly updated to help you be more productive.
Maintaining Your Application’s State Using Fluxor
Flux is an architectural pattern that allows managing data in web applications. Among its benefits are having a unidirectional data flow, a single store where object state data is managed, a deterministic type of state change and the ability to navigate through the history of object change versions.
Several libraries help with the implementation of this pattern, one of the most well-known projects for Blazor being Fluxor. Some fundamental concepts you should know to use this library include:
- State: Represents the single source of truth of the application—that is, the object state store. This state is immutable, meaning the object can only be replaced with a new version of the object with new data when there is a change. This allows us to navigate through the history of object versions.
- Actions: These are events that represent changes that must occur in the state. It is important to know that they do not implement business logic but do contain data that could serve for the state change.
- Reducers: These are methods that receive the current state and an action. They generate and return a new state. As mentioned earlier, the current state is not modified; instead, a copy with the modifications is created.
Once you understand the basic concepts, let’s integrate the library into a Blazor project using the Blazor Web App template with an Interactive render mode set to Server and an Interactivity location set to Per page/component, modifying the Counter Component in a series of steps:
- Install the package
Fluxor.Blazor.Web. - Register the service in
Program.csas follows:
var builder = WebApplication.CreateBuilder(args);
...
var currentAssembly = typeof(Program).Assembly;
builder.Services.AddFluxor(options => options.ScanAssemblies(currentAssembly));

var app = builder.Build();
The AddFluxor method allows Fluxor to automatically scan all related components in the current assembly so that the pattern functions correctly, meaning it searches for Stores, Reducers and other components, avoiding the need to register them manually.
- Initialize the store by adding the
StoreInitializercomponent in theMainLayout.razorfile.
@inherits LayoutComponentBase

<Fluxor.Blazor.Web.StoreInitializer @rendermode=InteractiveServer/>

<div class="page">
    <div class="sidebar">
        <NavMenu />
    </div>

    <main>
        <div class="top-row px-4">
            <a href="https://learn.microsoft.com/aspnet/core/" target="_blank">About</a>
        </div>

        <article class="content px-4">
            @Body
        </article>
    </main>
</div>

<div id="blazor-error-ui" data-nosnippet>
    An unhandled error has occurred.
    <a href="." class="reload">Reload</a>
    <span class="dismiss">🗙</span>
</div>
The StoreInitializer component initializes the application state before pages and components are rendered.
- Create a folder named
Storeand inside it, create a new class calledCounterState:
[FeatureState]
public class CounterState
{
    public int ClickCount { get; }

    private CounterState() { }

    public CounterState(int clickCount)
    {
        ClickCount = clickCount;
    }
}
In the previous code, the FeatureState attribute allows the state to be discovered by the AddFluxor method. Additionally, you can see that the state is immutable since the property is defined with only a getter. Finally, a parameterless constructor must be created to determine the initial state.
- To display the state, go to the
Countercomponent and modify it as follows:
@page "/counter"
@using BlazorFluxorTests.Store
@using Fluxor
@rendermode InteractiveServer
@inject IState<CounterState> CounterState
@inherits Fluxor.Blazor.Web.Components.FluxorComponent

<PageTitle>Counter</PageTitle>

<h1>Counter</h1>

<p role="status">Current count: @CounterState.Value.ClickCount</p>

<button class="btn btn-primary" @onclick="IncrementCount">Click me</button>

@code {
    private int currentCount = 0;

    private void IncrementCount()
    {
        currentCount++;
    }
}
In the previous code, we can see several changes:
- Necessary namespaces are added to work with our Fluxor classes and the Fluxor framework.
- The global
CounterStatestate managed by Fluxor is injected so our component can access it. - It inherits from
FluxorComponent, which facilitates the integration of Blazor components with the global state managed by Fluxor. Some advantages include automatic re-rendering of the component when the state changes and simplified state subscription.
When running the application, you’ll see that the Counter page displays a value of 0, which is the default state value. However, when you press the button to increment the counter, nothing happens. Let’s fix this next.
- In the
Storefolder, create a new class calledIncrementCounterAction. This class represents an action, which is why it will remain empty:
public class IncrementCounterAction{}
- Return to the
Countercomponent and inject a reference toIDispatcher. Then, execute theDispatchmethod to dispatch an instance of the action. This allows the UI to indicate an intention to increment the counter, although this functionality is not yet implemented:
@page "/counter"
...
@inject IDispatcher Dispatcher
...
@code {
    private void IncrementCount()
    {
        var action = new IncrementCounterAction();
        Dispatcher.Dispatch(action);
    }
}
As you can see, all initial state variables of the component have been removed in this step.
- Inside the
Storefolder, create a new class calledReducers, which should be static and look as follows:
public static class Reducers
{
    [ReducerMethod]
    public static CounterState ReduceIncrementCounterAction(CounterState state, IncrementCounterAction action) =>
        new CounterState(clickCount: state.ClickCount + 1);
}
You can see that the Reducer creates a new instance of CounterState with the current state modified.
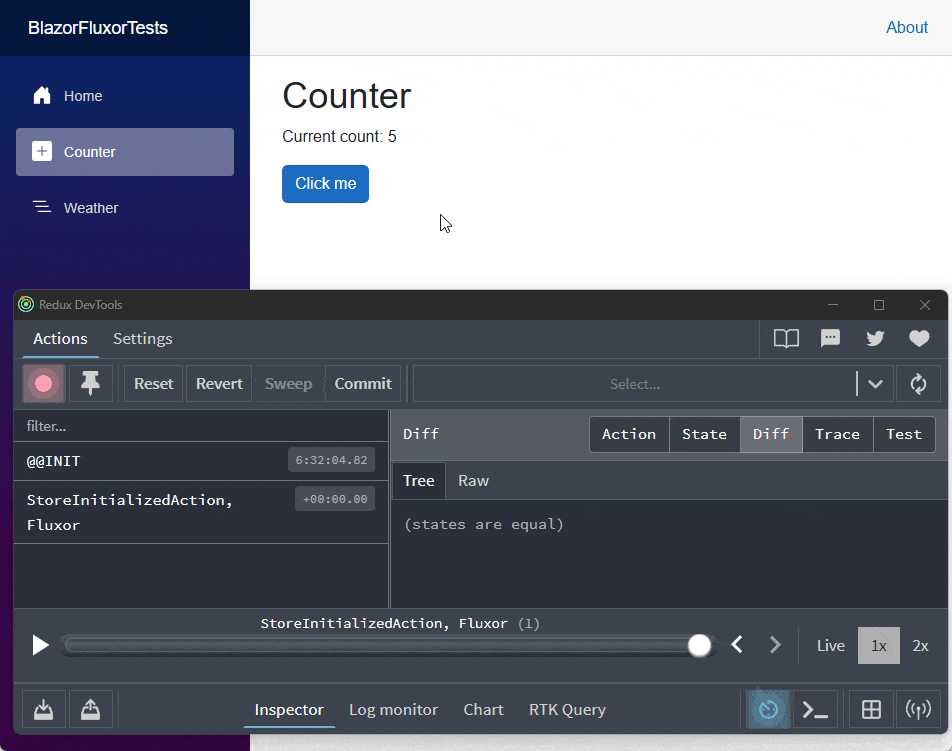
When running the application, you will see that the state updates correctly. Additionally, if you configure the Chrome extension called Redux DevTools, you can debug the component state and navigate through the state history:
Without a doubt, the Flux pattern forces us to think differently when developing with Blazor, but it offers many advantages by maintaining a single state for the application.
Quickly Building CMSes Using Oqtane
Oqtane is an open-source project that has gained popularity on GitHub, allowing the installation of a Blazor-based CMS on your own server or with an external provider like Azure. You can even use it on your mobile devices thanks to the power of Blazor Hybrid. The project’s goal is to let you focus on business logic development without worrying about general infrastructure issues. It is worth mentioning that the project is backed by the .NET Foundation, which highlights its importance.
The project maintainers provide an ARM template to easily install Oqtane on Azure with a single click. If you prefer to try Oqtane locally, follow these steps:
- Clone the project from the official repository.
- Rebuild the entire solution.
- Set
Oqtane.Serveras the startup project. - Start running the application.
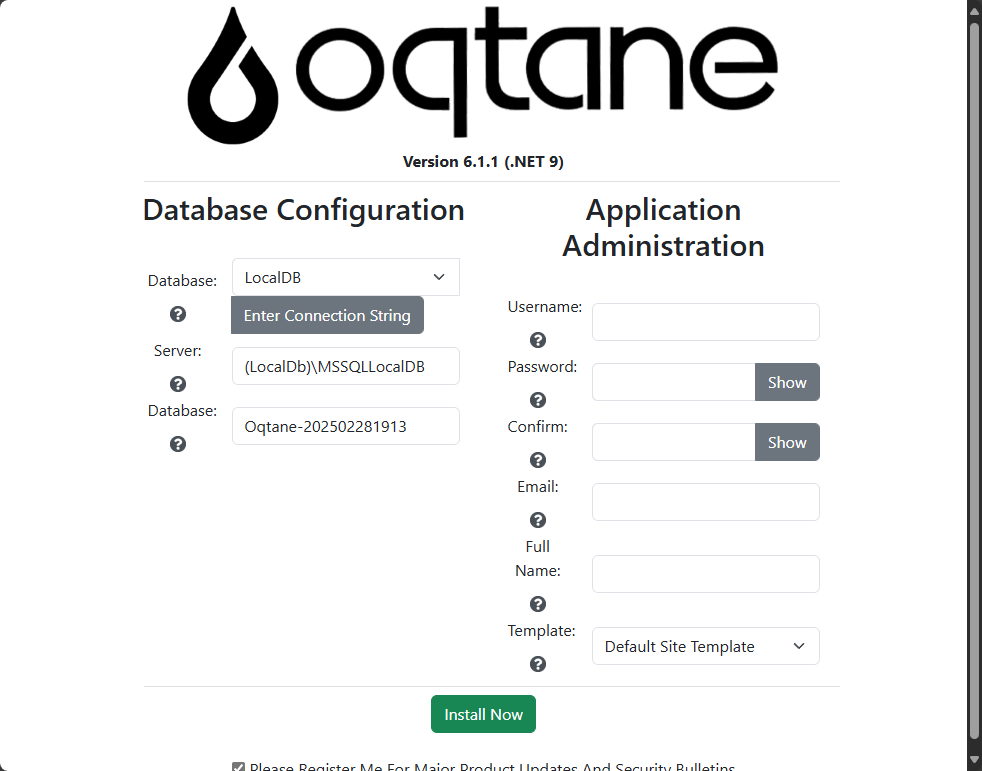
After starting the application, you’ll see a screen allowing you to specify database information and system administrator details:
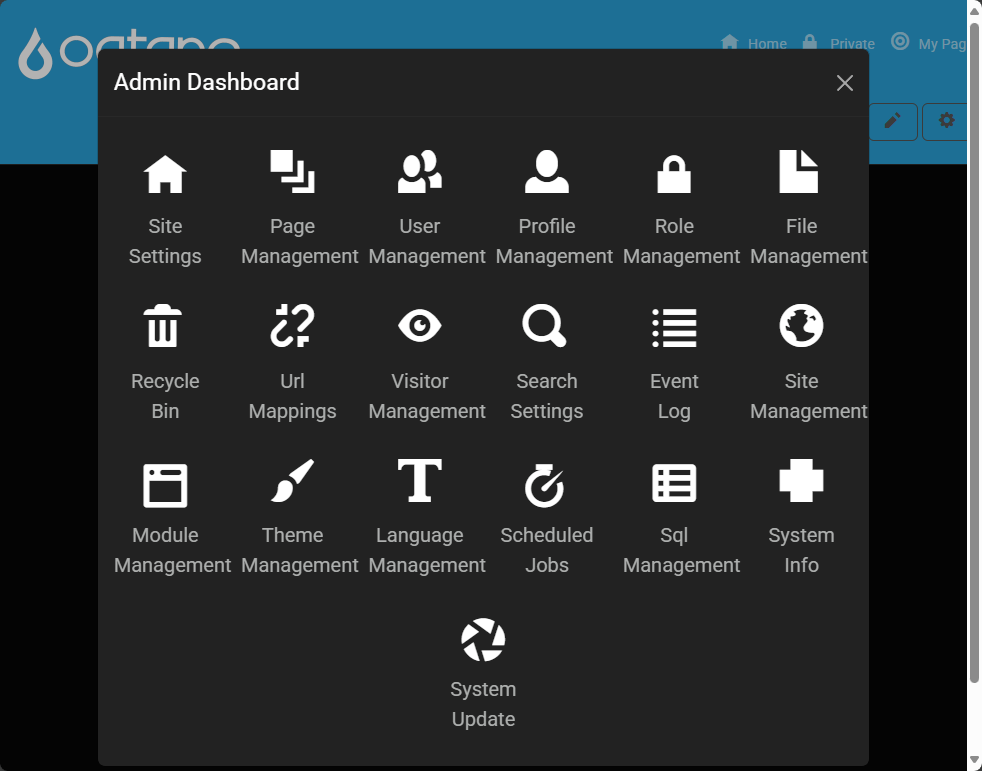
Once the application is installed, you’ll see the main site being rendered. You can also click the Login button to access site administration. To give you an idea of what you can do with Oqtane, here’s a screenshot showing all available management options:
This project will certainly help you avoid starting from scratch or learning the fundamentals of a well-structured and complex project. If you want to develop your own modules, you can follow their tutorials.
Easily Using Icons with BlazorOcticons
Icons are a fundamental part of any webpage. That’s why the BlazorOcticons project allows us to use Octicons in our projects—an open-source icon set developed by GitHub in SVG format. The advantage of this project is that it lets us use them as Blazor components.
To use them, install the BlazorOcticons package in your Blazor project. Then, go to the _Imports.razor file and add the following directive:
@using System.Net.Http
...
@using BlazorOcticons.Octicons
That’s all you need to integrate this project. The next step is to start using the Razor components that have been added, which have very descriptive names. Additionally, you can change the icon’s color and size. Here’s an example of how to add an Octicon:
<CodeOfConduct16 Color="#333" Size="32"/>
Running the application will display the icon:
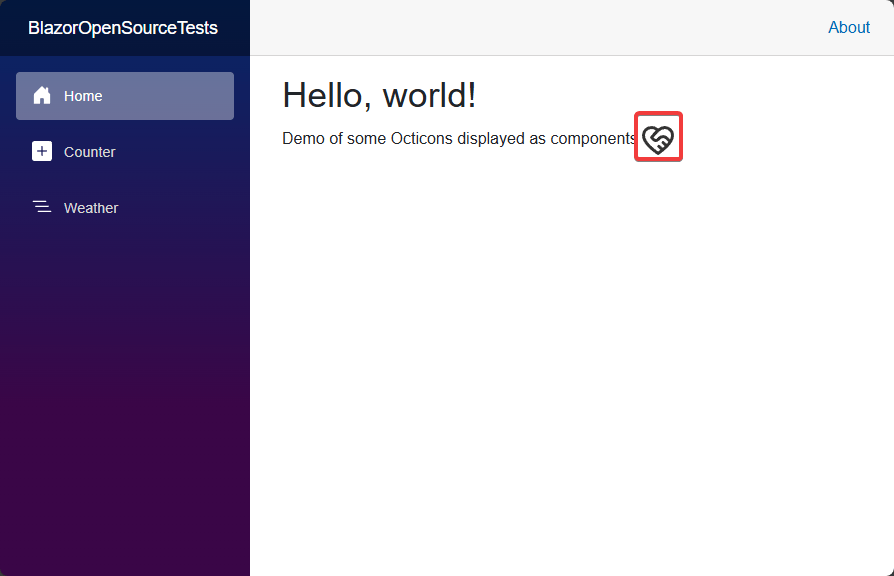
This project makes it easy to add icons in a Blazor-friendly way using components.
Generating Strongly Typed C# Methods from JS Functions
Blazor is a wonderful technology that allows combining C#, HTML and CSS. However, there are times when you may need to execute JavaScript code. If you have worked with Blazor, you should know that there are methods like InvokeVoidAsync and InvokeAsync that allow interacting with JS functions through IJSRuntime. However, using these functions is not strongly typed, which can lead to runtime errors.
To solve this problem, we can use the project BlazorInteropGenerator, which allows generating strongly typed interop methods by parsing JS functions and converting them into C# extension methods for IJSRuntime.
To integrate this project into your Blazor projects, follow these steps:
- Install the NuGet package
GoLive.Generator.BlazorInterop. - In the root of the project, add a new file named
BlazorInterop.jsonand assign it a Build Action equal to C# analyzer additional file. - Modify the
BlazorInterop.jsonfile as follows:
{
  "Files": [
    {
      "Output": "JSInterop.cs",
      "Source": "wwwroot\blazorinterop.js",
      "Namespace": "BlazorInteropGeneratorTest",
      "ObjectToInterop": "window.blazorInterop",
      "Init": [ "window={}" ]
    }
  ],
  "InvokeVoidString": "await JSRuntime.InvokeVoidAsync("{0}", {1});",
  "InvokeString": "return await JSRuntime.InvokeAsync<T>("{0}",{1});"
}
You should configure the file according to your project as follows:
- Output: Specifies the name of the generated C# file
- Source: Defines the path of the JS file used to generate the interop methods
- Namespace: The namespace used in the generated C# file
- ObjectToInterop: The JavaScript object used for interop
- Init: An array of initialization scripts executed before interop
- Since we specified that the
Sourceis theblazorinterop.jsfile inwwwroot, we will create it in that path with some example methods as follows:
window.blazorInterop = {
    printPage: function () {
        window.print();
    },

    setPageTitle: function (title) {
        document.title = title;
    },
};
- In
App.razor, modify thebodysection as follows:
<body>
    <Routes />
    <script src="blazorinterop.js"></script>
    <script src="_framework/blazor.web.js"></script>
</body>
Make sure to place the reference to the blazorinterop.js file before blazor.web.js. Otherwise, execution will throw exceptions.
If you compile the project now, you will see that a new class is generated with the assigned name, in our example
JSInterop.cs. You can open the file and examine its contents.Modify the
Countercomponent so that instead of increasing the count, it displays the print dialog as follows:
@page "/counter"
@rendermode InteractiveServer
@inject IJSRuntime JSRuntime

<PageTitle>Counter</PageTitle>

<h1>Counter</h1>

<p role="status">Current count: @currentCount</p>

<button class="btn btn-primary" @onclick="IncrementCount">Click me</button>

@code {
    private int currentCount = 0;

    private async Task IncrementCount()
    {
        await JSRuntime.printPageVoidAsync();
    }
}
If you run the project now, you will see that pressing the button opens the print dialog:
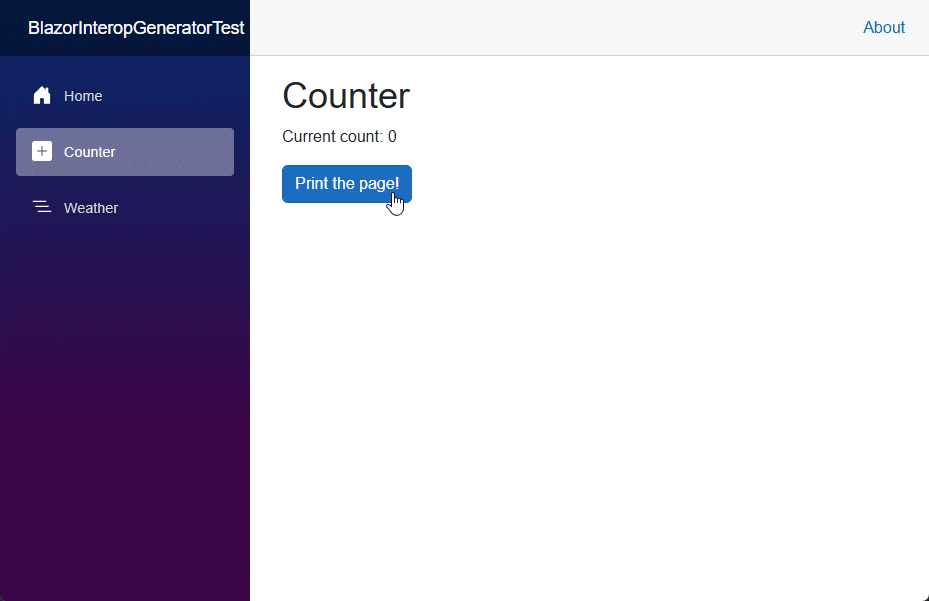
We achieved this using a strongly typed method, thanks to the BlazorInteropGenerator project.
Conclusion
There are numerous open-source projects that can help us in our daily development.
We have examined some that can help accelerate our Blazor-based developments: BlazorSize for obtaining browser dimensions, Fluxor for integrating the Flux pattern in Blazor, Oqtane for speeding up CMS creation, BlazorOcticons for using and displaying icons as components, and BlazorInteropGenerator for converting JS functions into strongly typed C# methods. It’s your time to integrate them into your Blazor developments or discover new projects.

Héctor Pérez
Héctor Pérez is a Microsoft MVP with more than 10 years of experience in software development. He is an independent consultant, working with business and government clients to achieve their goals. Additionally, he is an author of books and an instructor at El Camino Dev and Devs School.
Related Posts
Comments
All articles
Topics
Web MobileMobile
Desktop
Design
Productivity
People
