Blazor Basics: Blazor JavaScript Interop—Calling JavaScript from .NET

Summarize with AI:
Learn how to integrate JavaScript code and JavaScript libraries into a Blazor web application.
The most significant advantage of using Blazor for web development is using C# instead of JavaScript. Yes, JavaScript is popular and has its place in web development. Yet, many of us prefer C# and use Blazor instead of React, Angular or Vue to implement web applications.
Nonetheless, JavaScript is very popular, and many libraries are available. Another good thing about Blazor is that we can integrate JavaScript libraries and use the ASP.NET Core Blazor JavaScript interoperability (or JS interop for short).
As a result, we get the best of both worlds. Isn’t that fantastic?
In this article, I will demonstrate different levels of JavaScript integration into Blazor applications. Since JavaScript is executed on the browser, it doesn’t matter whether we use Blazor Server or Blazor WebAssembly interactivity.
You can access the code used in this example on GitHub.
Do Not Manipulate DOM Elements Using JavaScript
Before we learn how to call JavaScript from .NET or integrate JavaScript libraries into a Blazor web application, it is crucial to provide a word of caution.
Blazor maintains an internal representation of the Document Object Model (DOM) and interacts with those DOM elements rendered in the browser. If we manipulate DOM elements using JavaScript, Blazor doesn’t know about those manipulations, and the behavior could be unexpected since the state in the browser differs from Blazor’s internal model.
Yes, integrating React or Angular components is possible. However, you can only access the DOM elements from Blazor or React/Angular. Don’t mix and match.
A good example of JavaScript integration is executing existing JavaScript logic or integrating a user interface library, such as a charting library or similar, which is currently unavailable as a native .NET library.
Calling a Simple JavaScript Function
Let’s start with calling a simple JavaScript function from a Blazor web application.
We start by implementing a JavaScript function. First, we create a scripts.js file inside the Blazor web application’s wwwroot folder.
We insert the following showMessage function.
function showMessage(message) {
    const result = 2 * 21
    alert(message + " " + result)
}
It’s a simple function that takes a message as an argument (to show you how to pass data from a .NET method to a JavaScript function) and uses JavaScript code to build a message shown in the browser using its native alert function.
Next, we need to load the JavaScript file inside the Blazor web application. We use the default .NET 8 Blazor web application project template and open the App.razor file.
The App.razor file already references the blazor.web.js file required to start a Blazor web application. Below that line, we add another line to reference the script.js file.
The whole body section of the App.razor file looks like this:
<body>
    <Routes @rendermode="InteractiveServer" />
    <script src="_framework/blazor.web.js"></script>
    <!-- references the script.js file from the wwwroot folder -->
    <script src="script.js"></script>
</body>
Next, we open the Home.razor page component. We want to call the showMessage function implemented above when pressing a button on the Home page.
@page "/"
@inject IJSRuntime JS

<PageTitle>Home</PageTitle>
<h1>Calling JavaScript!</h1>

<button @onclick="ButtonClicked">Call JavaScript</button>

@code {
    public async Task ButtonClicked()
    {
        await JS.InvokeVoidAsync("showMessage", new object[] { "Calling JavaScript from .NET!" });
    }
}
We use the @inject directive to inject a reference to the JavaScript runtime using the IJSRuntime type from the Microsoft.JSInterop namespace.
Next, we add a button and assign an onclick handler.
In the code section, we add a ButtonClicked method. The implementation calls the JavaScript function using the InvokeVoidAsync method on the injected IJSRuntime instance.
As the first method argument, we provide the name of the JavaScript function as a string. As the second method argument, we provide an object array with a single item, the message.
Important: JavaScript function arguments are provided by order and not by name. If there are multiple parameters on the JavaScript function we want to call, we need to make sure the order of the arguments is correct when calling the InvokeVoidAsync method.
Alternatively, there is also an InvokeAsync method that we can utilize when we expect a return value from calling the JavaScript function.

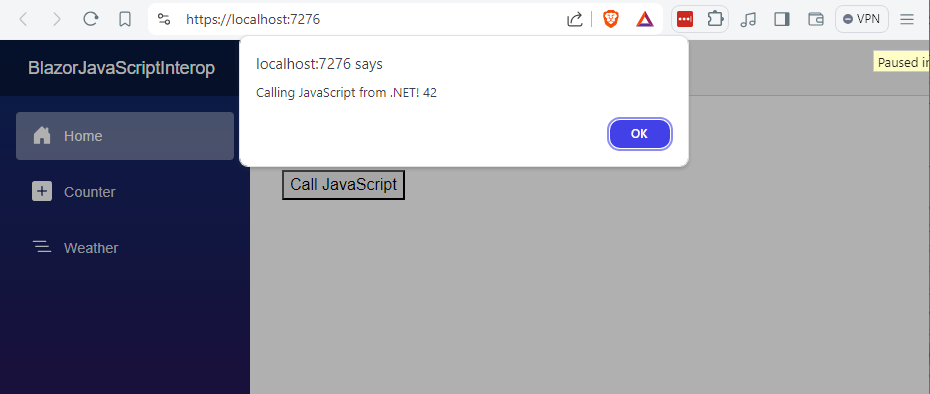
When we build and start the application, the Blazor web application renders the Home page with a button. When we click the button, the JavaScript code is executed, and we see the message in the browser.
Calling a JavaScript Function Returning a Value
What if we want to return a value from the JavaScript method and work with the returned value inside the .NET code?
As mentioned above, the InvokeAsync method allows us to retrieve a return value from a JavaScript function call.
We add the following JavaScript function to the script.js file:
function calculateAge(yearOfBirth) {
    const currentYear = new Date().getFullYear()
    return currentYear - yearOfBirth
}
The calculateAge function accepts the year of birth as a single parameter. We then use JavaScript code to calculate the age and return the value.
In the Home.razor file, we add another button:
<button @onclick="ShowMyAge">Show my Age</button>
We also implement the ShowMyAge method in the code section and add the MyAge property of type int.
@code {
    public int MyAge { get; set; } = 0;

    public async Task ButtonClicked()
    {
        await JS.InvokeVoidAsync("showMessage", new object[] { "Calling JavaScript from .NET!" });
    }

    public async Task ShowMyAge()
    {
        MyAge = await JS.InvokeAsync<int>("calculateAge", new object[] { 1990 });
    }
}
Last but not least, we add another definition to the component template that shows the age if the value is greater than 0.
@if (MyAge > 0)
{
    <div>I'm @MyAge years old.</div>
}
This time, we use the InvokeAsync method and provide int as the generic type argument. Here, we use the type that we expect the JavaScript method to return. It could also be a complex type (an object) as long as it is serializable.
We assign the return value of the InvokeAsync method to the MyAge property.

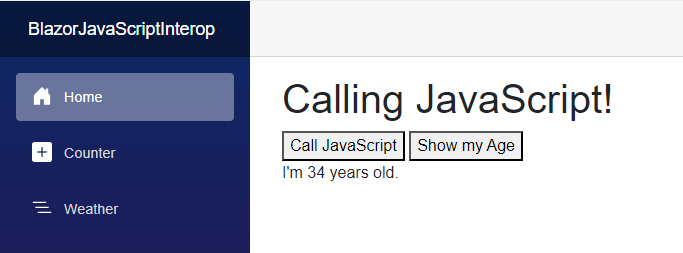
When we build and run the application, we see a second button on the Home page with the text “Show my Age.” When we click on the button, the JavaScript method is executed, and we see the text on the screen with my age.
Debugging the JavaScript Code
The JavaScript code is loaded like a regular web application. We use web standards, and there is nothing .NET-specific about loading the JavaScript code inside a Blazor web application.
Therefore, we can open the browser’s developer console, select the script.js file, set a breakpoint, and debug the application like a JavaScript-based web application.

The examples in this article show how simple it is to (re)use JavaScript code inside a Blazor web application and that we can use the browser’s developer tools by default without any additional work.
Integrating a JavaScript Library (Chart.js)
In the previous sections, we learned how to integrate simple JavaScript code without any dependencies into a Blazor web application.

In this chapter, we want to integrate a fully fledged JavaScript library. For this example, I chose Chart.js. Chart.js is a popular charting library that allows developers to create beautiful line charts, beyond other chart types.
Adding Chart.js to the Blazor Web Application
I created a Charts.razor page and added a link in the NavMenu component to route to the Charts page using the /charts route.
First, we need to download Chart.js and make it available within the Blazor application. We use cdnjs.com to download the chart.umd.min.js file.
Different versions of Chart.js are available. Here, we aren’t using any JavaScript bundler or transpiler. Therefore, we use the Universal Module Definition (umd) version.
Tip: I like to organize my JavaScript libraries in a specific way that helps me with version management and keep the solution clean. I use the following structure inside the wwwroot folder to store the chart.umd.min.js file: wwwroot/js/chartjs/4.4.1/chart.umd.min.js.
Referencing Chart.js in the Blazor Web Application
Now that we have the required JavaScript file in the Blazor web application, we need to reference it in the App.razor file.
We add a reference to the chart.umd.min.js file inside the wwwroot folder using the correct relative file path:
<body>
    <Routes @rendermode="InteractiveServer" />
    <script src="_framework/blazor.web.js"></script>
    <script src="js/chartjs/4.4.1/chart.umd.min.js"></script>
    <!-- references the script.js file from the wwwroot folder -->
    <script src="script.js"></script>
</body>
For reference, I added the whole body section of the App.razor file, which also contains the Routes component besides the JavaScript file references.
Creating the Charts in JavaScript
We can now create the JavaScript-based charts using Chart.js in the script.js file.
We add two JavaScript functions to the existing script.js file.
First, we add the createChart function:
function createChart(htmlElementId, data, label) {
    new Chart(
        document.getElementById(htmlElementId),
        {
            type: 'bar',
            data: {
                labels: data.map(row => row.year),
                datasets: [
                    {
                        label: label,
                        data: data.map(row => row.salary)
                    }
                ]
            },
            options: {
                scales: {
                    y: {
                        beginAtZero: true
                    }
                }
            },
        }
    );
}
This function accepts three function parameters. First, we want an htmlElementId to reference the correct canvas HTML element. Second, we want the data that we should render as a chart. And third, we want a label text that explains the data shown in the chart.
The implementation creates a new Chart object defined in the Chart.Js library and loaded in the App.razor file. We use bar as the chart type to define a bar chart. We also provide the data and the label as properties to the chart configuration.
Second, we add the disposeChart function:
function disposeChart(htmlElementId) {
    const chartStatus = Chart.getChart(htmlElementId);
    if (chartStatus != undefined) {
        chartStatus.destroy();
    }
}
The goal of this function is to remove the chart from the rendered website to free resources and to be able to reuse the canvas to render another chart in the same canvas element.
We use the getChart function on the Chart object to receive a reference to the HTML element and call the destroy function if available.
Using Charts in a Blazor Component
In the Charts.razor component, we add the following component template:
@page "/charts"
@inject IJSRuntime JS
@implements IAsyncDisposable

<PageTitle>Charts</PageTitle>

<h1>Using Charts.js from Blazor!</h1>

<div style="width: 800px; height: 400px")">
    <canvas id="@HtmlElementId"></canvas>
</div>
We use the built-it PageTitle component to set the title in the browser tab and an h1 HTML tag to render the page title on the screen.
Next, we have a div element with a width of 800 px and a height of 400 px. Inside the div, we have a canvas element with an id applied using a property defined in the component’s code section.
This canvas element is where the charting library will draw the chart.
Now to the code section of the component:
public string HtmlElementId { get; set; } = $"chart_{Guid.NewGuid()}";
First, we define a string property HtmlElementId and use string interpolation and the Guid class to create a unique ID for the canvas element.
This unique ID is required because we need this ID to reference the correct canvas element when calling the JavaScript code.
Hint: Technically, we could use a hard-coded ID for this example. However, if you later want to extract the chart into a component and reuse it on multiple pages, you’ll need a unique ID per chart.
Next, we define the data we want to render in the chart. Here, we use a record type with two properties: Year and Salary. We also create a Data property and assign an array of the LineChartData type with seven objects.
public LineChartData[] Data { get; set; } = [
    new LineChartData(2010, 65_400),
    new LineChartData(2011, 69_600),
    new LineChartData(2012, 72_250),
    new LineChartData(2013, 76_800),
    new LineChartData(2014, 92_400),
    new LineChartData(2015, 96_180),
    new LineChartData(2016, 103_500)
];

public record LineChartData(int Year, int Salary);
Hint:
Recordorclasstype definitions need to be placed below methods or properties that use them when using the@codeblock in a Blazor component.
We also define a bool instance variable JavaScriptInteropAvailable and set it to false. We will see this variable in use shortly.
private bool JavaScriptInteropAvailable = false;
We want to render the chart when the user loads the page and we want to make sure we remove the chart (and its resources) when the user navigates off the page.
Let’s start with the OnAfterRenderAsync method implementation:
protected async override Task OnAfterRenderAsync(bool firstRender)
{
    if (!firstRender)
    {
        await JS.InvokeVoidAsync("disposeChart", new object[] { HtmlElementId });
    }
    else
    {
        JavaScriptInteropAvailable = true;
    }

    await JS.InvokeVoidAsync("createChart", new object[] { HtmlElementId, Data, "Salary per year" });
}
We use the firstRender method argument for a conditional statement. If the firstRender method argument is false, we know that we already rendered a version of the chart and want to re-render the chart.
We render the chart by using the JS instance injected into the component using the IJSRuntime type. The InvokeVoicAsync method accepts the name of the JavaScript function as its first parameter, followed by an object array with the function arguments. When calling the disposeChart function defined above, we provide the HtmlElementId as its argument to specify which chart should be disposed.
If the firstRender method argument is true, we set the JavaScriptInteropAvailable property to true.
In both cases, we call the createChart JavaScript function using the InvokeVoidAsync method on the JS object of type IJSRuntime to call the createChart function. For this function, we provide three function arguments: The HtmlElementId, the Data and a label.
To properly dispose the chart when the Charts.razor component is disposed, we also implement the DisposeAsync method defined in the IAsyncDispose interface.
public async ValueTask DisposeAsync()
{
    if (JavaScriptInteropAvailable)
    {
        await JS.InvokeVoidAsync("disposeChart", new object[] { HtmlElementId });
    }
}
We check if the JavaScript interop is available and call the disposeChart function using the InvokeVoidAsync method on an instance of the IJSRuntime type.

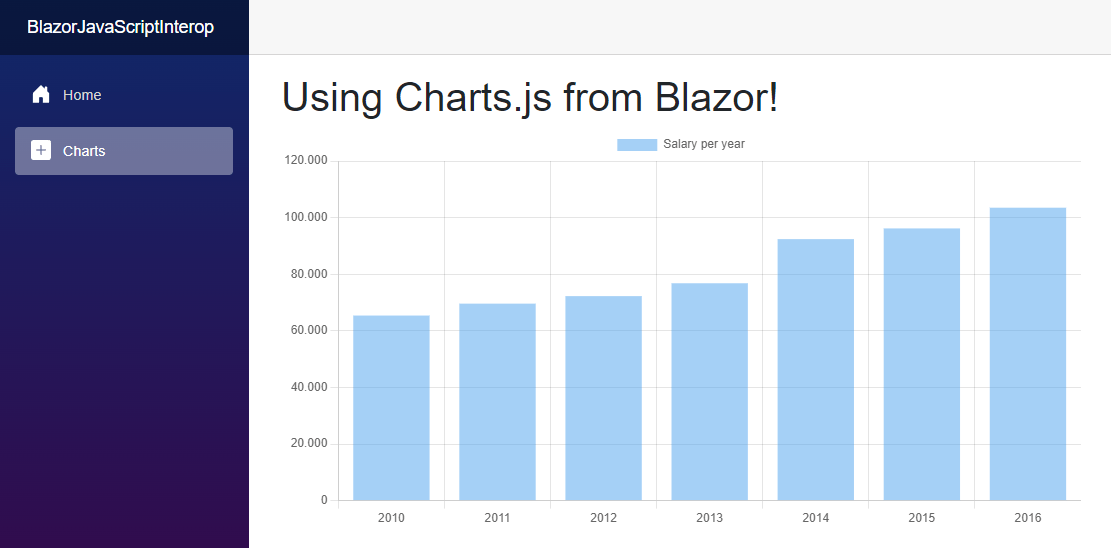
When we build and run the application, and navigate to the Charts page, we see the bar chart rendered using JavaScript inside a Blazor web application.
You can access the code used in this example on GitHub.
Conclusion
ASP.NET Core Blazor JavaScript interoperability allows us to use JavaScript code within a Blazor application.
It allows us to reuse existing code and write JavaScript code when needed or when a .NET library isn’t available. And we also have the option to integrate fully fledged JavaScript libraries into a Blazor web application.
We can call JavaScript functions, and we can use their return value inside the C# code.
Integrating a JavaScript library into a Blazor web application is simpler than we might think. First, we download the JavaScript file and integrate it into the wwwroot folder. We then reference it in the App.razor file to load it when the application loads in the browser.
We then use the IJSRuntime type to call JavaScript code from our Blazor components.
You can access the code used in this example on GitHub.
If you want to learn more about Blazor development, you can watch my free Blazor Crash Course on YouTube. And stay tuned to the Telerik blog for more Blazor Basics.

Claudio Bernasconi
Claudio Bernasconi is a passionate software engineer and content creator writing articles and running a .NET developer YouTube channel. He has more than 10 years of experience as a .NET developer and loves sharing his knowledge about Blazor and other .NET topics with the community.

