
Angular and Kendo UI MCP: Making Agents Work for You

Summarize with AI:
See what’s possible when your AI assistant can use your actual tools to perform work for you: The Kendo UI for Angular AI Coding Assistant can connect with the Angular MCP Server in a truly intelligent way.
Building modern Angular applications involves juggling multiple tasks: executing CLI commands, managing libraries, navigating documentation and, now, integrating AI tools.
The challenge? Most AI assistants provide generic code snippets but lack context about your specific project structure or the professional UI tools you use.
What if your AI assistant could do more than just suggest code? What if it could actually use your tools to perform the work for you? Imagine an agent that doesn’t just “talk” about Angular and Kendo UI documentation but actually applies official best practices directly to your codebase.
Today, we’re going to bridge that gap. We’ll connect your AI tools directly to your project to literally make Angular and Kendo UI work for you.
We’ll achieve this using Angular MCP and the Progress Kendo UI for Angular AI Coding Assistant.
But First, What Is MCP?
MCP stands for Model Context Protocol. Think of it as a standardized bridge that allows AI assistants to securely interact with your local tools and data.
Before MCP, interacting with an AI was like having a video call with a senior developer; they could offer great advice, but they couldn’t touch your keyboard. With MCP our reality changes, MCP brings a standard way for AI to connect with our source code; enabling it to execute commands, read files and understand the state of your project in real time and give full access and context to help us.
For a deeper dive into the concept, I recommend checking out The Promise of Model Context Protocol.
By combining Angular MCP for project management and the Kendo UI for Angular AI Coding Assistant for professional UI components, we can transform the development experience. We stop typing ng generate commands manually and stop switching context so we can see Kendo UI documentation inside our editor by following the Progress team’s recommended practices.
Let’s talk first about Angular MCP!
Part 1: Angular MCP (The Builder)
Think of Angular MCP as a direct line between your AI-powered editor (like Cursor or VS Code) and the Angular CLI.
Instead of switching to a terminal, you can simply ask your AI to create a new component called user-profile, add @angular/material to your project, or fix a build error and explain what happened.
We need to register the MCP server in your editor’s configuration. In Cursor, open your MCP settings (usually found via Command + Shift + P > “Open MCP Settings”) and add the following:
{
  "servers": {
    "angular-cli": {
      "type": "stdio",
      "command": "npx",
      "args": ["-y", "@angular/cli", "mcp"]
    }
  }
}
Note for VS Code users: The configuration file is typically located at:
- macOS/Linux:
~/.vscode/mcp.json
Cursor users: You can add this JSON to your MCP configuration by opening the Command Palette (Cmd/Ctrl + Shift + P) and searching for “MCP.” The configuration file is located under the Tools & MCP section.
Once added, restart your editor and verify it works by asking: “Generate a new Angular service called api-client.”
Checkpoint: Your agent can now manage your Angular project. But how do we handle the UI design?
Learn more about the basics of getting started with Angular and Cursor.
Kendo UI AI Coding Assistant (The Designer)
Building professional dashboards usually involves navigating documentation and manually wiring up complex components. The Kendo UI for Angular AI Coding Assistant changes this by acting as a local Kendo UI expert that understands the entire library.
The Kendo UI for Angular MCP Server runs with npx and uses your Progress Telerik license directly.
First, you need a valid Telerik license. If you don’t have one, you can start a free trial and you don’t need a credit card. Second, you need to add the configuration to your mcp.json file:
{
  "servers": {
    "kendo-angular-mcp-server": {
      "type": "stdio",
      "command": "npx",
      "args": ["-y", "@progress/kendo-angular-mcp@latest"],
      "env": {
        "TELERIK_LICENSE": "YOUR_LICENSE_KEY_HERE"
      }
    }
  }
}
Pro tip: If you have your license key set up globally on your machine, you can omit the
envsection!
Now your agent has the tools to build a responsive orders dashboard. Instead of writing hundreds of lines of code, you can simply prompt your agent using the #kendo_angular_assistant handle:
“Use the #kendo_angular_assistant to build an OrdersDashboardComponent. I need a responsive layout with a sidebar, and a Kendo Grid in the main content area showing ID, Customer, Date, Status and Total. Add a “New Order” button in a toolbar above the grid and use the Kendo Default theme.”
The agent follows three steps. It analyzes your request to see which Kendo UI components you need. Then, it generates clean and typed code for TypeScript and HTML using Kendo UI standards. Finally, it implements the code in your files and helps you with the modules.
Need to iterate? Just ask for a refinement:
“Awesome. Now update the grid to allow filtering by Status using a dropdown, and highlight ‘Pending’ orders in yellow.”
The agent adapts the code instantly, following your specialized requirements.
Let’s See It in Action
To start a new project, just run this command in your terminal:
ng new kendo-store
Now, configure your editor with both MCP servers. Here is a complete example of how your mcp.json should look. Don’t forget to add your Telerik license key:
{
  "servers": {
    "angular-cli": {
      "type": "stdio",
      "command": "npx",
      "args": ["-y", "@angular/cli", "mcp"]
    },
    "kendo-angular-mcp-server": {
      "type": "stdio",
      "command": "npx",
      "args": ["-y", "@progress/kendo-angular-mcp@latest"],
      "env": {
        "TELERIK_LICENSE": "YOUR_LICENSE_KEY_HERE"
      }
    }
  }
}
Now, let’s play with our Cursor agent. We want it to do the tasks for us using these new MCP tools.
For example, ask it which tools are available. It must show Kendo (if you have configured Angular or other MCP). Then, just use a prompt mentioning #kendo_angular_assistant like:
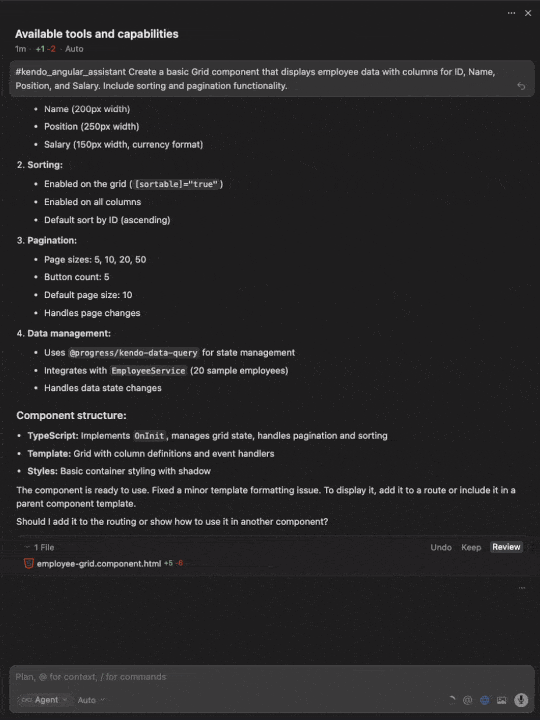
#kendo_angular_assistant Create a basic Grid component that displays employee data with columns for ID, Name, Position, and Salary. Include sorting and pagination functionality.
Let’s see how Cursor works with Kendo UI for Angular MCP:
Maybe you’re wondering, “Do I need to remember every prompt?” Don’t worry, Progress Kendo UI provides a list of optimized prompts ready for use with the Kendo UI for Angular AI Coding Assistant.
Now you are ready with prompts and MCP to give the agents the tools to work for you.
Conclusion
Honestly, we shouldn’t spend our time fighting with our tools. We need to make them work for us.
With Angular MCP handling the CLI work and the Kendo AI Assistant building the professional UI, you can finally focus on what really matters: solving problems and building your app. No more boring boilerplate or searching documentation for hours.
Stop copying and pasting code from ChatGPT, or leaving your agent to work without tools. Give your agents the tools they need to work better for you!
And remember: Kendo UI for Angular comes with a free trial. So, give it a try if you aren’t already using it.

Dany Paredes
Dany Paredes is a Google Developer Expert on Angular and Progress Champion. He loves sharing content and writing articles about Angular, TypeScript and testing on his blog and on Twitter (@danywalls).
Related Posts
Comments
All articles
Topics
Web MobileMobile
Desktop
Design
Productivity
People
