The Ultimate Guide to the Broadcast Channel API

Summarize with AI:
In this article, we will explore the Broadcast Channel API and how it works, as well as how it can be used in real-world cases.
When using a web application, it is common to open multiple browser tabs representing different instances or windows of the same application. These transitions can sometimes result in a disconnection between the browser tabs. For instance, you might log out or update the application’s state in one tab, but the others may still show that you are logged in.
Sometimes, refreshing the page may fix the issue, but it is not always the most efficient solution. To keep multiple browser tabs in sync, developers have had to rely on techniques like localStorage events, constant polling, service workers, etc.
In contrast to these approaches, the browser has a built-in web API called the Broadcast Channel API, which offers an efficient solution to synchronize data across tabs, windows and iframes in real time.
In this article, we will explore the Broadcast Channel API and how it works, as well as how it can be used in real-world cases.
What Is the Broadcast Channel API?
The Broadcast Channel API allows basic communication between different browsing contexts, including tabs, windows, frames and iframes, on the same origin as the application. It allows us to create a simple communication channel that can be tapped into, which makes it easy for all open tabs or other contexts to remain synchronized.
Unlike the window.postMessage method, the Broadcast Channel API simplifies things by avoiding the need to manage the target window or iframe separately. Targets can subscribe to an existing channel by creating a new Broadcast Channel instance with the same name as the subject channel.
How It Works
The core element of the Broadcast Channel API is the channel. Once created, the channel can broadcast data to all contexts (such as tabs, windows, etc.) that are subscribed to that specific channel. You can think of the channel as a public address system for your application, where all subscribed contexts can hear messages being passed across.
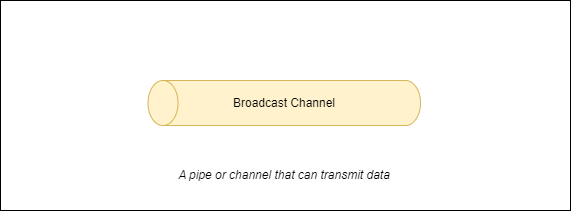
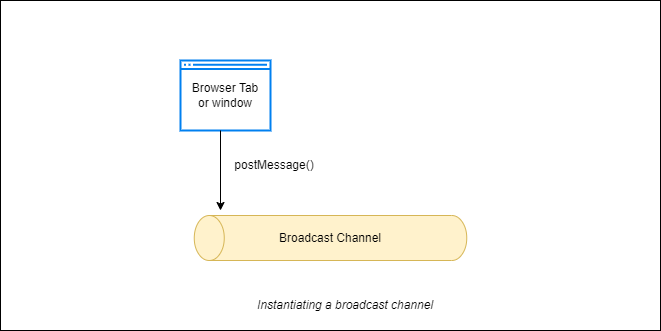
Any instance of a particular application running in a browser context can always create a broadcast channel by creating an instance of the Broadcast Channel class. We can achieve this by passing the channel’s name to the class constructor.
The important thing here is to use the same channel name consistently across all instances that need to be connected. After setting it up, this instance can start broadcasting data across the channel.
The recipient contexts can also listen and receive the transmitted data.
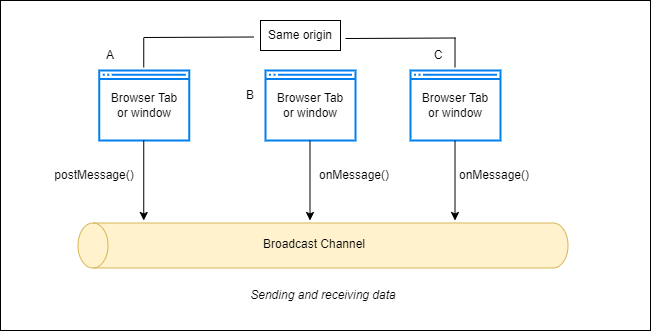
Based on the illustration above, it is important to note that when an instance of the application is in view in a particular instance. Context A and data is being transmitted across the channel. The other contexts, B and C, can only listen at that moment. Also, when context B is transmitting, A and C can listen.
Browser Compatibility
The Broadcast Channel API is supported in modern and standard versions of Google Chrome, Mozilla Firefox, Microsoft Edge, Safari, Opera and Samsung Internet. The API is not supported in any version of Internet Explorer or older versions of Safari.
To keep your application working smoothly across all browsers, it is important to have a feature detection mechanism in place. This way, you can check if the Broadcast Channel API is available and, if not, provide a fallback.
Benefits of Using the Broadcast Channel API
The Broadcast Channel API offers many benefits when working with modern web applications. Here are some of them:
- Real-time data synchronization: One of the most significant benefits is the ability to instantly synchronize data across multiple browser contexts, such as tabs, windows or iframes. Whether updating the user session status, synchronizing the user’s shopping cart, managing notifications, etc., changes in one tab are instantly reflected in others.
- Eliminates reliance on any third party: The Broadcast Channel API is one of the provided Web APIs, meaning we do not have to rely on third-party libraries or external services to achieve synchronization. This makes it a more secure, reliable and maintenance-free solution.
- Simplicity: The Broadcast Channel API is lightweight and easy to set up and implement. We can easily create a channel and start transmitting data with just a few lines of code.
- Improved user experience: Synchronizing multiple browser contexts can prevent inconsistent behavior, thereby improving the user’s experience. For instance, a browser logging out in one tab automatically logs the user out of all open tabs.
- Reduced network requests: With the Broadcast Channel API, everything runs locally within the browser, eliminating the need to make network requests or constantly query a server.
Implementing the Broadcast Channel API
As mentioned earlier, implementing the Broadcast Channel API is straightforward and requires only a few steps. In this section, we will go over the steps to implement the Broadcast Channel API, covering everything from creating a channel to handling messages and eventually disconnecting the channel when it is no longer needed.
Creating or Joining a Broadcast Channel
To use the Broadcast Channel API, we need to create or join a channel. To connect to a broadcast channel, we need to create an instance of the default BroadcastChannel class and pass the channel’s name to its constructor.
If an instance of an application makes the first attempt to connect to a specific broadcast channel, the channel with the defined name gets created.
const channel = new BroadcastChannel("test_bc");
Here, we created a broadcast channel with the name test_bc.
Data Transmission
Once the channel is created, we can now transfer data across it using the postMessage method of the broadcast channel instance.
channel.postMessage("Sample text sent over the broadcast channel");
Here, we triggered the postMessage method and passed some texts. The method can also send numbers, objects, arrays, as well as other non-primitive data types.
Receiving a Message
The Broadcast Channel API provides an onMessage method for receiving data from the broadcast channel. onMessage is an event handler triggered when data is sent from any other context on the same channel, and it captures the data being sent.
channel.onmessage = (event) => {
  console.log(event);
};
Here, we captured and logged the event to the console.
Disconnecting a Broadcast Channel
Once inter-context communication is no longer required, it is good practice to disconnect from the broadcast channel. We can use the close method on the object instance of the broadcast channel to disconnect from the channel.
channel.close();
This prevents any further messages from being received, also freeing up resources.
Use Cases
In the previous section, we saw how to implement the Broadcast Channel API. Now, let’s demo it in a simple Next.js application.
Run the command below in your terminal to create a Next.js project:
npx create-next-app
Next, enter a name for the project and accept the resulting prompts as shown below:

Change into the newly created project folder, and start the development server:
cd test-project
npm run dev
Replace the code in the src/app/page.tsx file with the following:
import React from "react";

export default function Home() {
  return <div className="">hello world!</div>;
}
With the project setup done, let’s demo the API before looking at individual use cases.
Create a components/Demo.tsx file in the src/ folder and add the following to it:
"use client";

import { useEffect, useState } from "react";

export default function Demo() {
  const [message, setMessage] = useState("");
  const [receivedMessage, setReceivedMessage] = useState("");

  useEffect(() => {
    const channel = new BroadcastChannel("test_bc");

    channel.onmessage = (event) => {
      setReceivedMessage(event.data);
    };

    return () => {
      channel.close();
    };
  }, []);

  const sendMessage = () => {
    const channel = new BroadcastChannel("test_bc");
    channel.postMessage(message);
  };

  return (
    <div>
      <h2>Broadcast Channel API Demo</h2>
      <input
        type="text"
        value={message}
        onChange={(e) => setMessage(e.target.value)}
        placeholder="Type a message"
        className="border mr-4"
      />
      <button onClick={sendMessage}>Send Message</button>
      {receivedMessage && (
        <p>
          <span className="font-semibold">Received message:</span>{" "}
          {receivedMessage}
        </p>
      )}
    </div>
  );
}
The code above renders an input field and a button. The input field takes in text inputs, and the button, when clicked, triggers a sendMessage function. The function sets up the broadcast channel and posts the entered text to the channel.
To receive data from the channel, we defined a useEffect hook that calls the onMessage handler.
Add the component to the src/app/page.tsx file as shown below:
import React from "react";
import Demo from "@/components/Demo";

export default function Home() {
  return (
    <div className="m-8">
      <Demo />
    </div>
  );
}
Open the application to see what we have.
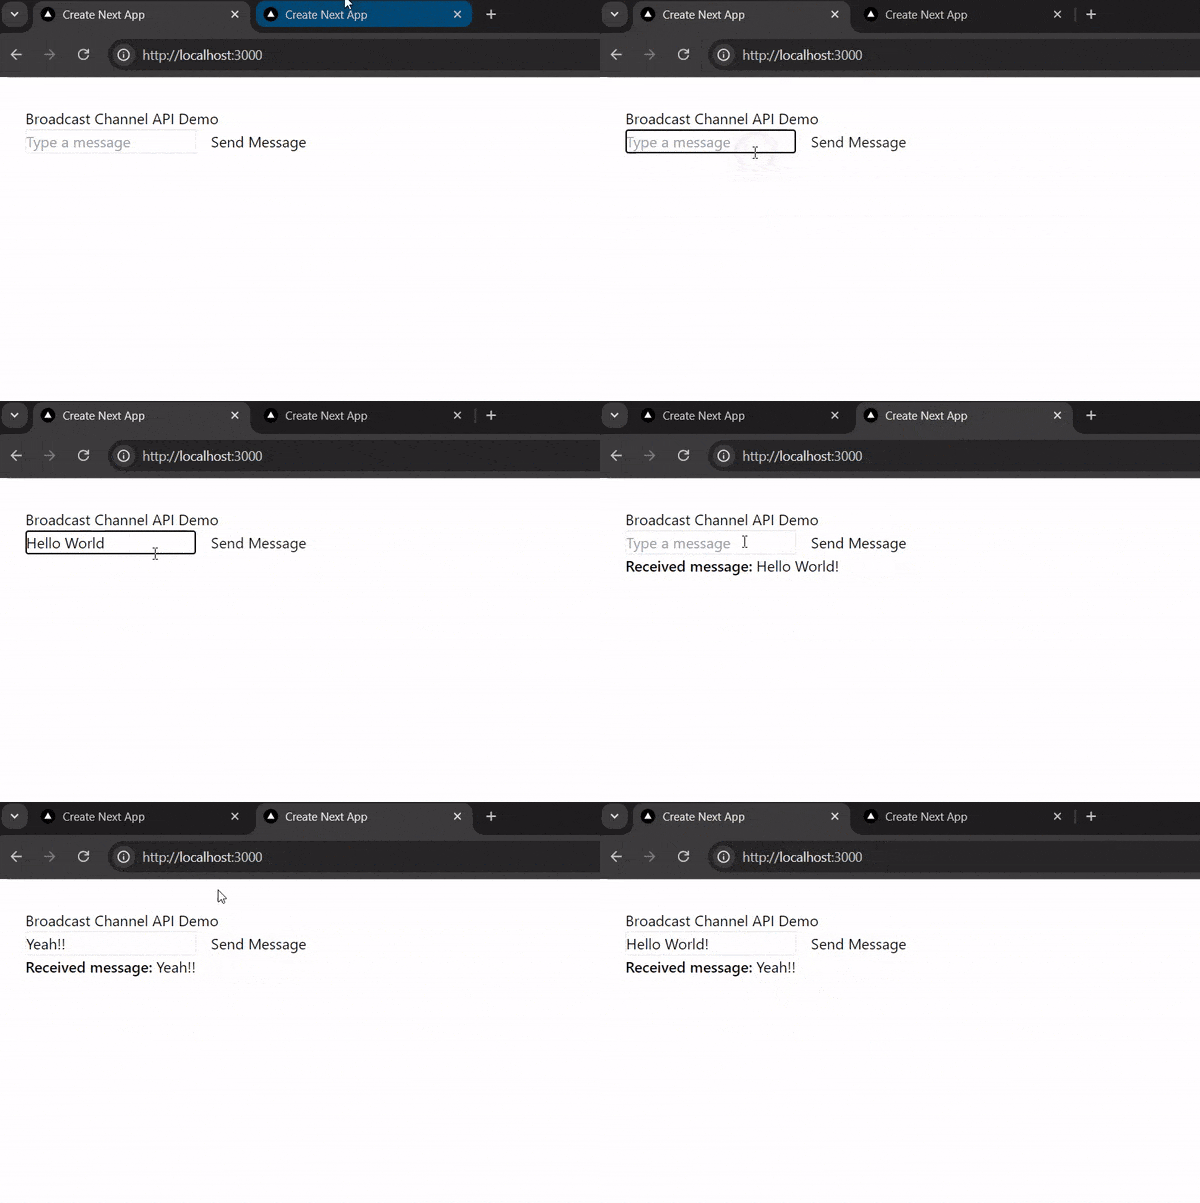
You can see how the state is synchronized across different tabs without having to refresh the page.
User Session Management
In this section, we will see how the Broadcast Channel API can help manage user sessions across multiple tabs or windows in the browser.
When a user logs in or out in one tab, all other tabs should be automatically notified and updated.
Create a SessionProvider.tsx file in the src/components/ folder and add the following to it:
"use client";

import {
  createContext,
  useContext,
  useState,
  useEffect,
  ReactNode,
} from "react";

type Props = {
  children: ReactNode,
};

type ContextType = {
  isAuthenticated: boolean,
  login: () => void,
  logout: () => void,
};

const SessionContext = (createContext < ContextType) | (undefined > undefined);

export const useSession = (): ContextType => {
  const context = useContext(SessionContext);
  if (!context) {
    throw new Error("error");
  }
  return context;
};

export const SessionProvider = ({ children }: Props) => {
  const [isAuthenticated, setIsAuthenticated] =
    useState <
    boolean >
    (() => {
      return localStorage.getItem("auth") === "logged_in";
    });

  const login = () => {
    setIsAuthenticated(true);
    localStorage.setItem("auth", "logged_in");
    broadCastMsg("login");
  };

  const logout = () => {
    setIsAuthenticated(false);
    localStorage.removeItem("auth");
    broadCastMsg("logout");
  };

  const broadCastMsg = (message: string) => {
    const channel = new BroadcastChannel("session");
    channel.postMessage({ action: message });
    channel.close();
  };

  useEffect(() => {
    const channel = new BroadcastChannel("session");
    channel.onmessage = (event: MessageEvent) => {
      if (event.data.action === "logout") {
        setIsAuthenticated(false);
        localStorage.removeItem("auth");
      } else if (event.data.action === "login") {
        setIsAuthenticated(true);
        localStorage.setItem("auth", "logged_in");
      }
    };
    return () => channel.close();
  }, []);

  return (
    <SessionContext.Provider value={{ isAuthenticated, login, logout }}>
      {children}
    </SessionContext.Provider>
  );
};
In the code above, we first created a context and defined a SessionProvider higher-order component that passes the context across to the children components.
isAuthenticated is a boolean state value that indicates whether or not a user is authenticated. login is a function that updates the isAuthenticated state and persists the data with the browser’s local storage.
We then defined a logout function that updates the state and calls the broadcastMsg function. The broadcastMsg function handles setting up the session broadcast channel and transmitting data across that channel.
Next, to receive data from the broadcast channel, we defined a useEffect hook that connects with the session channel and triggers the onMessage event handler, which updates the state accordingly.
Finally, we defined the useSession hook that can be used elsewhere in the application to access the data stored in the context.
Now, let us create an authentication page. Create a src/app/auth/page.tsx file and add the following to it:
"use client";

import { useSession } from "@/components/SessionProvider";

export default function Home() {
  const { isAuthenticated, login, logout } = useSession();

  return (
    <div className="p-4 my-12 w-full max-w-[30rem] text-center border">
      <h1 className="text-2xl font-semibold">Auth page</h1>
      {!isAuthenticated && (
        <button onClick={login} className="my-4 underline text-green-900">
          Login
        </button>
      )}
      {isAuthenticated && (
        <>
          <p className="my-2">You are logged in!</p>
          <button onClick={logout} className="my-2 underline text-red-500">
            Logout
          </button>
        </>
      )}
    </div>
  );
}
The code above imports the useSession hook and updates the page accordingly.
We also need to wrap the page in a layout file with the SessionProvider component.
Create a layout.tsx file in the src/app/auth/ folder and add the following to it:
import { SessionProvider } from "@/components/SessionProvider";

export default function AuthLayout({
  children,
}: {
  children: React.ReactNode,
}) {
  return <SessionProvider>{children}</SessionProvider>;
}
Open the auth page route in the browser to preview the demo.
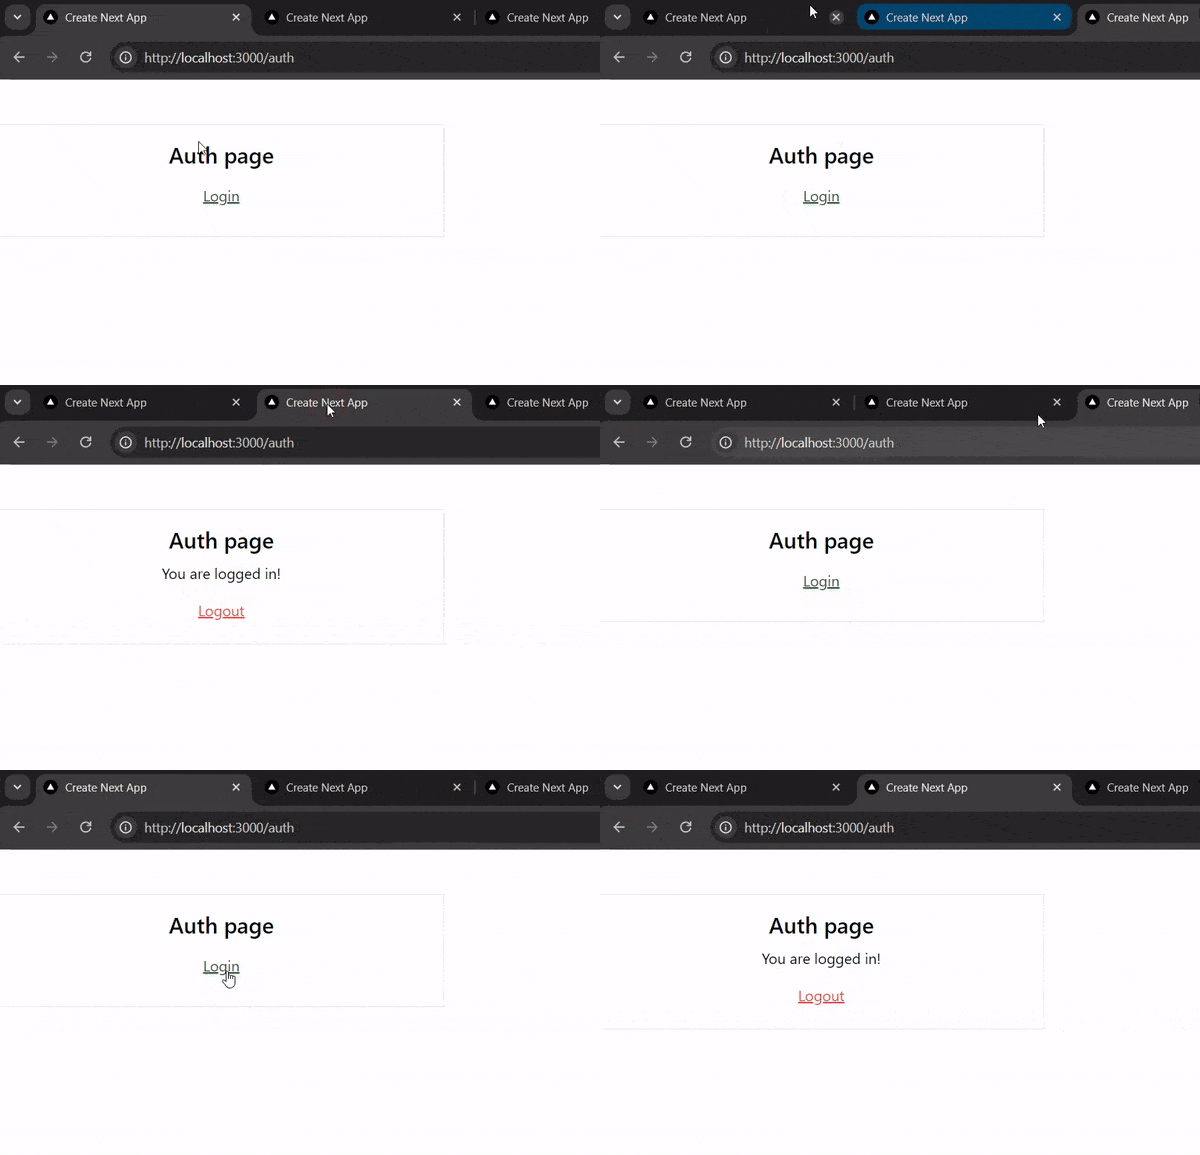
You can also see how the authentication status synchronizes across the tabs.
Multi-Tab Form Autofill
Another use case of the Broadcast Channel API is auto-filling form data across multiple browser tabs or windows. If a user enters data in a form in one tab, it should automatically reflect in other open tabs.
To do this, let’s create another context for managing and synchronizing the form data. Create a FormCtxProvider.tsx file in the /src/components/ folder and add the following to it:
"use client";

import { createContext, useContext, useState, useEffect, ReactNode } from 'react';

type Props = {
  children: ReactNode;
}

type FormContextType = {
  formData: { [key: string]: string };
  update: (field: string, value: string) => void;
}

const FormContext = createContext<FormContextType | undefined>(undefined);

export const useFormCtx = (): FormContextType => {
  const context = useContext(FormContext);
  if (!context) {
    throw new Error('error!');
  }
  return context;
};

export const FormCtxProvider = ({ children }: Props) => {
  const [formData, setFormData] = useState<{ [key: string]: string }>({
    username: '',
    email: '',
    hobby: ''
  });

  const update = (field: string, value: string) => {
    const updatedData = { ...formData, [field]: value };
    setFormData(updatedData);
    localStorage.setItem('formData', JSON.stringify(updatedData));
    broadcastData(field, value);
  };

  const broadcastData = (field: string, value: string) => {
    const channel = new BroadcastChannel('form_sync');
    channel.postMessage({ field, value });
    channel.close();
  };

  useEffect(() => {
    const storedFormData = localStorage.getItem('formData');

    if (storedFormData) {
      setFormData(JSON.parse(storedFormData));
    }

    const channel = new BroadcastChannel('form_sync');

    channel.onmessage = (event: MessageEvent) => {
      const { field, value } = event.data;
      setFormData(prevFormData => ({
        ...prevFormData,
        [field]: value
      }));
    };
    return () => channel.close();
  }, []);

  return (
    <FormContext.Provider value={{ formData, update }}>
      {children}
    </FormContext.Provider>
  );
};
The code above is similar to what we have in the SessionProvider component of the previous use case. We have:
- update: A function to update the state and also persist the data.
- broadcastData: To set up the broadcast channel and also transmit data.
- useEffect: To listen for updates and reflect changes across tabs or windows accordingly.
Next, create a src/app/form/page.tsx file and add the following to it:
"use client";

import { ChangeEvent } from "react";
import { useFormCtx } from "@/components/FormCtxProvider";

export default function Form() {
  const { formData, update } = useFormCtx();

  const handleChange = (e: ChangeEvent<HTMLInputElement>) => {
    const { name, value } = e.target;
    update(name, value);
  };

  return (
    <form className="p-4 my-12 mx-4 w-full max-w-[30rem] border">
      <h1 className="text-2xl font-semibold text-center">
        Multi-tab form autofill
      </h1>
      <div className="w-full flex flex-col gap-2 my-4">
        <label>Name:</label>
        <input
          type="text"
          name="username"
          value={formData.username}
          onChange={handleChange}
          className="border p-2"
        />
      </div>

      <div className="w-full flex flex-col gap-2 my-4">
        <label>Email:</label>
        <input
          type="email"
          name="email"
          value={formData.email}
          onChange={handleChange}
          className="border p-2"
        />
      </div>

      <div className="w-full flex flex-col gap-2 my-4">
        <label>Hobby:</label>
        <input
          type="text"
          name="hobby"
          value={formData.hobby}
          onChange={handleChange}
          className="border p-2"
        />
      </div>
    </form>
  );
}
In the code above, we created form fields and bound them with the formData state from the defined context. The handleChange function triggers the update to implement changes.
Let’s add a layout.tsx file to the src/app/form/ folder and add the following to it:
import { FormCtxProvider } from "@/components/FormCtxProvider";

export default function FormLayout({
  children,
}: {
  children: React.ReactNode,
}) {
  return <FormCtxProvider>{children}</FormCtxProvider>;
}
Here, we wrapped the form page with our FormCtxProvider.
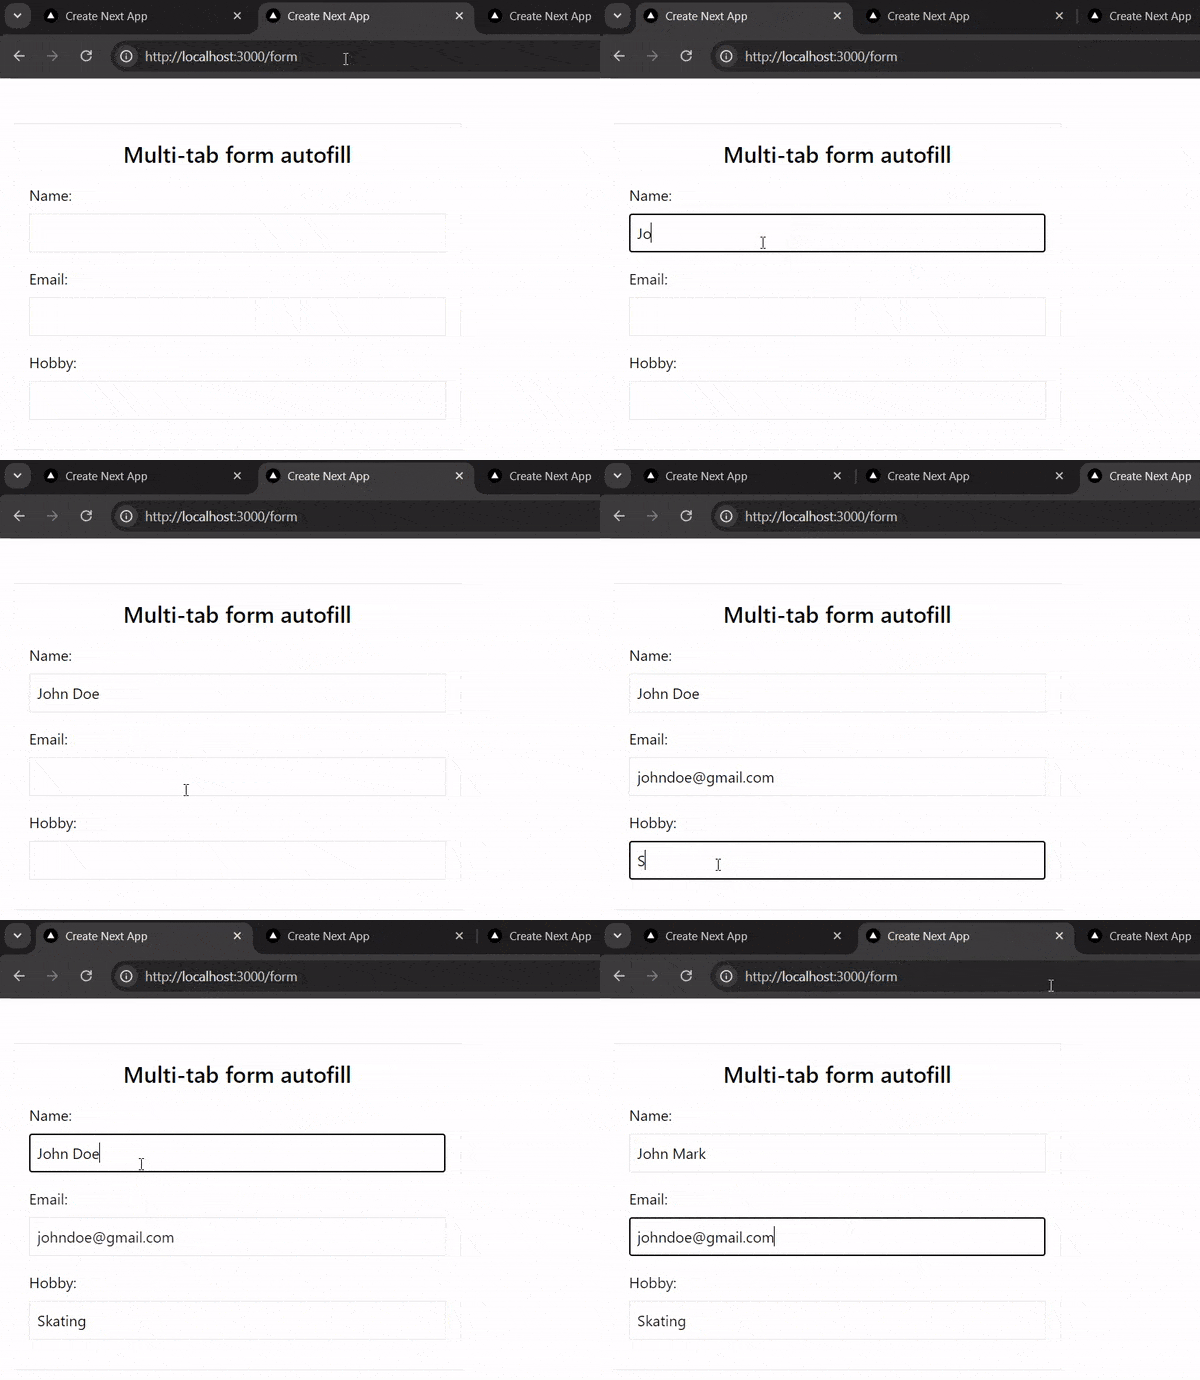
Navigate to the form route in the browser and preview the form. Notice how the data entered into the form inputs persists across different tabs.
Conclusion
The Broadcast Channel API provides a simple solution for synchronizing multiple contexts without complex workarounds. While there are many more use cases for the Broadcast Channel API, we only covered a few to keep this article simple.

Christian Nwamba
Chris Nwamba is a Senior Developer Advocate at AWS focusing on AWS Amplify. He is also a teacher with years of experience building products and communities.

