
Setting Up Web Development Environment for Windows

Summarize with AI:
Follow these tips to help you set up (or optimize) your development space on Windows.
Web development on Windows has come a long way. With tools like Windows Subsystem for Linux (WSL 2), Windows Terminal and modern runtime managers, you can now set up a fast, reliable and unix-friendly workflow without leaving Windows.
In this guide, we’ll walk through everything you need to set up a modern web development environment. From installing WSL 2 and mapping your Linux file system to customizing your shell with Zsh and managing runtimes with Node Version Manager (NVM) and launching your first frontend project with Vite, we’re covering the full-stack of modern tooling for web development.
Whether you’re a new developer getting started or an experienced one setting up a fresh machine, this guide covers everything you need to set up a modern web development project.
Prerequisites
- Operating System: Windows 10 (version 2004 or higher) or Windows 11
- GitHub Account: Required for version control and syncing with repositories
Setting Up the Windows Development Environment [The Foundation]
In this section, we will guide you through the installation and configuration of essential tools that establish the foundation of a modern development environment workflow on Windows.
Setting Up and Configuring Windows Subsystem for Linux (WSL)
One of the first and most important steps in setting up your Windows dev environment is installing Windows Subsystem for Linux (WSL). WSL lets you run a Linux environment directly on Windows—no virtual machine or dual-booting required.
I recommend using Ubuntu as your primary Linux distribution, but you’re free to try others. Most systems can run multiple Linux distributions concurrently without issues.
Installing and Configuring WSL2
WSL 2 is the latest version of the subsystem, offering a real Linux kernel and full system call compatibility. Previously, installation required several manual steps, but it is now easier than ever to install with a single command in PowerShell.
To Install WSL 2
Open PowerShell as Administrator and run the following command:
wsl --install
This command will do the following:
- Enable required WSL and VM platform components
- Download and install the latest Linux kernel
- Set WSL 2 as the default version
- Install Ubuntu as the default distribution (you may need to restart your system)
Once installation is complete, launch Ubuntu from the Start menu. It will take a few moments to initialize. Then, you will be prompted to create a UNIX username and password, which are separate from your Windows credentials.
It is also recommended that you regularly update and upgrade your packages. To do that, run the following command:
sudo apt update && sudo apt upgrade -y
Mapping Your Linux Drive
By default, Windows File Explorer shows your devices and drives. To streamline access, we’ll map the Ubuntu virtual drive as a network location.
Open \\wsl$\ location from the file explorer. This will display all your installed WSL distributions, then follow the instructions below:
- Right-click on the Ubuntu folder, and select “Map network drive”:
- Choose the drive letter (e.g.,
Z:). - Check Reconnect at sign-in.
- Click Finish
Below is the step-by-step demo image:
Your Linux home directory is now accessible from Windows as a network drive. From within the Linux terminal, you can access Windows files under
/mnt/(e.g.,/mnt/c/Users/your_username).
This configuration enables easy file transfers between Windows and Linux via drag-and-drop or copy-and-paste.
Restarting WSL
If WSL runs into issues or stops working, you can restart it with:
wsl.exe --shutdown
wsl.exe
That should bring everything back to normal.
Important Considerations When Using WSL
If you’re building web projects using WSL, there are a few critical things to keep in mind to improve performance and cross-platform compatibility:
- File system performance: For best performance, store your project files within the Linux file system (e.g.,
/home/username/). Avoid working directly from mounted Windows paths (/mnt/c/…) as this can slow down tools like Node.js, npm and webpack. - Line ending consistency: Linux uses
LF, while Windows usesCRLF. To prevent broken scripts or weird Git diffs, add a .gitattributes file to your project to enforce consistent line endings. - Path format differences: Path syntax differs between systems—Windows uses paths like
C:\Users\..., while Linux uses/home/username. Be mindful of this when setting environment variables, running scripts or configuring Docker. - Permissions and privileges: Some operations in WSL—such as installing packages, accessing system directories or opening privileged ports—may require elevated privileges. Use
sudowhere necessary, just like in a traditional Linux setup.
Setting Up Windows Terminal
You can launch the Linux terminal by either opening Ubuntu from the Start menu or running wsl from PowerShell or Command Prompt.
For a more feature-rich experience with features such as tabs, split panes, theming and key bindings, consider using Windows Terminal. It’s modern, fast and works seamlessly with WSL. While alternatives like Cmder, ConEmu and Hyper exist, in my experience, Windows Terminal provides the most reliable and developer-friendly setup for daily use.
Installing and Customizing Windows Terminal
If you’re using Windows 11, it’s built in. If you’re using Windows 10, install it via Microsoft Store or PowerShell:
winget install --id=Microsoft.WindowsTerminal -e
I recommend customizing your terminal settings, such as setting the default profile and starting directory, to streamline your workflow. This means that every time you launch Windows Terminal, it opens directly into your WSL environment inside your Linux user’s home directory.
Follow these instructions to set up your Default Profile:
- Open Windows Terminal.
- Click the down arrow
vnext to the tab button and choose Settings. - Under Startup section, set Default profile to Ubuntu.
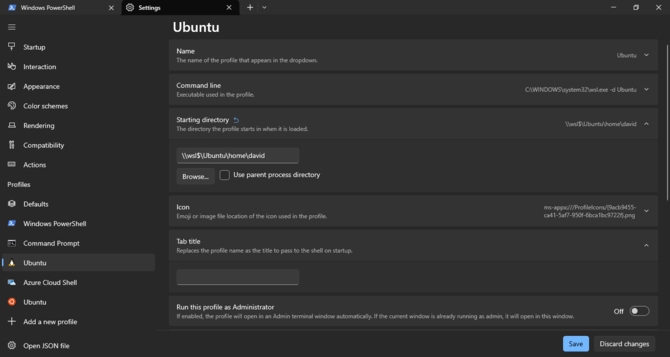
Below is the step-by-step demo image of the instruction above:
Follow these instructions to set up Starting Directory:
- In Settings, go to Profiles > Ubuntu.
- Under the General tab, find Starting directory.
- Enter the following:
\\wsl$\Ubuntu\home\your_username. Make sure to replaceyour_usernamewith your actual Ubuntu username.
You can leave the use parent process directory box unchecked.
You can also explore deeper customization via the JSON config file or by visiting Windows Terminal Themes for community themes.
Setting Up Git and GitHub
Git is essential for version control in development, while GitHub provides a platform to host, manage and collaborate on your code repositories.
Installing and Configuring Git
Git usually comes preinstalled on most Linux distributions via WSL. But to verify you have it (or the most up-to-date version), run the following command:
sudo apt update && sudo apt install git
Next, set your global Git identity:
git config --global user.name "Your Name"
git config --global user.email "youremail@example.com"
You can confirm the settings with:
git config --list
Generating SSH Keys for GitHub
Using SSH with GitHub allows you to authenticate securely without entering your username and password each time. To generate SSH keys for GitHub, follow these steps:
1. Generate a New SSH Key
Execute the following command (replace the placeholder with your GitHub email address):
ssh-keygen -t ed278490 -C "youremail@example.com"
-t ed25519uses the modern and secure Ed25519 algorithm.-Cadds a label for your key (usually your email).
When prompted:
- Press Enter to accept the default file location (
~/.ssh/id_ed25519). - Choose a passphrase if you’d like to add security (optional but recommended).
2. Start the SSH Agent
Make sure the SSH agent is running:
eval "$(ssh-agent -s)"
3. Add Your Key to the SSH Agent
ssh-add ~/.ssh/id_ed25519
If you used a custom name or location for the key, update the path accordingly.
4. Add the Public Key to your Github Account
First, copy your public key to the clipboard:
cat ~/.ssh/id_ed25519.pub
Then:
- Log in to GitHub.
- Go to https://github.com/settings/keys.
- Click “New SSH key.”
- Paste the key, give it a descriptive title (e.g., “WSL Dev Machine”) and save.
- Test Your SSH Connection. Run the following command to verify that everything is working:
ssh -T git@github.com
If setup is successful, you’ll see:
Hi your-username! You've successfully authenticated, but GitHub does not provide shell access.
Amplifying Your Shell with Zsh and Oh My Zsh
Zsh is a powerful, user-friendly alternative to Bash. When combined with Oh My Zsh, it delivers a highly customizable, feature-rich shell experience with themes, plugins and smart defaults.
Installing ZSH
sudo apt install zsh
Then, set Zsh as your default shell:
chsh -s $(which zsh)
You may need to restart your terminal or log out and back in for the change to take effect.
Installing Oh My Zsh
Oh My Zsh is a popular framework that makes managing your Zsh configuration easier, with support for themes, plugins, aliases and more.
First, install curl:
sudo apt install curl
Then install Oh My Zsh using the official install script:
sh -c "$(curl -fsSL https://raw.githubusercontent.com/ohmyzsh/ohmyzsh/master/tools/install.sh)"
Once installed, your terminal will automatically switch to Zsh and load the new config. You can start customizing it via your ~/.zshrc file.
Adding Themes and Plugins (Optional but Fun)
This section is optional, but if you’re like me and enjoy a customized terminal, here’s where things get exciting.
Install Powerlevel10k Theme
Powerlevel10k is a fast, responsive and visually rich Zsh theme with Git integration, segment prompts, icons and more.
Clone the theme into your Oh My Zsh custom themes directory:
git clone --depth=1 https://github.com/romkatv/powerlevel10k.git ${ZSH_CUSTOM:-$HOME/.oh-my-zsh/custom}/themes/powerlevel10k
Then open your ~/.zshrc file and update the theme setting:
ZSH_THEME="powerlevel10k/powerlevel10k"
Install Useful Plugins
- zsh-autosuggestion: This plugin provides real-time command suggestions as you type:
git clone https://github.com/zsh-users/zsh-autosuggestions \
${ZSH_CUSTOM:-~/.oh-my-zsh/custom}/plugins/zsh-autosuggestions
- zsh-syntax-highlighting: This plugin adds syntax highlighting to commands in your terminal:
git clone https://github.com/zsh-users/zsh-syntax-highlighting.git \
 ${ZSH_CUSTOM:-~/.oh-my-zsh/custom}/plugins/zsh-syntax-highlighting
Enable the Plugins
Edit your ~/.zshrc file and add the plugins to the list:
plugins=(git zsh-autosuggestions zsh-syntax-highlighting)
Then apply the changes:
source ~/.zshrc
Configure PowerLevel10K
To customize the look and feel of your terminal, run:
p10k configure
This launches an interactive wizard where you can choose your preferred prompt style, icons, layout and more.
You can always rerun the configuration later with the same command.
Want more? Check out the Awesome Zsh Plugins repo for a curated list of themes, plugins and other Zsh goodies.
Installing Node.js
Node.js is essential for modern JavaScript development. It brings server-side capabilities to JavaScript, allowing you to build servers, APIs, backend services and tools using the same language that powers the browser.
Installing NVM (Node Version Manager)
When working on multiple projects, you’ll often need to switch between different versions of Node.js. Node Version Manager (NVM) makes this easy by allowing you to install, manage and switch between Node.js versions directly from the command line.
To install NVM, run the following command in your terminal:
curl -o- https://raw.githubusercontent.com/nvm-sh/nvm/v0.39.7/install.sh | bash
After installation, activate NVM with:
export NVM_DIR="$HOME/.nvm"
[ -s "$NVM_DIR/nvm.sh" ] && \. "$NVM_DIR/nvm.sh"
Add the two lines above to your ~/.zshrc or ~/.bashrc so NVM loads automatically whenever a new shell session starts.
Installing Node.js via NVM
Run the following command to install the latest LTS (Long-Term Support) version of Node.js:
nvm install --lts
Set it as the default version:
nvm alias default node
Verify that Node and npm are available:
node --version
npm --version
LTS versions are stable, well-supported and recommended for most development and production workflows.
Installing and Using pnpm (Optional)
If you care about performance and disk space efficiency, consider using pnpm. It’s a modern alternative to npm and yarn that installs packages faster by using a content-addressable storage mechanism.
Run the following command to initialize a new project:
pnpm init
Use the following command to install dependencies:
pnpm install package-name
To install a package globally:
pnpm install package-name
Using Package Managers on Windows: Chocolatey & Scoop
Package managers streamline software installation, updates and maintenance—much like apt on Linux or brew on macOS. On Windows, the two most popular options are Chocolatey and Scoop.
Chocolatey
Chocolatey is a powerful, full-featured package manager for Windows. It supports system-wide installations and thousands of packages, including CLI tools, applications and services.
Installing Chocolatey
- Open PowerShell as Administrator
- Run the following:
Set-ExecutionPolicy Bypass -Scope Process -Force;
[System.Net.ServicePointManager]::SecurityProtocol = [System.Net.ServicePointManager]::SecurityProtocol -bor 3072;
iex ((New-Object System.Net.WebClient).DownloadString('https://community.chocolatey.org/install.ps1'))
Using Chocolatey
- Install a package:
choco install <package-name> -y
- Upgrade all installed packages:
choco upgrade all -y
Scoop
Scoop is a simpler, developer-friendly package manager that installs tools into your user profile—no admin rights needed. Ideal for CLI tools and programming languages.
Installing Scoop
- Open PowerShell (non-admin).
- Allow script execution:
Set-ExecutionPolicy RemoteSigned -Scope CurrentUser
- Install Scoop:
iwr -useb get.scoop.sh | iex
Using Scoop
- Install a Package:
scoop install <package-name>
- Update all installed packages:
scoop update *
Recommendation: Both Chocolatey and Scoop are excellent. Use Chocolatey for system-wide installations (apps, services) and Scoop for developer tools and CLI utilities. You can even use them side by side without conflict.
At this point, you can start your web development project with any web programming stack of your choice. Refer to the Further Resources section for reference.
Setting Up Your First Web Project with Vite
In the previous section, we covered some of the core tools you need to kick off any web development project on Windows. In this section, we’ll walk through how to quickly scaffold a modern frontend project using Vite.
Setting Up Vite
Vite is a modern frontend build tool created by Evan You, designed to power the next generation of web applications. It offers features like instant server start, optimized builds, lightning-fast Hot Module Replacement (HMR) and out-of-the-box support for TypeScript, JSX, CSS and popular frameworks like React, Vue and more. With Vite, you can skip tedious manual setup and jump straight into building modern JavaScript applications.
To scaffold a new Vite project, run the following command:
npm create vite@latest my-first-project
This command will walk you through the project setup interactively.
Then Vite will prompt you select a framework:
> npx
> "create-vite" my-first-project

│
◆  Select a framework:
│  ● Vanilla
│  ○ Vue
│  ○ React
│  ○ Preact
│  ○ Lit
│  ○ Svelte
│  ○ Solid
│  ○ Qwik
│  ○ Angular
│  ○ Marko
│  ○ Others
└
Vite can be used to bootstrap a range of frontend frameworks and libraries, so select Vanilla since we are scaffolding a plain vanilla web project.
Vite will ask you to choose a language, either JavaScript or TypeScript. You can choose whichever one you prefer for your project.
Use your arrow keys to make your selection. Here, JavaScript is selected:
◆  Select a variant:
│  ○ TypeScript
│  ○ TypeScript + SWC
│  ● JavaScript
│  ○ JavaScript + SWC
│  ○ React Router v7 ↗
│  ○ TanStack Router ↗
│  ○ RedwoodSDK ↗
You can see other options with SWC. SWC (Speedy Web Compiler) is a JavaScript/TypeScript compiler used in Vite for transforming JavaScript and TypeScript code. It’s a fast, low-level JavaScript and TypeScript compiler built with Rust, designed to deliver faster build times and better performance.
After setting up the framework, you will see an output that the project has been scaffolded in your project folder. Vite will then instruct you to install dependencies using npm (or the package manager you’re using):
◇  Scaffolding project in /Users/mac/my-first-project...
│
└  Done. Now run:
cd my-first-project
npm install
npm run dev
Navigate to your project folder as directed:
$ cd my-first-project
Then install the dependencies for this project:
$ npm install
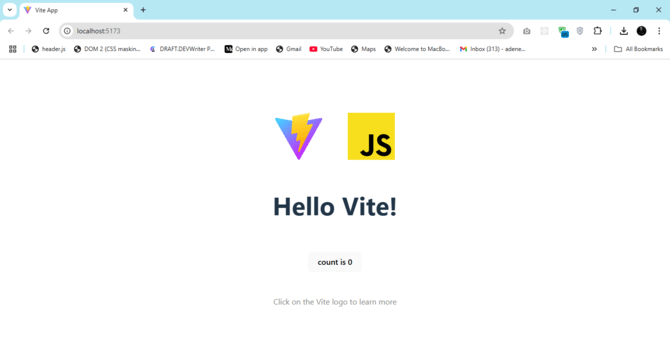
Next, start the development server to verify everything is working. Use the following command to run the development server:
$ npm run dev
This command will then run your project in development mode. It will prompt the following outputs:
VITE v6.3.5  ready in 1227 ms
➜  Local:   http://localhost:5173/
➜  Network: use --host to expose
➜  press h + enter to show help
Next, click on the link (http://localhost:5173/) to open the project in your browser:
You can decide to use any code editor of your choice at this stage, but Visual Studio Code is my preferred code editor.
Setting Up Visual Studio Code
Visual Studio Code (VS Code) has become one of the most popular code editors for web development, thanks to its simplicity, speed and rich plugin ecosystem that supports virtually any type of web project.
Installing Visual Studio Code
You can download VS Code from the official website.
Configuring VS Code for WSL
We will install and configure a Remote Development Extension Pack. It’s an extension that allows you to open any folder in a container, on a remote machine or WSL—while enjoying the full power of VS Code.
How to install the Remote Developer Extension:
- Open VS Code.
- Go to the Extension view (
ctrl+shift+X). - Search for Remote Development.
- Click Install.
Open WSL project in VS Code. This extension allows you to launch VS Code right from your WSL terminal by using just the code command. In your WSL terminal, navigate to your project directory and run the following command to open the entire directory of your project inside VS Code.
cd my-first-project
code .
Top VS Code Essential Extensions for Web Development
There are numerous extensions in VS Code for web development. Here are my top five:
- Web Dev: A bundle of popular tools for frontend development—includes Live Server, ESLint, JavaScript (ES6) Code Snippets and more. Instead of installing each tool individually, you can install this pack to streamline your setup.
- Prettier: Prettier is an opinionated code formatter for enforcing consistent style.
- GitLens: Supercharges Git integration inside VS Code. See line-by-line commit history, authorship and make Git workflows easier and more visual.
- Bracket Pair Colorizer: This extension enhances code readability by colorising matching brackets, making it easier to navigate and understand nested structures.
- Code Spell Checker: Helps catch typos in variable names, comments and documentation. Especially useful for maintaining code quality in larger codebases.
You can explore more extensions on the official Visual Studio Marketplace and tailor your setup based on your project’s needs.
Windows Productivity Apps and Browser Extensions for Web Development
In this section, I’ll highlight a few productivity tools for Windows, along with some of my favorite browser extensions that help streamline and enhance my web development workflow.
Chrome Browser Extensions
Google Chrome is my go-to browser for development, and these are some of the essential extensions I use to boost productivity:
- React Developer Tools: A must-have if you’re working with React. It lets you inspect and debug React components, analyze state and props, and identify performance issues.
- Web Developer: A powerful toolkit that allows you to disable images, scripts and styles; resize the viewport; and validate HTML and CSS. Perfect for testing and debugging.
- JSON Viewer Pro: Automatically formats and highlights JSON data in the browser, making it easier to read and debug.
- Lighthouse: Built by Google, this tool audits your web pages for performance, accessibility, SEO and best practices.
- CSS Peeper: Lets you quickly inspect CSS styles on any website without digging through developer tools. Great for UI exploration or reverse-engineering layouts.
You can check for an extension suitable for you at the Chrome Web Store. Also, you can get the equivalent of the above-listed extensions for Firefox here.
Productivity Tools for Windows
Here are some of my favorite free productivity apps that I use regularly in my dev workflow:
- Microsoft PowerToys: A collection of utilities that help power users tweak and optimize their Windows experience (e.g., FancyZones, file renamer, quick window resizing).
- Notion: A project management and note-taking software.
- Figma: A cloud-based UI/UX design tool that makes real-time collaboration with designers seamless.
- Slack: A wide used team communication and collaboration platform. Ideal for both work and open-source/community development teams.
Using Chocolatey, you can download all these apps at once with the following command in PowerShell as an administrator:
choco install powertoys notion figma slack -y
Chocolatey automates the setup process, so you don’t have to download and install each tool manually.
Additional Development Environment Setup [Optional]
I added this section for developers who are either beginners, not frontend-focused or don’t primarily work with JavaScript. It provides a quick walkthrough for setting up Docker with WSL and configuring a Python development environment inside WSL.
Docker
According to the official documentation, Docker is an open platform for developing, shipping and running applications. It allows you to decouple your application from the underlying infrastructure, making it easier to build, test and deploy software quickly.
Installing Docker
Docker Desktop enables you to run containers natively on Windows using WSL 2. You can install Docker Desktop using one of two methods:
Option 1 – Install via Chocolatey:
choco install docker-desktop
Option 2 – Install from the official site: https://www.docker.com/products/docker-desktop
After downloading, run the installer and ensure to check the box labeled “Use WSL 2 instead of Hyper-V” during setup. Once the installation is complete, restart your computer.
Verifying Docker Installation
To verify that Docker is installed correctly, open your terminal and run:
docker --version
Then run a test container to confirm everything is working:
docker run hello-world
You should see a success message indicating Docker is functioning correctly.
You’re now fully set up with Docker on Windows via WSL—native, fast and container-ready.
You can refer to Docker’s official documentation to learn more about how to use Docker effectively on Windows.
Wrapping Up
Congrats! That was a long read. But by now, you’re not just ready to code, you’re fully equipped for real-world web development on Windows. You’ve installed and configured WSL 2, customized your terminal with Zsh and Oh My Zsh, set up Git and secure GitHub workflows with SSH, installed Node.js via NVM and even scaffolded your first frontend project with Vite. All on Windows—without needing to leave your OS or spin up a VM.
If JavaScript is your main stack, this setup gives you everything you need to build and run modern frontend and backend applications using tools like React, Vue, Angular, Next.js, Express.js or Nest.js. And if you’re building with other stacks such as ASP.NET with Blazor, Python with Django, or Ruby on Rails, this environment setup still offers a solid foundation for web development on Windows. Just refer to the specific documentation for your chosen stack to complete your setup.
You have the tools and the setup, so now it’s time to create magic.
Happy coding!
Further Resources
- Blazor Basics: Getting Started with Blazor Development in Visual Studio 2022
- React Basics: Getting Started with React and Visual Studio Code
- Vue Basics: Getting Started with Vue.js and Visual Studio Code
- Angular Basics: Setting Up Angular Development Environment
- How to Install Python & Django on Windows
- Learning NestJS Part 1: Getting Started

David Adeneye Abiodun
David Adeneye is a software developer and a technical writer passionate about making the web accessible for everyone. When he is not writing code or creating technical content, he spends time researching about how to design and develop good software products.
Related Posts
Comments
All articles
Topics
Web MobileMobile
Desktop
Design
Productivity
People
