
Mastering Kendo UI

Summarize with AI:
Most people are familiar with the concept of a "black belt." When I was a kid, other kids would point to a guy we all knew was into Karate and say, "Watch out for that guy - he's a black belt!". In our world, Black Belt meant, "Bruce Lee" and "Crane kick your face". While the black belt is the visual representation of someone's level of expertise in martial arts, the actual ranking system is known as The Dan.
Kendo uses the Dan system as well. Rankings in Kendo can only be bestowed by examination. Furthermore, the dan is specifically a ranking for technical skill. There is another parallel ranking system that tests written knowledge. The highest achievable rank in Kendo is 8th dan, and is notorious for being incredibly difficult. There are only three 8th Degree dans in the world. It is truly a mastery of the art.
Mastering The Art Of Kendo UI
Kendo UI has grown from a collection of UI widgets into a full fledged JavaScript Application library, containing everything you need to build rich desktop and mobile applications. This makes mastering Kendo UI an art form in and of itself.
The longer that a developer works with Kendo UI, the more they will learn to master it's lesser known capabilities, and wield the widely known ones with even greater strength. In this article, we're going to take a look at some of the concepts and practices that every developer needs to approach the "8th dan" of Kendo UI.

The jQuery Bokken
Actual Kendo warriors use different types of weapons, but a common one is the Bokken. This is the wooden sword that you often see the Kendoka holding. In Kendo UI terms, jQuery is the Bokken. Kendo UI relies heavily on jQuery. It uses a vast amount of the library internally for element selection, XHR, control statements, object extension, event delegation and much more.
It is impossible to master Kendo UI without also having a mastery of jQuery
The good news is that it only takes a moderate amount of jQuery to get started with Kendo UI, and you will end up mastering jQuery in the process of mastering Kendo UI. It's a two-for-one deal. However, a deep understanding of jQuery will automatically vault you into the advanced dans of Kendo UI.
For the sake of this article, I'm going to assume you already have a really good handle on jQuery, and we'll go straight to where it's applicable in Kendo UI.
Advanced Concept 1: Modularization Using Classes
Every developer wants to re-use as much code as they possibly can. This is often frustrating in JavaScript because there is no class object offering classical inheritance and JavaScript objects are mutable. For this reason, Kendo UI exposes a Class object off of the root namespace. Extending this object will provide class-like capabilities that are essential in composing re-usable structures.
Encapsulation Of Logic
Classes are historically thought to encapsulate business logic. While this is true in JavaScript development as well, it is also common to find UI logic in well formed classes. Consider a case where an API is wrapped by some JavaScript logic. A good example of this is in large enterprise systems such as Progress OpenEdge, which provides a JavaScript Data Object (JSDO) - a JavaScript object that is designed to provide remote access to an OpenEdge database. You will find similar access methods in other enterprise systems, such as Oracle and Salesforce.
In the case of OpenEdge, a developer needs to configure a Session object and a JSDO before any calls can be made for remote data. Don't worry too much about what this code is doing as it's very platform specific.
(function () {

  var serviceURI = 'http://oemobiledemo.progress.com/MobilityDemoService',
      catalogURI = serviceURI + '/static/mobile/MobilityDemoService.json';

  // create a new session object
  var session = new progress.data.Session();
  session.login(serviceURI, '', '');
  session.addCatalog(catalogURI);

  // create a JSDO
  var jsdo = new progress.data.JSDO({ name: 'dsCustomer' });
  jsdo.subscribe('AfterFill', onAfterFillCustomers, this);

  // calling fill reads from the remote OE server
  jsdo.fill();

  // this function is called after data is returned from the server

  function onAfterFillCustomers(jsdo, success, request) {

    // for each customer record returned
    jsdo.eCustomer.foreach(function (customer) {
      // write out some of the customer data to the page
      document.write(customer.data.CustNum + ' ' + customer.data.Name + '<br>');

    });
  }
}());(function() {
var JSDO = kendo.Class.extend({
init: function(serviceURI, catalogURI, resourceName) {
// create a new session
this._createSession(serviceURI, catalogURI);
// create a new JSDO
this.jsdo = new progress.data.JSDO({ name: resourceName });
// subscribe to the after fill event
this.jsdo.subscribe('AfterFill', this._afterFill, this);
// expose the fill function
this.fill = function() {
this.jsdo.fill();
}
},
_createSession: function() {
this.session = new progress.data.Session();
this.session.login(serviceURI, '', '');
this.session.addCatalog(catalogURI);
},
_afterFill: function() {
// for each customer record returned
this.jsdo.eCustomer.foreach(function (customer) {
// write out some of the customer data to the page
document.write(customer.data.CustNum + ' ' + customer.data.Name + '
');
});
}
});
}());var serviceURI = 'http://oemobiledemo.progress.com/MobilityDemoService',
catalogURI = serviceURI + '/static/mobile/MobilityDemoService.json';
// create a new instance of the JSDO class facilitated by Kendo UI
var jsdo = new JSDO(serviceURI, catalogURI, 'dsCustomer');
// read the data from the remote endpoint
jsdo.fill();
These components can be included in a file and any developer who includes the file can instantly consume the data from a remote enterprise service while only having to be aware of the class interface, not the underlying implementation of the actual remote system object.
Advanced Concept 2: Promises
Kendo UI is JavaScript library, and JavaScript is asynchronous. That makes it powerful, but will also open the gates of chaos as your application grows. It's important to learn and implement JavaScript promises in your Kendo UI code.
In the above example, the fill() method is called on the class, but there is no way to know when the actual data comes back. Since the class handles writing the data to the DOM, we don't necessarily care when the data gets back. In a real-world scenario, we would want the class to return us the data so that we could then have another component mutate the DOM with it. Normally this might be implemented using a callback.
(function() {
  var JSDO = kendo.Class.extend({
    init: function(serviceURI, catalogURI, resourceName) {
      ...,
      this.fill = function(callback) {
        this.onFill = callback;
        this.jsdo.fill();
      }
    },

    _afterFill: function() {
      this.onFill(this.jsdo.eCustomer.getData());
    }
  });
}());
// read the data from the remote endpoint
jsdo.fill(function(customer) {
  $.each(customer, function() {
      $(document.body).append('<p>' + this.CustNum + ' ' + this.Name + '</p>');
  });
});
This is all well and good until your callback requires a callback which requires another callback. We mitigate the issues caused by this complexity using a promise-like abstraction in jQuery, called "Deferred". This is an object that is created and passed around from executing function to calling function and knows the state of any operations it's made aware of. While the callback is still present, it's easier to track what functions are executing when.
(function() {
  var JSDO = kendo.Class.extend({
    init: function(serviceURI, catalogURI, resourceName) {
      ...,
      this.fill = function(callback) {
        this.onFill = $.Deferred();
        this.jsdo.fill();
        return this.onFill;
      }
    },

    _afterFill: function() {
      this.onFill.resolve(this.jsdo.eCustomer.getData());
    }
  });
}());

jsdo.fill().then(function() {
  ...
});
Advanced Concept 3: Custom Transports
Using Kendo UI implies that you will probably be using Kendo UI widgets. This means that you will be heavily leveraging the Kendo UI DataSource. The DataSource is a powerful construct that you can bend to your will in just about every way. The most powerful concept that you can learn in Kendo UI DataSources is the custom transport.
Transports define the CRUD endpoints for a service. Usually, we think of these as being strings.
(function() {
  var ds = new kendo.data.DataSource({
    transport: {
        read: '/customers'
    }
  });
}());
Using the example from above, we could replace the logic which writes out the list of items to a list by binding it to a Grid and using a custom transport.
(function() {
  var serviceURI = 'http://oemobiledemo.progress.com/MobilityDemoService',
  catalogURI = serviceURI + '/static/mobile/MobilityDemoService.json';

  // create a new instance of the JSDO class facilitated by Kendo UI
  var jsdo = new JSDO(serviceURI, catalogURI, 'dsCustomer');

  $('#grid').kendoGrid({
    dataSource: {
      transport: {
        read: function(options) {
          jsdo.fill().then(function(customers) {

            // pass the data to the options.success function
            options.success(customers);

          });
        }
      }
    },
    columns: [
      { title: 'Customer Number', field: 'CustNum' },
      { field: 'Name' }
    ]
  });
}());
Advanced Concept 4: Template Functions
If you spend any amount of time with Kendo UI, there will inevitably be the day that you want a widget to look or behave slightly different than it does out of the box. Most of this can be done with configuration options and CSS. Some of it cannot. In these instances, template functions are your secret weapon.
Nearly all widgets utilize Kendo UI templates. These templates determine how each item will look when it is rendered into a widget. Templates are usually defined as strings. In this example, the template defines the label text on the bar chart.
(function() {

  var chartData = [
                { field: "Cat 1", left: -.80, right: 0 },
                { field: "Cat 2", left: -.56, right: 0 },
                { field: "Cat 3", left: 0, right: .69 },
                { field: "Cat 4", left: 0, right: .29 },
                { field: "Cat 5", left: 0, right: .58 }];

  $("#barchart").kendoChart({
    dataSource: {
      data: chartData
    },
    title: {
      text: 'Bar Chart'
    },
    seriesDefaults: {
      type: 'bar',
      stack: true
    },
    series: [{
      data: [0, 0, .69, .29, .85],
      field: 'right'
    }, {
      data: [-.80, -.56, 0, 0, 0],
      field: 'left'
    }],
    categoryAxis: {
      field: 'field',
      labels: {
        template: '#: value #'
      }
    }
  });
}());
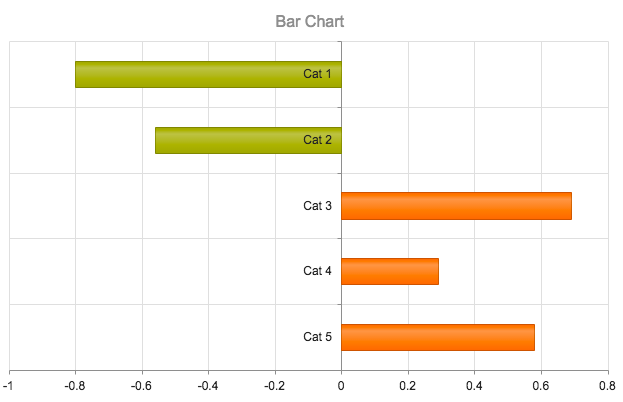
You can see on the chart that the labels are all aligned on the left-hand side of the bars, no matter which way they are going. It would be better if the labels were on the opposite side of the stacked bars. In fact, if you look at the data, it is already setup to support determining label placement.
The way to make this visual tweak to the chart is to pass a function instead of a string to the template. Inside of the function, we can get a reference to the current data item and then return the appropriate markup. In this case, that's SVG.
(function() {

  var chartData = [
                { field: "Cat 1", left: -.80, right: 0 },
                { field: "Cat 2", left: -.56, right: 0 },
                { field: "Cat 3", left: 0, right: .69 },
                { field: "Cat 4", left: 0, right: .29 },
                { field: "Cat 5", left: 0, right: .58 }];

 $("#barchart").kendoChart({
    dataSource: {
      data: chartData
    },
    title: {
      text: "Bar Chart"
    },
    seriesDefaults: {
      type: "bar",
      stack: true
    },
    series: [{
      data: [0, 0, .69, .29, .85],
      field: "right"
    }, {
      data: [-.80, -.56, 0, 0, 0],
      field: "left"
    }],
    categoryAxis: {
      field: "field",
      labels: {
        template: function(e) {
          if (e.dataItem.right === 0) {
            return "<tspan style='position: absolute' dx='20'>" + e.value + "</tspan>"
          }
          else {
            return "<tspan style='position: absolute' dx='-30'>" + e.value + "</tspan>"
          }
        }
      }
    }
  });
}());
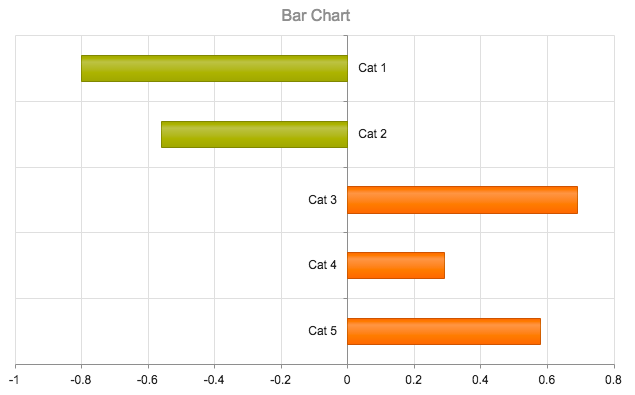
This does require the developer to know a thing or two about SVG, but the good news is that the Internet is chocked full of information. :)
Advanced Concept 5: Handle Touch Events
Touch events are essential on mobile devices. Ironically, it's 2015 and touch events are still a mess on the web. The good news is, you don't need to worry about any of that.
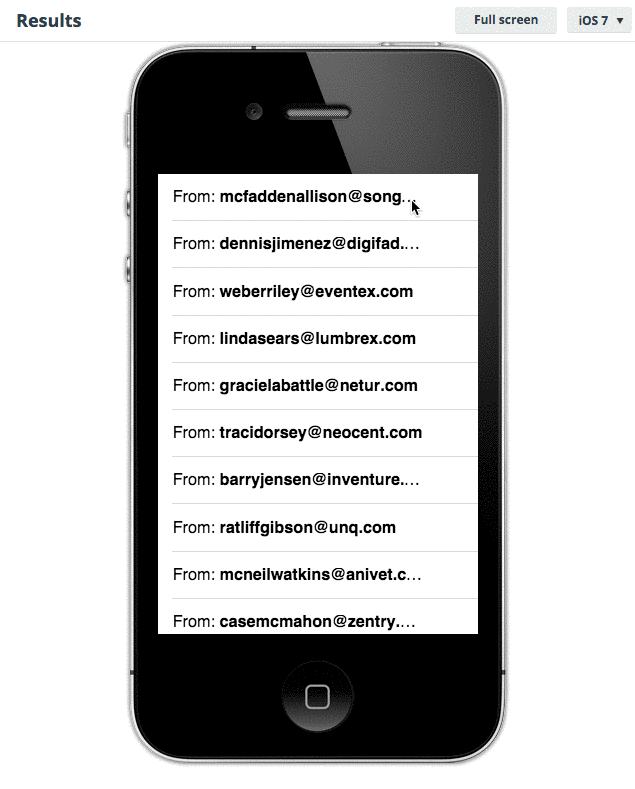
The Kendo UI Touch element abstracts all of the silliness of touch events away so that you can concentrate on building a modern touch interface. For instance, a simple ListView is rendered as such with Kendo UI Mobile.
  <div data-role="view">
    <ul data-role="listview" data-template="itemTemplate" data-source="app.products"></ul>
  </div>

  <script id="itemTemplate" type="text/x-kendo-template">
    <div class="wrapper">
      <p>From: <strong>#=email#</strong></p>
    </div>
  </script>

  <script>

    (function() {

      var app = window.app = window.app || {};
      var emails = "http://www.json-generator.com/api/json/get/cpWDSpjwUi?indent=2";

      app.products = new kendo.data.DataSource({
        transport: {
          read:  {
            url: emails,
            dataType: "jsonp"
          }
        }
      });

      new kendo.mobile.Application(document.body);

    }());

  </script>
Now let's add a theoretical requirement that the Kendo UI Mobile ListView does not meet out of the box.
On many mobile mail apps, there is the concept of swiping left or right on a message to take some action, such as archiving or scheduling it. This requires moving the list row out of the way with a touch. This would be incredibly complex to try and implement on your own. Fortunately, it's really not that hard with the Kendo UI Touch widget.
Touch widgets can be applied to ANY element. Kendo UI will then handle that element as if you mean to touch it. It will squash the 300ms click delay and all other mobile web touch weirdness. It also provides a completely sane API for working with that element, including tap, swipe, dragging, dragend and more. All you have to do as the developer is handle those events.
<div data-role="view">
  <ul data-role="listview" data-template="itemTemplate" data-source="app.products"></ul>
</div>

<script id="itemTemplate" type="text/x-kendo-template">
  <div class="wrapper">
  <div class="action" data-role="touch">
    <a data-role="button" class="btn-archive" data-icon="action">Archive</a>
  </div>
  <div class="item" data-role="touch" data-drag="app.events.dragging" data-dragend="app.events.dragend">
    <p>From: <strong>#=email#</strong></p>
  </div>
</script>

<script>

  (function() {

    var app = window.app = window.app || {};
    var emails = "http://www.json-generator.com/api/json/get/cpWDSpjwUi?indent=2";

    app.products = new kendo.data.DataSource({
      transport: {
        read:  {
          url: emails,
          dataType: "jsonp"
        }
      }
    });

    app.events = {
      dragging: function(e) {
        var left = e.sender.element.position().left;
        if (left <= 0) {
          e.sender.element.css("left", left + e.touch.x.delta);
        }
      },
      dragend: function(e) {
        var el = e.sender.element;
        // get the listview width
        var width = $("ul").width();
        // set a threshold of 65% of the width
        var threshold = (width * .35);
        // if the item is less than 65% of the way across, slide it out
        if (Math.abs(el.position().left) > threshold) {
          kendo.fx(el).slideIn("right")
                      .duration(500)
                      .reverse()
                      .then(function(){
            e.sender.element.closest("li").addClass("collapsed");
          });
        }
        else {
          el.animate({ left: 0 });
        }
      },
      swipe: function(e) {
        if (e.direction === "left") {
          var del = e.sender.element;
          kendo.fx(del).slideIn("right").duration(500).reverse();
        }
      }
    };

    new kendo.mobile.Application(document.body);

  }());

</script>
The Road To Mastery
There is much and more to mastering Kendo UI, beyond what I have shown here. Join me in person on May 4th in Boston, MA at TelerikNEXT for an "Advanced Kendo UI" rundown, plus two full days of technincal sessions covering every area of development from the desktop, to the web, to that phone in your pocket. Use promo code HOLLAND when you register for $50 off the standard ticket price.
TelerikNEXT: What's Next In App Development. Register today. I'll see you there.


Burke Holland
Burke Holland is a web developer living in Nashville, TN and was the Director of Developer Relations at Progress. He enjoys working with and meeting developers who are building mobile apps with jQuery / HTML5 and loves to hack on social API's. Burke worked for Progress as a Developer Advocate focusing on Kendo UI.