
How to Integrate MarkLogic with the KendoReact Grid and Map Components

Summarize with AI:
Use the KendoReact Grid and Map components to create a customizable, accessible interface fueled by the powerful MarkLogic database.
Progress MarkLogic is a database designed from the ground up to make massive quantities of heterogeneous data easily accessible through search.
The design philosophy behind the evolution of MarkLogic is that storing data is only part of the solution. The data must also be quickly and easily retrieved and presented in a way that makes sense to different types of users. Additionally, the data must be reliably maintained by an enterprise grade, scalable software solution that runs on commodity hardware.
In this blog post, we will create a Grid component with CRUD operations and a KendoReact Map that uses MarkLogic to visualize data.
Bear in mind that throughout this blog post, I will be using the Progress KendoReact Data Grid and KendoReact Map components. To learn how to get up and running with these components, I highly recommend reviewing the Getting Started with KendoReact article, which will get you up to speed with how to use the React data grid.
Set up MarkLogic
In case you get stuck, the full code for this project can be found in this GitHub repo.
First we have to install MarkLogic. Visit their official documentation and follow the steps necessary for your operating system.
After installing MarkLogic, visit localhost:8001 in your web browser to configure your MarkLogic server with an administrator username and password. (In our example, we use admin/admin for the username/password.) During this process, you can skip joining a cluster and enter anything for the wallet password.
Create a new project directory named kendo-react-marklogic-example. Inside that directory, create a directory named setup. Open a terminal inside the setup directory and run:
npm init
in order to create a new package.json and then run:
npm install --save request request-promise colors press-any-key
In the same directory create a config.js file that will contain our settings for configuring MarkLogic:
const config = {};

config.project = {
  name: "kendo-react-marklogic-sample"
};

config.auth = {
  user: "admin",
  pass: "admin",
  sendImmediately: false
};

config.host = "localhost";

config.databases = {
  content: {
    name: config.project.name + "-content"
  },
  modules: {
    name: config.project.name + "-modules"
  },
};

config.rest = {
  "rest-api": {
    name: config.project.name + "-rest",
    database: config.databases.content.name,
    "modules-database": config.databases.modules.name,
    port: 8077,
    "error-format": "json"
  },
  security: {
    authentication: "basic"
  },
  options: {
    name: "search-options",
    file: "search-options.xml"
  }
};

config.user = {
  "user-name": config.project.name + "-user",
  "password": "password",
  "role": [ "rest-admin", "rest-writer" ]
}

config.content = [
  {
    collection: "product",
    path: "/data/products"
  }
];

config.modules = {
    path: "/data/modules"
};

config.pause = 10000;

if (typeof module !== 'undefined' && typeof module.exports !== 'undefined') {
  module.exports = config;
}
Here we are configuring our database and authentication. In the same directory, create a file called setup.js that will contain our MarkLogic setup and add the following code:
const config = require(process.argv[2] || './config'),
      client = require('./client.js');

const setup = async (config) => {
  console.log(
    '                            SETUP STARTED                             '.gray.bold.inverse
  );
  try {
    await client.getConfig(config);
  } catch(error) {
    console.error("Cannot connect to MarkLogic, ending setup.".red);
    process.exit();
  }
  await Promise.all([
    client.createDatabase(config.databases.content.name, config),
    client.createDatabase(config.databases.modules.name, config)
  ]);
  await Promise.all([
    client.createForest(config.databases.content.name, config),
    client.createForest(config.databases.modules.name, config),
  ]);
  await client.createREST(config);
  await client.setRESTAuth(config);
  await client.createUser(config);
  console.log('Loading data...'.green);
  await Promise.all([
    client.loadContent(config),
    client.loadSearchOptions(config)
  ]);
  console.log(
      '                            SETUP FINISHED                            '.gray.bold.inverse
  );
}

setup(config);
Start the MarkLogic service on your machine by following the steps relevant to your OS:
Here is how starting MarkLogic looks on Windows:
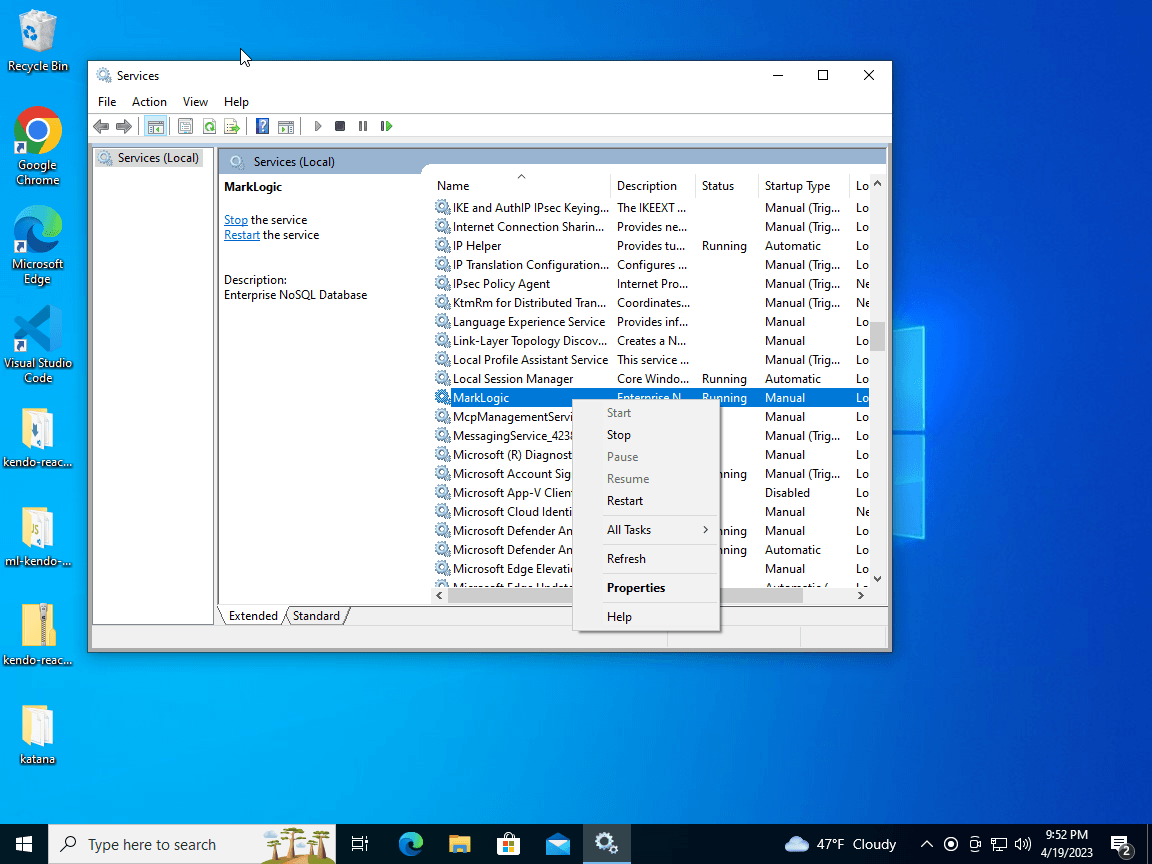
Open a terminal and inside the setup directory, run node setup.js and open localhost:8077. When running it for the first time, you will be prompted to create a username and password that must be added to the config:
config.auth = {
  user: "admin",
  pass: "admin",
  sendImmediately: false
};
Project Setup For Our Express Server
Now that we have MarkLogic up and running, we will take a look at how to setup a server that will serve our endpoints. We will be using Express.
In the project directory, we will create a directory named server. Inside we will run npm init in order to create a package.json file. Once you are done with that, run the following commands to install express and cors:
npm install express –save
npm install cors –save
npm install @progress/kendo-data-query –save
Next, create an index.js file in the same directory that will be our server and add the following lines:
const express = require("express");
const app = express();
const cors = require("cors");
app.use(cors());
app.use(express.json());

app.listen(4000, () => {
    console.log("Server is running on port 4000");
});
Here we are requiring express and cors and setting our app to listen to port 4000.
Next step is importing our products.js and process from the @progress/kendo-data-query package so that we can apply operation descriptors to the data.
Here is how our updated code looks:
const express = require("express");
const app = express();
const cors = require("cors");
app.use(cors());
app.use(express.json());
const data = require('./products')
const { process } = require('@progress/kendo-data-query');

app.listen(4000, () => {
    console.log("Server is running on port 4000");
});
Now we are ready to create our endpoints that will later be consumed on the client side.
app.get("/products", (req, res) => {
    let dataState = req.query.dataState;
    // this is the place to get the items from the database
    let skip = parseInt(dataState.skip);
    let take = parseInt(dataState.take);
    res.send(process(parsedData,
        {
            skip: skip,
            take: take,
            group: dataState.group,
            sort: dataState.sort,
            filter: dataState.filter
        }
    ));
});

app.put("/update", (req, res) => {
    let dataState = req.body.dataState;
    const item = req.body.item;
    const id = item.ProductID;
    // this is the place to update the database and return success if it was successful
    let index = parsedData.findIndex(item => item.ProductID === id);
    parsedData[index] = item;
    parsedData[index].inEdit = false;
    // return error if any
    res.send(process(parsedData, dataState));
});

app.post("/create", (req, res) => {
    const item = req.body.item
    let dataState = req.body.dataState;
    const id = parsedData.length + 1;
    item.ProductID = id;
    item.inEdit = false;
    parsedData.unshift(item);
    res.send(process(parsedData, dataState));
});

app.delete("/delete/:id", (req, res) => {
    let dataState = req.body.dataState;
    const id = parseInt(req.params.id);
    // this is the place to delete the item from the database and return success if it was successful
    let index = parsedData.findIndex(item => item.ProductID === id);
    parsedData.splice(index, 1);
    // return error if any
    res.send(process(parsedData, dataState));
});
This will allow us to create, update and delete an item in our Grid further down the road.
Here is how our index.js file looks with all the imports and endpoits set up:
const express = require("express");
const app = express();
const cors = require("cors");

const data = require('./products')
const mapData = require('../setup/data/countries-users.json')

const { process } = require('@progress/kendo-data-query');

const currentYear = new Date().getFullYear();

const parsedData = data.sampleProducts.map(product => {
    const date = new Date(product.FirstOrderedOn);
    date.setFullYear(currentYear);
    product.FirstOrderedOn = date.toISOString()
    return product;
})

app.use(cors());
app.use(express.json());

app.get("/products", (req, res) => {
    let dataState = req.query.dataState;
    // this is the place to get the items from the database
    let skip = parseInt(dataState.skip);
    let take = parseInt(dataState.take);
    res.send(process(parsedData,
        {
            skip: skip,
            take: take,
            group: dataState.group,
            sort: dataState.sort,
            filter: dataState.filter
        }
    ));
});

app.get("/map", (req, res) => {
    res.send(mapData)
});

app.put("/update", (req, res) => {
    let dataState = req.body.dataState;
    const item = req.body.item;
    const id = item.ProductID;
    // this is the place to update the database and return success if it was successful
    let index = parsedData.findIndex(item => item.ProductID === id);
    parsedData[index] = item;
    parsedData[index].inEdit = false;
    // return error if any
    res.send(process(parsedData, dataState));
});

app.post("/create", (req, res) => {
    const item = req.body.item
    let dataState = req.body.dataState;
    const id = parsedData.length + 1;
    item.ProductID = id;
    item.inEdit = false;
    parsedData.unshift(item);
    res.send(process(parsedData, dataState));
});

app.delete("/delete/:id", (req, res) => {
    let dataState = req.body.dataState;
    const id = parseInt(req.params.id);
    // this is the place to delete the item from the database and return success if it was successful
    let index = parsedData.findIndex(item => item.ProductID === id);
    parsedData.splice(index, 1);
    // return error if any
    res.send(process(parsedData, dataState));
});


app.listen(4000, () => {
    console.log("Server is running on port 4000");
});
Start the server by running the following command from the server directory:
node index.js
This will start the server and you should be able to see the Server is running on port 4000 message in the terminal.
Now we are ready to create our MarkLogic setup.
Creating our KendoReact Grid and Map UI
Navigate out of the server directory with cd../ and create a new directory called ui. Inside the new directory create a new react app by running:
npx create-react-app my-app --use-npm
We will need to install Axios, which will take care of our requests, and our KendoReact dependencies:
npm install --save axios @progress/kendo-react-grid @progress/kendo-data-query @progress/kendo-react-data-tools @progress/kendo-react-inputs @progress/kendo-react-intl @progress/kendo-react-dropdowns @progress/kendo-react-dateinputs @progress/kendo-drawing @progress/kendo-react-animation @progress/kendo-licensing @progress/kendo-react-buttons @progress/kendo-react-treeview @progress/kendo-react-popup @progress/kendo-svg-icons @progress/kendo-react-map @progress/kendo-drawing @progress/kendo-react-treelist @progress/kendo-theme-default
Navigate to the src directory inside my-app and create a new directory called context. Here we will be storing our Context that will be reused through the app. Context provides a way
to pass data through the component tree without having to pass props down manually at every level. Inside the folder create a file called data-context.js and define the required context for our CRUD operations:
import { createContext } from 'react';

const DataContext = createContext({
    enterEdit: () => {},
    remove: () => {},
    add: () => {},
    discard: () => {},
    update: () => {},
    cancel: () => {}
});
export default DataContext;
Next, we will create our components. In the same src directory create a new one called components. Inside create a new file CommandCell.jsx. This component will hold the buttons for the discard, add, delete and
update buttons:
import * as React from "react";
import DataContext from '../context/data-context';
import { Button } from "@progress/kendo-react-buttons";

const MyCommandCell = props => {
    const currentContext = React.useContext(DataContext);
    const { dataItem } = props;
    const isNewItem = dataItem.ProductID === undefined;

    const inEdit = dataItem.inEdit;

    const handleAddUpdate = React.useCallback(() =>{
        if(isNewItem){
            currentContext.add(dataItem)
        } else {
            currentContext.update(dataItem)
        }
    },[currentContext, dataItem, isNewItem])

    const handleDiscardCancel = React.useCallback(()=>{
        isNewItem ? currentContext.discard(dataItem) : currentContext.cancel()
    },[currentContext, dataItem, isNewItem])

    const handleEdit = React.useCallback(()=> {
        currentContext.enterEdit(dataItem)
    },[currentContext, dataItem])

    const handleDelete = React.useCallback(()=> {
        window.confirm("Confirm deleting: " + dataItem.ProductName) && currentContext.remove(dataItem)
    },[currentContext, dataItem])

    if(props.rowType === 'groupHeader') return null;

    return inEdit ?
            (<td className="k-command-cell">
                <Button onClick={handleAddUpdate}>
                    {isNewItem ? "Add" : "Update"}
                </Button>
                <Button onClick={handleDiscardCancel}>
                    {isNewItem ? "Discard" : "Cancel"}
                </Button>
            </td>) :
            (<td className="k-command-cell">
                <Button themeColor="primary" onClick={handleEdit}>
                    Edit
                </Button>
                <Button onClick={handleDelete}>
                    Remove
                </Button>
            </td>);
};

export default MyCommandCell;
In the components directory create a file called DropDownCell.jsx. This will be our dropdown component that will contain the following code:
import * as React from 'react';
import {
  DropDownList,
} from '@progress/kendo-react-dropdowns';

const categoryData = [
    {
      CategoryID: 1,
      CategoryName: 'Beverages',
      Description: 'Soft drinks, coffees, teas, beers, and ales',
    },
    {
      CategoryID: 2,
      CategoryName: 'Condiments',
      Description: 'Sweet and savory sauces, relishes, spreads, and seasonings',
    },
    {
      CategoryID: 6,
      CategoryName: 'Meat/Poultry',
      Description: 'Prepared meats',
    },
    {
      CategoryID: 7,
      CategoryName: 'Produce',
      Description: 'Dried fruit and bean curd',
    },
    {
      CategoryID: 8,
      CategoryName: 'Seafood',
      Description: 'Seaweed and fish',
    },
  ];

const DropDownCell = (props) => {

  if(props.rowType === 'groupHeader') return null;


  let fieldComplex = props.field.split('.');

  const handleChange = (e) => {
    if (props.onChange) {
      props.onChange({
        dataIndex: 0,
        dataItem: props.dataItem,
        field: fieldComplex[0],
        syntheticEvent: e.syntheticEvent,
        value: e.value,
      });
    }
  };

  const { dataItem } = props;
  const dataValue =
  dataItem[fieldComplex[0]] === null || dataItem[fieldComplex[0]][fieldComplex[1]] === null
      ? ''
      : dataItem[fieldComplex[0]][fieldComplex[1]];

  return (
    <td>
      {dataItem.inEdit ? (
        <DropDownList
          style={{ width: '100%' }}
          onChange={handleChange}
          value={dataItem[fieldComplex[0]]}
          data={categoryData}
          textField={fieldComplex[1]}
          defaultItem={{CategoryID: 0, CategoryName: 'Choose Category'}}
        />
      ) : (
        dataValue.toString()
      )}
    </td>
  );
};

export default DropDownCell;
With those two components set up, it is time to create our Grid. Open App.js and import our CSS, some React hooks, the KendoReact Grid, Axios, our custom cells and our Context. Add the following to the top of App.js:
import '@progress/kendo-theme-default/dist/all.css'
import { useState, useEffect } from "react";
import { Grid, GridColumn, GridToolbar } from '@progress/kendo-react-grid';
import { mapTree } from "@progress/kendo-react-treelist";
import { clone } from '@progress/kendo-react-common';
import { Button } from "@progress/kendo-react-buttons";
import MyCommandCell from './components/CommandCell';
import Axios from "axios";
import DropDownCell from './components/DropDownCell';
import DataContext from './context/data-context';
Next, we will take care of our App’s state by creating hooks. Add the following inside the App() function:
  const [data, setData] = useState([]);
  const [itemBeforeEdit, setItemBeforeEdit] = useState({})
  const [dataState, setDataState] = useState({ take: 8, skip: 0, group: [{field: 'ProductName'}] })
  const [total, setTotal] = useState(0);
Once that is done, we will use the Effect hook to fetch our data from the endpoints that we created earlier. Add the following after the state hooks:
useEffect(() => {
    Axios.get("http://localhost:4000/products", {
      params: {
        dataState: dataState
      }
    }).then((response) => {
      let parsedDataNew = mapTree(response.data.data, 'items', (product) => {
        product.FirstOrderedOn = product.FirstOrderedOn !== null ? new Date(product.FirstOrderedOn) : null;
        return product
      })
      setTotal(response.data.total)
      setData([...parsedDataNew]);
    });
  }, [dataState])

  const addRecord = () => {
    let newRecord = { ProductID: undefined, FirstOrderedOn: new Date(), Category: null, inEdit: true, Discontinued: false, UnitsInStock: 1, ProductName: null }
    let newData = [...data];
    newData.unshift(newRecord);
    setData(newData)
  }

  const handleItemChange = (event) => {
    let newData = mapTree(data, 'items', item => {
      if (event.dataItem.ProductID === item.ProductID) {
        item[event.field] = event.value;
      }
      return item;
    })
    setData(newData);
  }

  const enterEdit = (dataItem) => {
    let newData = mapTree(data, "items", (item) => {
      dataItem.ProductID === item.ProductID ? item.inEdit = true : item.inEdit = false;
      return item;
    });

    setItemBeforeEdit(clone(dataItem));
    setData(newData);
  }

  const remove = (dataItem) => {
    Axios.delete(`http://localhost:4000/delete/${dataItem.ProductID}`, { data : {dataState: dataState}}).then(
      (response) => {
        let newData = mapTree(response.data.data,'items', item => {
          item.FirstOrderedOn = new Date(item.FirstOrderedOn);
          return item;
        })
        setData([...newData]);
        setTotal(response.data.total)
      }
    );
  }

  const add = (dataItem) => {
    Axios.post("http://localhost:4000/create", { item: dataItem, dataState: dataState }).then((response) => {
      let newData = mapTree(response.data.data,'items', item => {
        item.FirstOrderedOn = new Date(item.FirstOrderedOn);
        return item;
      })
      setData(newData);
      setTotal(response.data.total)
    });
  }

  const discard = () => {
    let hasGroup = dataState.group.length > 0 ? true : false
    let newData = []
    hasGroup ? newData = data.filter(item => item.value !== undefined) : newData = data.filter(item => item.ProductID !== undefined )
    setData(newData);
  }

  const update = (dataItem) => {
    Axios.put("http://localhost:4000/update", { item: dataItem, dataState: dataState }).then(
      (response) => {
        let newData = mapTree(response.data.data,'items', item => {
          item.FirstOrderedOn = new Date(item.FirstOrderedOn);
          return item;
        })
        setData(newData);
      }
    );
  }

  const cancel = () => {
    let newData = mapTree(data, 'items', item => {
      if (item.ProductID === itemBeforeEdit.ProductID) {
        item = itemBeforeEdit;
        item.inEdit = false;
      }
      return item;
    })
    setData(newData);
  }

    const handleDataStateChange = (event) => {
      setDataState(event.dataState)
  }
Our next step is to render the KendoReact Grid component inside our DataContext.Provider. Replace the return content with the following:
<div className=”App”>
<DataContext.Provider
        value={{
          enterEdit: enterEdit,
          remove: remove,
          add: add,
          discard: discard,
          update: update,
          cancel: cancel
        }}
      >
        <Grid
          style={{
            height: "520px",
          }}
          data={data}
          editField="inEdit"
          onItemChange={handleItemChange}
          onDataStateChange={handleDataStateChange}
          {...dataState}
          pageable
          sortable
          filterable
          groupable
          total={total}
        >
          <GridToolbar>
            <div>
              <Button
                title="Add new"
                className="k-button k-button-md k-rounded-md k-button-solid k-button-solid-primary"                onClick={addRecord}
              >
                Add new record
              </Button>

            </div>
          </GridToolbar>
          <GridColumn field="ProductID" title="Id"  editable={false} filterable={false} />
          <GridColumn field="ProductName" title="Name" />
          <GridColumn field="Category.CategoryName" title="Category" cell={DropDownCell} />
          <GridColumn field="FirstOrderedOn" title="First Ordered On" editor="date" filter='date' format={'{0:d}'} />
          <GridColumn
            field="UnitsInStock"
            title="Units"
            editor="numeric"
            filter="numeric"
          />
          <GridColumn field="Discontinued" title="Discontinued" editor="boolean" filter="boolean" />
          <GridColumn cell={MyCommandCell}  filterable={false} />
        </Grid>
         </DataContext.Provider>
</div>
We are passing the products that we fetched earlier in our Effect hook to our KendoReact Grid via the data props. The components that we created earlier are passed as custom cells to the Category and last columns
in the Grid and the functions that we defined in our data-context.js file are passed as values to our Provider. Run npm start and open localhost:3000 and now you should see our KendoReact Grid rendered that can add a new record, edit an existing one or delete it and cancel the editing.
All that is left now is to add our KendoReact Map. Navigate inside the server folder and open index.js. Import the countries-users.json file that can be found inside the data folder in the project structure:
const mapData = require('../setup/data/countries-users.json')
Next, we need to set up our endpoint for the data that will be used by the Map. This can be set below our other requests in index.js:
app.get("/map", (req, res) => {
    res.send(mapData)
});
Press Ctrl + C (or Cmd + C) in your terminal to stop the server and then run node index.js again to start it. In App.js, import the Map, MapLayers, MapShapeLayer:
import { Map, MapLayers, MapShapeLayer } from '@progress/kendo-react-map';
We will need to manage state for the Map the same way that we did for our Grid. Add this at the top of the App() function:
const [mapData, setMapData] = useState({})
We will create a function getChartData inside App() that will fetch the data from our map endpoint and save the response inside mapData:
const getChartData = () => {
  Axios.get("http://localhost:4000/map", {
    }).then((response) => {
      setMapData(response.data.features)
    });
};
The data will be retrieved by calling the getChartData() function inside our Effect hook:
  useEffect(() => {
    getChartData()
    Axios.get("http://localhost:4000/products", {
      params: {
        dataState: dataState
      }
    }).then((response) => {
      let parsedDataNew = mapTree(response.data.data, 'items', (product) => {
        product.FirstOrderedOn = product.FirstOrderedOn !== null ? new Date(product.FirstOrderedOn) : null;
        return product
      })
      setTotal(response.data.total)
      setData([...parsedDataNew]);
    });
  }, [dataState])
Our next step is creating a MapContainer component for our map, as well as define the shape style and our center points:
const shapeStyle = {
    fill: {
      color: 'green'
    }
  };
  const center = [40, 0];
const MapContainer = () => {
  return <div>
     <Map center={center}>
      <MapLayers>
        <MapShapeLayer data={mapData} style={shapeStyle} />
      </MapLayers>
    </Map>
  </div>
}
All we must do now to render our Map is to add our MapContainer in the Markup below the Grid:
<div className="map-container">
         <MapContainer/>
         </div>
Open localhost and you will now see the Map component rendered successfully.
Conclusion
KendoReact can provide a beautiful UI and it can easily be integrated with MarkLogic, which supports multiple use cases while providing unified data security, governance and consistency.

Philip Kovachev
Philip Kovachev is a Technical Support Engineer at Progress. He loves helping customers and solving different issues and he’s passionate about frontend development. In his spare time, he likes playing the saxophone and traveling around the world.
Related Posts
Comments
All articles
Topics
Web MobileMobile
Desktop
Design
Productivity
People
