
How to Populate the WinForms RadGridView with Data in Bound Mode

Summarize with AI:
The Grid is the most commonly used data component in Telerik UI for WinForms. See how to parse different files or text formats that can be used for data transfer.
The Progress Telerik UI for WinForms suite provides a great diversity of UI controls for visualizing any kind of data. Without a doubt, RadGridView is the most commonly used data component, and we can’t imagine an end-user application without at least one grid in it. That is why we decided to start a series of blog posts introducing the powerful arsenal that RadGridView offers.
Let’s dive into the deep ocean of data binding as a major approach for populating the grid with records.
Data records are usually stored either on the server or inside a file. A step-by-step tutorial how to bind to a local server can be found at the following link: How to Bind GridView to a Local SQL Server. Different collections of custom objects are also supported. (Read more here.)
We will focus on parsing different files or text formats that can be used for data transfer. However, let’s start with the generic case with binding to a DataTable.
Bind to DataTable
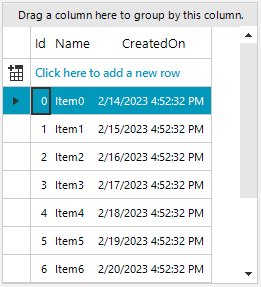
The simplest way to bind some data to RadGridView is to create a DataTable, define some columns with the respective type and add some rows with the cells content:
private void BindToDataTable()
{
  DataTable dt = new DataTable();
  dt.Columns.Add("Id", typeof(int));
  dt.Columns.Add("Name", typeof(string));
  dt.Columns.Add("CreatedOn", typeof(DateTime));
  for (int i = 0; i < 10; i++)
  {
    dt.Rows.Add(i, "Item"+i, DateTime.Now.AddDays(i));
  }

  this.radGridView1.DataSource = dt;
}
Bind to JSON
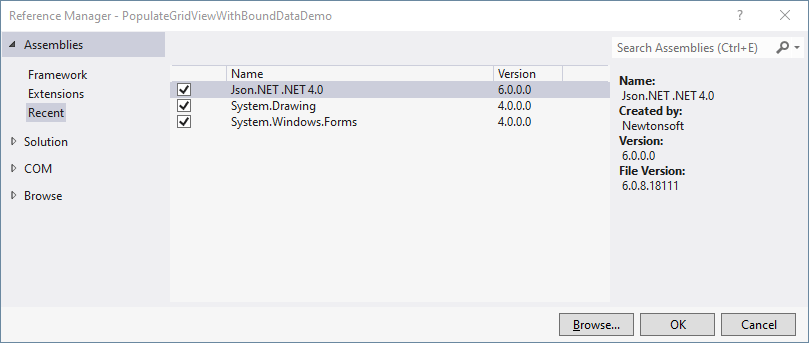
Direct binding to JSON is not supported by RadGridView. However, it is possible to convert the JSON content to a DataTable and then set the parsed DataTable as DataSource for the RadGridView control.
Note: It is necessary to add a reference to Json.NET:
public partial class RadForm1 : Telerik.WinControls.UI.RadForm
{
  public RadForm1()
  {
    InitializeComponent();
    BindToJson();
    this.radGridView1.BestFitColumns();
  }
  private void BindToJson()
  {
    string json = @"[
      {""id"":""10"",""name"":""User"",""add"":false,""edit"":true,""authorize"":true,""view"":true},
      { ""id"":""11"",""name"":""Group"",""add"":true,""edit"":false,""authorize"":false,""view"":true},
      { ""id"":""12"",""name"":""Permission"",""add"":true,""edit"":true,""authorize"":true,""view"":true}
    ]";
    DataTable table = Newtonsoft.Json.JsonConvert.DeserializeObject<DataTable>(json);
    this.radGridView1.DataSource = table;
  }
}

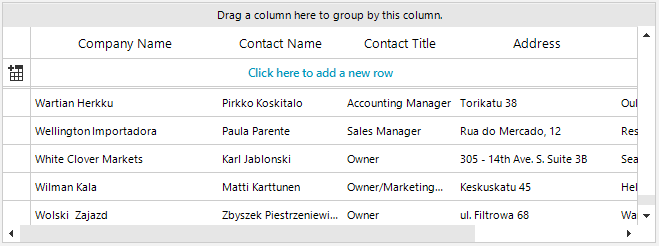
Bind to CSV
Comma Separated Values (CSV) files are a simple way of storing a huge amount of data content saved in a table structured format. It can be easily parsed to a DataTable as well and thus used again as DataSource collection for the grid.
public RadForm1()
{
  InitializeComponent();
  BindToCsv();
}

private void BindToCsv()
{
  bool isFirstRowHeader = true;
  string path = @"..\..\sampleData.csv";
  string header = isFirstRowHeader ? "Yes" : "No";
  string pathOnly = System.IO.Path.GetDirectoryName(path);
  string fileName = System.IO.Path.GetFileName(path);
  string sql = @"SELECT * FROM [" + fileName + "]";

  using (System.Data.OleDb.OleDbConnection connection = new System.Data.OleDb.OleDbConnection(
    @"Provider=Microsoft.Jet.OLEDB.4.0;Data Source=" + pathOnly +
    ";Extended Properties=\"Text;HDR=" + header + "\""))
      using (System.Data.OleDb.OleDbCommand command = new System.Data.OleDb.OleDbCommand(sql, connection))
        using (System.Data.OleDb.OleDbDataAdapter adapter = new System.Data.OleDb.OleDbDataAdapter(command))
        {
          DataTable dataTable = new DataTable();
          dataTable.Locale = CultureInfo.CurrentCulture;
          adapter.Fill(dataTable);
          this.radGridView1.DataSource = dataTable;
        }
}
RadGridView is capable of displaying hierarchical data where the main scenarios can be listed as below:
- Self-referencing hierarchy
- Object-relational hierarchy (master detail)
- Load on demand
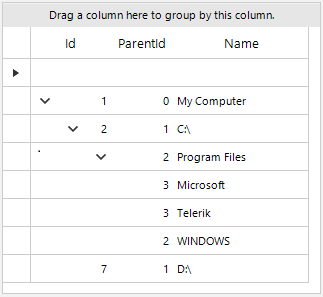
Bind to Self-Reference Hierarchy
The data content is represented by a flat collection where the hierarchical relation is defined by ID and parent’s ID fields. Thus, each record knows the ID of its parent and the nested structure can be built.
private void BindSelfReferenceHierarchy()
{
  DataTable selfRefTable = new DataTable();
  selfRefTable.Columns.Add("Id", typeof(int));
  selfRefTable.Columns.Add("ParentId", typeof(int));
  selfRefTable.Columns.Add("Name", typeof(string));
  selfRefTable.Rows.Add(1, 0, "My Computer");
  selfRefTable.Rows.Add(2, 1, @"C:\");
  selfRefTable.Rows.Add(3, 2, "Program Files");
  selfRefTable.Rows.Add(4, 3, "Microsoft");
  selfRefTable.Rows.Add(5, 3, "Telerik");
  selfRefTable.Rows.Add(6, 2, "WINDOWS");
  selfRefTable.Rows.Add(7, 1, @"D:\");

  this.radGridView1.Relations.AddSelfReference(this.radGridView1.MasterTemplate, "Id", "ParentId");
  this.radGridView1.DataSource = selfRefTable;
}
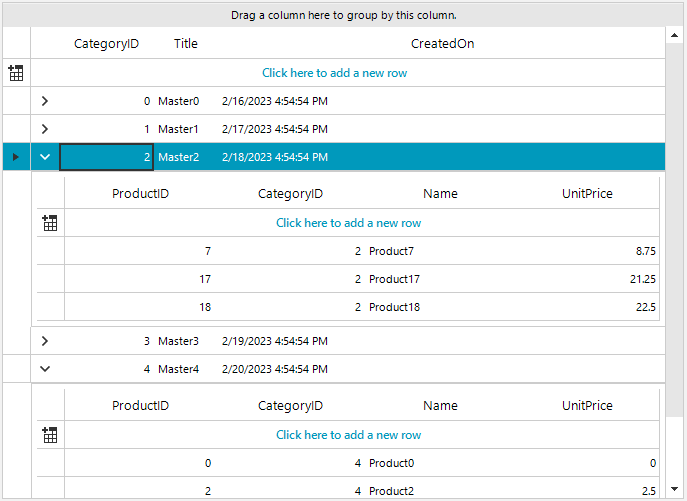
Bind to Object-Relational Data
The data content is represented by two (or up to N according to the hierarchy depth) flat collections where each hierarchical level needs a separate data collection and a grid template to store the data.
The different grid levels are connected with a specific relation, called GridViewRelation pointing to the parent and child levels respectively. It links one field from the parent level and one field from the child level. This is pretty close to the foreign key in the SQL tables.
The following code snippet demonstrates how to construct Categories-Products object-relational hierarchy:
private void BindToObjectRelational()
{
  Random rand = new Random();
  DataTable categories = new DataTable();
  categories.Columns.Add("CategoryID", typeof(int));
  categories.Columns.Add("Title", typeof(string));
  categories.Columns.Add("CreatedOn", typeof(DateTime));
  for (int i = 0; i < 5; i++)
  {
    categories.Rows.Add(i, "Master" + i, DateTime.Now.AddDays(i));
  }

  DataTable productsTable = new DataTable();
  productsTable.Columns.Add("ProductID", typeof(int));
  productsTable.Columns.Add("CategoryID", typeof(int));
  productsTable.Columns.Add("Name", typeof(string));
  productsTable.Columns.Add("UnitPrice", typeof(decimal));
  for (int i = 0; i < 30; i++)
  {
    productsTable.Rows.Add(i, rand.Next(0, 5), "Product" + i, 1.25 * i);
  }

  this.radGridView1.MasterTemplate.DataSource = categories;
  this.radGridView1.MasterTemplate.AutoSizeColumnsMode = GridViewAutoSizeColumnsMode.Fill;

  GridViewTemplate productsLevel = new GridViewTemplate();
  productsLevel.DataSource = productsTable;
  productsLevel.AutoSizeColumnsMode = GridViewAutoSizeColumnsMode.Fill;
  this.radGridView1.MasterTemplate.Templates.Add(productsLevel);

  GridViewRelation relation = new GridViewRelation(radGridView1.MasterTemplate);
  relation.ChildTemplate = productsLevel;
  relation.RelationName = "CategoriesProducts";
  relation.ParentColumnNames.Add("CategoryID");
  relation.ChildColumnNames.Add("CategoryID");
  this.radGridView1.Relations.Add(relation);

}
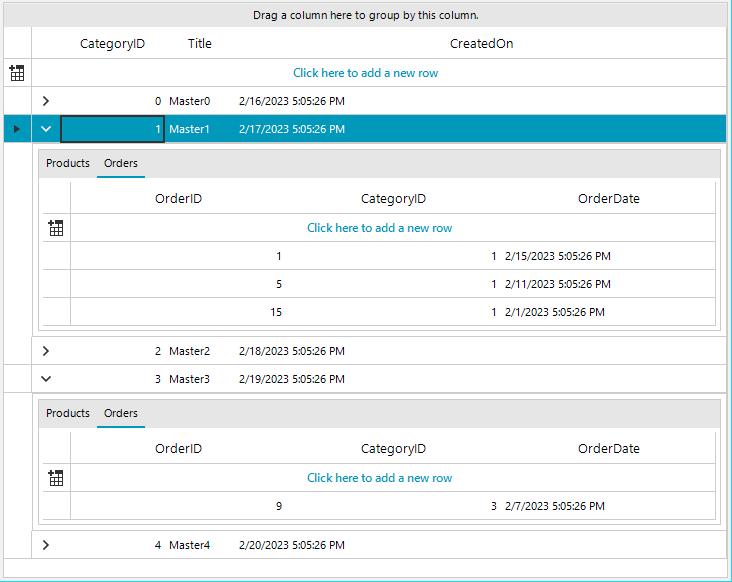
Multiple Child Tabs in Hierarchy
Each GridViewTemplate has a Templates property which stores its respective child hierarchical levels. Thus, it is possible to add as many child templates as possible on the same hierarchical level.
Now, we will add a second tab, next to the Products tab with orders:
DataTable ordersTable = new DataTable();
ordersTable.Columns.Add("OrderID", typeof(int));
ordersTable.Columns.Add("CategoryID", typeof(int));
ordersTable.Columns.Add("OrderDate", typeof(DateTime));
for (int i = 0; i < 30; i++)
{
  ordersTable.Rows.Add(i, rand.Next(0, 5), DateTime.Now.AddDays(-1 * i));
}

GridViewTemplate ordersLevel = new GridViewTemplate();
ordersLevel.DataSource = ordersTable;
ordersLevel.Caption = "Orders";
ordersLevel.AutoSizeColumnsMode = GridViewAutoSizeColumnsMode.Fill;
this.radGridView1.MasterTemplate.Templates.Add(ordersLevel);

GridViewRelation relationOrders = new GridViewRelation(radGridView1.MasterTemplate);
relationOrders.ChildTemplate = ordersLevel;
relationOrders.RelationName = "CategoriesOrders";
relationOrders.ParentColumnNames.Add("CategoryID");
relationOrders.ChildColumnNames.Add("CategoryID");
this.radGridView1.Relations.Add(relationOrders);
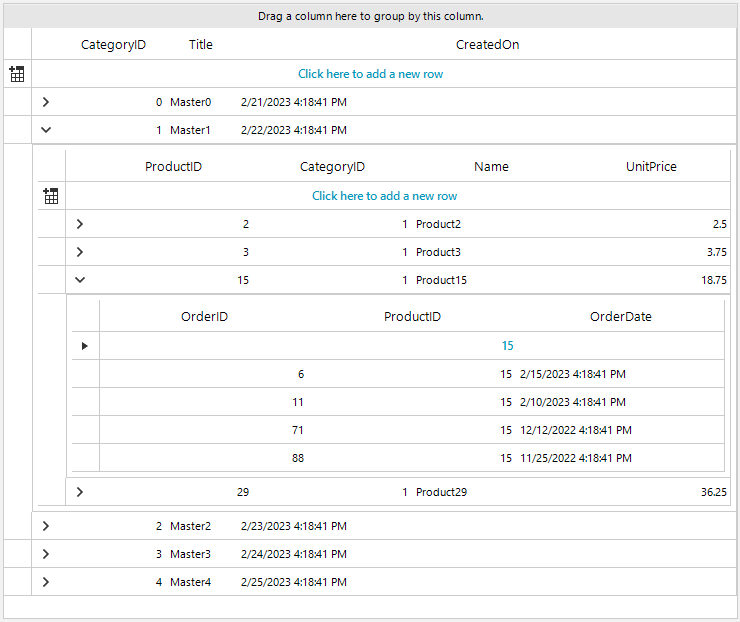
Nested Multi-Level Hierarchy
In a similar way, we will define nested GridViewTemplates with the necessary GridViewRelations to construct three levels of hierarchy: Categories-Products-Orders.
Random rand = new Random();
DataTable categories = new DataTable();
categories.Columns.Add("CategoryID", typeof(int));
categories.Columns.Add("Title", typeof(string));
categories.Columns.Add("CreatedOn", typeof(DateTime));
for (int i = 0; i < 5; i++)
{
  categories.Rows.Add(i, "Master" + i, DateTime.Now.AddDays(i));
}

DataTable productsTable = new DataTable();
productsTable.Columns.Add("ProductID", typeof(int));
productsTable.Columns.Add("CategoryID", typeof(int));
productsTable.Columns.Add("Name", typeof(string));
productsTable.Columns.Add("UnitPrice", typeof(decimal));
for (int i = 0; i < 30; i++)
{
  productsTable.Rows.Add(i, rand.Next(0, 5), "Product" + i, 1.25 * i);
}

this.radGridView1.MasterTemplate.DataSource = categories;
this.radGridView1.MasterTemplate.AutoSizeColumnsMode = GridViewAutoSizeColumnsMode.Fill;

GridViewTemplate productsLevel = new GridViewTemplate();
productsLevel.DataSource = productsTable;
productsLevel.Caption = "Products";
productsLevel.AutoSizeColumnsMode = GridViewAutoSizeColumnsMode.Fill;
this.radGridView1.MasterTemplate.Templates.Add(productsLevel);

GridViewRelation relation = new GridViewRelation(radGridView1.MasterTemplate);
relation.ChildTemplate = productsLevel;
relation.RelationName = "CategoriesProducts";
relation.ParentColumnNames.Add("CategoryID");
relation.ChildColumnNames.Add("CategoryID");
this.radGridView1.Relations.Add(relation);

DataTable ordersTable = new DataTable();
ordersTable.Columns.Add("OrderID", typeof(int));
ordersTable.Columns.Add("ProductID", typeof(int));
ordersTable.Columns.Add("OrderDate", typeof(DateTime));
for (int i = 0; i < 100; i++)
{
  ordersTable.Rows.Add(i, rand.Next(0, 30), DateTime.Now.AddDays(-1 * i));
}

GridViewTemplate ordersLevel = new GridViewTemplate();
ordersLevel.DataSource = ordersTable;
ordersLevel.Caption = "Orders";
ordersLevel.AutoSizeColumnsMode = GridViewAutoSizeColumnsMode.Fill;
productsLevel.Templates.Add(ordersLevel);

GridViewRelation relationOrders = new GridViewRelation(productsLevel);
relationOrders.ChildTemplate = ordersLevel;
relationOrders.RelationName = "ProductsOrders";
relationOrders.ParentColumnNames.Add("ProductID");
relationOrders.ChildColumnNames.Add("ProductID");
this.radGridView1.Relations.Add(relationOrders);
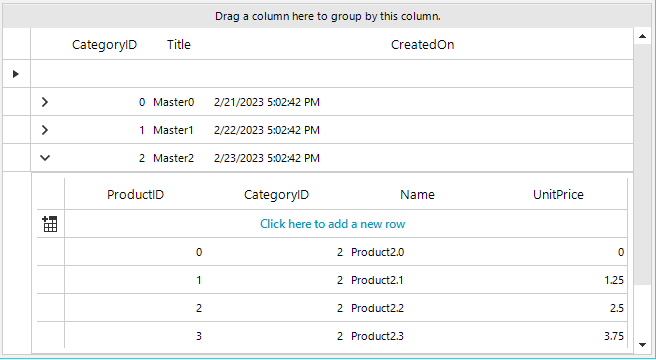
Load Hierarchy on Demand
In some cases, it wouldn’t be necessary to load the entire data for all hierarchical levels. This is the so-called load-on-demand functionality. The hierarchical levels are loaded only when they are requested, e.g., when the user expands a parent row.
private void LoadOnDemand()
{
  Random rand = new Random();
  GridViewDecimalColumn idColumn = new GridViewDecimalColumn("CategoryID");
  GridViewTextBoxColumn titleColumn = new GridViewTextBoxColumn("Title");
  GridViewDateTimeColumn dateColumn = new GridViewDateTimeColumn("CreatedOn");
  this.radGridView1.MasterTemplate.Columns.AddRange(idColumn, titleColumn, dateColumn);
  this.radGridView1.MasterTemplate.AutoSizeColumnsMode = GridViewAutoSizeColumnsMode.Fill;
  for (int i = 0; i < 5; i++)
  {
    this.radGridView1.MasterTemplate.Rows.Add(i, "Master" + i, DateTime.Now.AddDays(i));
  }

  GridViewTemplate productsLevel = new GridViewTemplate();
  productsLevel.AutoSizeColumnsMode = GridViewAutoSizeColumnsMode.Fill;
  GridViewDecimalColumn productIdColumn = new GridViewDecimalColumn("ProductID");
  GridViewDecimalColumn categoryIdColumn = new GridViewDecimalColumn("CategoryID");
  GridViewTextBoxColumn productNameColumn = new GridViewTextBoxColumn("Name");
  GridViewDecimalColumn unitPriceColumn = new GridViewDecimalColumn("UnitPrice");
  productsLevel.Columns.AddRange(productIdColumn, categoryIdColumn, productNameColumn, unitPriceColumn);
  this.radGridView1.MasterTemplate.Templates.Add(productsLevel);
  productsLevel.HierarchyDataProvider = new GridViewEventDataProvider(productsLevel);
  this.radGridView1.RowSourceNeeded += RadGridView1_RowSourceNeeded;
}

private void RadGridView1_RowSourceNeeded(object sender, GridViewRowSourceNeededEventArgs e)
{
  if (e.Template.HierarchyLevel==1)
  {
    for (int i = 0; i < 30; i++)
    {
      GridViewRowInfo row = e.Template.Rows.NewRow();
      row.Cells["ProductID"].Value = i;
      row.Cells["CategoryID"].Value = e.ParentRow.Cells["CategoryID"].Value;
      row.Cells["Name"].Value = "Product" + row.Cells["CategoryID"].Value+"."+i;
      row.Cells["UnitPrice"].Value = 1.25 * i;
      e.SourceCollection.Add(row );
    }
  }
}
The GridViewRowSourceNeededEventArgs gives you access to the respective Template. Hence, if you have several hierarchical levels, you can easily distinguish them via the Template.HierarchyLevel or Caption.
Converting Data Types
In the last section of this blog post, we will pay attention to a very delicate and important matter when it comes to data binding and mapping the data records’ fields with the grid columns. We will give you tips how to handle the cases when the data record stores the value in a specific type that is not compatible to the respective column in RadGridView that we want to use.
The most general case is storing “YES” and “NO” in the DataSource collection while GridViewCheckBoxColumn expects Boolean values to parse true/false values. Let’s consider the following setup:
DataTable dt = new DataTable();
dt.Columns.Add("Id", typeof(int));
dt.Columns.Add("Name", typeof(string));
dt.Columns.Add("IsActive", typeof(string));
for (int i = 0; i < 20; i++)
{
  dt.Rows.Add(i, "Item" + i, i % 2 == 0 ? "YES" : "NO");
}
this.radGridView1.DataSource = dt;
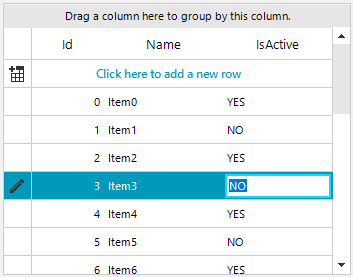
By default, RadGridView generates GridViewTextBoxColumn for string fields. However, if you want to replace the default column with a GridViewCheckBoxColumn, you are expected to lose the fields value mapping since the string value can’t be parsed to Boolean.
To handle this case, we will implement a custom TypeConverter class which to determine how RadGridView recognizes this type. For more information, see How to: Implement a Type Converter in MSDN.
public class ToggleStateConverter : TypeConverter
{
  public override bool CanConvertTo(ITypeDescriptorContext context, Type destinationType)
  {
    return destinationType == typeof(ToggleState) || destinationType == typeof(bool);
  }
  public override object ConvertTo(ITypeDescriptorContext context, CultureInfo culture, object value, Type destinationType)
  {
    if (value is string && destinationType == typeof(ToggleState))
    {
      string stringValue = (string)value;
      switch (stringValue)
      {
        case "YES":
          return ToggleState.On;
        case "NO":
          return ToggleState.Off;
        default:
          return ToggleState.Indeterminate;
      }
    }
    else if (value is bool && destinationType == typeof(char))
    {
      bool boolValue = (bool)value;
      switch (boolValue)
      {
        case true:
          return "YES";
        case false:
          return "NO";
        default:
          return "NO";
      }
    }
    return base.ConvertTo(context, culture, value, destinationType);
  }
  public override bool CanConvertFrom(ITypeDescriptorContext context, Type sourceType)
  {
    return sourceType == typeof(ToggleState) || sourceType == typeof(bool);
  }
  public override object ConvertFrom(ITypeDescriptorContext context, CultureInfo culture, object value)
  {
    ToggleState state;
    bool boolValue;
    if (value is ToggleState)
    {
      state = (ToggleState)value;
      switch (state)
      {
        case ToggleState.On:
          return "YES";
        case ToggleState.Off:
          return "NO";
        default:
          return "NO";
      }
    }
    else if (value is bool)
    {
      boolValue = (bool)value;
      switch (boolValue)
      {
        case true:
          return "YES";
        case false:
          return "NO";
        default:
          return "NO";
      }
    }
    return base.ConvertFrom(context, culture, value);
  }
}
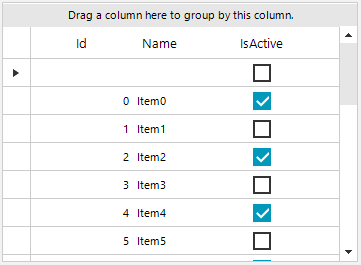
Now, we should apply the converter to column:
DataTable dt = new DataTable();
dt.Columns.Add("Id", typeof(int));
dt.Columns.Add("Name", typeof(string));
dt.Columns.Add("IsActive", typeof(string));
for (int i = 0; i < 20; i++)
{
  dt.Rows.Add(i, "Item" + i, i % 2 == 0 ? "YES" : "NO");
}
this.radGridView1.DataSource = dt;
this.radGridView1.Columns.Remove("IsActive");
GridViewCheckBoxColumn checkBoxColumn = new GridViewCheckBoxColumn("IsActive");
checkBoxColumn.FieldName = "IsActive";
checkBoxColumn.DataTypeConverter = new ToggleStateConverter();
checkBoxColumn.EditMode = EditMode.OnValueChange;
this.radGridView1.Columns.Add(checkBoxColumn);
A similar approach with a TypeConverter can be applied for any grid column, and you can convert different types. Another example is converting DateTime values to UNIX format and vice versa: How to Show DateTime Values Stored in a UNIX Format with Filtering Still Working in RadGridView.
Stay tuned for more! We’ll see you next time for more on the Telerik UI for WinForms Grid.
Sign up for a Trial
Feel free to sign up for our free 30-day trial, which gives you access to the components as well as our outstanding technical support at zero cost. Just head to the Telerik UI for WinForms overview page or click the button below to sign up for a trial today!
Time for Feedback
Oh, and one more thing. We would be more than happy to hear your thoughts and suggestions on our library, so please drop us a line in the comments section below or by visiting the Telerik UI for WinForms Feedback Portal.

Desislava Yordanova
Desislava Yordanova is a proactive ambassador of diligent processes and a customer-caring professional. Currently, she is a Technical Support Engineer, Principal in the Document Processing team after a successful journey in the Telerik UI for WinForms team. She joined the company in 2013. Desislava holds a master’s degree in Computer Systems and Technologies from the Technical University in Sofia. Apart from her job, she is keen on snowboarding and travelling. You can find Desislava on LinkedIn.
Related Posts
Comments
All articles
Topics
Web MobileMobile
Desktop
Design
Productivity
People
