
Building a More Powerful and Faster Data Grid With Kendo UI for Angular

Summarize with AI:
Today, let’s see how the Kendo UI for Angular Grid can be used to create a robust data grid, and how it compares to Angular Material.
In an older article, we showed how to create a data grid using Angular Material with sorting and pagination, and made it faster (with an extra package).
Today we’re going to face all these requirements using the Kendo UI for Angular Grid.
The Kendo UI Grid provides all these features (and more) out of the box, so it is configurable with excellent documentation and examples. We are going to use the power of the Kendo UI Grid to show data with pagination, sorting, scrolling and transformation.
The implementation is divided into six parts to create a grid to show data; to allow sorting, filtering and pagination; and to boost performance.
- Add Kendo UI Grid
- List data with Kendo UI Grid
- Add pagination scrolling with virtual scrolling
- Add sorting and pagination with Data Query State
- Add filtering and grouping
- Kendo UI Grid or Angular Mat Table?
Add Kendo UI Grid
First, we’ll install the Progress Kendo UI for Angular Grid in the app using the command ng add @progress/kendo-angular-grid in the terminal. It automatically installs and configures the GridModule into the app.module.
ng add @progress/kendo-angular-grid
ℹ Using package manager: npm
✔ Found compatible package version: @progress/kendo-angular-grid@7.2.1.
✔ Package information loaded.

The package @progress/kendo-angular-grid@7.2.1 will be installed and executed.
Would you like to proceed? Yes
✔ Packages successfully installed.
UPDATE src/app/app.module.ts (500 bytes)
UPDATE package.json (1894 bytes)
UPDATE angular.json (3203 bytes)
✔ Packages installed successfully.
UPDATE src/polyfills.ts (2567 bytes)
Perfect, we’ve already installed the Kendo UI Grid. Next, we start using it in our app.
List Data With Kendo UI Grid
To show how easy the Angular Grid component from Kendo UI is to use, we will display the API response with the kendo-grid component.
First, we create the service NbaService because it uses the httpClient to import into the app.module. Next, we create the method and, using the httpClient, call the API.
The API returns one array of NBA players in the property data to simplify our code return of an observable of any.
In the real world, we must map the data to the interface.
import  {  Injectable  }  from  '@angular/core';
import  {  HttpClient  }  from  '@angular/common/http';
import  {  map,  Observable  }  from  'rxjs';

@Injectable({  providedIn:  'root'  })

export  class  NbaService  {

        constructor(private  httpClient: HttpClient)  {
        }

        getData(): Observable<any>  {
                return  this.httpClient.get('https://www.balldontlie.io/api/v1/players').pipe(
                map((response: any)  =>  {
                console.log(response)
                return  response.data;
            })
        );
    }
}
The API response returns a player list with some properties like:
[
    {
        first_name: "Alex"
        id: 1
        last_name: "Abrines"
        position: "G"
    }
]
In the app.component.ts, we must inject the NbaService into the constructor and declare a new property players to store the observable from the service.
export class AppComponent implements OnInit {
  title = 'using-kendo-grid';
  players = this.nbaService.getData();
  constructor(private nbaService: NbaService) {

  }
}
Edit the app.component.html template, add the kendo-grid, and set the property data with the players observable, using the pipe async to subscribe and get the response from API.
<kendo-grid [data]="players | async"></kendo-grid>
Open the page running the command ng server -o, and see the results:
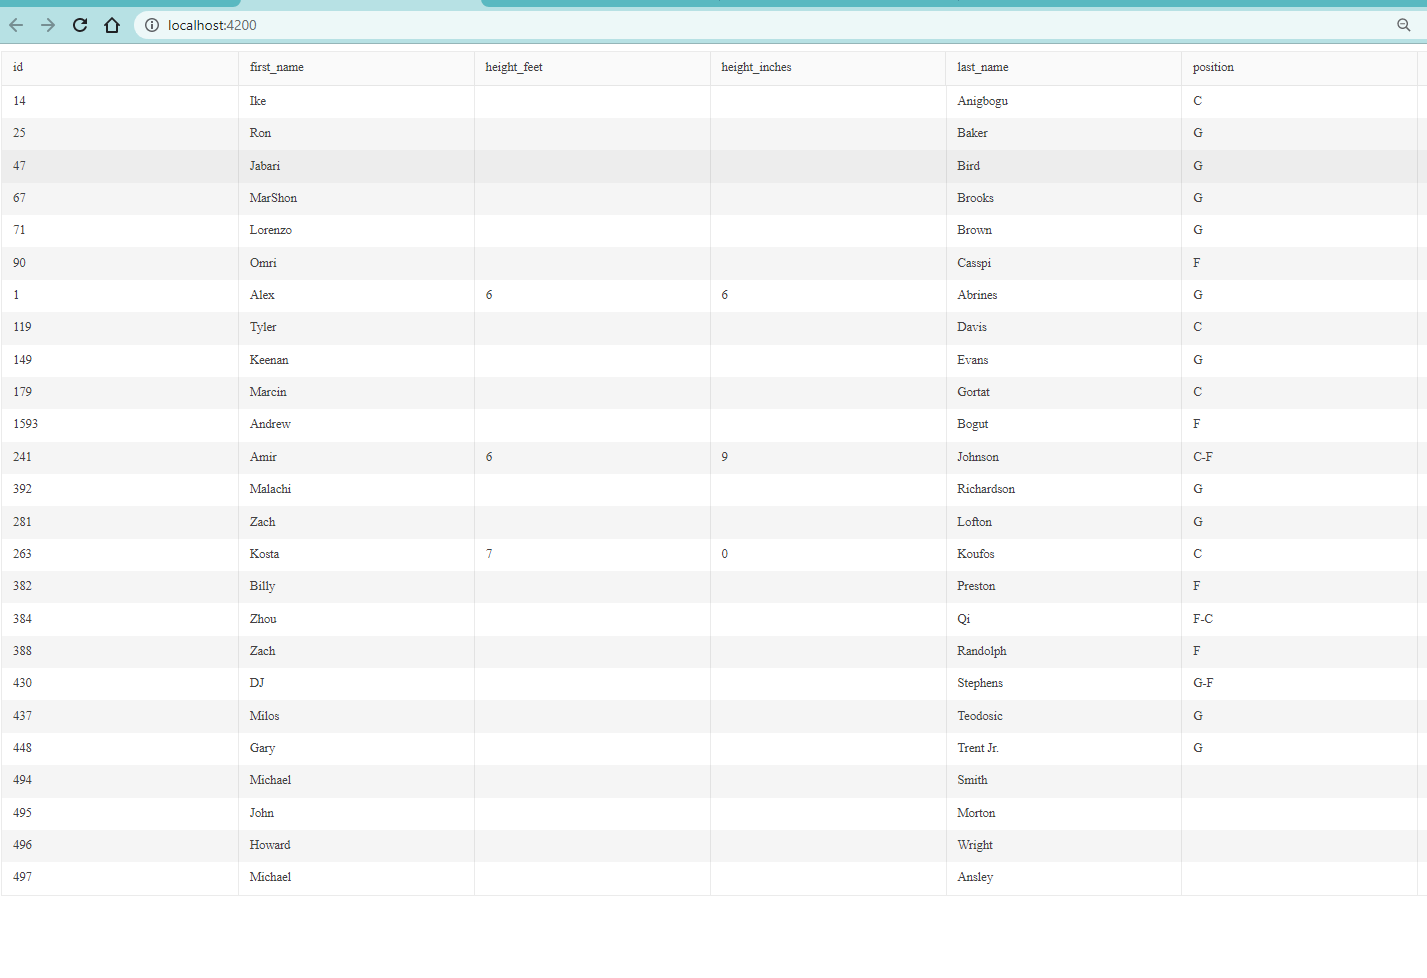
Nice! Kendo-Grid automatically takes the properties and renders them so quickly.
Working With Columns, Templates and Selection
Our Angular Grid is working, but in the real world, we have to do some tasks with the data like:
- Work with columns – For instance, only show specific columns with first name, last name and position.
- Transform data – Using the column data, we can transform it, like in our case changing “C” to “Center.”
- Paginate and sort – We must allow for viewing data when it will need to be displayed in batches, and we need to allow various filtering and sorting options.
All these requirements we can do with the Kendo UI Grid without an extra package and with a short amount of code. Let’s do them one by one.
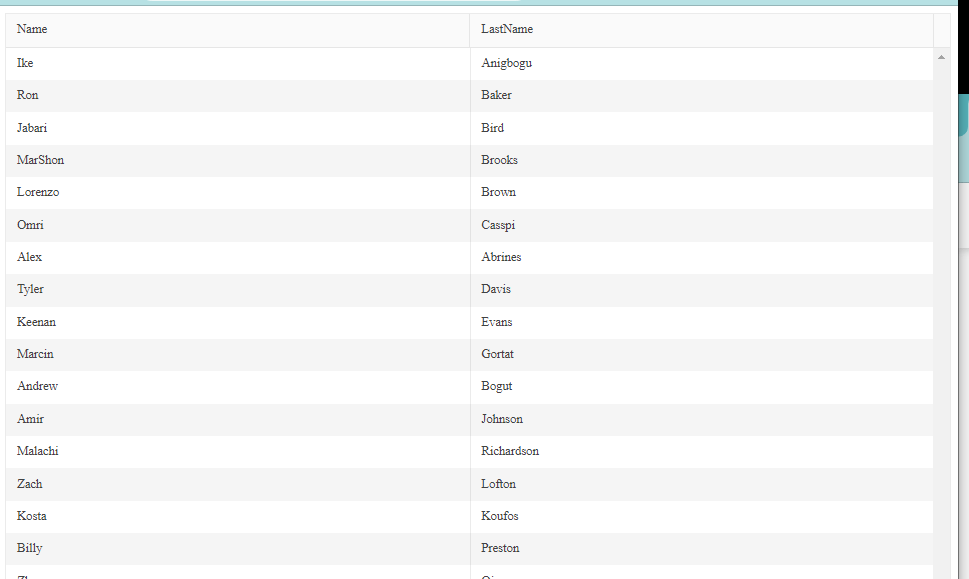
Columns
By default, Kendo UI Grid shows all columns, but we can control this using <kendo-grid-column></kendo-grid-column>. It has the property field to set which column to show, and the property title to
change the column’s title. When using the kendo-grid-column, the Grid ignores all columns and only shows the columns declared into the Grid.
<kendo-grid [data]="players | async">
  <kendo-grid-column field="first_name" title="Name" ></kendo-grid-column>
  <kendo-grid-column field="last_name" title="LastName"></kendo-grid-column>
</kendo-grid>
Transform Column Data
The data in the kendo-grid sometimes don’t fit with the UI requirements, and we can use the Angular pipe to transform and get the values from the Kendo UI Grid.
First, we create the pipe positiontranslate to take responsibility for transforming the data. It gets the value and returns the transformation.
Remember to register the pipe into the app.module.ts.
import { Pipe, PipeTransform } from '@angular/core';

@Pipe({
  name: 'positiontranslate'
})
export class PositionTranslatePipe implements PipeTransform {

  transform(value: any, args?: any): any {
    switch (value) {
      case "G":
        return "Guard";
      case "F":
        return "Forward";
      case "C":
        return "Center";
      case "PF":
        return "Point Guard";
      case "SF":
        return "Shooting Guard";
      case "SG":
        return "Small Forward";
      case "PG":
        return "Power Forward";
      default:
        break;
    }
  }

}
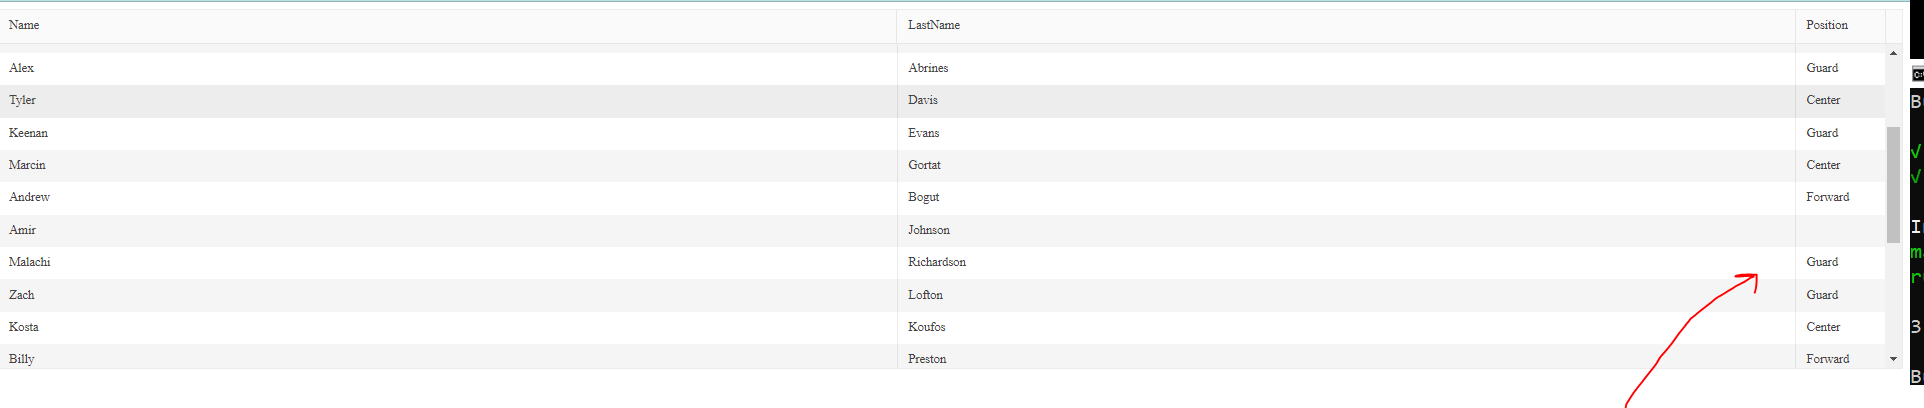
Next, add the column position into the Kendo UI Grid. Inside, add the ng-template. We access the current row data using dataItem via the template-context of the kendoGridCellTemplate directive
API Reference.
We transform the data inside the column using interpolation and the pipe. The pipe gets access to the dataItem.position and changes it with the pipe positiontranslate.
 <kendo-grid-column field="position" title="Position" [width]="100">
    <ng-template kendoGridCellTemplate let-dataItem>
        {{dataItem.position | positiontranslate}}
    </ng-template>
  </kendo-grid-column>
The final result:

Add Pagination Scrolling With Virtual Scrolling
The Kendo UI Grid helps scroll the data (as an alternative to pagination) easily and takes care of performance using virtual scrolling. It shows only the elements visible in the Grid and removes the remaining from the DOM.
To configure, set properties scrollable="virtual", height=400 and rowHeight=30 to perform the calculations based on the grid height.
<kendo-grid
[data]="playerData | async"	scrollable="virtual" [rowHeight]="30" [height]="400">
<kendo-grid-column  field="first_name"  title="Name"  ></kendo-grid-column>
<kendo-grid-column  field="last_name"  title="LastName"></kendo-grid-column>
<kendo-grid-column  field="position"  title="Position"  [width]="100">
<ng-template  kendoGridCellTemplate  let-dataItem>
	{{dataItem.position | positiontranslate}}
</ng-template>
</kendo-grid-column>
</kendo-grid>
Learn more about virtual scrolling.
Add Sorting and Pagination With Data Query State
We already did a good job showing data, scrolling and transforming, and now we have the last two core features—pagination and sorting. The Kendo UI Grid provides a set of functions to work with the data in our Grid efficiently.
In other libraries, we would need to create manual functions for paging and sorting. But the Kendo UI team provides the kendo-data-query package to work with the Data Grid and the GridDataResult from the kendo-grid.
The @progress/kendo-data-query package is already installed with the kendo-grid.
First, we declare a new GridDataResult variable playerData from @progress/kendo-angular-grid. It sets the initial configuration for our Grid.
public playerData: GridDataResult = { data: [], total: 0 };
Next, declare a new variable playerGridState type State with the configuration for skip, take and sort.
public  playerGridState: State = {
	skip:  0,
	take:  10,
	sort: [],
}
Change the subscription in the template with the async pipe to a new method to get the values from the API and assign them to the playerData, but use the function process to handle the API response with the grid configuration.
We do this because when the user clicks on the pagination, the state needs to update or create a new method onDataStateChange and set the new state from that event, and call the getData again.
getData() {
	this.nbaService.getData().subscribe(data  => {
		this.playerData = process(data, this.playerGridState);
	});
}
public  onDataStateChange(state: State) {
	this.playerGridState = state;
	this.getData();
}
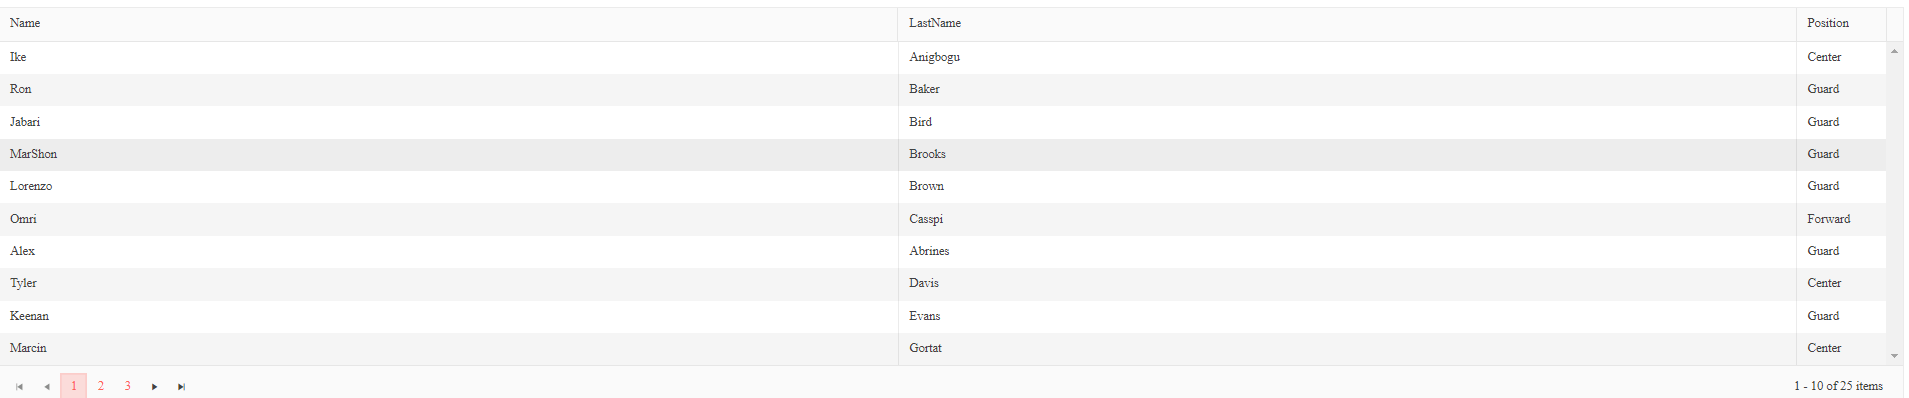
Edit app.component.html, assign the data to the playerData; configure properties pageable and sortable to true; and configure sort, skip and size with the playerGridState and link the event (data state change) with the onDataStateChange to update the values.
To use the pagination, remove the properties scrollable and rowHeight.
<kendo-grid
	[data]="playerData"
	[pageable]="true"
	[sortable]="true"
	[sort]="playerGridState.sort"
	[skip]="playerGridState.skip"
	[pageSize]="playerGridState.take"
	(dataStateChange)="onDataStateChange($event)"
	>
	<kendo-grid-column  field="first_name"  title="Name"  ></kendo-grid-column>
	<kendo-grid-column  field="last_name"  title="LastName"></kendo-grid-column>
	<kendo-grid-column  field="position"  title="Position"  [width]="100">
		<ng-template  kendoGridCellTemplate  let-dataItem>
			{{dataItem.position | positiontranslate}}
		</ng-template>
	</kendo-grid-column>
</kendo-grid>
Open the browser, and we have a robust grid with pagination and sorting working like a charm.
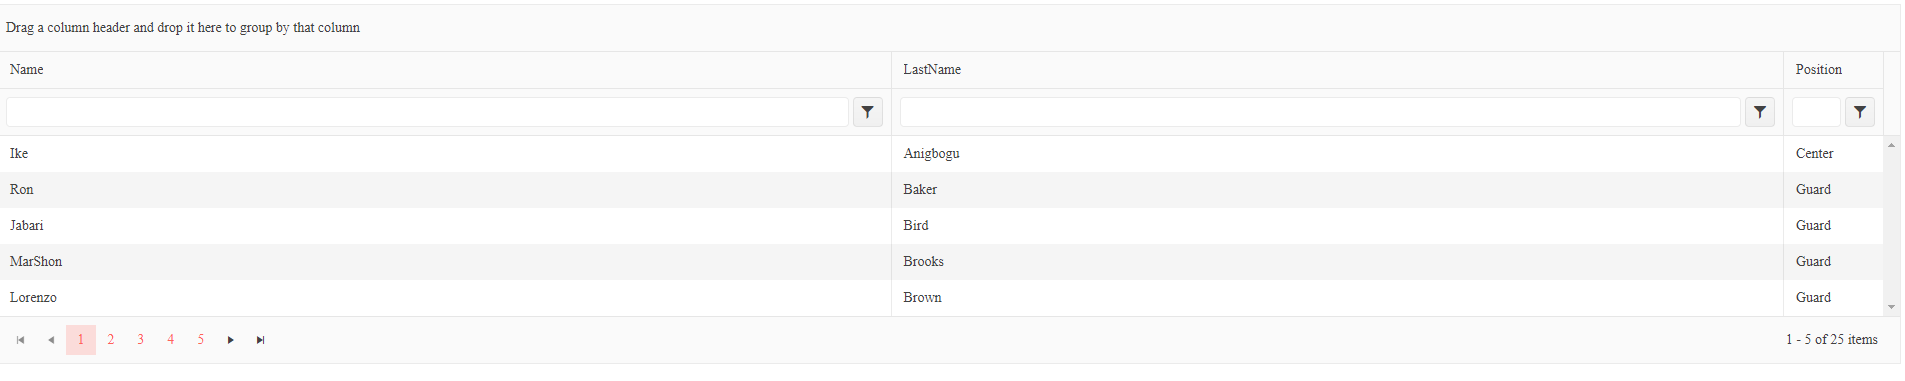
Add Filtering and Grouping
Kendo UI Grid ships by default with filter and grouping features. Adding these options into the Grid is so easy: using the power of State, set the properties groupable to true and group to playerGridState.group and same for the filter—like the example:
[groupable]="true"
[group]="playerGridState.group"
[filterable]="true"
[filter]="playerGridState.filter"
Kendo UI Grid or Angular Material Mat Table?
If we compare both libraries, each is very powerful for building a grid for our projects but let’s remark on some points.
Angular Material provides a basic grid with a nice UI, pagination and sorting. However, we need to write extra code for filtering data and improve the performance using an unofficial package to support virtualization or understand the CDK virtual scrolling, which lacks documentation.
Kendo UI Grid provides a powerful grid with built-in capabilities for filtering, grouping, sorting, pagination and performance with great examples and documentation.
So, take care to consider each point before making your next decision.
Conclusion
We learned how to build a robust Angular grid in Kendo UI connected to an API and using the power of virtualization and pagination using Data Query State. It makes you highly productive and delivers fast and robust applications with a small amount of code.
You can find a complete code example for this article and play with the sample app at the following links:
Thanks for your time. I hope it helps you feel how powerful the Kendo UI Grid is so you can consider it for your future projects.

Dany Paredes
Dany Paredes is a Google Developer Expert on Angular and Progress Champion. He loves sharing content and writing articles about Angular, TypeScript and testing on his blog and on Twitter (@danywalls).
Related Posts
Comments
All articles
Topics
Web MobileMobile
Desktop
Design
Productivity
People
