
Build & Deploy Rich UI JavaScript Apps, FAST!

Summarize with AI:
Let's say you know JavaScript, because today who doesn't. And because you know it so well, you want to write JavaScript everywhere: front-end; back-end; database; all JavaScript all the time!
Now, let's say you need a JavaScript web application built as fast as humanly possible. To do this fast, you already know you'll have to stand on the shoulders of giants.
At present, I'm unaware of any better giants, or combination of giants, on which to stand than Meteor, Kendo UI Core , and Bootstrap. Using these free and open source tools a developer can build and deploy a JavaScript application, using only JavaScript, in an incredibly short amount of time, for free.
You might not have heard of Meteor or looked very closely at it in recent years. In this article I'm going to introduce Meteor and show how to use it with Bootstrap and Kendo UI to build and deploy something extremely fast! Let's say, something like a Leaderboard application.
What is Meteor?
Meteor is a set of open source projects that form a full-stack JavaScript platform for creating real-time, single-page JavaScript web applications for desktop and mobile devices. Said another way, meteor is an integrated ecosystem providing the front-end, back-end, build tools, packaging system, and database all rolled together and underpinned by one programming language (i.e. Javascript) and technology (i.e. Node.js).
If the words "platform", "integrated", and "full stack" just scared you senseless, don't worry, you can also think of Meteor as just a default set of optional packages. It's robust and complete, but without being forcefully so at the expense of developer lock-in. It's just not your typical enterprise full-stack integrated platform of the past. Meteor is like most modern JavaScript offerings where you use what you want, how you want, from a set of open source projects! In fact, according to the Meteor project:
"There is no piece of software called "Meteor". When people say that their app is built on Meteor, they just mean that they used some of the Meteor Project's libraries and tools to build their app."
That is music to my modular, decoupled, JavaScript-loving ears and it should be to yours too!
What is Meteor Doing?
Meteor will build a JavaScript application (via a Node.js CLI tool) that out of the box will first sync data locally in the client to an object store (minimongo) then to a back-end database (MongoDB) via a custom web sockets protocol (DDP). Think of it as similar to the MEAN stack, except implementing and connecting all the parts is already done and real time is built-in by way of WebSockets. You simply flip a switch and you have a platform to build and deploy a real-time, isomorphic JavaScript application with almost zero setup.
By using Meteor one can focus on the front-end application logic (i.e. collections, templates, controllers, views, etc.) required to build applications, without having to configure and implement a back-end, database, and API for the front-end to consume.
I'm only going to briefly explain what Meteor is doing for the purposes of this article. For a more in-depth explanation checkout, "Why Meteor" from meteorpedia.com or the subproject pages on meteor.com. Reading either of these resources will give the additional details you might be seeking about exactly how Meteor does what it does.
Landing on a Meteor?
Starting with Meteor is a walk in the park compared to landing a probe on a real meteor or setting up other development platforms. Did you know that humans actually did landed a probe on a comet in 2014? Pretty Amazing, though this actually has nothing to do with the Meteor development.
Instead, let's talk about landing the Meteor platform on your local machine so you can run Meteor applications locally.
To install Meteor open your terminal on a Mac or Linux machine and type (Sorry, no Windows, but its coming!):
$ curl https://install.meteor.com/ | sh
Once Meteor has download and installed, you can verfiy the installation by running:
$ meteor --version
This will confirm which version of Meteor you have installed.
That's all it takes to get Meteor installed. Now let's take it for a spin.
Using Meteor
To get start using Meteor select a directory on your local system to store a project. Then, from the terminal run:
$ meteor create --example todos
This will create a Meteor application in a directory called, todos. To run and serve this application so that it can be viewed in a web browser, cd into the todos directory and run:
$ meteor
Now open your web browser and go to http://localhost:3000. There you'll find a fully functional todo's application.
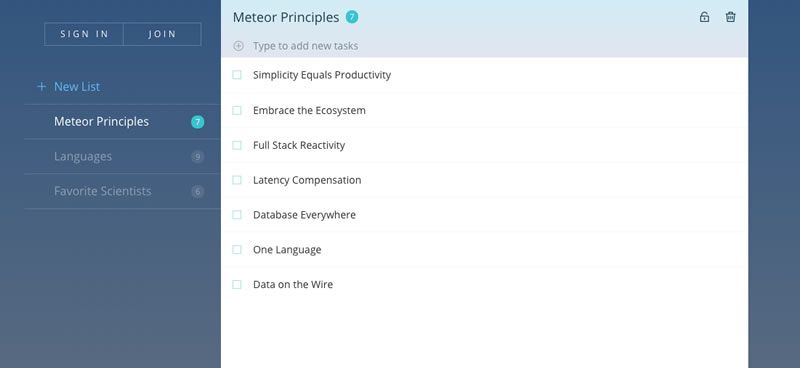
Take some time to examine the application then investigate the file structure and code so that you have an idea of what Meteor can do.
├── client //.js, .html, .css, sent to client, Meteor magic
│   ├── head.html //<head></head> element for app
│   ├── lib //meteor directory, these files run first in client
│   │   └── jquery.touchwipe.js
│   ├── stylesheets
│   │   ├── globals
│   │   │   ├── ...
│   │   ├── main.less
│   │   └── util
│   │       ├── ...
│   └── templates
│       ├── app-body.html
│       ├── app-body.js
│       ├── app-not-found.html
│       ├── app-not-found.import.less
│       ├── auth-join.html
│       ├── auth-join.js
│       ├── auth-signin.html
│       ├── auth-signin.js
│       ├── auth.import.less
│       ├── lists-show.html
│       ├── lists-show.import.less
│       ├── lists-show.js
│       ├── loading.html
│       ├── loading.import.less
│       ├── todos-item.html
│       └── todos-item.js
├── lib //meteor directory, runs both on client & server
│   ├── collections.js
│   └── router.js
├── mobile-config.js
├── public //meteor directory, static files, no meteor magic
│   ├── apple-touch-icon-precomposed.png
│   ├── favicon.png
│   ├── font
│   │   ├── ...
│   ├── icon
│   │   ├── ...
│   └── img
│       └── logo-todos.svg
├── resources
│   ├── icons
│   │   ├── ...
│   └── splash
│       ├── ...
└── server //meteor directory, runs on server only
    ├── bootstrap.js
    └── publish.js
For additional details about special directories and structuring an application read, "Structuring your application" from the official Meteor documentation.
In short, you should be aware that Meteor will uniquely treat the following directories in your application folder in special and unique ways when building the application.
- lib - All files under directories named lib are loaded before everything else.
- client - Any directory named client is not loaded on the server. Similar to wrapping your code in
if (Meteor.isClient) { ... }. - server - Any directory named server is not loaded on the client. Similar to wrapping your code in
if (Meteor.isServer) { ... }. - public - All files inside a top-level directory called public are served as-is to the client.
- private - All files inside a top-level directory called private are only accessible from server code and can be loaded via the Assets API.
- client/compatibility - This folder is for compatibility JavaScript libraries that rely on variables declared with
varat the top level being exported as globals. - tests - Any directory named tests is not loaded anywhere. Use this for any local test code.
Meteor Development Prerequisites
At this point I'm assuming you are comfortable using the terminal. It's fair to say, that using the terminal is a prerequisite. Additional prerequisites for using Meteor involve some degree of comfort and familiarity with the following:
- JavaScript, HTML, CSS
- the DOM (i.e. jQuery like selecting and events)
- Templates, specifically Spacebars (identical to Handlebars templates, if you know Handlebars you know Spacebars)
- Client-side object stores, specifically minimongo (i.e. an in memory JavaScript database)
- noSQL databases, specifically MongoDB
A brief survey of the prerequisites, if you are unfamiliar, is recommended before reading the remainder of this article.
Learning Enough Meteor to Use Meteor
I'm not going to repeat content from the vast number of in-depth and high quality Meteor introductions available for free on-line. After reading (or even before finishing) this article you should go and read one of the following resources to familiarize yourself with Meteor development.
These are just a couple of many, and any one of them should have you up and grokking Meteor development in little time. Just pick one and go for it.
Of course, if you have deep pockets, you might consider purchasing the highly acclaimed "Discovering Meteor" book or get an eventedmind.com account to watch "Getting Started with Meteor".
Of the resources mentioned, I personally found the Eventedmind screencasts to be the best in terms of communicating the material in short order with clarity.
Create a Meteor app called "myApp"
To build a Meteor app select a directory on your local system to store the application. From this directory using the Meteor CLI run the following command:
$ meteor create myApp
The create command will create a directory called "myApp" and place inside of it a default Meteor application.
The myApp directory will contain the following default files and folders:
├── .meteor
│   ├── .finished-upgraders
│   ├── .gitignore
│   ├── .id
│   ├── local
│   │   └── isopacks
│   ├── packages
│   ├── platforms
│   ├── release
│   └── versions
├── myApp.css
├── myApp.html
└── myApp.js
Notice that the .html, .css, and .js files took on the "myApp" name.
Go ahead now and change directories so that you are in the myApp directory (i.e. $cd myApp).
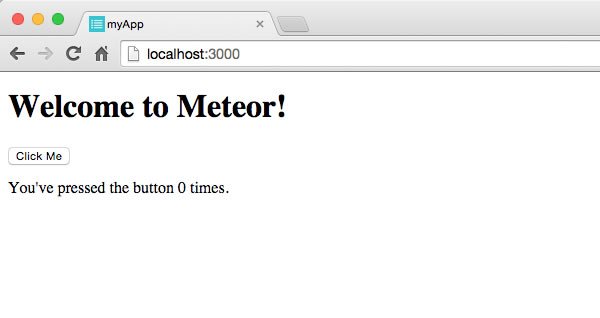
To run the default application that Meteor created run the meteor command from the myApp directory. If you are following along locally on your own computer you should now see the myApp code running from a browser at http://localhost:3000. Or, if you haven't been following along you can see the myApp code running from a Meteorpad here.
Either way, you should be seeing the default Meteor application created from the create command.
Adding Kendo UI and Bootstrap to "myApp"
With a bare bones meteor application created it's now possible to install the Bootstrap and Kendo UI core Bootstrap Meteor packages. Let's do that now.
Make sure you are in the myApp directory from the terminal. Run the following two commands.
$ meteor add twbs:bootstrap
and
$ meteor add telerik:kendo-ui-core-bootstrap-theme
The add command is telling Meteor to go and get a package from Atmosphere (i.e. Meteor's repository of packages similar to npm) and make it available in the myApp application. Once installed, these packages are ready to use. No additional configuration is required.
These packages are not your ordinary packages. They are smart packages! This means that they are available to be used on both the client and server simply by add'ing them. Again, no additional configuration is needed.
Adding these two packages gives a Meteor developer immediate access to today's best tools for constructing UI's fast. Just consider that Kendo UI core offers over 40 widgets and JavaScript application tools. Plus, the offical Bootstrap theme connects Kendo UI with everything that Bootstrap has to offer. I've used this combination in the past and it makes for super fast development because you have a library of CSS styles and widgets already built and ready to use. Additionally, when the time comes, Telerik offers professional Kendo UI widgets to meet the demands of line of business applications for the enterprise.
If you are following along locally, you might have noticed when installing packages, Meteor restarts your application. Yet, the application, of course, does not look any different once it is reloaded. We didn't change any files, so this should be expected.
To take advantage of Bootstrap and Kendo UI, and display the speed and simplicity of these UI tools, let's update the myApp.html and myApp.js files to change the default application into a Leaderboard application.
Open myApp.html and replace its contents with the following HTML:
<body>
    {{> list}}
</body>

<template name="list">
    <div class="panel panel-default" style="margin:25px;">
        <div class="panel-heading">Leaderboard</div>
        <p>{{> addForm}}</p>
        <table class="table">
            <thead>
                <tr>
                    <th>Score</th>
                    <th>Name</th>
                    <th></th>
                </tr>
            </thead>
            <tbody id="list">

            </tbody>
        </table>
        <div id="pager"></div>
    </div>

</template>

<template name="addForm">
    <div style="margin:20px; text-align:center; background-color:#fcfcfc">
    <form class="form-inline addForm">
        <div class="form-group">
            <label for="name">Name</label>
            <input class="form-control" type="text" name="name" placeholder="Type name" />
        </div>
        <div class="form-group">
            <label for="score">Score</label>
            <input class="form-control" type="text" name="score" placeholder="0" />
        </div>
        <button type="submit" class="btn btn-default">Add</button>
    </form>
    </div>
</template>
Next, open the myApp.js file and replace its contents with the following JavaScript:
Players = new Mongo.Collection('players'); //runs on both client and server

if (Meteor.isClient) {

    Template.list.rendered = function() {

        var dataSource = new kendo.data.DataSource({
            sort: {
                field: 'score',
                dir: 'desc'
            },
            pageSize: 4
        });

        this.$('#list').kendoListView({
            dataSource: dataSource,
            template: '<tr><td>#:score#</td><td>#:name#</td><td><button class="remove" data-id="#:_id#">X</button></td></tr>'
        });

        this.$('#pager').kendoPager({
            dataSource: dataSource
        });

        this.autorun(function() {
            dataSource.data(Players.find().fetch());
        });
    };

    Template.list.events({
        'click .remove': function(event) {
            Players.remove($(event.target).data('id'));
        }
    });

    Template.addForm.events({
        'submit .addForm': function(event) {

            Players.insert({
                name: event.target.name.value,
                score: Number(event.target.score.value)
            });

            // Clear form
            event.target.name.value = '';
            event.target.score.value = '';

            return false;

        }
    });
}

if (Meteor.isServer) {

    Meteor.startup(function() {

        if (Players.find().count() === 0) {
            var names = ['Ada Lovelace', 'Grace Hopper', 'Marie Curie', 'Carl Friedrich Gauss'];
            _.each(names, function(name) {
                Players.insert({
                    name: name,
                    score: Math.floor(Random.fraction() * 10) * 5
                });
            });
        }
    });

}
Take some time to digest the code in both of these files.
By changing and saving these two files, you should be looking at a new Letterboard application created from Bootstrap CSS and the Kendo UI listview and pager widgets.
In the video, you may notice that the updates from one client are being pushed to all clients - real time...built in!
If you haven't been following along locally you can examine and run the changes I made to the myApp.html and myApp.js files on this MeteorPad:
Warning: Meteorpad is new. It will likely load slow and might even be buggy in modern browsers.
Deploying the "myApp" Leaderboard Application
We've built a real database driven application with 68 lines of JavaScript and 43 lines of HTML. Now it's time to deploy it. To deploy a Meteor application quickly, all you'll need is a meteor.com account. If you don't have an account go and sign up for an account on meteor.com. Otherwise, you'll be asked to create one from the terminal the first time you deploy.
Deploying an application is trivial. From the myApp directory we've been working in run the following deploy command from the terminal:
meteor deploy [UNIQUE NAME].meteor.com
Make sure you replace '[UNIQUE NAME]' with something like 'myapp3948'. The sub-domain has to be unique or the application can't be deployed.
I've deployed myApp using the command $ meteor deploy mykendouiapp.meteor.com to the following url http://mykendouiapp.meteor.com. You can get check it out for yourself now.
And that's all it takes to deploy an application to the free hosting provided by the Meteor team.
However, the simplicity of deploying an application to the meteor.com domain is just for getting started purposes, light prototyping, and hackathons (i.e. nothing mission critical). The fine folks on the Meteor project did not intend for real applications to be deployed in this manner.
If you are in need of a more permanent home for a Meteor application you should turn to a Node host that offers Meteor support. Modulus.io is one such host and offers direct deployment of Meteor applications. Here is a "Getting Started" document if you'd like to know more about professional Meteor hosting.
Meteor + Bootstrap + Kendo UI Core = An App Fast!
I'm going to make a bold statement. The combination of Meteor, Bootstrap, and Kendo UI Core has ushered in a new era of application development. One where, legitimately robust and comprehensive front-end web apps can be built and deployed in a matter of minutes. The barriers to entry are simply being exploded and the rise of full-stack, isophmoric platforms are upon us. This in turn is resurrecting the spirits of web masters of old, who like modern, full-stack JavaScript developers, could alone build an entire application front to back with a single skill set. Except of course, today, they can do it faster and in the same language.
The next time you want to build and deploy something fast, that has rich UI parts baked in, you should definitely give Meteor, Bootstrap, and Kendo UI a go.
Keeping the Meteor and Kendo UI High Going
I'm a bit on a Meteor and Kendo UI high myself. If you are too, check out the following resources to keep the high going!

Cody Lindley
Cody Lindley is a front-end developer working as a developer advocate for Telerik focused on the Kendo UI tools. He lives in Boise, ID with his wife and three children. You can read more about Cody on his site or follow him on Twitter at @codylindley.