AI Smart Assistant in .NET MAUI DataGrid
The .NET MAUI DataGrid control offers AI-powered features that allow users to interact with the DataGrid using natural language prompts. This functionality enables users to perform various operations such as sorting, grouping, filtering, and manipulating columns without needing to write code.
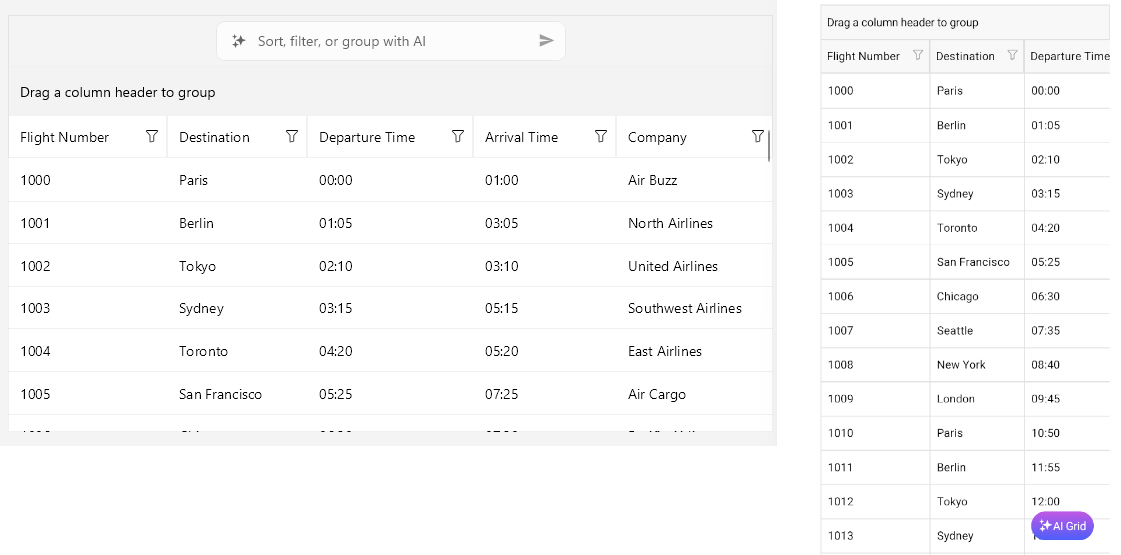
On mobile, the AI Smart Assistant panel can be accessed via a floating action button on the bottom-right corner of the DataGrid. On desktop platforms, the AI Smart Assistant panel displays above the header area of the DataGrid.
Here is how the AI Smart Assistant panel is arranged on desktop, with the panel above the DataGrid header area, and on mobile, where it is opened from a floating action button in the bottom-right corner of the DataGrid:
Here is how the AI Smart Assistant panel behaves on desktop and mobile when no suggestions are shown:
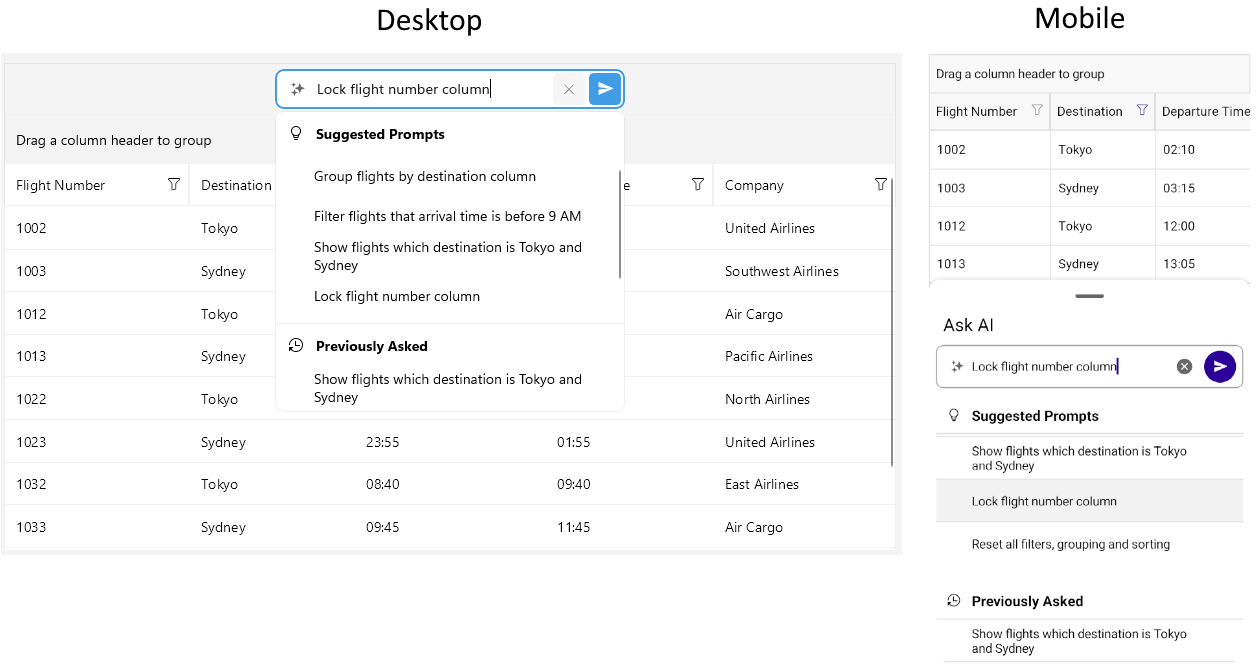
When no suggestions are available, the AI Smart Assistant panel shows only the prompt input area and any configured helper text, without a suggestions list.
Supported Operations
The following operations can be performed using AI Smart Assistant:
- Grouping—Users can group the DataGrid by one or more columns.
- Sorting—Users can sort the control by specifying the column and the sort direction (ascending or descending).
- Filtering—Users can filter the control based on specific criteria.
- Column Manipulation—Users can freeze, hide columns and more.
Getting Started with the AI Smart Assistant
To get started with the AI Smart Assistant functionality in the .NET MAUI DataGrid, follow the steps:
Prerequisites
.NET9or later.- An AI provider. For example Azure OpenAI or OpenAI, etc.
Telerik.AI.SmartComponents.Extensionspackage.
1. Getting Started with the Telerik.AI.SmartComponents.Extensions
The AI Smart Assistant functionality relies on the Telerik.AI.SmartComponents.Extensions package. The package provides the necessary extensions to integrate AI capabilities into the control.
- Install the
Telerik.AI.SmartComponents.Extensionspackage in your .NET MAUI project.
dotnet add package Telerik.AI.SmartComponents.ExtensionsThe Telerik.AI.SmartComponents.Extensions package has a dependency on the Microsoft.Extensions.AI package.
-
Configure the AI services in your application. This typically involves setting up an AI provider (such as Azure OpenAI, OpenAI, etc.) and providing the necessary API keys or credentials.
-
Register the AI service and AI chat client in your application.
For the example, we will use the
Azure.AI.OpenAIandMicrosoft.Extensions.AI.OpenAIpackages. Add the packages to your project. To register the AI service and chat client, the following code is needed inMauiProgram.cs:C#builder.Services.AddSingleton(sp => { return new AzureOpenAIClient(new Uri("AZURE_OPENAI_ENDPOINT"), new AzureKeyCredential("AZURE_OPENAI_API_KEY")); }); builder.Services.AddChatClient(services => services.GetRequiredService<AzureOpenAIClient>().GetChatClient("gpt-4.1").AsIChatClient() );
2. Process DataGrid AI Requests
-
How to access the AI model in the ViewModel is a developer decision.
-
The
Telerik.AI.SmartComponents.Extensionslibrary provides two key methods:AddGridChatTools()—Configures the AI model with DataGrid-specific capabilities.ExtractGridResponse()—Extracts structured commands and messages from the AI response that the DataGrid can understand.
For the demo we will use a command in the
ViewModel. The command is bound to the DataGridUserCommand. The command executes when a prompt is submitted from the AI Smart Assistant panel.Here is a sample
ViewModeldefinition:C#public class AIPromptViewModel : NotifyPropertyChangedBase { private CancellationTokenSource cancellationTokenSource; private ICommand processAICommand; private ICommand cancelAICommand; private readonly IChatClient chatClient; public AIPromptViewModel(IChatClient chatClient) { this.chatClient = chatClient; } public ICommand ProcessAICommand { get => this.processAICommand ?? (this.processAICommand = new Command<DataGridPromptRequestCommandContext>(this.ExecuteProcessAI)); } public ICommand CancelAICommand { get => this.cancelAICommand ?? (this.cancelAICommand = new Command(this.ExecuteCancelAI)); } private async void ExecuteProcessAI(DataGridPromptRequestCommandContext context) { if (this.cancellationTokenSource != null) { // An AI request is already being processed return; } this.cancellationTokenSource = new CancellationTokenSource(); try { var request = JsonSerializer.Deserialize<GridAIRequest>(context.RequestJson); var options = new ChatOptions(); options.AddGridChatTools(request.Columns); List<ChatMessage> messages = request.Contents.Select(m => new ChatMessage(ChatRole.User, m.Text)).ToList(); ChatResponse completion = await this.chatClient.GetResponseAsync(messages, options); var response = JsonSerializer.Serialize(completion.ExtractGridResponse(), new JsonSerializerOptions() { PropertyNamingPolicy = JsonNamingPolicy.CamelCase }); context.ResponseJson = response; } catch (OperationCanceledException) { // Cancellation was already handled by setting ProcessingState to Canceled // No need to set it again here } catch (Exception ex) { await this.ShowErrorAsync($"Failed to process request: {ex.Message}"); context.HasError = true; } finally { this.cancellationTokenSource?.Dispose(); this.cancellationTokenSource = null; } } private void ExecuteCancelAI() { this.cancellationTokenSource?.Cancel(); } protected async Task ShowErrorAsync(string message) { #if NET10_0_OR_GREATER await Microsoft.Maui.Controls.Application.Current?.Windows[0].Page?.DisplayAlertAsync("Error", message, "OK"); #else await Microsoft.Maui.Controls.Application.Current?.Windows[0].Page?.DisplayAlert("Error", message, "OK"); #endif } }-
Deserializes the incoming
JSON(context.RequestJson)into aGridAIRequest. This contains grid columns and user prompt contents. -
Creates
ChatOptionsand registers DataGrid-specific tools viaoptions.AddGridChatTools(request.Columns)so the AI knows what columns/operations are available. -
Maps each request content to a
ChatMessagewithChatRole.User. -
Calls the AI backend through
IChatClient.GetResponseAsync(messages, options)to get aChatResponse. -
Extracts the grid-specific instruction from the AI result with
completion.ExtractGridResponse(). -
Serializes the response to a
JSONand assign tocontext.ResponseJsonfor the DataGrid to consume.
-
Get the service registered in the
MauiProgram.csand pass it to the instance of theViewModel. Then set the binding context of the page to be thisViewModel.C#var chatClient = Application.Current.Handler.MauiContext.Services.GetRequiredService<IChatClient>(); this.viewModel = new AIPromptViewModel(chatClient); this.BindingContext = this.viewModel; -
Set the DataGrid's
IsAIEnabledproperty totrue. When setting totrue, the AI Smart Assistant panel gets enabled, allowing users to input prompts.
Example Prompts
Here are some example prompts that users can use to interact with the DataGrid:
- "Group the data by the Category column."
- "Sort the data by the Name column in ascending order."
- "Filter the data to show only items with a price greater than 100."
- To freeze a column use the
lockkeyword. For example: "Lock the Price column."
Example with AI Smart Assistant
1. Add DataGrid definition in XAML:
<telerik:RadDataGrid ItemsSource="{Binding Flights}"
                     AutoGenerateColumns="False"
                     IsAIEnabled="True"
                     UserEditMode="Cell"
                     UserGroupMode="Enabled">
    <telerik:RadDataGrid.Commands>
        <local:DataGridUserCommand Id="PromptRequest"
                                   Command="{Binding ProcessAICommand}" />
        <local:DataGridUserCommand Id="CancelPromptRequest"
                                   Command="{Binding CancelAICommand}" />
    </telerik:RadDataGrid.Commands>
    <telerik:RadDataGrid.AISettings>
        <telerik:DataGridAISettings SuggestedPrompts="{Binding SuggestedPrompts}" />
    </telerik:RadDataGrid.AISettings>
    <telerik:RadDataGrid.Columns>
        <telerik:DataGridNumericalColumn HeaderText="Flight Number" PropertyName="FlightNumber" />
        <telerik:DataGridTextColumn HeaderText="Destination" PropertyName="To" />
        <telerik:DataGridTimeColumn HeaderText="Departure Time" PropertyName="DepartureTime" />
        <telerik:DataGridTimeColumn HeaderText="Arrival Time" PropertyName="ArrivalTime" />
        <telerik:DataGridTextColumn HeaderText="Company" PropertyName="Company" />
    </telerik:RadDataGrid.Columns>
</telerik:RadDataGrid>
2. Add the telerik namespace:
xmlns:telerik="http://schemas.telerik.com/2022/xaml/maui"
3. Define the DataGridUserCommand:
public sealed class DataGridUserCommand : DataGridCommand
{
    public static readonly BindableProperty CommandProperty =
        BindableProperty.Create(nameof(Command), typeof(ICommand), typeof(DataGridUserCommand), null);

    public ICommand Command
    {
        get => (ICommand)this.GetValue(CommandProperty);
        set => this.SetValue(CommandProperty, value);
    }

    public override bool CanExecute(object parameter)
    {
        var command = this.Command;
        if (this.Owner == null || command == null)
        {
            return false;
        }

        return command.CanExecute(parameter);
    }

    public override void Execute(object parameter)
    {
        var command = this.Command;
        if (command != null)
        {
            command.Execute(parameter);
        }
    }
}
3. Add sample data model:
public class FlightInfo
{
    public string Company { get; set; }

    public int FlightNumber { get; set; }

    public TimeSpan ArrivalTime { get; set; }

    public TimeSpan DepartureTime { get; set; }

    public string From { get; set; }

    public string To { get; set; }
}
4. Define the ViewModel:
public class FlightsViewModel
{
    private static readonly HttpClient HttpClient = new HttpClient();
    private CancellationTokenSource cancellationTokenSource;
    private ICommand processAICommand;
    private ICommand cancelAICommand;
    private ObservableCollection<string> suggestedPrompts;

    public FlightsViewModel()
    {
        this.suggestedPrompts = this.CreateDefaultSuggestedPrompts();

        this.Flights = new ObservableCollection<FlightInfo>();

        string[] companies = new[]
        {
            "Air Buzz",
            "North Airlines",
            "United Airlines",
            "Southwest Airlines",
            "East Airlines",
            "Air Cargo",
            "Pacific Airlines",
        };

        string[] cities = new[]
        {
            "Seattle",
            "New York",
            "London",
            "Paris",
            "Berlin",
            "Tokyo",
            "Sydney",
            "Toronto",
            "San Francisco",
            "Chicago"
        };

        for (int i = 0; i < 50; i++)
        {
            var company = companies[i % companies.Length];
            var fromIndex = i % cities.Length;
            var toIndex = (i + 3) % cities.Length;
            if (toIndex == fromIndex)
            {
                toIndex = (toIndex + 1) % cities.Length;
            }

            var departureTime = TimeSpan.FromHours(i % 24).Add(TimeSpan.FromMinutes((i * 5) % 60));
            var arrivalTime = departureTime.Add(TimeSpan.FromHours(1 + (i % 2)));

            int flightNumber = 1000 + i;

            this.Flights.Add(new FlightInfo
            {
                Company = company,
                FlightNumber = flightNumber,
                DepartureTime = departureTime,
                ArrivalTime = arrivalTime,
                From = cities[fromIndex],
                To = cities[toIndex]
            });
        }
    }

    public ObservableCollection<FlightInfo> Flights { get; private set; }

    public ObservableCollection<string> SuggestedPrompts => this.suggestedPrompts;

    public ICommand ProcessAICommand
    {
        get => this.processAICommand ?? (this.processAICommand = new Command<DataGridPromptRequestCommandContext>(this.ExecuteProcessAI));
    }

    public ICommand CancelAICommand
    {
        get => this.cancelAICommand ?? (this.cancelAICommand = new Command(this.ExecuteCancelAI));
    }

    private ObservableCollection<string> CreateDefaultSuggestedPrompts()
    {
        return new ObservableCollection<string>
        {
            "Group flights by destination column",
            "Filter flights that arrival time is before 9 AM",
            "Show flights which destination is Tokyo and Sydney",
            "Lock flight number column",
            "Reset all filters, grouping and sorting",
        };
    }

    private async void ExecuteProcessAI(DataGridPromptRequestCommandContext context)
    {
        if (this.cancellationTokenSource != null)
        {
            // An AI request is already being processed
            return;
        }

        this.cancellationTokenSource = new CancellationTokenSource();

        try
        {
            var request = JsonSerializer.Deserialize<object>(context.RequestJson);
            var requestResult = await HttpClient.PostAsJsonAsync("https://demos.telerik.com/service/v2/ai/grid/smart-state", request, this.cancellationTokenSource.Token);
            var response = await requestResult.Content.ReadAsStringAsync(this.cancellationTokenSource.Token);

            context.ResponseJson = response;
        }
        catch (OperationCanceledException)
        {
            // Cancellation was already handled by setting ProcessingState to Canceled
            // No need to set it again here
        }
        catch (Exception ex)
        {
            await this.ShowErrorAsync($"Failed to process request: {ex.Message}");
            context.HasError = true;
        }
        finally
        {
            this.cancellationTokenSource?.Dispose();
            this.cancellationTokenSource = null;
        }
    }

    private void ExecuteCancelAI()
    {
        this.cancellationTokenSource?.Cancel();
    }

    private async Task ShowErrorAsync(string message)
    {
#if NET10_0_OR_GREATER
        await Microsoft.Maui.Controls.Application.Current?.Windows[0].Page?.DisplayAlertAsync("Error", message, "OK");
#else
        await Microsoft.Maui.Controls.Application.Current?.Windows[0].Page?.DisplayAlert("Error", message, "OK");
#endif
    }
}
5. Define the user command for the ProcessAICommand and CancelAICommand:
public sealed class DataGridUserCommand : DataGridCommand
{
    public static readonly BindableProperty CommandProperty =
        BindableProperty.Create(nameof(Command), typeof(ICommand), typeof(DataGridUserCommand), null);

    public ICommand Command
    {
        get => (ICommand)this.GetValue(CommandProperty);
        set => this.SetValue(CommandProperty, value);
    }

    public override bool CanExecute(object parameter)
    {
        var command = this.Command;
        if (this.Owner == null || command == null)
        {
            return false;
        }

        return command.CanExecute(parameter);
    }

    public override void Execute(object parameter)
    {
        var command = this.Command;
        if (command != null)
        {
            command.Execute(parameter);
        }
    }
}
The DataGrid AI Smart Assistant examples in the SDKBrowser Demo Application use a Telerik-hosted AI service for demonstration purposes only.
To use the AI Smart Assistant in your application, you must configure your own AI service.
How to do that is described in the Getting Started with the AI Smart Assistant article.
For a runnable example demonstrating the AI Smart Assistant, see the SDKBrowser Demo Application and go to the DataGrid > AI Smart Assistant category.