Working with Cosmos DB in ASP.NET Core

Summarize with AI:
Cosmos DB is a NoSQL database from Microsoft that supports multiple data models such as documents, key values and graphs. In this post, we will learn how to integrate an ASP.NET Core API and manipulate data in this cloud-native database.
Cosmos DB is a managed database offered as a cloud service by Microsoft through the Azure platform.
Learning about cloud resources is a basic requirement for any developer who wants to expand their knowledge in building large-scale applications. As a cloud service, Cosmos DB eliminates the need to manage database infrastructure, facilitating the development and operation of modern applications that require performance and availability on a global scale.
In this post, we will understand how Cosmos DB works, and how we can integrate a web application using ASP.NET Core resources to handle data manipulation in Cosmos DB.
What Are NoSQL Databases?
Relational databases emerged in the 1970s and are known for using Structured Query Language (SQL) to manipulate and store information. These databases are called “relational” because they organize data into tables that are related to each other through keys, allowing different sets of data to have references to each other.
However, maintaining these relationships can generate high costs, especially when coupling between data is optional. In these cases, the use of relational databases can become problematic.
NoSQL databases emerged to deal with situations in which there is no need to maintain strong references between data, providing an alternative to the traditional relational approach. Unlike relational databases, NoSQL databases do not rely on a rigid relationship structure, which offers greater flexibility and scalability in scenarios where relationships between data are less important.
The most popular NoSQL databases are MongoDB, Apache Cassandra, Redis, Couchbase, DynamDB and Cosmos DB. Each database has its particularities, such as the type of data stored. For example, MongoDB stores data in document format, while Redis uses the key-value format.
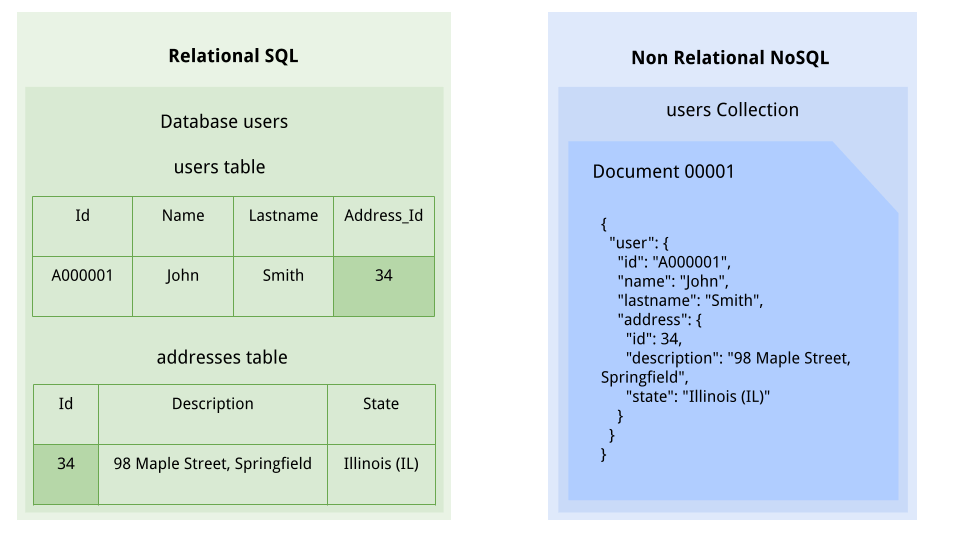
Data is stored in JavaScript Object Notation (JSON) format in NoSQL databases that use documents. The image below demonstrates the main differences between SQL and NoSQL databases that use documents for storage.
Knowing Cosmos DB
What Is Cosmos DB?
Cosmos DB is a platform as a service (PaaS) integrated with the services offered by Azure, which is Microsoft’s cloud platform.
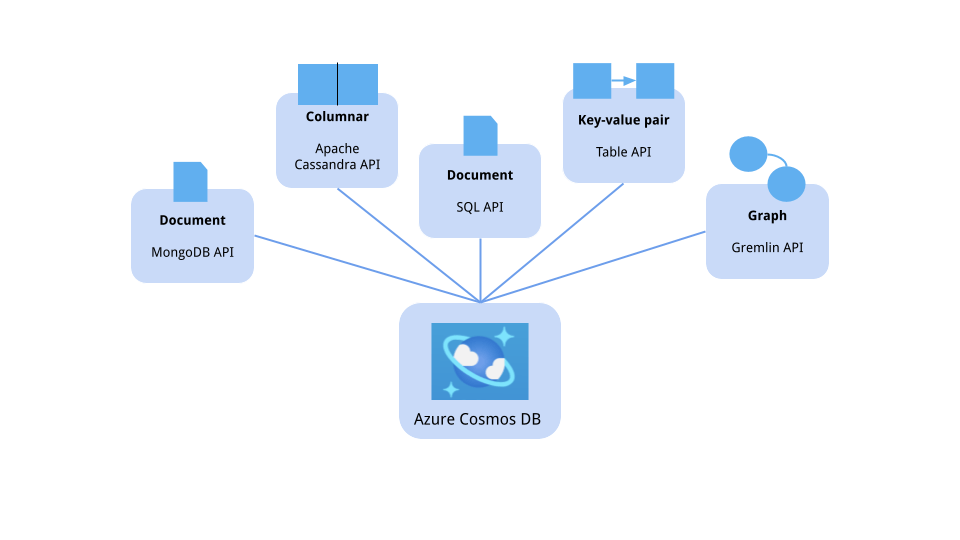
In addition to being a NoSQL database, Cosmos DB supports several data models, such as documents, key-value, graphs and wide columns, through APIs available for the main NoSQL databases of today such as MongoDB, Cassandra and Gremlin, in addition to an API for tables.
Azure Cosmos DB is widely used in large-scale applications because it was designed to meet scenarios that require high availability and low latency, such as IoT, gaming, ecommerce and social networking applications. It allows the creation of applications that can be scaled globally without complications.
When to Consider Using Cosmos DB
The use of Cosmos DB is recommended in scenarios where there is a need for fast responses and efficient horizontal scaling.
Consider an ecommerce system, where each product has a page with the product’s characteristics. The customer will probably view many product pages until choosing the right product to add to the shopping cart. Therefore, every time the user opens the product page, the data must be ready to be displayed. If there is any delay in loading the data due to latency, the user experience can be compromised.
In addition, large ecommerce companies allow the sale of used products, encouraging anyone who wants to sell a product to start using the application with a seller profile. In this way, the application can scale considerably, depending on the number of sellers, and this is something that Cosmos DB can handle efficiently, adding resources automatically as needed.
Hands-on with Cosmos DB
In this post, we will integrate an ASP.NET Core API with a Cosmos DB database. But don’t worry about Azure licensing—in this example, we will use a free tool for testing Cosmos DB called Cosmos DB Emulator. You can download it from this link in the “Install the emulator” section: Develop locally using the Azure Cosmos DB emulator.
After installing the tool on your machine, a Cosmos DB emulator server will be available and you can access it through the address https://localhost:8081/_explorer/index.html.
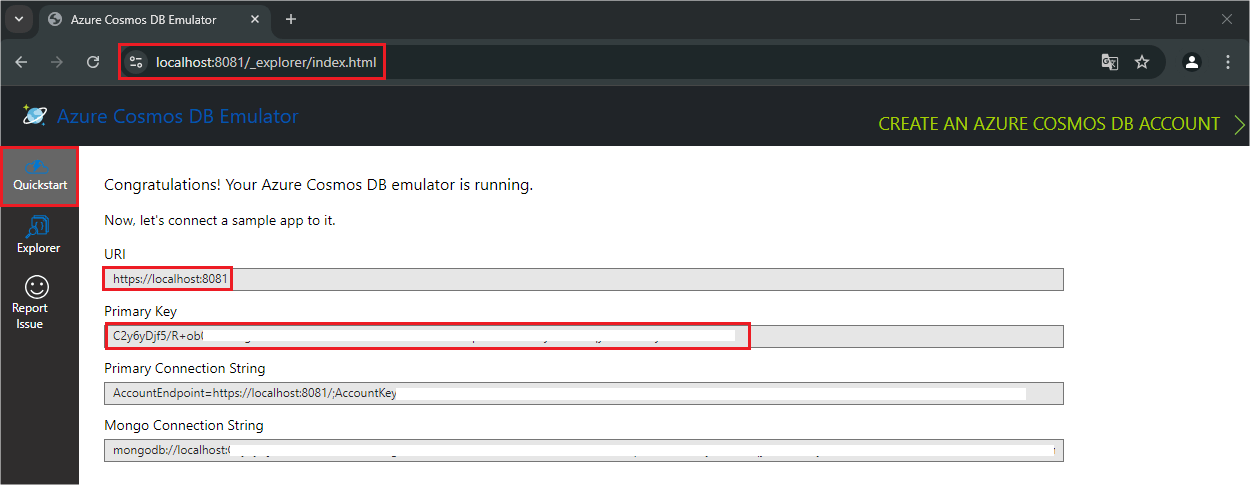
Note that the following data is displayed on the emulator homepage:
- URI:
https://localhost:8081address where the Cosmos DB server is running - Primary key: Provides access to all administrative features for the database account
- Primary connection string: Connection string composed of the AccountEndpoint and AccountKey
- Mongo connection string: Connection string for MongoDB
Creating the Database and Container
In Cosmos DB, a container is a storage and scalability unit that organizes and stores data. Containers are automatically partitioned and distributed across multiple servers for horizontal scalability (as opposed to relational databases that scale vertically). Each item within a container is associated with a partition key, which determines which partition the item will be stored in and is used to manage the appropriate partition where it will be written, updated or deleted.
To create a container in Cosmos DB Emulator, click on the Explore tab, then click on the “New container” button, then fill in the fields as shown in the image below:
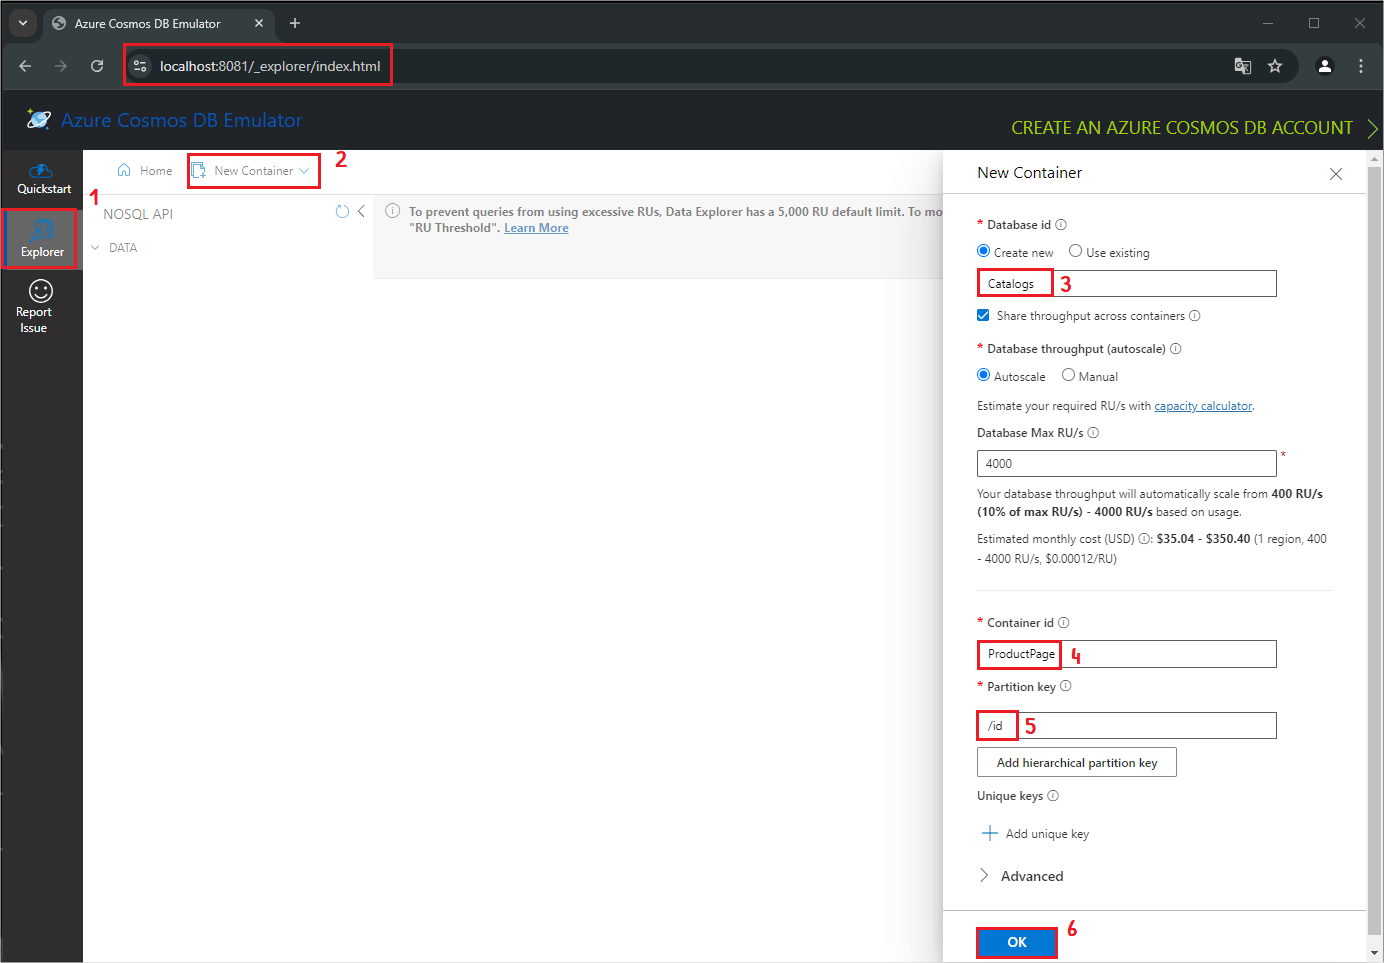
Note that in addition to the database and container, we are defining the name of the partition key. In this example, we will use the same ID as the entity that will be stored in the database. Therefore, it must be written with a lowercase initial letter, otherwise it will generate an error.
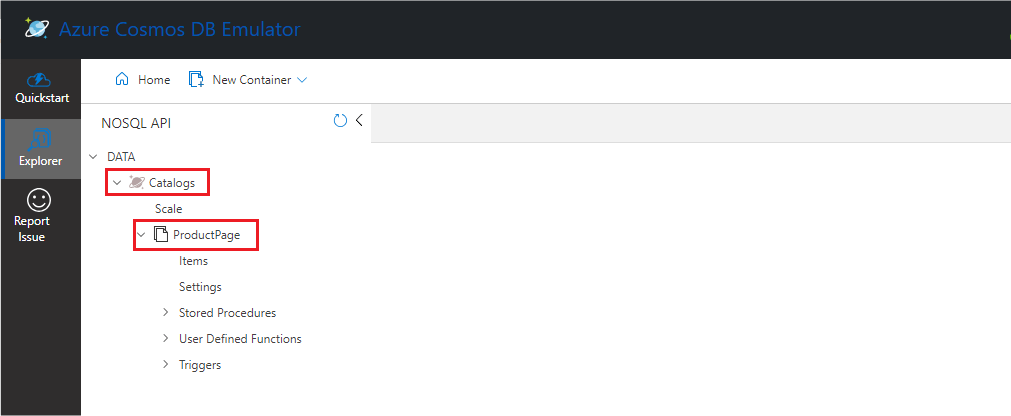
After filling in the fields and clicking OK, you can check the container and database created:
Creating the Application and Integrating It with Cosmos DB
In this post, we will create an ASP.NET Core web API to manage product page data. We will integrate it with Cosmos DB, and it will have two endpoints, a POST to insert data and a GET to retrieve it, and then we will use Progress Telerik Fiddler Everywhere to make the requests.
You can access the source code in this GitHub repository: EasyStore source code.
To create the application solution and the API project, use the commands below:
dotnet new sln -n EasyStore
dotnet new webapi -n Catalog.API
dotnet sln add Catalog.API/Catalog.API.csproj
Then use the following commands to download the dependencies for Cosmos DB and CSV Helper (which we will use to manipulate CSV files):
cd Catalog.API
dotnet add package Microsoft..Cosmos
dotnet add package CsvHelperAzure
This tutorial will focus on the basics, avoiding advanced separation of concerns techniques. The goal is to keep things as simple as possible. So, open the application in your IDE, and create a new folder called “Models” and add the following class to it to represent the ProductPage entity:
using Newtonsoft.Json;
namespace Catalog.API.Models;

public class ProductPage
{
  [JsonProperty("id")]
  public string Id { get; set; }
  public string Title { get; set; }
  public string Description { get; set; }
  public string ImageUrl { get; set; }
  public string AdditionalInfo { get; set; }
  public DateTime PublishedDate { get; set; }
  public bool IsPublished { get; set; }
}
Note that here we use the [JsonProperty("id")] attribute which is necessary for the id property to be equal to the partition key that we configured in Cosmos DB.
Next, create a new folder called “Services” and inside it create the class below:
using Catalog.API.Models;
using Microsoft.Azure.Cosmos;
namespace Catalog.API.Services;

public class CatalogService
{
    private readonly Container _container;
    private readonly ILogger<CatalogService> _logger;

    public CatalogService(CosmosClient cosmosClient, string databaseName, string containerName, ILogger<CatalogService> logger)
    {
        _container = cosmosClient.GetContainer(databaseName, containerName);
        _logger = logger;
    }

    public async Task AddProductPage(ProductPage productPage)
    {
        try
        {
            var partitionKey = new PartitionKey(productPage.Id);

            await _container.UpsertItemAsync(productPage, partitionKey);
        }
        catch (CosmosException ex)
        {
            _logger.LogError($"CosmosDB Error: {ex.StatusCode} - {ex.Message}");
            _logger.LogError($"ActivityId: {ex.ActivityId}");
        }
        catch (Exception ex)
        {
            _logger.LogError($"Unexpected Error: {ex.Message}");
        }
    }

    public async Task<ProductPage?> GetProductPage(string id)
    {
        try
        {
            var response = await _container.ReadItemAsync<ProductPage>(id, new PartitionKey(id));
            return response.Resource;
        }
        catch (CosmosException ex) when (ex.StatusCode == System.Net.HttpStatusCode.NotFound)
        {
            return null;
        }
    }
}
Here we have the CatalogService class that has the AddProductPage() method that receives an item (productPage) as a parameter and calls the UpsertItemAsync() method to add the item to the Cosmos DB container. In addition, there are also exception handlers to know if there was an exception coming from Cosmos DB or another source.
The GetProductPage() method receives an ID and searches for an item through ReadItemAsync(). If the return is a status code 404, the return is null.
Next, let’s create the controller and the endpoints. So, create a new folder called “Controllers” and add the following controller in it:
using Microsoft.AspNetCore.Mvc;
using Catalog.API.Models;
using Catalog.API.Services;
using CsvHelper;
using System.Globalization;

namespace Catalog.API.Controllers;

[ApiController]
[Route("api/[controller]")]
public class CatalogController : ControllerBase
{
    private readonly CatalogService _catalogService;

    public CatalogController(CatalogService catalogService)
    {
        _catalogService = catalogService;
    }

    [HttpPost("/product-page/upload")]
    public async Task<IActionResult> UploadProductPages([FromForm] IFormFile file)
    {
        if (file == null || file.Length == 0)
            return BadRequest("File is empty.");

        using var streamReader = new StreamReader(file.OpenReadStream());
        using var csvReader = new CsvReader(streamReader, CultureInfo.InvariantCulture);
        var productPages = csvReader.GetRecords<ProductPage>();

        foreach (var productPage in productPages)
        {
            await _catalogService.AddProductPage(productPage);
        }

        return Ok("Product pages have been uploaded and saved to the database.");
    }

    [HttpGet("/product-page")]
    public async Task<ActionResult<IEnumerable<ProductPage>>> GetProductPage([FromQuery] string id)
    {
        var productPage = await _catalogService.GetProductPage(id);
        return productPage != null ? Ok(productPage) : NotFound();
    }
}
Here we have a controller with two endpoints: the first to upload a CSV file with the product page data, and the second to retrieve the data from a product page registered by ID.
The next step is to create the configurations in the Program class. So replace the contents of the Program.cs class with the code below:
using Catalog.API.Services;
using Microsoft.Azure.Cosmos;

var builder = WebApplication.CreateBuilder(args);

builder.Services.AddEndpointsApiExplorer();
builder.Services.AddSwaggerGen();
builder.Services.AddControllers();

builder.Services.AddSingleton(s =>
{
    var cosmosClient = new CosmosClient(
        builder.Configuration["CosmosDb:Account"],
        builder.Configuration["CosmosDb:Key"]);

    var logger = s.GetRequiredService<ILogger<CatalogService>>();

    return new CatalogService(
        cosmosClient,
        builder.Configuration["CosmosDb:DatabaseName"],
        builder.Configuration["CosmosDb:ContainerName"],
        logger);
});

var app = builder.Build();

if (app.Environment.IsDevelopment())
{
    app.UseSwagger();
    app.UseSwaggerUI();
}

app.UseHttpsRedirection();
app.MapControllers();

app.Run();
Note that here we configure the connection string with Cosmos DB through variables such as CosmosDb:Account and "CosmosDb:Key which will be configured in the appsettings.json file.
In the appsettings.json add the following code:
"CosmosDb": {
   "Account": "https://localhost:8081",
   "Key": "YOUR_AZURE_KEY",
   "DatabaseName": "Catalogs",
   "ContainerName": "ProductPage"
 },
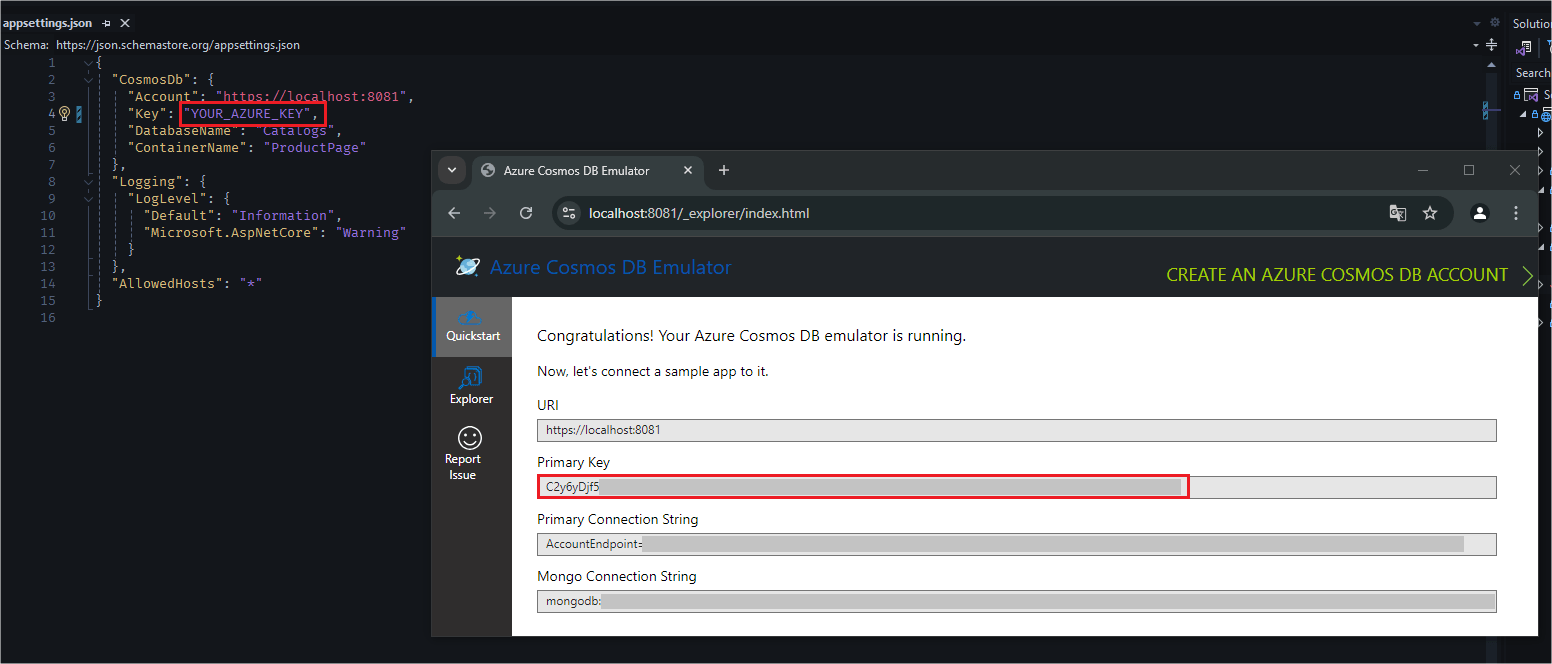
It is important to note that the Key variable must be filled with the value present in the Cosmos DB container configuration, as shown in the image below:
Running the Application and Checking the Data
All the necessary configurations are ready, now we can run the application and check the data in the Cosmos DB Emulator.
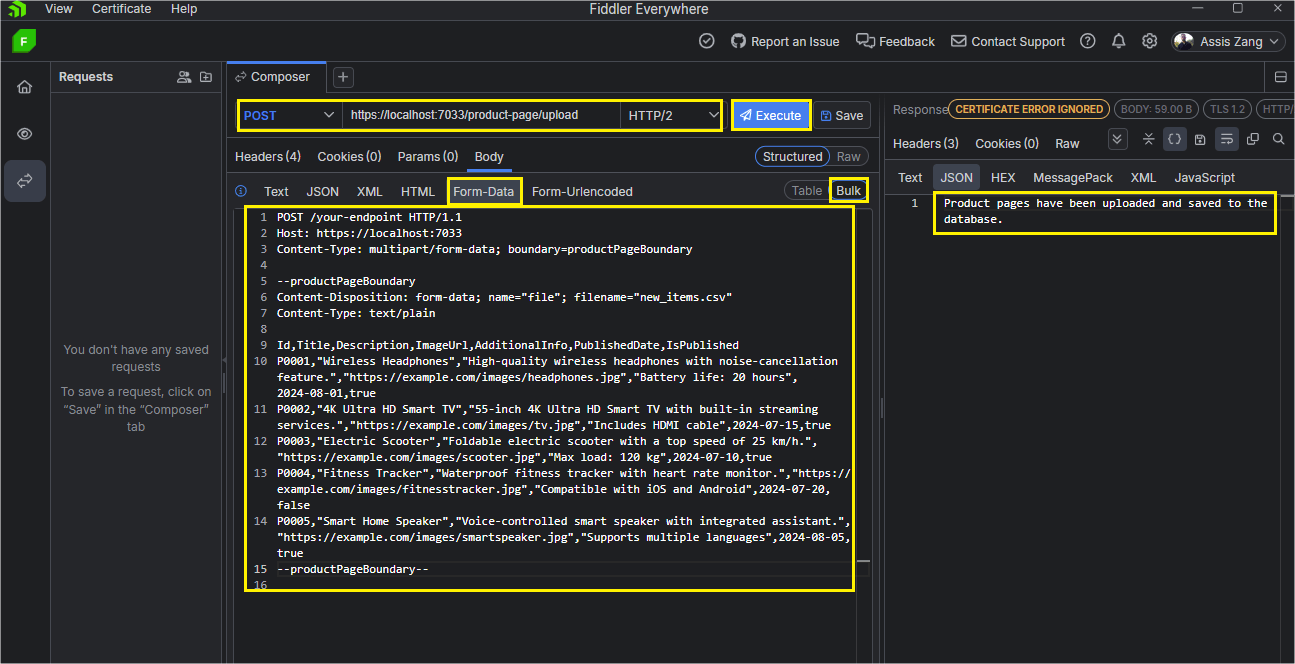
Run the application, and in Fiddler Everywhere open the composer tab and create a request (POST) to the endpoint: https://localhost:PORT/product-page/upload. In the “body” tab select “Form-Data” and “Bulk.” Then insert the code below in the request body:
Content-Type: multipart/form-data; boundary=productPageBoundary

--productPageBoundary
Content-Disposition: form-data; name="file"; filename="new_items.csv"
Content-Type: text/plain

Id,Title,Description,ImageUrl,AdditionalInfo,PublishedDate,IsPublished
P0001,"Wireless Headphones","High-quality wireless headphones with noise-cancellation feature.","https://example.com/images/headphones.jpg","Battery life: 20 hours",2024-08-01,true
P0002,"4K Ultra HD Smart TV","55-inch 4K Ultra HD Smart TV with built-in streaming services.","https://example.com/images/tv.jpg","Includes HDMI cable",2024-07-15,true
P0003,"Electric Scooter","Foldable electric scooter with a top speed of 25 km/h.","https://example.com/images/scooter.jpg","Max load: 120 kg",2024-07-10,true
P0004,"Fitness Tracker","Waterproof fitness tracker with heart rate monitor.","https://example.com/images/fitnesstracker.jpg","Compatible with iOS and Android",2024-07-20,false
P0005,"Smart Home Speaker","Voice-controlled smart speaker with integrated assistant.","https://example.com/images/smartspeaker.jpg","Supports multiple languages",2024-08-05,true
--productPageBoundary--
Here, we are sending the data from product pages as a CSV file.
The Content-Type header defines the request’s content type as multipart/form-data. It includes a boundary (delimiter) called productPageBoundary, a string that separates the different parts of the data sent.
Each piece of content is then delimited by the boundary. The first block of data starts with Content-Disposition, which is the form-data, and identifies the field name as file and specifies the file name as new_items.csv.
The content of the CSV file is included in the request, containing rows representing the products with their information, such as ID, title, description, image URL, additional information, publication date, and publication status.
Finally, the request ends with the same boundary delimiter, which marks the end of the data sent.
So if you execute the request you will get the following response with a sentence indicating success:
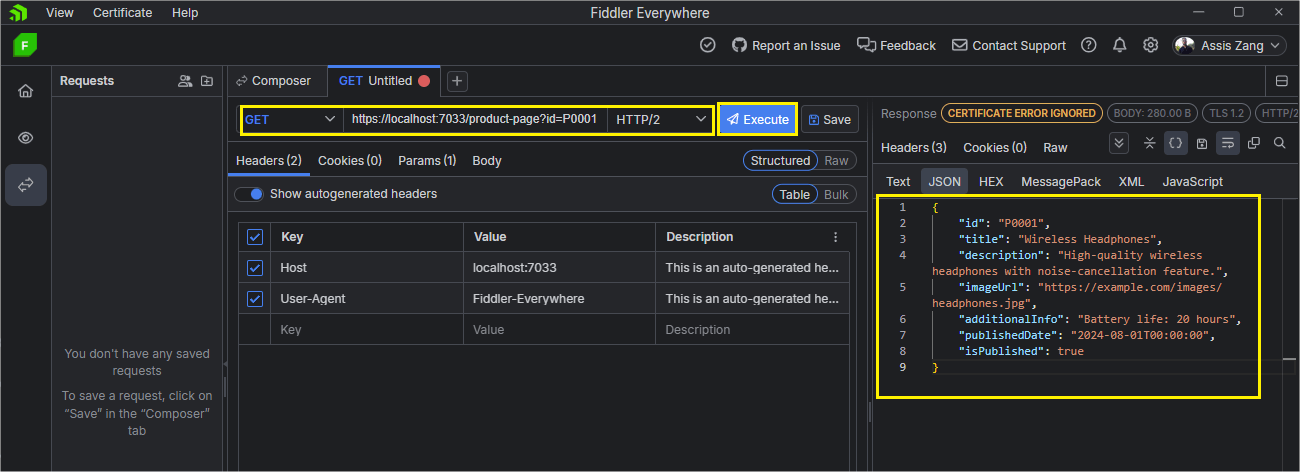
Now, if you request the endpoint https://localhost:PORT/product-page?id=P0001 you can check the newly created record:
And if you access the CosmosDB Emulator you can check the data created in the container:
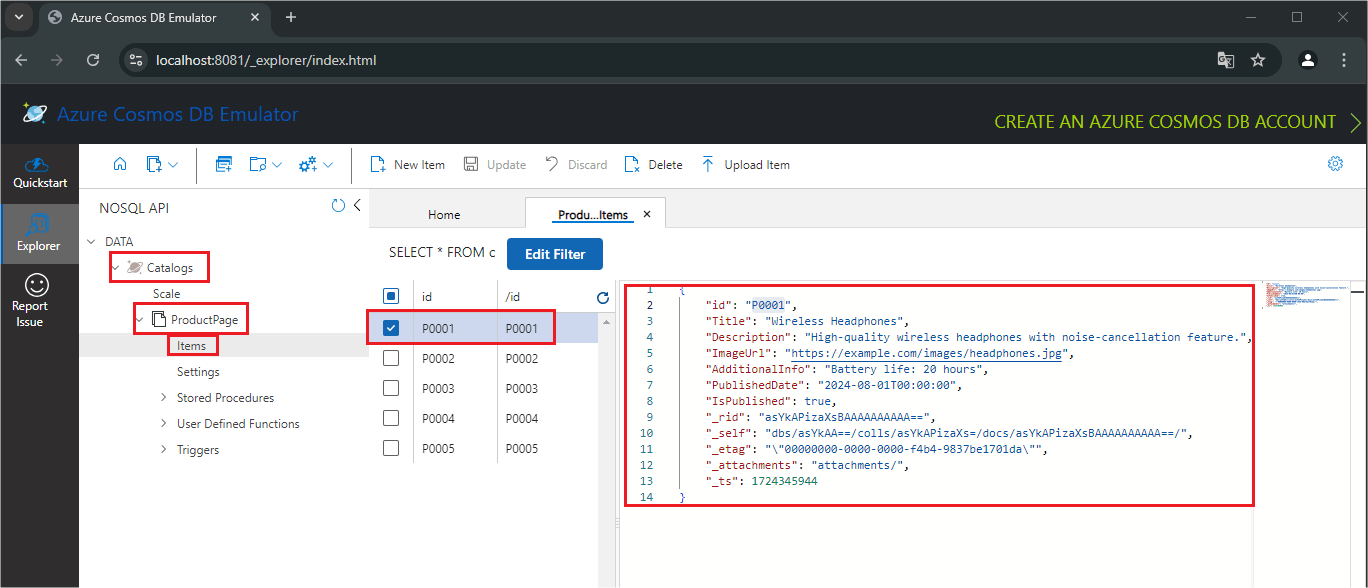
Note that in addition to the information sent in the request, in the document with id “P0001” there are other properties generated by Cosmos DB:
_rid: The resource ID (_rid) is a unique identifier, used internally for positioning and navigation of the document resource._self: This is a system-generated property. It is the unique Uniform Resource Identifier (URI ) for the resource._etag: It specifies the etag resource required for optimistic concurrency control._attachments: This specifies the address path to the attachment resource._ts: This specifies the last recorded timestamp.
Conclusion
Cosmos DB offers many features for working with web applications and integrates seamlessly with the .NET ecosystem, as both are Microsoft products. In this post, we explored the basics of Cosmos DB and highlighted some of its key services, such as APIs compatible with popular databases such as MongoDB and Apache Cassandra. We also covered building a web API in ASP.NET Core and integrating it with the Cosmos DB NoSQL database using the Cosmos DB Emulator.
Cosmos DB is an excellent choice, especially when performance and scalability are critical. With the growing demand for solutions that can scale efficiently, developers must be familiar with the capabilities of Cosmos DB. This knowledge is essential for making good decisions when building medium- to large-scale web applications.


