
Real-Time Data Updates with the Telerik UI for .NET MAUI Grid

Summarize with AI:
Learn how to make real-time updates in your .NET MAUI applications with SignalR, common in stocks or cryptocurrency scenarios.
In this article, you will learn how to carry out real-time updates in your .NET MAUI-based applications thanks to the power of SignalR, common in stocks or cryptocurrency scenarios. You will also see why the Progress Telerik .NET MAUI DataGrid control is ideal in these scenarios, as it allows functionalities such as rendering custom columns through the use of SkiaSharp. Let’s get started!
Creating a Stock Update Service
We will start with a simple API project that simulates the retrieval of stocks from the stock market, with the purpose of showing you how to create a service that exposes real-time information using SignalR. For this demonstration, I created a project using the ASP.NET Core Web API template with the following classes:
Stock.cs
public class Stock
{
    public string Symbol { get; set; } = string.Empty;
    public string CompanyName { get; set; } = string.Empty;
    public decimal Price { get; set; }
    public decimal Change { get; set; }
    public decimal ChangePercent { get; set; }
    public decimal OpenPrice { get; set; }
    public decimal HighPrice { get; set; }
    public decimal LowPrice { get; set; }
    public decimal PreviousClose { get; set; }
    public long Volume { get; set; }
    public long MarketCap { get; set; }
    public DateTime LastUpdated { get; set; }
    public bool IsMarketOpen { get; set; }
    public string Sector { get; set; } = string.Empty;
}
StockService.cs
    public interface IStockService
    {
        List<Stock> GetAllStocks();
        Stock? GetStock(string symbol);
        event Action<Stock>? StockUpdated;
    }

    public class StockService : IStockService, IDisposable
    {
        private readonly Dictionary<string, Stock> _stocks;
        private readonly Timer _updateTimer;
        private readonly Random _random;
        private readonly int _updateIntervalMs;

        public event Action<Stock>? StockUpdated;

        public StockService(IConfiguration configuration)
        {
            _stocks = new Dictionary<string, Stock>();
            _random = new Random();

            _updateIntervalMs = configuration.GetValue<int>("StockSimulation:UpdateIntervalMs", 2000);

            InitializeStocks();

            _updateTimer = new Timer(UpdateStockPrices, null,
                TimeSpan.FromMilliseconds(_updateIntervalMs),
                TimeSpan.FromMilliseconds(_updateIntervalMs));
        }

        private void InitializeStocks()
        {
            var stockData = new[]
            {
            new { Symbol = "AAPL", Company = "Apple Inc.", Sector = "Technology", Price = 175.50m, MarketCap = 2800000000000L },
            new { Symbol = "GOOGL", Company = "Alphabet Inc.", Sector = "Technology", Price = 138.25m, MarketCap = 1750000000000L },
            new { Symbol = "MSFT", Company = "Microsoft Corporation", Sector = "Technology", Price = 378.90m, MarketCap = 2850000000000L },
            new { Symbol = "AMZN", Company = "Amazon.com Inc.", Sector = "Consumer Discretionary", Price = 143.75m, MarketCap = 1500000000000L },
            new { Symbol = "TSLA", Company = "Tesla Inc.", Sector = "Consumer Discretionary", Price = 248.50m, MarketCap = 790000000000L },
            new { Symbol = "NVDA", Company = "NVIDIA Corporation", Sector = "Technology", Price = 455.30m, MarketCap = 1120000000000L },
            new { Symbol = "META", Company = "Meta Platforms Inc.", Sector = "Technology", Price = 298.80m, MarketCap = 760000000000L },
            new { Symbol = "JPM", Company = "JPMorgan Chase & Co.", Sector = "Financial Services", Price = 158.45m, MarketCap = 460000000000L },
            new { Symbol = "V", Company = "Visa Inc.", Sector = "Financial Services", Price = 265.90m, MarketCap = 520000000000L },
            new { Symbol = "JNJ", Company = "Johnson & Johnson", Sector = "Healthcare", Price = 162.30m, MarketCap = 425000000000L }
        };

            foreach (var data in stockData)
            {
                var stock = new Stock
                {
                    Symbol = data.Symbol,
                    CompanyName = data.Company,
                    Sector = data.Sector,
                    Price = data.Price,
                    PreviousClose = data.Price + (decimal)(_random.NextDouble() * 10 - 5),
                    OpenPrice = data.Price + (decimal)(_random.NextDouble() * 6 - 3),
                    MarketCap = data.MarketCap,
                    Volume = _random.NextInt64(1000000, 50000000),
                    IsMarketOpen = IsMarketOpen(),
                    LastUpdated = DateTime.UtcNow
                };

                stock.HighPrice = stock.OpenPrice + Math.Abs((decimal)(_random.NextDouble() * 8));
                stock.LowPrice = stock.OpenPrice - Math.Abs((decimal)(_random.NextDouble() * 8));
                stock.Change = stock.Price - stock.PreviousClose;
                stock.ChangePercent = stock.PreviousClose != 0 ? (stock.Change / stock.PreviousClose) * 100 : 0;

                _stocks[data.Symbol] = stock;
            }
        }

        private void UpdateStockPrices(object? state)
        {
            if (!IsMarketOpen()) return;

            foreach (var stock in _stocks.Values)
            {
                var changePercent = (_random.NextDouble() - 0.5) * 0.04;
                var priceChange = stock.Price * (decimal)changePercent;

                stock.Price = Math.Max(0.01m, stock.Price + priceChange);
                stock.Change = stock.Price - stock.PreviousClose;
                stock.ChangePercent = stock.PreviousClose != 0 ? (stock.Change / stock.PreviousClose) * 100 : 0;

                if (stock.Price > stock.HighPrice)
                    stock.HighPrice = stock.Price;
                if (stock.Price < stock.LowPrice)
                    stock.LowPrice = stock.Price;

                stock.Volume += _random.NextInt64(10000, 500000);
                stock.LastUpdated = DateTime.UtcNow;

                StockUpdated?.Invoke(stock);
            }
        }

        private static bool IsMarketOpen()
        {
            var now = DateTime.Now;
            var timeOfDay = now.TimeOfDay;

            return true;
        }

        public List<Stock> GetAllStocks()
        {
            return _stocks.Values.ToList();
        }

        public Stock? GetStock(string symbol)
        {
            _stocks.TryGetValue(symbol.ToUpper(), out var stock);
            return stock;
        }

        public void Dispose()
        {
            _updateTimer?.Dispose();
        }
    }
In the code above, we are simulating a Stock service that updates its information every 2 seconds. I have also modified Program.cs to create the endpoint that allows querying all stocks:
var builder = WebApplication.CreateBuilder(args);
...
builder.Services.AddSingleton<IStockService, StockService>();
var app = builder.Build();
...
var stocksApi = app.MapGroup("/api/stocks");

// GET /api/stocks - Get All Stocks
stocksApi.MapGet("/", (IStockService stockService, ILogger<Program> logger) =>
{
    try
    {
        var stocks = stockService.GetAllStocks();
        return Results.Ok(stocks);
    }
    catch (Exception ex)
    {
        logger.LogError(ex, "Failed to retrieve all stocks");
        return Results.Problem("Internal Server Error", statusCode: 500);
    }
})
.WithName("GetAllStocks")
.WithOpenApi();
...

app.Run();
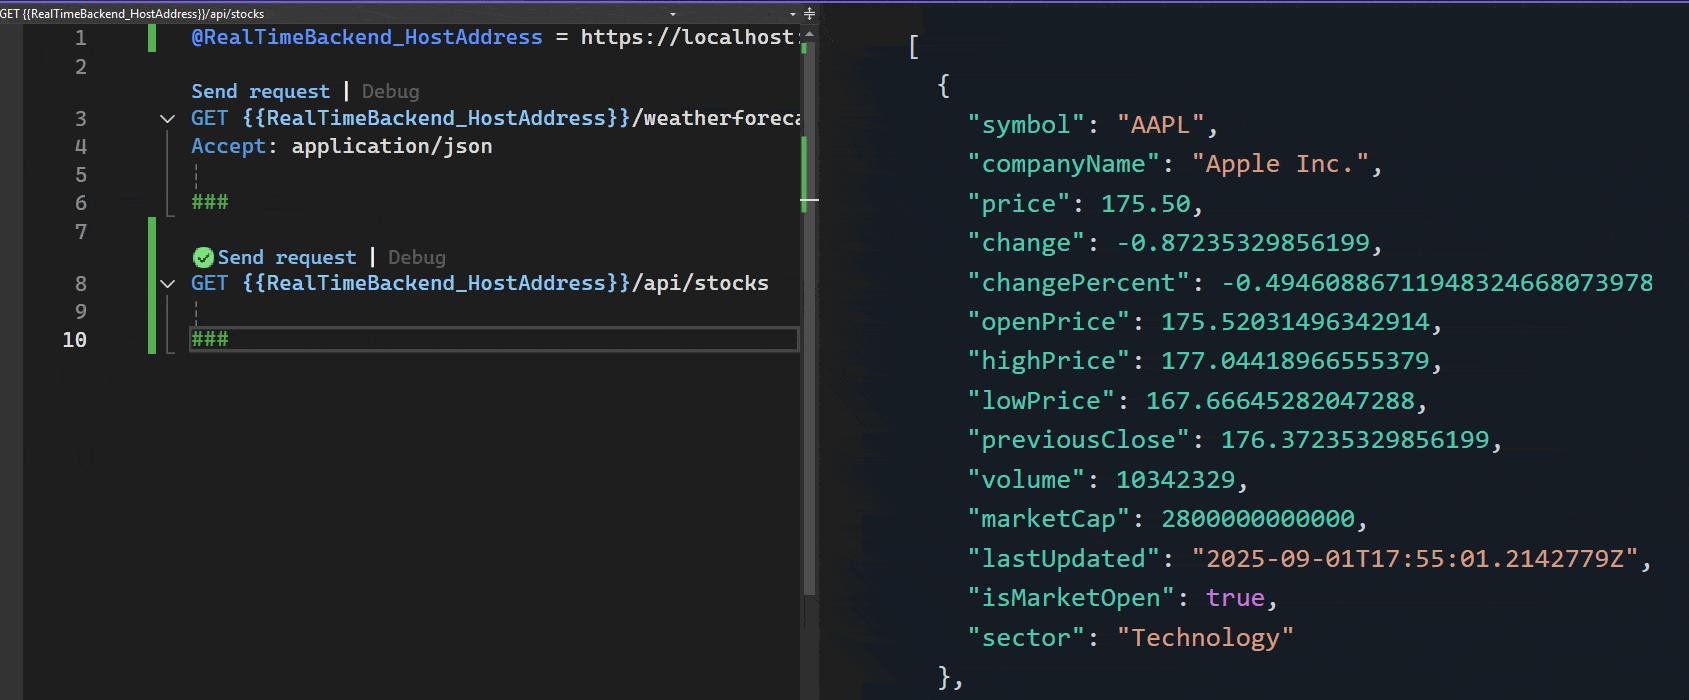
When starting the service and testing it, we can see how each execution produces different information for the stocks:
Creating a Hub for Real-Time Data Transmission
Once we have verified that the API is functioning correctly, the next step is to create a SignalR Hub, which is the communication channel used to send and receive messages. To achieve this, we need to define a class that allows clients to connect to the stocks they want to monitor.
In our example, to keep things simple, we will define methods for clients to subscribe and unsubscribe to changes in all stocks as follows:
StockHub.cs
public class StockHub : Hub
{
    private readonly IStockService _stockService;

    public StockHub(IStockService stockService)
    {
        _stockService = stockService;
    }

    public async Task SubscribeToAllStocks()
    {
        await Groups.AddToGroupAsync(Context.ConnectionId, "all_stocks");

        var stocks = _stockService.GetAllStocks();
        await Clients.Caller.SendAsync("AllStocksUpdate", stocks);
    }

    public async Task UnsubscribeFromAllStocks()
    {
        await Groups.RemoveFromGroupAsync(Context.ConnectionId, "all_stocks");
    }

    public async Task GetAllStocks()
    {
        var stocks = _stockService.GetAllStocks();
        await Clients.Caller.SendAsync("AllStocksSnapshot", stocks);
    }

    public override async Task OnConnectedAsync()
    {
        await Clients.Caller.SendAsync("Connected", $"Connected to the Stocks Hub. ID: {Context.ConnectionId}");
        await base.OnConnectedAsync();
    }

    public override async Task OnDisconnectedAsync(Exception? exception)
    {
        await base.OnDisconnectedAsync(exception);
    }
}
You may notice that there were no additional installations needed, as SignalR is part of the ASP.NET Core framework. Some important concepts from the previous code that you should know in case you haven’t worked with SignalR are as follows:
- Groups: The group manager class
- Context.ConnectionId: A temporary unique identifier for a client’s connection to the Hub
- all_stocks: The group label that will receive updates about the stocks
- Clients.Caller.SendAsync: Sends an event called
AllStocksUpdateonly to the client that made the call, along with the update data
After creating the Hub, we need to map it so that clients can connect to it. This should be done in Program.cs:
...
builder.Services.AddSignalR();
var app = builder.Build();
...
app.MapHub<StockHub>("/stockHub");
var stocksApi = app.MapGroup("/api/stocks");
...
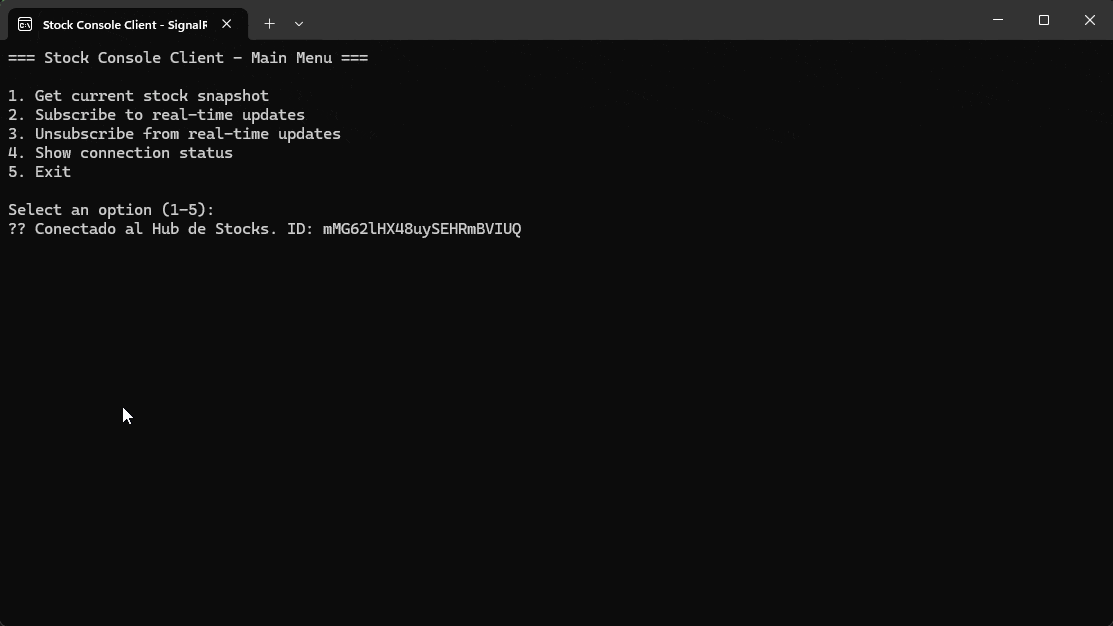
To test the application, I created a console application that you can see in action below:

As you can see in the image above, when we subscribe to the Hub to receive real-time notifications, we only receive the first update even though new data is being generated behind the scenes every two seconds. This is happening because we are not sending the updates of the new data through the Hub; we are only doing it internally for the API.
It is possible to create a Background Service responsible for sending broadcasts through the Hub. This will occur when an update is detected through the event StockUpdated defined in StockService:
StockUpdateBroadcastService.cs
public class StockUpdateBroadcastService : BackgroundService
{
    private readonly IHubContext<StockHub> _hubContext;
    private readonly IStockService _stockService;
    private readonly ILogger<StockUpdateBroadcastService> _logger;

    public StockUpdateBroadcastService(
        IHubContext<StockHub> hubContext,
        IStockService stockService,
        ILogger<StockUpdateBroadcastService> logger)
    {
        _hubContext = hubContext;
        _stockService = stockService;
        _logger = logger;
    }

    protected override async Task ExecuteAsync(CancellationToken stoppingToken)
    {
        _stockService.StockUpdated += OnStockUpdated;

        _logger.LogInformation("Stock update broadcast service started");

        while (!stoppingToken.IsCancellationRequested)
        {
            await Task.Delay(1000, stoppingToken);
        }

        _stockService.StockUpdated -= OnStockUpdated;
        _logger.LogInformation("Stock update broadcast service stopped");
    }

    private async void OnStockUpdated(Models.Stock stock)
    {
        try
        {
            await _hubContext.Clients.Group($"stock_{stock.Symbol}")
                .SendAsync("StockUpdate", stock);

            await _hubContext.Clients.Group("all_stocks")
                .SendAsync("StockUpdate", stock);

            _logger.LogDebug($"Update for {stock.Symbol} broadcasted: ${stock.Price:F2}");
        }
        catch (Exception ex)
        {
            _logger.LogError(ex, $"Error broadcasting update for {stock.Symbol}");
        }
    }
}
It is essential to register the background service in the dependency container in Program.cs:
...
builder.Services.AddHostedService<StockUpdateBroadcastService>();

var app = builder.Build();
When running the application with this change, we will see that the console application is now receiving updates every 2 seconds:
Once we have verified that everything is working correctly, let’s move on to see how to connect a .NET MAUI app to the service that communicates real-time information.
Creating a .NET MAUI App to Receive Real-Time Notifications
The next step is to create the .NET MAUI application to receive the stock information and display it in the UI. The framework does not include a DataGrid control to display stock data in a straightforward manner. Fortunately, the Telerik suite for .NET MAUI has a quite robust and flexible implementation of the .NET MAUI DataGrid control, which will allow us to display data quickly.
To achieve this, first, you need to create or open a .NET MAUI project, and then install the Telerik controls as per the installation guide. Next, install the following NuGet packages:
CommunityToolkit.MvvmMicrosoft.AspNetCore.SignalR.Client
Similarly, it is important to have a model that represents the stock information as well as a simulated history of actions and methods that simulate initializations, updates, etc.:
Stock.cs
public partial class Stock : ObservableObject
{
    [ObservableProperty]
    private string symbol = string.Empty;

    [ObservableProperty]
    private string companyName = string.Empty;

    [ObservableProperty]
    private decimal price;

    [ObservableProperty]
    private decimal change;

    [ObservableProperty]
    private decimal changePercent;

    [ObservableProperty]
    private decimal openPrice;

    [ObservableProperty]
    private decimal highPrice;

    [ObservableProperty]
    private decimal lowPrice;

    [ObservableProperty]
    private decimal previousClose;

    [ObservableProperty]
    private long volume;

    [ObservableProperty]
    private long marketCap;

    [ObservableProperty]
    private DateTime lastUpdated;

    [ObservableProperty]
    private bool isMarketOpen;

    [ObservableProperty]
    private string sector = string.Empty;

    public List<double> PriceHistory { get; private set; } = new List<double>();

    public string PriceText => $"${Price:F2}";

    public string ChangeText => Change >= 0 ? $"+${Change:F2}" : $"-${Math.Abs(Change):F2}";

    public string ChangePercentText => $"({(Change >= 0 ? "+" : "")}{ChangePercent:F2}%)";

    public Color ChangeColor => Change >= 0 ? Colors.Green : Colors.Red;

    public string VolumeText => Volume.ToString("N0");

    public string MarketCapText => FormatMarketCap(MarketCap);

    public string LastUpdatedText => LastUpdated.ToString("HH:mm:ss");

    private static string FormatMarketCap(long marketCap)
    {
        if (marketCap >= 1_000_000_000_000)
            return $"${marketCap / 1_000_000_000_000.0:F1}T";
        else if (marketCap >= 1_000_000_000)
            return $"${marketCap / 1_000_000_000.0:F1}B";
        else if (marketCap >= 1_000_000)
            return $"${marketCap / 1_000_000.0:F1}M";
        else
            return $"${marketCap:N0}";
    }

    public void UpdateFrom(Stock newStock)
    {
        Symbol = newStock.Symbol;
        CompanyName = newStock.CompanyName;

        AddPriceToHistory((double)newStock.Price);

        Price = newStock.Price;
        Change = newStock.Change;
        ChangePercent = newStock.ChangePercent;
        OpenPrice = newStock.OpenPrice;
        HighPrice = newStock.HighPrice;
        LowPrice = newStock.LowPrice;
        PreviousClose = newStock.PreviousClose;
        Volume = newStock.Volume;
        MarketCap = newStock.MarketCap;
        LastUpdated = newStock.LastUpdated;
        IsMarketOpen = newStock.IsMarketOpen;
        Sector = newStock.Sector;

        OnPropertyChanged(nameof(PriceText));
        OnPropertyChanged(nameof(ChangeText));
        OnPropertyChanged(nameof(ChangePercentText));
        OnPropertyChanged(nameof(ChangeColor));
        OnPropertyChanged(nameof(VolumeText));
        OnPropertyChanged(nameof(MarketCapText));
        OnPropertyChanged(nameof(LastUpdatedText));
    }

    private void AddPriceToHistory(double price)
    {
        PriceHistory.Add(price);

        if (PriceHistory.Count > 20)
        {
            PriceHistory.RemoveAt(0);
        }
    }

    public void InitializePriceHistory(double initialPrice)
    {
        if (PriceHistory.Count == 0)
        {
            for (int i = 0; i < 10; i++)
            {
                double variation = (Random.Shared.NextDouble() - 0.5) * 0.1;
                PriceHistory.Add(initialPrice * (1 + variation));
            }
        }
    }
}
With the model ready in the .NET MAUI application, we can continue with the connection service.
Creating the Service to Get SignalR Notifications
In order to connect a client to a SignalR Hub, it is necessary to create a HubConnection. In our .NET MAUI app, we will create a class that will handle this connection, as well as properties and events that will allow the application to make the necessary changes when it receives an update to the data.
The class looks as follows:
StockSignalRService.cs
public partial class StockSignalRService : ObservableObject, IDisposable
{
    private readonly HubConnection _connection;
    private bool _isConnected = false;

    [ObservableProperty]
    private string connectionStatus = "Disconnected";

    [ObservableProperty]
    private bool isConnecting = false;

    public ObservableCollection<Stock> Stocks { get; } = new();
    public bool IsConnected => _isConnected;

    public event Action<string>? MessageReceived;
    public event Action<Stock>? StockUpdated;

    public StockSignalRService()
    {
        var hubUrl = DeviceInfo.Platform == DevicePlatform.Android
            ? "http://10.0.2.2:5031/stockHub"
            : "http://localhost:5134/stockHub";

        _connection = new HubConnectionBuilder()
            .WithUrl(hubUrl)
            .WithAutomaticReconnect()
            .Build();

        ConfigureEventHandlers();
    }

    private void ConfigureEventHandlers()
    {
        _connection.Closed += OnDisconnected;
        _connection.Reconnected += OnReconnected;
        _connection.Reconnecting += OnReconnecting;

        _connection.On<Stock>("StockUpdate", OnStockUpdate);
        _connection.On<List<Stock>>("AllStocksUpdate", OnAllStocksUpdate);
        _connection.On<List<Stock>>("AllStocksSnapshot", OnAllStocksSnapshot);
        _connection.On<string>("Connected", OnConnectedMessage);
    }

    public async Task<bool> ConnectAsync()
    {
        if (_isConnected) return true;

        try
        {
            IsConnecting = true;
            ConnectionStatus = "Connecting...";

            await _connection.StartAsync();
            _isConnected = true;
            ConnectionStatus = "Connected";

            await SubscribeToAllStocksAsync();

            return true;
        }
        catch (Exception ex)
        {
            ConnectionStatus = $"Error: {ex.Message}";
            MessageReceived?.Invoke($"Connection error: {ex.Message}");
            return false;
        }
        finally
        {
            IsConnecting = false;
        }
    }

    public async Task DisconnectAsync()
    {
        if (!_isConnected) return;

        try
        {
            await _connection.StopAsync();
            _isConnected = false;
            ConnectionStatus = "Disconnected";

            MainThread.BeginInvokeOnMainThread(() =>
            {
                Stocks.Clear();
            });
        }
        catch (Exception ex)
        {
            MessageReceived?.Invoke($"Error while disconnecting: {ex.Message}");
        }
    }

    public async Task<bool> SubscribeToAllStocksAsync()
    {
        if (!_isConnected) return false;

        try
        {
            await _connection.InvokeAsync("SubscribeToAllStocks");
            MessageReceived?.Invoke("Subscribed to all stocks");
            return true;
        }
        catch (Exception ex)
        {
            MessageReceived?.Invoke($"Subscription error: {ex.Message}");
            return false;
        }
    }

    public async Task<bool> GetAllStocksAsync()
    {
        if (!_isConnected) return false;

        try
        {
            await _connection.InvokeAsync("GetAllStocks");
            return true;
        }
        catch (Exception ex)
        {
            MessageReceived?.Invoke($"Error retrieving stocks: {ex.Message}");
            return false;
        }
    }

    #region Event Handlers

    private Task OnDisconnected(Exception? exception)
    {
        MainThread.BeginInvokeOnMainThread(() =>
        {
            _isConnected = false;
            ConnectionStatus = exception != null ? $"Disconnected: {exception.Message}" : "Disconnected";
            Stocks.Clear();
        });
        return Task.CompletedTask;
    }

    private Task OnReconnected(string? connectionId)
    {
        MainThread.BeginInvokeOnMainThread(() =>
        {
            _isConnected = true;
            ConnectionStatus = "Reconnected";
        });

        _ = Task.Run(async () => await SubscribeToAllStocksAsync());

        return Task.CompletedTask;
    }

    private Task OnReconnecting(Exception? exception)
    {
        MainThread.BeginInvokeOnMainThread(() =>
        {
            _isConnected = false;
            ConnectionStatus = "Reconnecting...";
        });
        return Task.CompletedTask;
    }

    private void OnStockUpdate(Stock stock)
    {
        MainThread.BeginInvokeOnMainThread(() =>
        {
            var existingStock = Stocks.FirstOrDefault(s => s.Symbol == stock.Symbol);
            if (existingStock != null)
            {
                existingStock.UpdateFrom(stock);
            }
            else
            {
                Stocks.Add(stock);
            }

            StockUpdated?.Invoke(stock);
        });
    }

    private void OnAllStocksUpdate(List<Stock> stocks)
    {
        MainThread.BeginInvokeOnMainThread(() =>
        {
            foreach (var stock in stocks)
            {
                var existingStock = Stocks.FirstOrDefault(s => s.Symbol == stock.Symbol);
                if (existingStock != null)
                {
                    existingStock.UpdateFrom(stock);
                }
                else
                {
                    Stocks.Add(stock);
                }
            }
        });
    }

    private void OnAllStocksSnapshot(List<Stock> stocks)
    {
        MainThread.BeginInvokeOnMainThread(() =>
        {
            Stocks.Clear();
            foreach (var stock in stocks)
            {
                stock.InitializePriceHistory((double)stock.Price);
                Stocks.Add(stock);
            }
        });
        MessageReceived?.Invoke($"Snapshot received for {stocks.Count} stocks");
    }

    private void OnConnectedMessage(string message)
    {
        MessageReceived?.Invoke(message);
    }

    #endregion

    public void Dispose()
    {
        _connection?.DisposeAsync();
    }
}
In the above code, we should highlight a few points:
- If you follow the exercise, you need to change the port according to your service.
- Events
MessageReceivedandStockUpdatedare created so that an external class can know when a message has been generated and when there is an update to the stocks. HubConnectionBuilderis used to create the HubConnection.- The events to which the client will subscribe from the Hub are registered through
_connection.On. You will notice that the names are the same as those defined inStockHub.csof the Web API project. - When a client connects through
ConnectAsync, the subscription is initiated through_connection.StartAsync(), and it automatically subscribes to listen to all stocks viaSubscribeToAllStocksAsync().
With the SignalR message subscription service, the next step is to create the page’s view model.
Creating the Application’s ViewModel
Creating the viewmodel for the project is very similar to any .NET MAUI viewmodel using the MVVM Toolkit, with the difference being the use of the service StockSignalRService:
MainViewModel.cs
public partial class MainViewModel : ObservableObject
{
    [ObservableProperty]
    private bool isLoading = false;
    [ObservableProperty]
    private bool isConnected = false;

    private readonly StockSignalRService _stockService;

    public ObservableCollection<Stock> Stocks => _stockService.Stocks;

    public MainViewModel(StockSignalRService stockService)
    {
        _stockService = stockService;

        _ = Task.Run(async () => await InitializeConnectionAsync());
    }

    private async Task InitializeConnectionAsync()
    {
        try
        {
            await _stockService.ConnectAsync();
        }
        catch (Exception ex)
        {
            Debug.WriteLine($"Connection Error: {ex.Message}");
        }
    }
}
In the above code, let’s highlight a few things:
- The service
StockSignalRServiceis used to connect to the SignalR Hub. - A collection of type
Stockis defined, which is linked to theStocksproperty of the service, meaning that when there is a change notification from the service, the collection will automatically have these new values, updating the UI automatically. - Once the page is displayed, the method
ConnectAsyncfrom the service is invoked, which, as a reminder, subscribes to updates of all stocks.
Creating the Page with the DataGrid in the Application
The last part of the project is creating the ContentPage that will show real-time updated information.
Using a component like a CollectionView to display data, in addition to implementing functionalities like sorting, grouping, filtering, etc., can be quite a headache. Fortunately, in the Telerik control suite, we have the DataGrid control, which includes the aforementioned functionalities and many more natively.
For our example, we will use a RadDataGrid that will take up the entire page, although you could modify this page to show information such as the time of the last update, the number of updates, choosing which stocks to display, etc.
The page in its first version will look like this:
<Grid>

    <telerik:RadDataGrid
        x:Name="StocksDataGrid"
        AutoGenerateColumns="True"
        Background="White"
        GridLinesColor="LightGray"
        ItemsSource="{Binding Stocks}"
        RowHeight="50">
    </telerik:RadDataGrid>

</Grid>
In the code behind the page, we need to modify the code to receive the viewmodel and bind it to the BindingContext:
public partial class MainPage : ContentPage
{
    private readonly MainViewModel _viewModel;

    public MainPage(MainViewModel viewModel)
    {
        InitializeComponent();
        _viewModel = viewModel;
        BindingContext = _viewModel;
    }

    protected override void OnDisappearing()
    {
        base.OnDisappearing();
    }
}
Finally, you need to modify MauiProgram.cs to allow the dependency container to resolve the dependency injections:
public static class MauiProgram
{
    public static MauiApp CreateMauiApp()
    {
        var builder = MauiApp.CreateBuilder();
       ...

        builder.Services.AddScoped<StockSignalRService>();
        builder.Services.AddScoped<MainViewModel>();
        builder.Services.AddScoped<MainPage>();

#if DEBUG
        builder.Logging.AddDebug();
#endif

        return builder.Build();
    }
}
Once we have done the above, we can see the page in action:
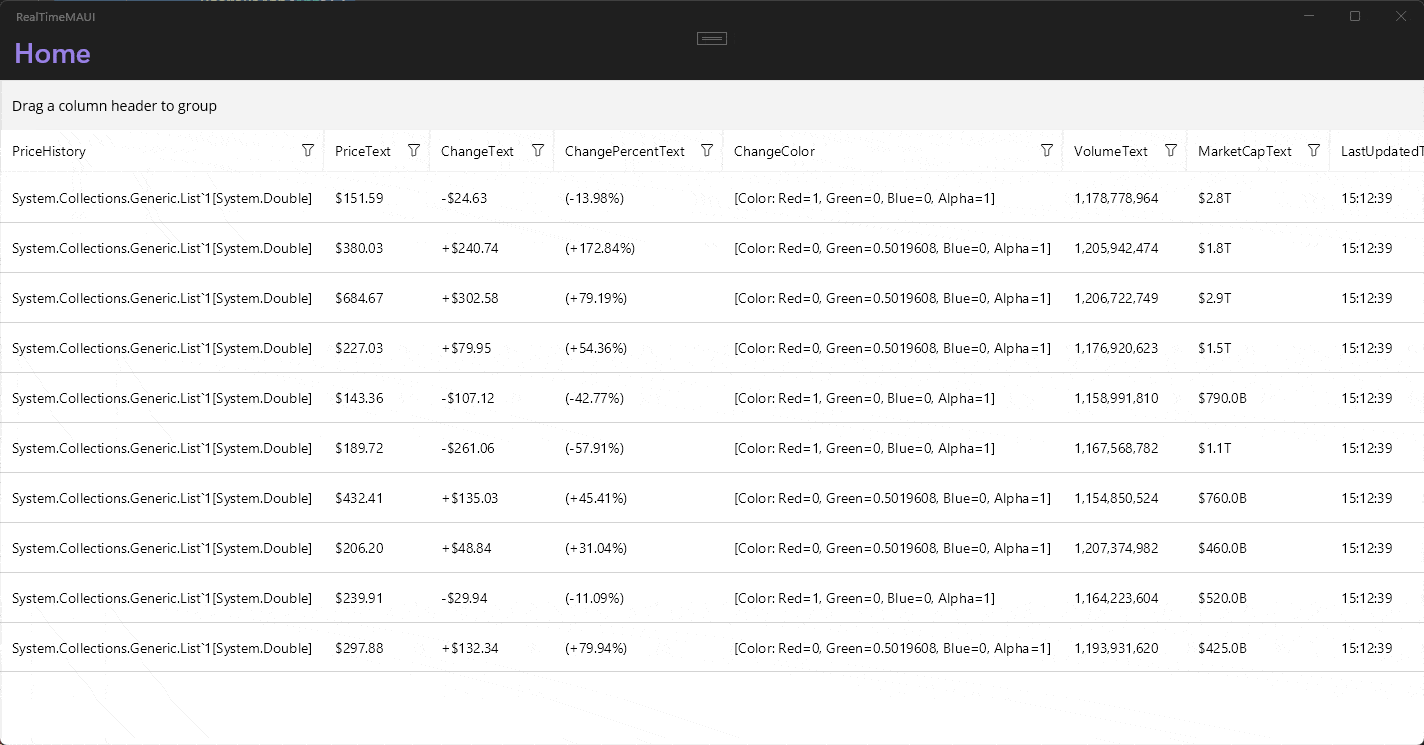
Although the Grid shows some data oddly, we have verified that the update occurs every 2 seconds correctly, as you can see in the PriceText, ChangeText and ChangePercentText columns.
Improving the DataGrid for Better Information Display
One of the things I love about the Telerik DataGrid control is its customization options. This translates to being able to decide what columns to include in the DataGrid and format them according to what we need. To do this, we must follow these steps:
- Place the property
AutoGenerateColumnsinFalse. - Add a section
<telerik:RadDataGrid.Columns>inside the RadDataGrid definition. - Create the columns according to the type of data you want to display (in our case, they will be of the type
DataGridTextColumn). - Configure the properties of each column according to the operations we want to allow (sorting, filtering, etc.).
The code for our example will look like this:
<ContentPage.Resources>
    <ResourceDictionary>
        <Style x:Key="HeaderStyle" TargetType="telerik:DataGridColumnHeaderAppearance">
            <Setter Property="BackgroundColor" Value="DarkBlue" />
            <Setter Property="TextColor" Value="White" />
        </Style>
    </ResourceDictionary>
</ContentPage.Resources>

<Grid>
    <telerik:RadDataGrid
        x:Name="StocksDataGrid"
        AutoGenerateColumns="False"
        Background="White"
        GridLinesColor="LightGray"
        ItemsSource="{Binding Stocks}"
        RowHeight="50">

        <telerik:RadDataGrid.Columns>
            <telerik:DataGridTextColumn
                CanUserFilter="True"
                CanUserGroup="True"
                CanUserSort="True"
                HeaderText="Symbol"
                PropertyName="Symbol">
                <telerik:DataGridTextColumn.HeaderStyle>
                    <Style BasedOn="{StaticResource HeaderStyle}" TargetType="telerik:DataGridColumnHeaderAppearance" />
                </telerik:DataGridTextColumn.HeaderStyle>
            </telerik:DataGridTextColumn>

            <telerik:DataGridTextColumn
                CanUserFilter="True"
                CanUserGroup="True"
                CanUserSort="True"
                HeaderText="Company Name"
                PropertyName="CompanyName">
                <telerik:DataGridTextColumn.HeaderStyle>
                    <Style BasedOn="{StaticResource HeaderStyle}" TargetType="telerik:DataGridColumnHeaderAppearance" />
                </telerik:DataGridTextColumn.HeaderStyle>
            </telerik:DataGridTextColumn>

            <telerik:DataGridTextColumn
                CanUserFilter="True"
                CanUserSort="True"
                HeaderText="Price"
                PropertyName="Price">
                <telerik:DataGridTextColumn.HeaderStyle>
                    <Style BasedOn="{StaticResource HeaderStyle}" TargetType="telerik:DataGridColumnHeaderAppearance" />
                </telerik:DataGridTextColumn.HeaderStyle>
                <telerik:DataGridTextColumn.CellContentTemplate>
                    <DataTemplate>
                        <Label
                            HorizontalOptions="End"
                            Text="{Binding PriceText}"
                            VerticalOptions="Center" />
                    </DataTemplate>
                </telerik:DataGridTextColumn.CellContentTemplate>
            </telerik:DataGridTextColumn>

            <telerik:DataGridTextColumn
                CanUserFilter="True"
                CanUserSort="True"
                HeaderText="Change"
                PropertyName="Change">
                <telerik:DataGridTextColumn.HeaderStyle>
                    <Style BasedOn="{StaticResource HeaderStyle}" TargetType="telerik:DataGridColumnHeaderAppearance" />
                </telerik:DataGridTextColumn.HeaderStyle>
                <telerik:DataGridTextColumn.CellContentTemplate>
                    <DataTemplate>
                        <Label
                            HorizontalOptions="End"
                            Text="{Binding ChangeText}"
                            TextColor="{Binding ChangeColor}"
                            VerticalOptions="Center" />
                    </DataTemplate>
                </telerik:DataGridTextColumn.CellContentTemplate>
            </telerik:DataGridTextColumn>

            <telerik:DataGridTextColumn
                CanUserFilter="True"
                CanUserSort="True"
                HeaderText="% Change"
                PropertyName="ChangePercent">
                <telerik:DataGridTextColumn.HeaderStyle>
                    <Style BasedOn="{StaticResource HeaderStyle}" TargetType="telerik:DataGridColumnHeaderAppearance" />
                </telerik:DataGridTextColumn.HeaderStyle>
                <telerik:DataGridTextColumn.CellContentTemplate>
                    <DataTemplate>
                        <Label
                            HorizontalOptions="End"
                            Text="{Binding ChangePercentText}"
                            TextColor="{Binding ChangeColor}"
                            VerticalOptions="Center" />
                    </DataTemplate>
                </telerik:DataGridTextColumn.CellContentTemplate>
            </telerik:DataGridTextColumn>

            <telerik:DataGridTextColumn
                CanUserFilter="True"
                CanUserSort="True"
                HeaderText="Volume"
                PropertyName="Volume">
                <telerik:DataGridTextColumn.HeaderStyle>
                    <Style BasedOn="{StaticResource HeaderStyle}" TargetType="telerik:DataGridColumnHeaderAppearance" />
                </telerik:DataGridTextColumn.HeaderStyle>
                <telerik:DataGridTextColumn.CellContentTemplate>
                    <DataTemplate>
                        <Label
                            HorizontalOptions="End"
                            Text="{Binding VolumeText}"
                            VerticalOptions="Center" />
                    </DataTemplate>
                </telerik:DataGridTextColumn.CellContentTemplate>
            </telerik:DataGridTextColumn>

            <telerik:DataGridTextColumn
                CanUserFilter="True"
                CanUserSort="True"
                HeaderText="Market Cap"
                PropertyName="MarketCap">
                <telerik:DataGridTextColumn.HeaderStyle>
                    <Style BasedOn="{StaticResource HeaderStyle}" TargetType="telerik:DataGridColumnHeaderAppearance" />
                </telerik:DataGridTextColumn.HeaderStyle>
                <telerik:DataGridTextColumn.CellContentTemplate>
                    <DataTemplate>
                        <Label
                            HorizontalOptions="End"
                            Text="{Binding MarketCapText}"
                            VerticalOptions="Center" />
                    </DataTemplate>
                </telerik:DataGridTextColumn.CellContentTemplate>
            </telerik:DataGridTextColumn>

            <telerik:DataGridTextColumn
                CanUserFilter="True"
                CanUserGroup="True"
                CanUserSort="True"
                HeaderText="Sector"
                PropertyName="Sector">
                <telerik:DataGridTextColumn.HeaderStyle>
                    <Style BasedOn="{StaticResource HeaderStyle}" TargetType="telerik:DataGridColumnHeaderAppearance" />
                </telerik:DataGridTextColumn.HeaderStyle>
            </telerik:DataGridTextColumn>
        </telerik:RadDataGrid.Columns>

    </telerik:RadDataGrid>

</Grid>
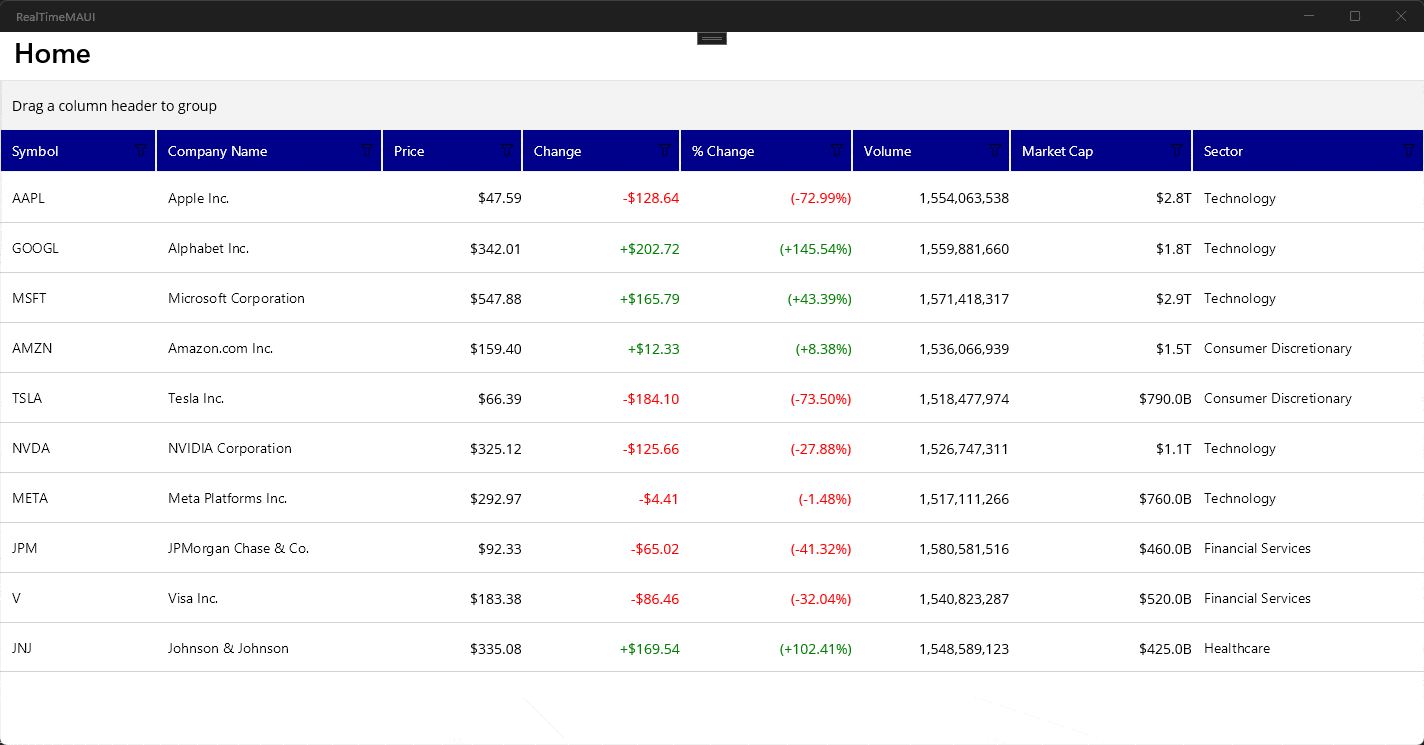
Once the previous modifications are done, you can see that the DataGrid looks much better:
Creating a Custom Column to Display a Different Format
It is very likely that at some point you want to display a custom chart in your DataGrid. For example, in stock applications, it is common to show price trends through charts. The Telerik DataGrid control is rendered using the SkiaSharp library, which allows us to create charts as complex as we want. There are multiple tutorials on using SkiaSharp in .NET MAUI available online.
For the case of the DataGrid, we must use as a base the class DataGridCellRenderer, which contains a method called RenderContainer that we can use to render the custom content for the current element. In our example, I created a class called SparklineRenderer that looks like this:
public class SparklineRenderer : DataGridCellRenderer
{
    protected override void RenderContainer(DataGridCellRendererRenderContext renderContext)
    {
        if (renderContext.Item is Stock stock &&
            renderContext is DataGridSkiaSharpCellRendererRenderContext skRenderContext)
        {
            DrawSparkline(stock, skRenderContext, skRenderContext.Bounds);
        }
    }

    private void DrawSparkline(Stock stock, DataGridSkiaSharpCellRendererRenderContext context, Microsoft.Maui.Graphics.Rect bounds)
    {
        var priceHistory = stock.PriceHistory;
        if (priceHistory == null || priceHistory.Count < 2)
            return;

        double padding = 4;
        double chartWidth = bounds.Width - (2 * padding);
        double chartHeight = bounds.Height - (2 * padding);
        double chartX = bounds.X + padding;
        double chartY = bounds.Y + padding;

        double displayScale = context.DisplayScale;

        double minPrice = priceHistory.Min();
        double maxPrice = priceHistory.Max();
        double priceRange = maxPrice - minPrice;

        if (priceRange == 0)
            priceRange = 1;

        var points = new List<SKPoint>();
        for (int i = 0; i < priceHistory.Count; i++)
        {
            double x = chartX + (i * chartWidth / (priceHistory.Count - 1));
            double normalizedValue = (priceHistory[i] - minPrice) / priceRange;
            double y = chartY + chartHeight - (normalizedValue * chartHeight);

            points.Add(new SKPoint((float)(x * displayScale), (float)(y * displayScale)));
        }

        double totalChange = priceHistory.Last() - priceHistory.First();
        SKColor lineColor = totalChange >= 0 ?
            new SKColor(34, 197, 94) :
            new SKColor(239, 68, 68);

        using (var paint = new SKPaint())
        {
            paint.Color = lineColor;
            paint.StrokeWidth = 1.5f * (float)displayScale;
            paint.Style = SKPaintStyle.Stroke;
            paint.IsAntialias = true;

            using (var path = new SKPath())
            {
                if (points.Count > 0)
                {
                    path.MoveTo(points[0]);
                    for (int i = 1; i < points.Count; i++)
                    {
                        path.LineTo(points[i]);
                    }
                    context.Canvas.DrawPath(path, paint);
                }
            }
        }

        using (var paint = new SKPaint())
        {
            paint.Color = lineColor;
            paint.Style = SKPaintStyle.Fill;
            paint.IsAntialias = true;

            float dotRadius = 1f * (float)displayScale;
            foreach (var point in points)
            {
                context.Canvas.DrawCircle(point.X, point.Y, dotRadius, paint);
            }
        }

        if (points.Count > 0)
        {
            using (var paint = new SKPaint())
            {
                paint.Color = lineColor;
                paint.Style = SKPaintStyle.Fill;
                paint.IsAntialias = true;

                var lastPoint = points.Last();
                float highlightRadius = 2f * (float)displayScale;
                context.Canvas.DrawCircle(lastPoint.X, lastPoint.Y, highlightRadius, paint);
            }
        }
    }
}
Let’s examine some important points from the previous code:
- It inherits from
DataGridCellRenderer, a class essential for displaying content in the DataGrid. - The method
RenderContaineris used to draw the content. - The stock history is obtained, which is a list of simulated previous values.
- An area to draw the chart is defined.
- In the first loop
for, the history is transformed into normalizedXandYcoordinates according to the chart area. - Through
totalChangeandlineColor, it is determined whether the color should be green or red. - A
SKPathis created with the calculated points, and the chart is drawn. - Small circles are added using
DrawCircleto highlight each individual point. - A larger circle is drawn to represent the most recent value.
Once we have the new renderer, we will use it in the DataGrid as follows:
<telerik:DataGridTextColumn
    CanUserFilter="False"
    CanUserSort="False"
    CellRenderer="{StaticResource SparklineRenderer}"
    HeaderText="Trend"
    PropertyName="Symbol">
    <telerik:DataGridTextColumn.HeaderStyle>
        <Style BasedOn="{StaticResource HeaderStyle}" TargetType="telerik:DataGridColumnHeaderAppearance" />
    </telerik:DataGridTextColumn.HeaderStyle>
</telerik:DataGridTextColumn>
With the new cell added to the DataGrid, we will see that the custom chart appears in the UI:
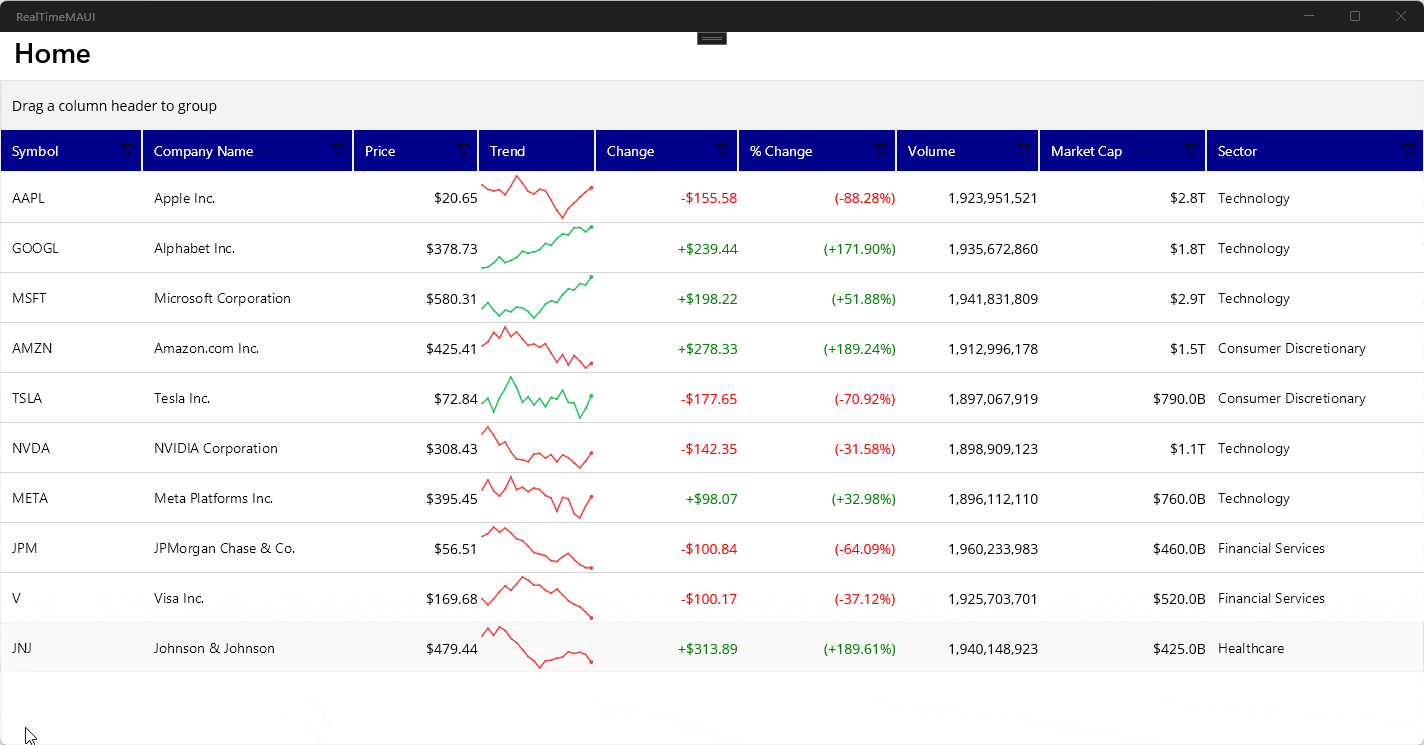
Undoubtedly, being able to customize the content of the cells opens a new door of opportunity to present quick and accurate information to app users.
Conclusion
Throughout this post, you have learned how to create SignalR-based applications to achieve real-time communication, something crucial in stock, cryptocurrency or similar applications.
You have also seen how the Telerik UI for .NET MAUI DataGrid control is an excellent option for displaying this content, not only for its properties to work with data but also for its flexibility in customization. It is your time to provide your clients with unique data-driven experiences.

Héctor Pérez
Héctor Pérez is a Microsoft MVP with more than 10 years of experience in software development. He is an independent consultant, working with business and government clients to achieve their goals. Additionally, he is an author of books and an instructor at El Camino Dev and Devs School.
Related Posts
Comments
All articles
Topics
Web MobileMobile
Desktop
Design
Productivity
People
