Python Desktop Application Development with Telerik UI for WPF: A Mighty Combo to Try Out

Summarize with AI:
Looking to build GUI for your Python app? Have a Python desktop app which needs some boost and sparkle? Well, guess what? You can now achieve this with the help of our powerful and modern looking UI controls for WPF.
Python and WPF? Oh, yes, IronPython and Telerik UI for WPF are a match made in heaven that will bring your Python desktop application to the next level.
IronPython
Don’t worry if this is the first time you've heard about IronPython. No worries if the first thing that crossed your mind is Iron Man. Yes, I know he had no superpowers per se, yet with the help of his imagination, he did become extremely powerful. Right?
IronPython is a powerful open-source variation of Python, integrated with the .NET Framework. It gives you the ability to use .NET Framework into Python desktop GUI and vice versa. Cool, right? 😊 Wanna learn something even cooler—the latest version comes with a built-in template project for Visual Studio 2019.
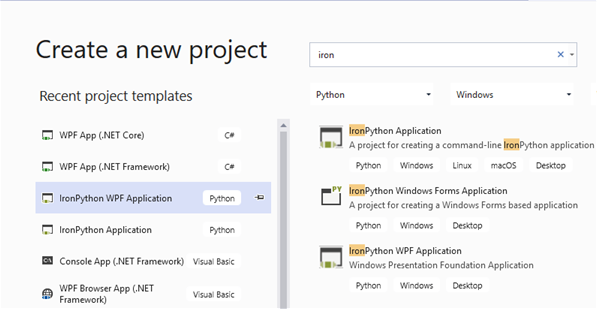
So, let’s use it as a base and first create a simple Hello WPF App.
Once the Python project is created, you can see the well-known WPF assemblies are integrated as well as a starting WPF Window and a Python compiled file.
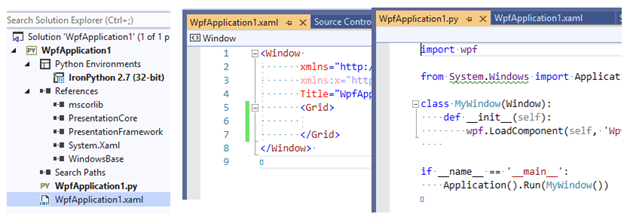
To me, personally, this looks much like a standard application with the major difference that the code behind C# / VB file is replaced with Python file. If you add a sample button in the XAML window and run the app you will have your first "Hello WPF App in Python" running. Cheers to that!

Bring Telerik Datagrid On
Now let’s make a huge step onto using Telerik controls. First, you need to install the Telerik UI for WPF UI component suite—you can download it from here. Then add the required Telerik assemblies for using the RadGridView for WPF.
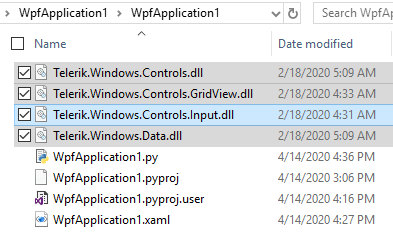
To reference the binaries in the app, import the clr library and then use the addReference methods:
import wpf
import clr
clr.AddReference('Telerik.Windows.Controls.dll')
clr.AddReference('Telerik.Windows.Controls.Input.dll')
clr.AddReference('Telerik.Windows.Data.dll')
clr.AddReference('Telerik.Windows.Controls.GridView.dll')
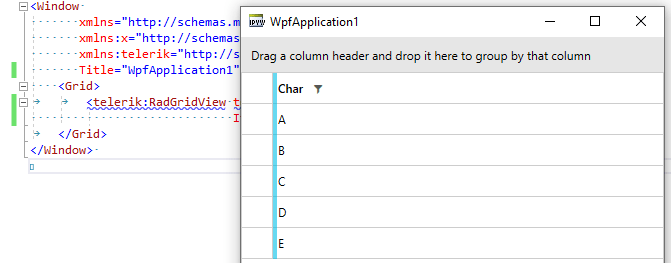
As a last step, let’s write some XAML to show a DataGrid populated with ‘very sensitive business information’:
<Window
xmlns:telerik="http://schemas.telerik.com/2008/xaml/presentation"
Title="WpfApplication1" Height="240" Width="600" x:Name="Root" >
<Grid>
<telerik:RadGridView telerik:StyleManager.Theme="Fluent"
ItemsSource="ABCDE" />
</Grid>
</Window>
Here we go. The RadGridView (with the awesome Fluent Theme applied) is running in the Python world:
MVVM Ready
Most of the real-world business apps in WPF use the MVVM pattern to separate the business logic from the View. But how to build the foundation of the MVVM inside our Python WPF project? Let me guide you through.
1. Build a base viewmodel class for all future view models. It should be property-changed ready in order to notify the UI for changes in the data:
from System.ComponentModel import INotifyPropertyChanged, PropertyChangedEventArgs

class ViewModelBase(INotifyPropertyChanged):
    def __init__(self):
        self.propertyChangedHandlers = []

    def RaisePropertyChanged(self, propertyName):
        args = PropertyChangedEventArgs(propertyName)
        for handler in self.propertyChangedHandlers:
            handler(self, args)

    def add_PropertyChanged(self, handler):
        self.propertyChangedHandlers.append(handler)

    def remove_PropertyChanged(self, handler):
        self.propertyChangedHandlers.remove(handler)
2. Build a Command class, which will receive actions from UI and will execute them in the ViewModels:
    from System.Windows.Input import ICommand

    class Command(ICommand):
        def __init__(self, execute):
            self.execute = execute

        def Execute(self, parameter):
            self.execute()

        def add_CanExecuteChanged(self, handler):
            pass

        def remove_CanExecuteChanged(self, handler):
            pass

        def CanExecute(self, parameter):
            return True
3. Build the ViewModel classes for the application which will connect the UI to the data:
3.1. Define a ViewModel class for the data in each DataGrid row:
class Club(ViewModelBase):
    def __init__(self, name, est, capacity, stadName):
        ViewModelBase.__init__(self)
        self.Name = name
        self.Established = est
        self.StadiumCapacity = capacity
        self.StadiumName = stadName
3.2. Define a main ViewModel which provides list of child models and defines commands to manipulate the data:
from System.Collections.ObjectModel import ObservableCollection
from datetime import date

class ViewModel(ViewModelBase):
    def __init__(self):
        ViewModelBase.__init__(self)
        self.Clubs = ObservableCollection[Club]()
        self.Clubs.Add(Club('FC Barcelona', date(1899, 11, 29), 99354.0, 'Camp Nou'))
        self.Clubs.Add(Club('Juventus F.C.', date(1897, 1, 1), 41507.0, 'Juventus Stadium'))
        self.Clubs.Add(Club('Real Madrid', date(1902, 3, 6), 81044.0, 'Santiago Bernabeu'))
        self.Clubs.Add(Club('Liverpool', date(1892, 1, 1), 54074.0, 'Anfield'))
        self.Clubs.Add(Club('Manchester United', date(1878, 1, 1), 76212.0, 'Old Trafford'))
        self.Clubs.Add(Club('Chelsea', date(1905, 1, 1), 42055.0, 'Stamford Bridge'))
        self.ClearCommand = Command(self.clear)
        self.DecreaseCapacityCommand = Command(self.decreaseCapacity)

    def clear(self):
        self.Clubs.Clear()

    def decreaseCapacity(self):
        for club in self.Clubs :
           cap = club.StadiumCapacity
           club.StadiumCapacity *= 0.9
           club.RaisePropertyChanged("StadiumCapacity")
Note that when a property has changed and needs a UI update, the function RaisePropertyChanged is called.
4. Assign the DataContext in code and the ItemsSource & Commands in XAML:
from System.Windows import Application, Window

class MyWindow(Window):
    def __init__(self):
        xaml = wpf.LoadComponent(self, 'WpfApplication1.xaml')
        xaml.Root.DataContext = ViewModel()

if __name__ == '__main__':
    Application().Run(MyWindow())
<telerik:RadGridView ShowGroupPanel="False" telerik:StyleManager.Theme="Fluent"
                        ItemsSource="{Binding Clubs}" Height="240"
                        AutoGenerateColumns="False"
                        EditTriggers="None"
                        Margin="30 30 30 50">
    <telerik:RadGridView.Columns>
        <telerik:GridViewDataColumn DataMemberBinding="{Binding Name}" Header="Name" />
        <telerik:GridViewDataColumn DataMemberBinding="{Binding Established}" Header="Established" />
        <telerik:GridViewDataColumn DataMemberBinding="{Binding StadiumName}" Header="StadiumName" />
        <telerik:GridViewDataColumn DataMemberBinding="{Binding StadiumCapacity}" Header="StadiumCapacity" DataFormatString="n2"/>
    </telerik:RadGridView.Columns>
</telerik:RadGridView>

<StackPanel Orientation="Horizontal" VerticalAlignment="Bottom" HorizontalAlignment="Center">
    <telerik:RadButton Content="Clear Clubs" Command="{Binding ClearCommand}" Margin="20" Width="240"
                telerik:StyleManager.Theme="Fluent" />
    <telerik:RadButton Content="Decrease Stadium Capacity 10%" Command="{Binding DecreaseCapacityCommand}" Margin="20" Width="240"
                telerik:StyleManager.Theme="Fluent" />
</StackPanel>
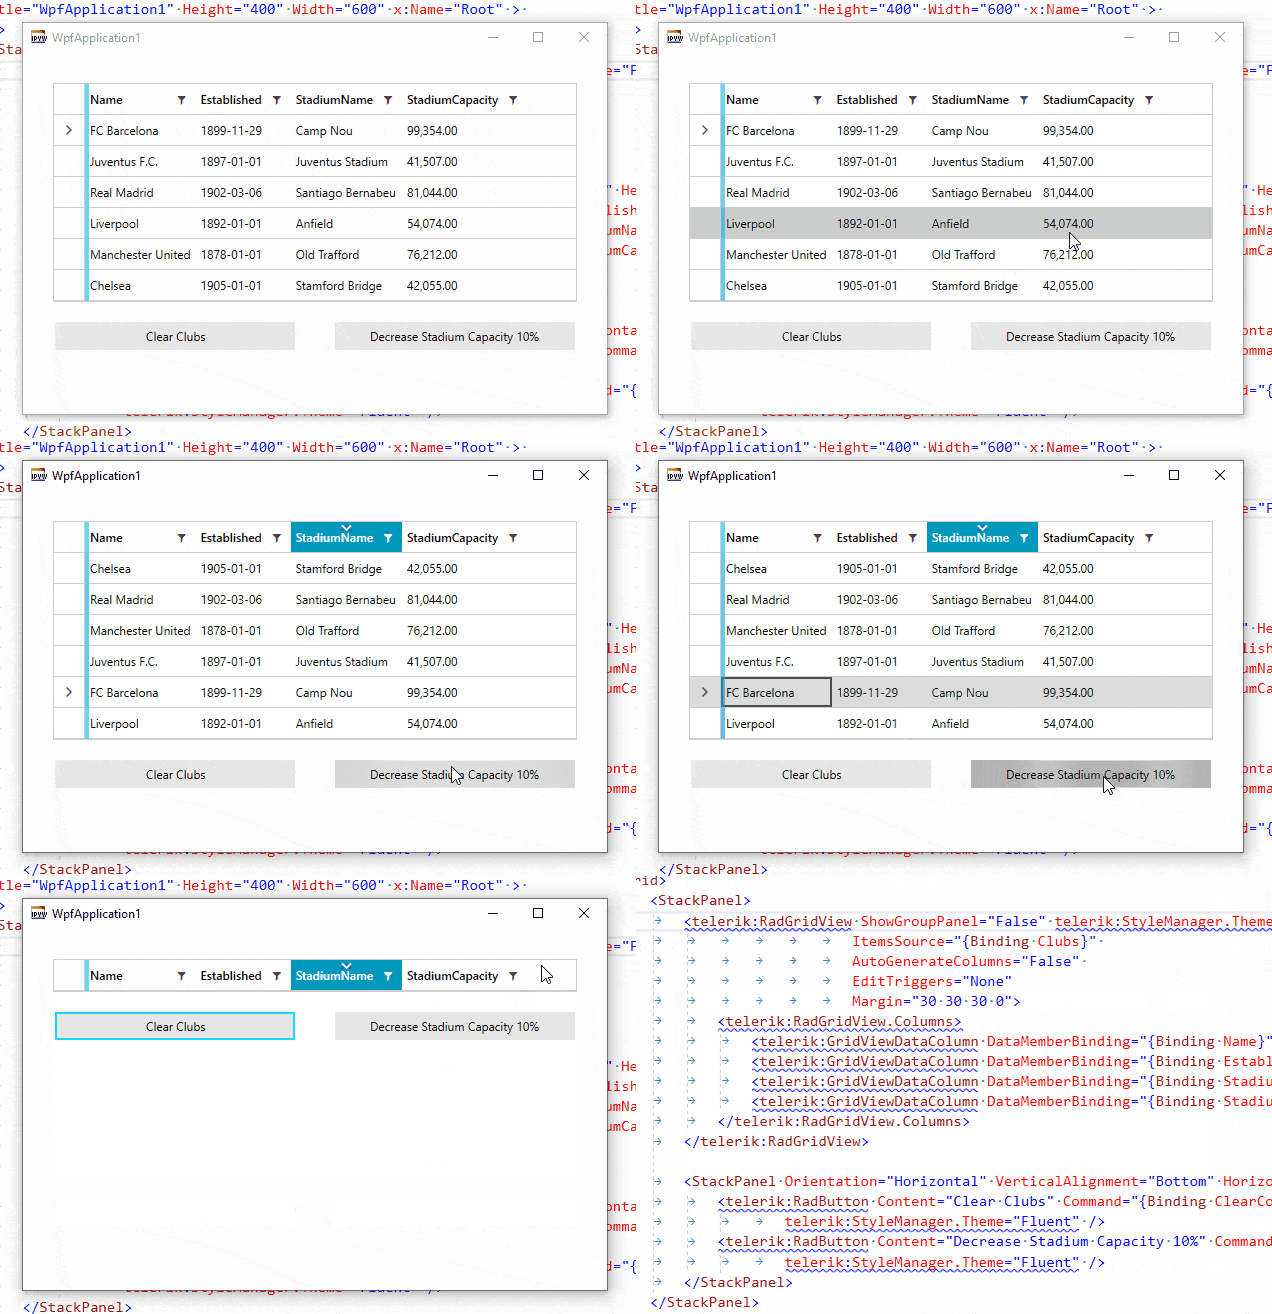
As a result, you get a fully functional MVVM-ready DataGrid with data changes reflected in the UI at run-time:
Summary
This was a short intro to combining Python desktop GUI and Telerik UI for WPF. I’ll be more than thrilled to learn about your experience with integrating Telerik UI for WPF in your Python projects.
Feel more than welcome to drop us a line in the comments section bellow on how it went with our components or submit your feedback directly to our Feedback Portal.

Petar Mladenov
Petar Mladenov is a XAML specialist on the Telerik WPF & Silverlight team located in Sofia, Bulgaria. During weekdays he creates a cool desktop UI components like dialogs, diagrams and charts. On weekends you will find him with a fishing rod in hand, skiing or just exploring some cool places.
