
What to Know When Porting a WPF App to .NET MAUI Blazor Hybrid

Summarize with AI:
Your WPF app can gain more users if you make it cross-platform, but what’s the best way to do that—with .NET MAUI or Blazor Hybrid? Here are the steps involved if the results show Blazor Hybrid.
In the previous .NET MAUI vs. WPF post, we had a look at our choices that Microsoft gives us to transform a WPF app to cross-platform. We talked about the most important differences between WPF and .NET MAUI.
Today we will review another interesting topic—how we can transform our WPF app to a cross-platform app using Hybrid Blazor apps.
You can take this simple test to choose the best technology stack for your needs:
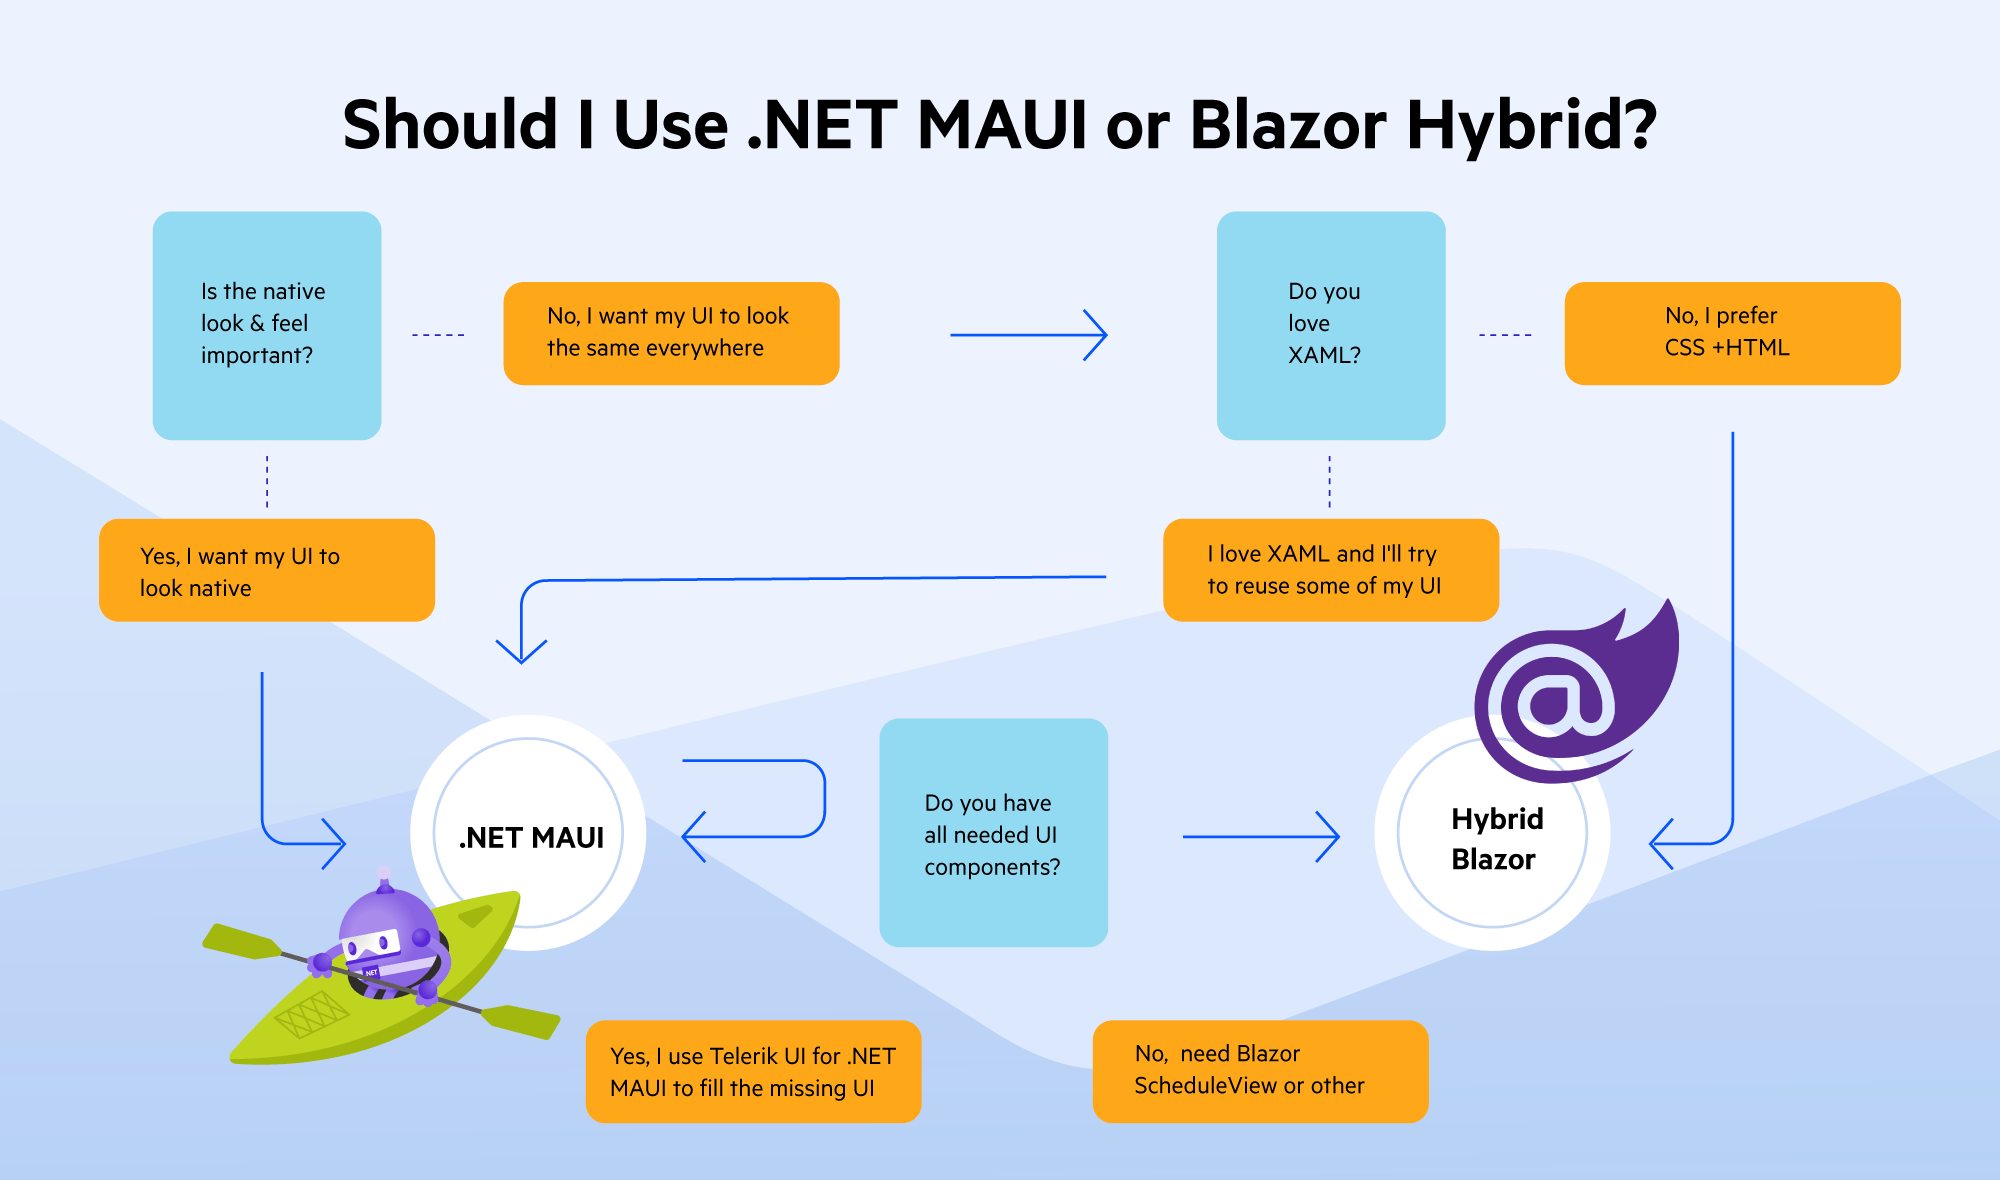
So if your result for this little quiz leads you to Blazor Hybrid, this is the post for you!
What situations might that be?
- The first case is for using such an approach is if we want our app to have a unified UI, to write the code at once but we need all desktop features, like file access system, camera settings, etc.
- Another situation is when we already ported our code to .NET MAUI, but we need a component that Blazor ecosystem has to offer, such as Telerik Pivot or Telerik ScheduleView, for example, or another of the powerful components from Telerik UI for Blazor.
Scenario 1
Unified UI
The best choice here is to create a new Hybrid Blazor app using Microsoft VS Templates.
With .NET 7, you can choose between WPF Hybrid Blazor or .NET MAUI Blazor, and which one to choose depends which OS you need to target.
In this series, we are focused on the cross-platform experience, so .NET MAUI Hybrid Blazor app is our choice.
Visual Studio directly creates a Blazor app wrapped in the .NET MAUI project structure.
Scenario 2
We have a great MAUI/WPF app but we need a component that only the Blazor ecosystem has to offer.
For example, if you need to use Scheduling functionality in .NET MAUI, then you can look into the rich Telerik UI for Blazor suite.
In this case, our .NET MAUI app is already created and we need to follow the steps below to add the Blazor part or you can again create a blank MAUI Hybrid app and copy the needed files from there.
1. Add the Razor SDK, Microsoft.NET.Sdk.Razor to your project by editing its first line of the CSPROJ project file:
<Project Sdk="Microsoft.NET.Sdk.Razor">
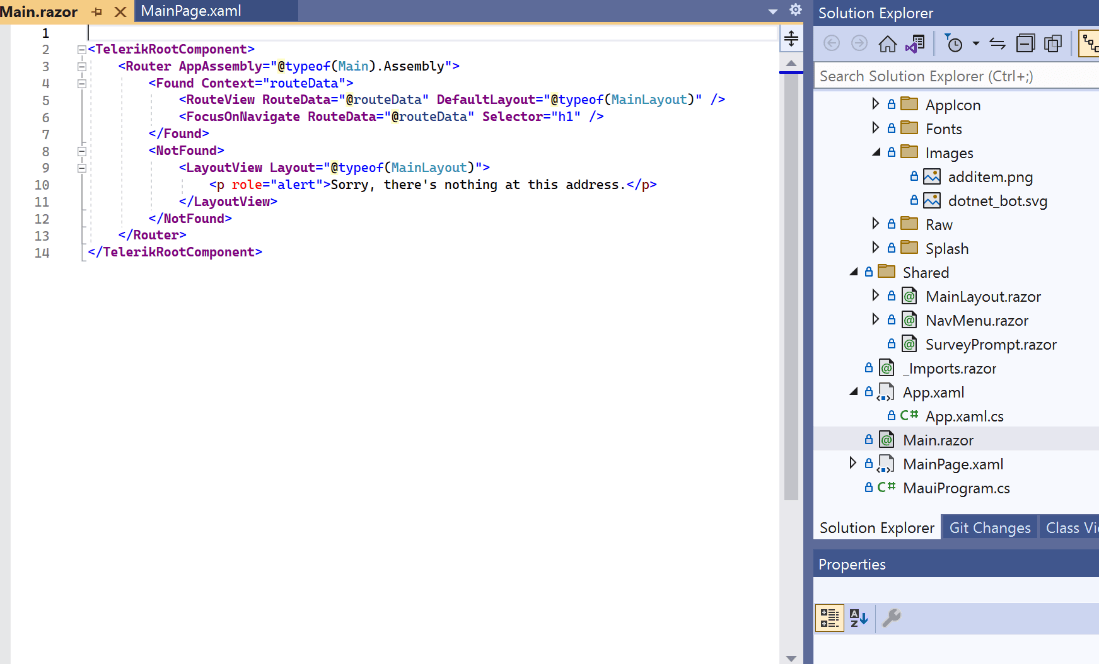
2. Add the root Razor component for the app to the project ака Main.razor page:
A razor component is a page containing the UI for your needs. It is the place to write your code when working with Blazor.
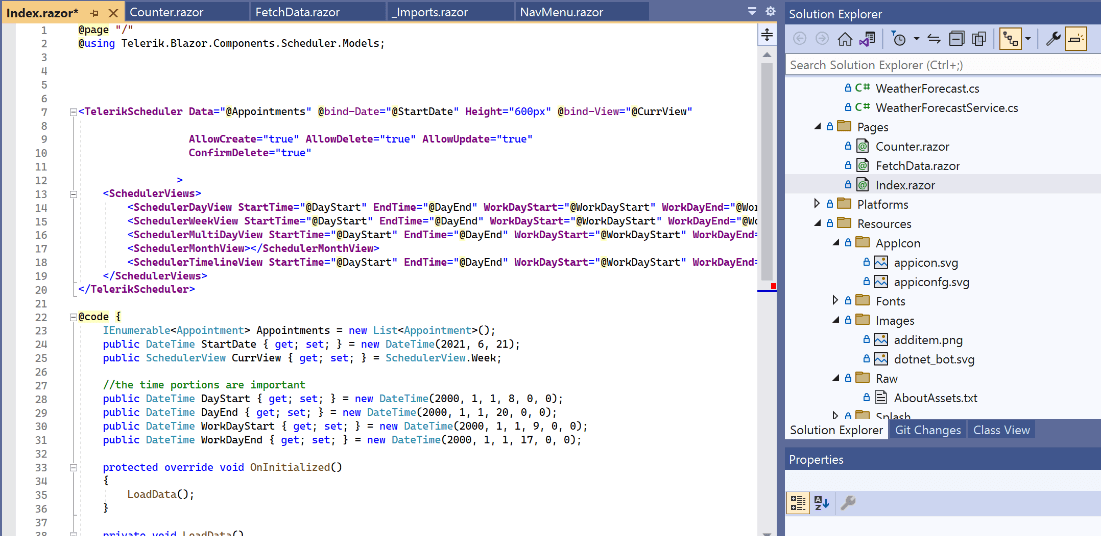
3. Add your Razor components to project folders named Pages and Shared.
For example, the code that I will use to add the Scheduler is placed in the Pages folder:
@Page "/"
@Using Telerik.Blazor.Components.Scheduler.Models;
 <Telerikscheduler Data="@Appointments" @Bind-Date="@Startdate" Height="600px" @Bind-View="@Currview"

                  Allowcreate="True" Allowdelete="True" Allowupdate="True"
                  Confirmdelete="True"

                >
    <Schedulerviews>
        <Schedulerdayview Starttime="@Daystart" Endtime="@Dayend" Workdaystart="@Workdaystart" Workdayend="@Workdayend" />
        <Schedulerweekview Starttime="@Daystart" Endtime="@Dayend" Workdaystart="@Workdaystart" Workdayend="@Workdayend" />
        <Schedulermultidayview Starttime="@Daystart" Endtime="@Dayend" Workdaystart="@Workdaystart" Workdayend="@Workdayend" Numberofdays="10" />
        <Schedulermonthview></Schedulermonthview>
        <Schedulertimelineview Starttime="@Daystart" Endtime="@Dayend" Workdaystart="@Workdaystart" Workdayend="@Workdayend" />
    </Schedulerviews>
</Telerikscheduler>

@code {
    IEnumerable<Appointment> Appointments = new List<Appointment>();
    public DateTime StartDate { get; set; } = new DateTime(2021, 6, 21);
    public SchedulerView CurrView { get; set; } = SchedulerView.Week;

    //the time portions are important
    public DateTime DayStart { get; set; } = new DateTime(2000, 1, 1, 8, 0, 0);
    public DateTime DayEnd { get; set; } = new DateTime(2000, 1, 1, 20, 0, 0);
    public DateTime WorkDayStart { get; set; } = new DateTime(2000, 1, 1, 9, 0, 0);
    public DateTime WorkDayEnd { get; set; } = new DateTime(2000, 1, 1, 17, 0, 0);

    protected override void OnInitialized()
    {
        LoadData();
    }
    private void LoadData()
    {
       Appointments = appointmentService.GetAppointments();
    }
}
4. Add your static web assets to a project folder named wwwroot (things like favicon, fonts, etc.).
5. Add any optional _Imports.razor files to your project. This means list here the additional libraries that you will use.
Here, to use Telerik UI for Blazor, the following code should be added:
@using Telerik.Blazor
@using Telerik.Blazor.Components
@using Telerik.FontIcons
@using Telerik.SvgIcons

<ContentPage xmlns="http://schemas.microsoft.com/dotnet/2021/maui"
             xmlns:x="http://schemas.microsoft.com/winfx/2009/xaml"
             xmlns:local="clr-namespace:MyBlazorApp"
             x:Class="MyBlazorApp.MainPage">

    <BlazorWebView HostPage="wwwroot/index.html">
        <BlazorWebView.RootComponents>
            <RootComponent Selector="#app" ComponentType="{x:Type local:Main}" />
        </BlazorWebView.RootComponents>
    </BlazorWebView>

</ContentPage>
6. Modify the CreateMauiApp method of your MauiProgram class to register the BlazorWebView control for use in your app.
To do this, on the IServiceCollection object, call the AddMauiBlazorWebView method to add component web view services to the services collection:
public static class MauiProgram
{
    public static MauiApp CreateMauiApp()
    {
        var builder = MauiApp.CreateBuilder();
        builder
            .UseMauiApp<App>()
            .ConfigureFonts(fonts =>
            {
                fonts.AddFont("OpenSans-Regular.ttf", "OpenSansRegular");
            });

        builder.Services.AddMauiBlazorWebView();
#if DEBUG
        builder.Services.AddMauiBlazorWebViewDeveloperTools();
#endif
        // Register any app services on the IServiceCollection object
        // e.g. builder.Services.AddSingleton<WeatherForecastService>();

        return builder.Build();
    }
}
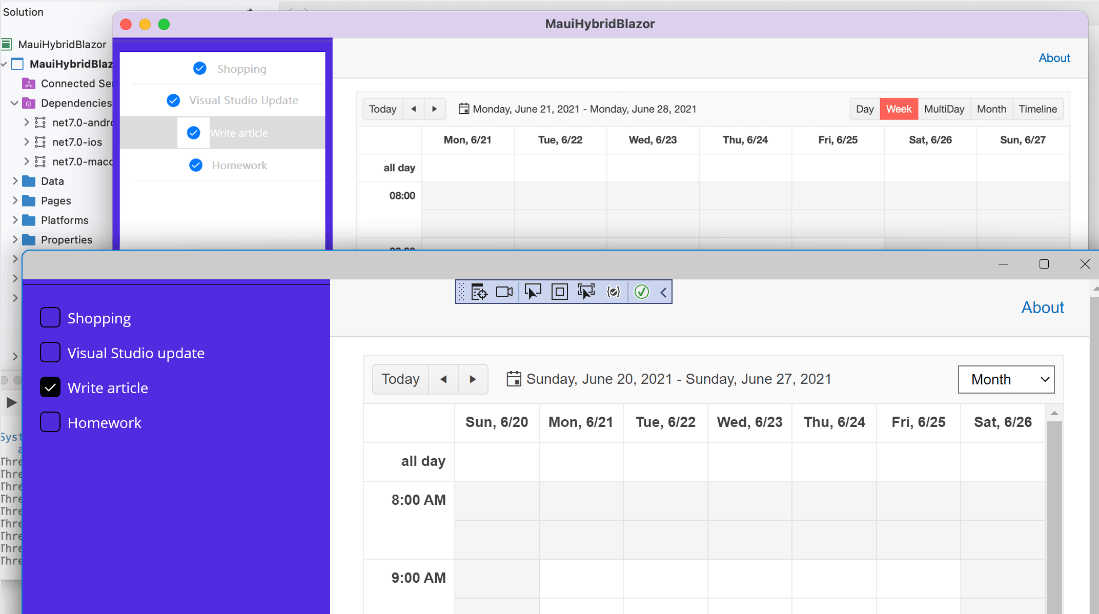
And when the BlazorWebView is added and your .NET MAUI app becomes a .NET MAUI Blazor Hybrid app, it is time to add Telerik ScheduleView. The steps to do that are:
Add Telerik libraries by following the link: Download Telerik UI for Blazor
Add the Telerik client assets by adding these two lines in the
<head>tag of wwroot/index.html:
<link rel="stylesheet" href="_content/Telerik.UI.for.Blazor/css/kendo-theme-default/all.css" />
<script src="_content/Telerik.UI.for.Blazor/js/telerik-blazor.js" defer></script>
- Include @using statements in the _imports.razor file:
@using Telerik.Blazor
@using Telerik.Blazor.Components
@using Telerik.FontIcons
@using Telerik.SvgIcons
- Add the TelerikRootComponent in Main.razor page:
<TelerikRootComponent>
    <Router AppAssembly="@typeof(Main).Assembly">
        <Found Context="routeData">
            <RouteView RouteData="@routeData" DefaultLayout="@typeof(MainLayout)" />
            <FocusOnNavigate RouteData="@routeData" Selector="h1" />
        </Found>
        <NotFound>
            <LayoutView Layout="@typeof(MainLayout)">
                <p role="alert">Sorry, there's nothing at this address.</p>
            </LayoutView>
        </NotFound>
    </Router>
</TelerikRootComponent>
- Register the Telerik Services by modifying once the
CreateMauiApp()method:
// register the Telerik services
builder.Services.AddTelerikBlazor();
And then if you followed all of the steps above, you should be able to see Telerik UI as part of your .NET MAUI project. The .NET MAUI project in my case contains also a .NET MAUI ListView on the left, and the BlazorWebView on the right:
<?xml version="1.0" encoding="utf-8" ?>
<ContentPage xmlns="http://schemas.microsoft.com/dotnet/2021/maui"
             xmlns:x="http://schemas.microsoft.com/winfx/2009/xaml"
             xmlns:local="clr-namespace:MauiHybridBlazor"
             x:Class="MauiHybridBlazor.MainPage"
             BackgroundColor="{DynamicResource PageBackgroundColor}">
    <Grid>
        <Grid.RowDefinitions>
            <RowDefinition Height="10"/>
            <RowDefinition Height="*"/>
            <RowDefinition Height="Auto"/>

        </Grid.RowDefinitions>
        <Grid.ColumnDefinitions>
            <ColumnDefinition Width="300" />
            <ColumnDefinition Width="*" />
        </Grid.ColumnDefinitions>
        <ProgressBar
            x:Name="isRefreshingControl"
        />

        <ListView
            x:Name="itemListControl"
            Grid.Row="1"
            Margin="10"
        >
            <ListView.ItemTemplate>
                <DataTemplate>
                    <ViewCell>
                        <HorizontalStackLayout   HorizontalOptions="Center"  VerticalOptions="Center" >
                            <CheckBox Margin="1"    Color="Black"  />
                            <Label Text="{Binding}" VerticalOptions="Center"/>
                        </HorizontalStackLayout>
                    </ViewCell>

                </DataTemplate>
            </ListView.ItemTemplate>
        </ListView>

    …........
        <BlazorWebView  Grid.Column="1" Grid.RowSpan="3" x:Name="blazorWebView" HostPage="wwwroot/index.html">
            <BlazorWebView.RootComponents>
                <RootComponent Selector="#app" ComponentType="{x:Type local:Main}" />
            </BlazorWebView.RootComponents>
        </BlazorWebView>
    </Grid>
</ContentPage>
Conclusion
The .NET world is more powerful than ever and now you can choose between mobile, web and desktop .NET frameworks and mix them to implement the best solution for your users.
Whatever your choice is, you are also covered with Telerik UI and Telerik DevCraft, with more than 1,000 additional UI components, templates, themes and a lot of resources so you can improve your development time and deliver a great UI at the same time. Download it now and share your experience with us.
If you want to learn more about Blazor with .NET MAUI, check out the new free ebook: Blazor Hybrid and Web in One Solution by our Principal Developer Advocate and Microsoft MVP Ed Charbeneau and visit the new Blazor Hybrid page.

Rossitza Fakalieva
Rossitza Fakalieva is a Technical Manager, Microsoft MVP in Developer Technologies and a Director of the Bulgarian chapter of the global Women Who Code organization. She previously worked on the Telerik engineering team and defines herself as .NET enthusiast. She loves to empower others to grow in their career and in the tech field—by teaching, by delivering courses and presentations, and as part of her daily job.
Related Posts
Comments
All articles
Topics
Web MobileMobile
Desktop
Design
Productivity
People
