Mark working hours and days in different colors with RadScheduler for Silverlight
Summarize with AI:
We received a couple of questions on how some of the days and hours in the different views of RadScheduler can be customized.
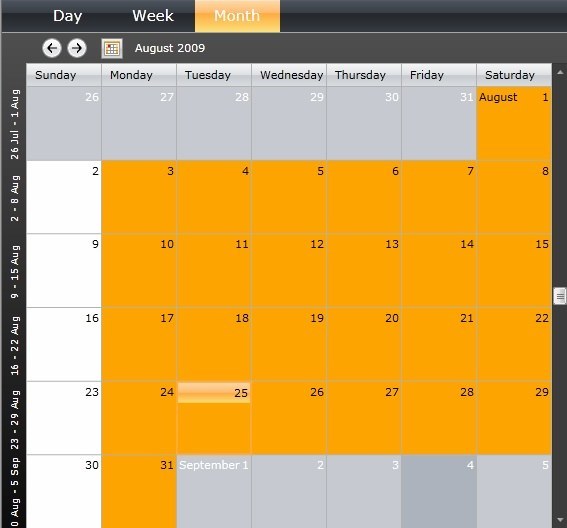
The answer of this question is in the attached application illustrating how working hours and days can be marked in orange.
The solution includes 3 easy steps :
To create a custom theme you can follow the steps below:
Now it is time to create the converter:
And of course, use it:
Find the style with a key "OneWeekDayStyle" applied to the hours in Day and Week views and edit it, like:
Find the style with a key "MonthDayStyle" applied to the days in a Month view and edit it, like:
And the result is shown below:


Don't hesitate to leave your comments.
The answer of this question is in the attached application illustrating how working hours and days can be marked in orange.
The solution includes 3 easy steps :
- Create a custom theme using the default RadScheduler' theme.
- Create a ValueConverter returning the right color depending on the hour/day.
- Find the style applied to every hour(timeslot) and apply the converter to the Background property.
To create a custom theme you can follow the steps below:
- Create a Silverlight class library.
- Inherit the Telerik.Windows.Theme class.
- Set the Source property of the constructor of the theme.
- Add a Generic.xaml file containing the XAML of RadScheduler.(You can find and use this file from the attached project)
Now it is time to create the converter:
| public class TimeSlotsWorkingHoursConverter : IValueConverter |
| { |
| public object Convert(object value, Type targetType, object parameter, System.Globalization.CultureInfo culture) |
| { |
| TimeSlot slot = value as TimeSlot; |
| if (slot != null) |
| { |
| if (parameter != null && parameter.ToString() == "Month" && IsWorkingDay(slot) ) |
| { |
| return new SolidColorBrush(Colors.Orange); |
| } |
| else if (IsWorkingHour(slot)) |
| { |
| return new SolidColorBrush(Colors.Orange); |
| } |
| return new SolidColorBrush(Colors.White); |
| } |
| else |
| { |
| return new SolidColorBrush(Colors.White); |
| } |
| } |
| public object ConvertBack(object value, Type targetType, object parameter, System.Globalization.CultureInfo culture) |
| { |
| throw new NotImplementedException(); |
| } |
| private bool IsWorkingHour(TimeSlot slot) |
| { |
| return (slot.Start.Hour >= 8 && slot.End.Hour <= 17 && slot.End.Hour > 0 && IsWorkingDay(slot)); |
| } |
| private bool IsWorkingDay(TimeSlot slot) |
| { |
| return slot.Start.DayOfWeek >= DayOfWeek.Monday && slot.End.DayOfWeek <= DayOfWeek.Saturday; |
| } |
| } |
And of course, use it:
Find the style with a key "OneWeekDayStyle" applied to the hours in Day and Week views and edit it, like:
| <Style x:Key="OneWeekDayStyle" TargetType="telerikScheduler:TimeSlotItem"> |
| <Setter Property="Template" > |
| <Setter.Value> |
| <ControlTemplate TargetType="telerikScheduler:TimeSlotItem"> |
| <Border x:Name="PART_ContentHost" |
| Background="{Binding ., Converter={StaticResource TimeSlotsWorkingHoursConverter}}" |
| Margin="0,0,1,1" |
| BorderBrush="{StaticResource TimeSlotItemBorderBrush}" |
| MinHeight="20" |
| > |
| <telerik:CommandManager.InputBindings> |
| <telerik:InputBindingCollection> |
| <telerik:MouseBinding MouseAction="LeftDoubleClick" Command="telerikScheduler:RadSchedulerCommands.CreateAppointment" /> |
| </telerik:InputBindingCollection> |
| </telerik:CommandManager.InputBindings> |
| <vsm:VisualStateManager.VisualStateGroups> |
| <vsm:VisualStateGroup x:Name="CommonStates"> |
| <vsm:VisualState x:Name="Normal" /> |
| <vsm:VisualState x:Name="MouseOver" > |
| <Storyboard> |
| <ObjectAnimationUsingKeyFrames Storyboard.TargetName="PART_ContentHost" Storyboard.TargetProperty="Background" Duration="0"> |
| <DiscreteObjectKeyFrame KeyTime="0" Value="{StaticResource MonthTimeSlotItemOverBrush}"/> |
| </ObjectAnimationUsingKeyFrames> |
| </Storyboard> |
| </vsm:VisualState> |
| </vsm:VisualStateGroup> |
| <vsm:VisualStateGroup x:Name="SelectionStates"> |
| <vsm:VisualState x:Name="Unselected"/> |
| <vsm:VisualState x:Name="Selected"> |
| <Storyboard> |
| <ObjectAnimationUsingKeyFrames Storyboard.TargetName="PART_ContentHost" Storyboard.TargetProperty="Background" Duration="0"> |
| <DiscreteObjectKeyFrame KeyTime="0" Value="{StaticResource MonthTimeSlotItemSelectedBrush}"/> |
| </ObjectAnimationUsingKeyFrames> |
| </Storyboard> |
| </vsm:VisualState> |
| </vsm:VisualStateGroup> |
| </vsm:VisualStateManager.VisualStateGroups> |
| </Border> |
| </ControlTemplate> |
| </Setter.Value> |
| </Setter> |
| </Style> |
Find the style with a key "MonthDayStyle" applied to the days in a Month view and edit it, like:
| <Style x:Key="MonthDayStyle" TargetType="telerikScheduler:TimeSlotItem"> |
| <Setter Property="Control.Template"> |
| <Setter.Value> |
| <ControlTemplate TargetType="telerikScheduler:TimeSlotItem"> |
| <Border Name="DayBorder" |
| BorderBrush="{StaticResource SchedulerBorderBrush}" |
| Background="{Binding ., Converter={StaticResource TimeSlotsWorkingHoursConverter},ConverterParameter=Month}" |
| BorderThickness="0,0,1,1" > |
| .... |
| </Border> |
| </ControlTemplate> |
| </Setter.Value> |
| </Setter> |
| </Style> |
And the result is shown below:
Don't hesitate to leave your comments.

About the Author
Rossitza Fakalieva
Rossitza Fakalieva is a Technical Manager, Microsoft MVP in Developer Technologies and a Director of the Bulgarian chapter of the global Women Who Code organization. She previously worked on the Telerik engineering team and defines herself as .NET enthusiast. She loves to empower others to grow in their career and in the tech field—by teaching, by delivering courses and presentations, and as part of her daily job.
Related Posts
Comments
Comments are disabled in preview mode.
