How to Work With Client-Side Blazor

Summarize with AI:
You’ve probably heard talk of Blazor Wasm, but what is it and how can you use it to rapidly build your web applications?
In short, client-side Blazor (Blazor Wasm) brings C# to the browser.
We’re all familiar with the idea of writing JavaScript, which runs in the browser, but now we have another option: to write C# and run that in the browser too.
This works thanks to something called WebAssembly.
WebAssembly (Wasm) represents a significant change in web application development: opening the door to being able to compile binary bundles and ship them to the browser (as an alternative to shipping JavaScript code as text).
Now you might be thinking, Running binary code in the browser sounds complicated. But, thankfully, we don’t need to worry about the lower level implementation details because Microsoft has taken care of them, freeing us up to focus on the fun part: building web applications using Blazor’s component model.
Explore Blazor: Free quick start guide to productivity with Blazor. Get our Beginner's Guide ebook
Build Your Application, One Component at a Time
You can spin up a new Blazor Wasm project in your IDE (Visual Studio, Jetbrains Rider, etc.) or via the command line.
dotnet new blazorwasm
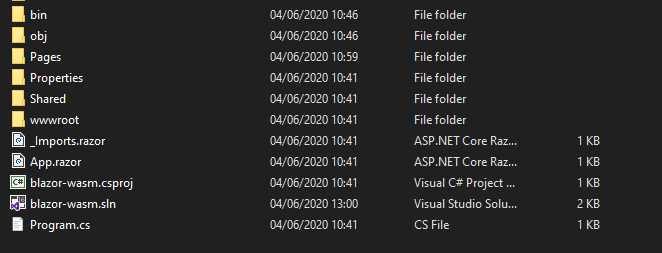
When you do, you’ll find yourself staring at the standard Blazor Wasm project.

Everything in Blazor is a component and you’ll find a few examples in the Pages folder…

These components (be they your own or components you’ve brought in via a component library such as Telerik’s UI for Blazor) form the building blocks of your Blazor applications.
Here’s an example:
Greeting.razor
<h1>Hello, @Name</h1>

@code {
    [Parameter]
    public string Name { get; set; }
}
We can now render this component wherever we want, passing in a value for the Name parameter…
<Greeting Name="Gurdeep" />
Blazor’s components are referenced by filename, so our Greeting component is defined in a file called Greeting.razor and we can include it elsewhere in our application using its name: <Greeting />.
Re-use Those Components
If you’re used to a more traditional “page-based” approach to building web applications, this component-based approach can seem a little odd at first, but its strengths soon become apparent.
For example, imagine you need to display a “Like” button in your app.
Naturally this kind of UI “widget” might appear in multiple places: posts, replies, comments, etc.
With Blazor you would define this as a component, consisting of UI markup written using Razor…
LikeButton.razor
@if (_liked)
{
	<span>Liked!</span>
}
else
{
	<button @onclick="HandleLikeClicked">
		Like!
	</button>
}
… and UI logic written using C#.
@code {

	[Parameter]
	public EventCallback OnLiked { get; set; }

	bool _liked { get; set; }

	protected void HandleLikeClicked() {
		_liked = true;
		OnLiked.InvokeAsync(EventArgs.Empty);
	}
}
Admittedly this needs a bit of CSS and probably a graphic or two to make it look better. But, appearance aside, we have a simple “Like” button.
When you click the button, the private _liked boolean flag is set to true and Blazor will re-render the UI to show the text “Liked” instead of the button.
At the same time, the OnLiked Event Callback will be invoked.
This means, wherever you decide to use your shiny new Like component, you can pass in the behavior you want to be triggered when the user “likes” the thing (whatever that may be).
@foreach (var post in Posts)
{
    <h2>@post.Title</h2>
    <LikeButton OnLiked="()=>HandleLiked(post)"/>
}
This loops over a list of Post objects and renders a Like button for each.
When the user clicks the Like button (inside the LikeButton component), OnLiked is invoked, forwarding the specific post to the HandleLiked method.
@code {
    private List<Post> Posts { get; set; }

    protected void HandleLiked(Post post)
    {
        Console.WriteLine("Liked this post: " + post.Title);
    }
}
Now you have the means to keep your “Like” buttons consistent (in appearance and behavior) throughout your app, but still perform different actions depending on where the button is rendered, and what should happen when it’s clicked.
Differences Between Server-Side and Client-Side
You may have heard mention of Blazor Server and Blazor WebAssembly (or Blazor Wasm).
These are two different hosting models for your Blazor applications.
In practice, you’ll build your app using the same component model (see above), but when it comes to hosting you can either keep everything on the server (Blazor Server) or ship your application to the browser (Blazor WebAssembly).
With Blazor Wasm your code is compiled into a number of DLL files which are retrieved by the browser (when someone visits your site).
The browser downloads these DLL files plus the .NET runtime, and runs your app via WebAssembly.
With Blazor Server, the browser opens up a connection to the server which keeps hold of the DLL files and runs your application using the .NET runtime (on the server).
Crucially, how you build and debug your application remains largely consistent between the two hosting models.
In both cases you’ll build your applications using Blazor’s component model.
The primary differences relate to how your app will scale and handle failures (such as loss of network).
Blazor Server
- No initial download of the framework
- Relies on an open connection to the server
- Performance is directly affected by latency (the connection between the browser and the server)
- You’ll get an error if the connection to the server is lost
Blazor Wasm
- Initial download of framework (the first time you access any Blazor Wasm site, but once you have it, you have it!)
- Your app runs in the browser so is unaffected by network latency
- No need to maintain a connection to the server (but can still make HTTP calls to a backend API)
Try Kendo UI for Vue—Complete UI component library for web apps. Free Trial
Debug Client-Side Blazor
Sooner or later you’re going to need to see what your components are doing: to check your logic or diagnose an issue.
If you’ve written JavaScript code recently, I’m guessing you’ve adopted one of the following options for diagnosing unexpected behavior in your code:
- Frantically added as many
console.logstatements as you could until you figured out what on earth is going on! - Figured out how to debug your JavaScript code (either in the browser, or via an integration with your IDE/code editor)
I know which one I’ve used more often…
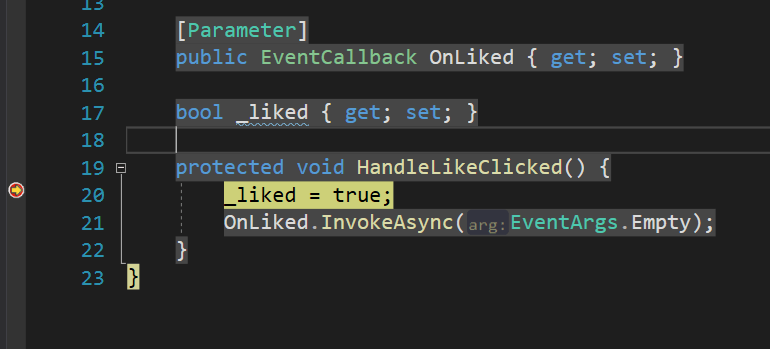
Thankfully, with the official release of Blazor Wasm, you can resist the temptation to litter your code with Console.WriteLine (the C# equivalent of console.log) and, instead, debug your application code in your favorite editor.
Debug in Visual Studio
So long as you have a recent version of Visual Studio 2019 installed you can simply set a breakpoint in your code and hit F5 to debug your Blazor Wasm application.

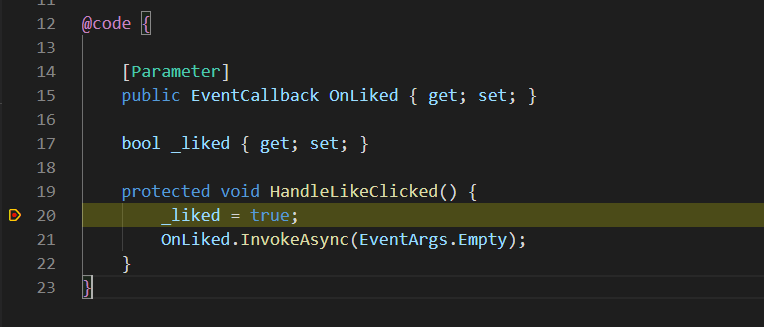
Debug in VS Code
Visual Studio Code requires a little more setup to make debugging work.
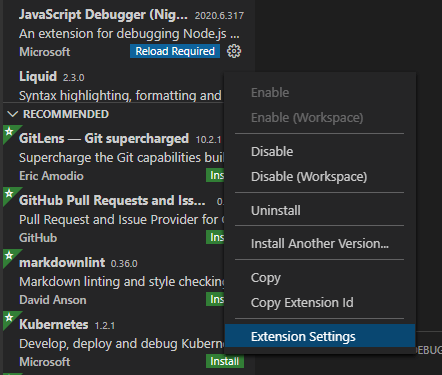
As per the official docs, you’ll need the C# extension and JavaScript Debugger (Nightly) extension.
With those installed, access the Javascript Debugger (Nightly) extensions’ settings (via the little cog in the list of extensions).

Then tick the box next to Debug > Javascript: Use Preview.

With all that done, when you subsequently open a Blazor Wasm project folder in VS Code, you’ll be prompted to “add required assets”.

Click “Yes”, set a breakpoint, then hit F5 to start with debugging support enabled (or head over to the Run tab and run the Launch and Debug configuration).

Go Faster with a Component Library
One of the great advantages of building your application using components is you don’t have to build every single component yourself.
After all, the value of your application is generally in its unique, domain-specific logic and intelligence, not in the specific date picker, or modal popup you need to implement to make it all work.
If you’re looking to rapidly build your web applications using tried-and-tested UI components, you can save yourself a lot of time by adopting a Blazor Component Library.
Telerik UI for Blazor is one such library and works with both Blazor Server and Blazor Wasm, so you can use whichever Blazor Hosting model makes sense for your use case, and build your applications in the exact same way regardless.
Try Telerik UI for Blazor—Native components for building web apps with C#. Free Trial
In Summary
Blazor Wasm is finally here, and its component model enables you to build your application, one component at a time.
You can easily debug your code using Visual Studio, or VS Code, and you can take advantage of Telerik UI for Blazor to rapidly build up your application while retaining the ability to run it via either Blazor Server or Blazor Wasm.

Jon Hilton
Jon spends his days building applications using Microsoft technologies (plus, whisper it quietly, a little bit of JavaScript) and his spare time helping developers level up their skills and knowledge via his blog, courses and books. He's especially passionate about enabling developers to build better web applications by mastering the tools available to them. Follow him on Twitter here.
