
Fitting It All In: Keeping the Grid Small with a Custom Update Panel

Summarize with AI:
You want to spend your time adding functionality, not getting the basics of your UI to work. Here's how, in Blazor, the right combination of HTML, code, and components can create a custom editing experience for a Telerik Grid that takes up the minimum space on the screen.
In a previous post, I combined an ASP.NET MVC View, a Blazor component, and about a half-dozen Telerik UI for Blazor components to create a page that displayed a grid of customers with a tabbed interface that allowed the user to view related information for any selected customer. What I hadn't done was allow the user to update any of that information, which is what this column is all about.
In many ways this post is unnecessary: The TelerikGrid implements update, delete, and save functionality out of the box. However, taking advantage of that built-in functionality requires that you add at least two more columns to the grid to hold the buttons that implement adding and deleting rows. On a mobile device you might not want to give up that screen space: In small format screens, ‘taller/longer' is OK, but ‘wider' is evil (though fitting everything on a single screen is ideal, of course). And it doesn't help that I've already added a column to my grid to allow the user to select a row
Reducing Columns with Click and Double-Click
So I'm going to redesign my grid to eliminate the HTML button by replacing it with a smaller image that the user can click on (or tap) to select a customer when viewing the customer's "related data." As my image, I used the favicon.ico icon that comes with the default ASP.NET Core project temple. To activate the display of the related data, I just leverage the click event for the <img> element. In that event, I use the grid's Context property (which holds the object displayed in the current row of the grid) to capture the current customer and shove it into a property defined in my component's code (currentCustomer).
This lets me support updates without adding a new column: I put the code to activate my update panel in the <img> element's dblclick event. In that code, I open a TelerikWindow to display the current customer's data and let the user update that customer (I put that code in a method I called EditItem).
To incorporate that HTML into a TelerikGrid, all I have to do is define a column with a <Template> element inside of it and then put my HTML in there. Initially, therefore, my grid looks like this:
<TelerikGrid Data="@custs">
  <TelerikGridColumns>
    <TelerikGridColumn Title="Select"
                       Width="10%"
                       Context="customer">
      <Template>
        <td>
          <img src="/favicon.ico"
               height="25"
               width="25"
               onclick="@(a =>currentCustomer = ((Customer) customer))"
               ondblclick="@(a =>EditItem(a))" />
        </td>
      </Template>
    </TelerikGridColumn>
  <TelerikGridColumn Field="Id" Title="Id" Width="10%" />
  <!-- more columns -->
</TelerikGrid>
And here's the related code:
@functions
{
  [Parameter]
  private IEnumerable<Customer> custs { get; set; }
  private Customer currentCustomer { get; set; }
  private void EditItem(UIMouseEventArgs args)
  {
    // ...
  }
When the user single clicks, I'd also like to give the user some feedback on which customer is selected by updating the background color for the <td> element that the <img> element is nested inside of. To support that I set up a field called backcolor and switch its value depending on whether or not the customer for the current row matches the customer in the currentCustomer property.
My enhanced <Template> element now looks like this:
<Template>
  @if (customer == currentCustomer)
  {
    backcolor = "red";
  }
  else
  {
    backcolor = "light-gray";
  }
  <td style="background-color: @backcolor">
    <img src="/favicon.ico"
         height="25"
         width="25"
         onclick="@(a =>currentCustomer = ((Customer) customer))"
         ondblclick="@(a =>EditItem(a))" />
  </td>
</Template>
The supporting code for this change is pretty simple since all I have to do is add a field to hold the current background color:
@functions
{
  private string backcolor = "white";
  // ...
}
Defining the Update Window
My next step is to define the window that will pop up to display the data and let the user change the current customer's data.
One note, however: In HTML when a user double clicks, the element actually fires a click event, followed by a dblclick event. This can force you to write some ugly code to prevent the click event code from executing before the "real" double-click event. Fortunately for me, having the click event fire before any double-click event doesn't cause me any problems: It just causes the related data for the current customer to be displayed before I open the update panel.
I used a TelerikWindow to create my update panel. The "frame" for my window is easy to define: I include a title section to display the current customer's name (so the user knows who's being edited) and two buttons to support update and cancel. I also made the window modal (which also centers the window in the page). Finally, I used the ref attribute to tie my window to a field in my code (EditWindow). I use that reference in my code to call the window's Open() method to display the window (later, I'll use the reference to call the window's Close() method to hide the window).
Here's all the required markup to create that frame:
<TelerikWindow ref="EditWindow" Modal="true">
  <TelerikWindowTitle>
    Edit @currentCustomer.FirstName @currentCustomer.LastName
  </TelerikWindowTitle>
  <TelerikWindowContent>
    <TelerikButton OnClick="@Update">Update</TelerikButton>
    <TelerikButton OnClick="@Close">Cancel</TelerikButton>
  </TelerikWindowContent>
</TelerikWindow>
In my @functions block, I have to create the field that ties to my window's ref attribute and add the code to open the window in the EditItem method called from my dblclick event. I also added the methods I'll call from the click events of the two buttons in the window (though all these methods do right now is close the window):
@functions
{
  private TelerikWindow EditWindow;

  private void EditItem(UIMouseEventArgs args)
  {
    EditWindow.Open();
  }

  private void Update()
  {
    EditWindow.Close();
  }

  private void Close()
  {
    EditWindow.Close();
  }

  // ...
}
Accepting Inputs and Handling Updates
Now, it's just a matter of adding the necessary components to my window that will let the user update the Customer object in the currentCustomer property. The Customer object has four properties that I'll let the user update:
FirstNameandLastName: I'll useTelerikTextBoxcomponents for themSignup: I'll use aTelerikDateInputcomponentCreditScore: ATelerikNumericTextBox
Just a reminder: To get many of these Telerik controls to work, you'll also need to include the Telerik JavaScript support file (there are some things Blazor can't do… yet). That means you'll need to add this <script> element to the View (or Razor Page) that's hosting your component:
<script src="https://kendo.cdn.telerik.com/blazor/1.1.0/telerik-blazor.min.js" defer></script>But with that taken care of, I can just add the input components to my window with the appropriate labels. To tie a component to a property on the Customer in the currentCustomer property, I just need to set the component's bind-Value attribute to the property the component is supposed to work with. Setting the bind-Value attribute ensures that any change to the property's value will be displayed in the <TelerikTextBox> element; similarly, any changes the user makes in the <TelerikTextBox> element will be automatically passed to my property.
Here's an example of a <TelerikTextBox> element tied to the Customer's FirstName property:
<TelerikTextBox bind-Value="@currentCustomer.FirstName">
</TelerikTextBox>
In addition to tying the component to a Customer property, where it makes sense I take advantage of the various attributes on the component to control what the user is allowed to enter. After all of those changes, here's all the markup for the window:
<TelerikWindow ref="EditWindow" Modal="true">
<TelerikWindowTitle>
Edit @currentCustomer.FirstName @currentCustomer.LastName
</TelerikWindowTitle>
<TelerikWindowContent>
Signup Date:<br />
<TelerikDateInput bind-Value="@currentCustomer.SignUp"
Format="yy-MMM-dd">
</TelerikDateInput><br />
First Name:<br />
<TelerikTextBox bind-Value="@currentCustomer.FirstName"
MaxLength="20"
MinLength="2">
</TelerikTextBox><br />
Last Name:<br />
<TelerikTextBox bind-Value="@currentCustomer.LastName"
MaxLength="20"
MinLength="2">
</TelerikTextBox><br />
Credit Score:<br />
<TelerikNumericTextBox bind-Value="@currentCustomer.CreditScore"
Max="5"
Min="1"
Step="1">
</TelerikNumericTextBox><br />
<br />
<TelerikButton OnClick="@Update">Update</TelerikButton>
<TelerikButton OnClick="@Close">Cancel</TelerikButton>
</TelerikWindowContent>
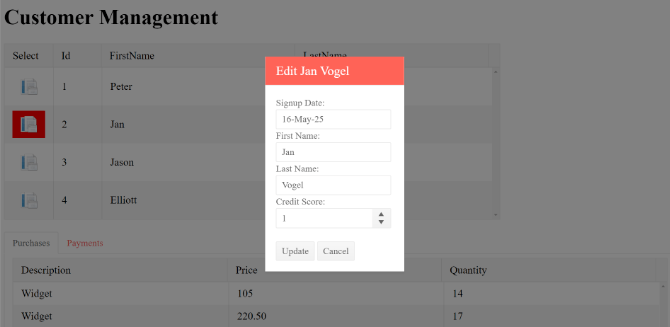
</TelerikWindow>As this picture shows, it doesn't look half bad even without any special styling applied:
What's left, of course, is to handle updating the Customer after the user finishes. Since this is server-side Blazor, I can call local resources to handle that – my customer repository, for example. With client-side Blazor, I'd want to call a Web Service. Since changes to my UI components are automatically reflected in the currentCustomer properties, all I have to do is access the currentCustomer property from my update method.
Putting that all together, my update method can be as simple as this:
private void Update()
{
  CustomerRepo.Update(currentCustomer);
  EditWindow.Close();
}
And this is the point I'm trying to make: The right combination of components, HTML, and code can give you the UI you want with very little code required (a half-dozen lines, in this case). Of course, a real application will require more code than what I have here, but all that additional code will be all about adding functionality rather than just "making it work."

Peter Vogel
Peter Vogel is both the author of the Coding Azure series and the instructor for Coding Azure in the Classroom. Peter’s company provides full-stack development from UX design through object modeling to database design. Peter holds multiple certifications in Azure administration, architecture, development and security and is a Microsoft Certified Trainer.