Vector Search with EF 9

Entity Framework Core 9 introduced a new feature for vector search, which allows searches based on vector similarity, allowing developers to incorporate these advantages directly into databases. Check out this post on how to implement vector search in ASP.NET Core using this new feature in EF 9.
Vector search is an approach that allows finding a specific piece of data in a different way from traditional methods, as it is based on vector similarity. That is, vectors that are semantically or visually similar to each other.
Entity Framework Core 9 introduced, albeit experimentally, the possibility of creating and searching vector data in the Azure Cosmos DB database. In this post, we will see an introduction to vector search, what its advantages are and how to implement vector search in ASP.NET Core using the experimental features of EF 9.
What Is Vector Search?
Vector search is a search technique used to find data that has some similarity to each other. Vectors commonly determine this similarity.
Vectors, or embeddings, are numeric characters that represent words, documents, images or videos. Vectors capture semantic relationships between data. This technique identifies similar items based on their proximity in a multidimensional vector space, rather than relying solely on exact text matches, as in traditional search approaches.
Differences Between Vector Search vs. Traditional Search
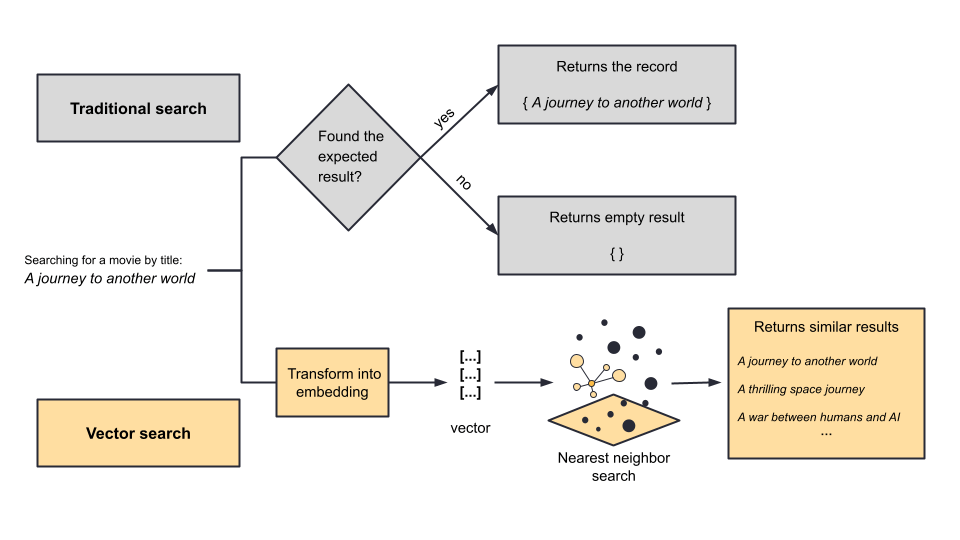
Traditional search uses a keyword-based approach to retrieve information. In this way, the search is performed through an exact or approximate match of terms, without interpreting the context or the semantic relationship between the terms.
In contrast, vector search transforms data into multidimensional numerical representations (vectors), allowing the identification of semantic similarities and expanding the power of the search.
While the traditional approach is effective for exact and structured searches, vector search excels in scenarios where understanding the context and the relationship between terms is essential, such as in semantic searches, chatbots and recommendation systems.
Imagine the following scenario: If you search for a “good fantasy movie” in a traditional search engine, it may return pages that contain exactly those words, but it may not necessarily understand that “great adventure movie” may have the same meaning. However, vector search, through embeddings, can perceive this relationship and return more relevant results, even if the words are not identical.
In other words, traditional search is based on character matching and word frequency, while vector search uses machine learning to capture the meaning and relationships between terms.
Note in the example below where the main differences between traditional search and vector search are demonstrated.

When Is Vector Search Most Useful?
Search is useful in situations where it is necessary to search for information in large volumes of unstructured data, especially when the exact search for keywords is not very relevant, in which case the search for similarity in vector search stands out.
In this context, we can highlight some scenarios:
Semantic search in texts – Unlike traditional keyword-based searches, vector search can find files such as documents that have similar meanings, even if they use different words. For example, social networks and ecommerce.
Image and video search – Vector search allows you to find similar images without relying on metadata, directly analyzing the visual characteristics of the files.
Multimodal data search – Vector search can capture complex relationships between different types of data, such as text and images, and combine them for a more in-depth result.
Chatbots and Virtual Assistants – Vector search can be used to formulate more relevant responses for the user, based on the meaning (sentiment) and not just the exact words.
Vector Search in ASP.NET Core
.NET 9 brought native vector search support to ASP.NET Core for the first time, and it is currently available in Azure Cosmos DB, Microsoft’s cloud database. If you are not familiar with Cosmos DB, I suggest you read this post: Working with Cosmos DB in ASP.NET Core.
Disclaimer 1: At the time of writing the post, vector search was still in preview, which may be changed in the future.
Disclaimer 2: This post uses the Cosmos DB Emulator, in which case no additional configuration is required. However, if you are going to use the official version of Cosmos DB, you will need to update your account resources to support vector search. You can do this using the Azure CLI:
az cosmosdb update --resource-group <resource-group-name> --name <account-name> --capabilities EnableNoSQLVectorSearch
Disclaimer 3: This post uses the generation of similar random vectors. To generate vectors using data, it is necessary to use external APIs, such as OpenAI vector embeddings, which will not be covered in this post.
Azure Cosmos DB now supports vector storage, allowing you to run all queries in a single database, directly on documents that contain other data in addition to the vector. This eliminates the need to create an additional solution for a dedicated vector database, which can significantly simplify the architecture of applications.
To implement vector search in practice, we will create a simple API in ASP.NET Core, insert some sample data and retrieve this data through vector search. The database used for insertion and search will be Cosmos DB, through the Cosmos DB Emulator, running locally.
You can access the full project code in this GitHub repository: Source code.
Implementing the Application
To create the base application, you can use the command below in the terminal:
dotnet new web -o VectorMovieRecommendation
The NuGet packages used in the application are the following:
- Microsoft.Azure.Cosmos
- Microsoft.EntityFrameworkCore
- Microsoft.EntityFrameworkCore.Cosmos
- Microsoft.EntityFrameworkCore.Design
- Newtonsoft.Json
You can install them via the terminal or use the Visual Studio package manager or another IDE of your choice.
So, in the application, create a new folder called “Models” and, inside it, create the following class:
using Newtonsoft.Json;

namespace VectorMovieRecommendation.Models;
public class Movie
{
    [JsonProperty("id")]
    public string Id { get; set; } = Guid.NewGuid().ToString();
    public float[] Vector { get; set; } = new float[1025];
    public string Title { get; set; } = string.Empty;
    public string Description { get; set; } = string.Empty;
    public int ReleaseYear { get; set; }
    public List<string> Genres { get; set; } = new List<string>();
    public double Rating { get; set; }
}
Note that here we declare a property called Vector which is a list of float arrays. And we also declare a value of 1025, which represents the number of elements stored in the array. This property will represent the vector when we insert a record into Cosmos DB and will be used for verification during the similarity search.
The next step is to create the context class, which will contain the EF Core settings for creating the tables. Create a new folder called “Data” and, inside it, add the class below:
using Microsoft.Azure.Cosmos;
using Microsoft.EntityFrameworkCore;
using VectorMovieRecommendation.Models;
namespace VectorMovieRecommendation.Data;
public class AppDbContext : DbContext
{
    public AppDbContext(DbContextOptions<AppDbContext> options) : base(options) { }
    public DbSet<Movie> Movies { get; set; } = default!;

    protected override void OnModelCreating(ModelBuilder modelBuilder)
    {
        #pragma warning disable EF9103 // Type is for evaluation purposes only and is subject to change or removal in future updates. Suppress this diagnostic to proceed.
        modelBuilder.Entity<Movie>()
            .Property(e => e.Vector)
            .IsVector(DistanceFunction.Cosine, 1025);
        #pragma warning restore EF9103 // Type is for evaluation purposes only and is subject to change or removal in future updates. Suppress this diagnostic to proceed.
    }
}
Let’s analyze the code.
Here we create a context class to perform the default EF Core configurations, but note that in the OnModelCreation method there is an additional configuration:
modelBuilder.Entity<Movie>()
.Property(e => e.Vector)
.IsVector(DistanceFunction.Cosine, 1025);
This configuration tells EF to map the Vector property of the Movie entity as a 1025-dimensional vector, using the cosine distance function. This is done through the IsVector method during model configuration.
By defining the property as a vector and specifying the cosine distance function, EF can optimize queries that involve similarity comparisons between vectors.
Another element that you may notice is the #pragma warning disable EF9103 directive that is used to suppress a compiler warning, identified by the code EF9103. This warning indicates that a given feature or API is experimental, intended for evaluation purposes only, and is subject to change or removal in future updates. Since it is still an experimental feature (at least as of the date this post was written), if you do not use the directive, the compiler will report an error.
The next step is to configure the environment variables. They are in the appsettings.json file, add the following:
 "CosmosDb": {
    "AccountEndpoint": "https://localhost:PORT_NUMBER",
    "AccountKey": "YOUR_COSMOS_DB_ACCOUNT_KEY",
    "DatabaseName": "VectorMovieRecommendationDB",
    "ContainerName": "Movies"
  },
Remember to replace PORT_NUMBER with the port where the Cosmos DB Emulator is running and YOUR_COSMOS_DB_ACCOUNT_KEY with the configuration key.
Configuring the Program Class
In the Program class we will configure the dependency injections, the environment variables and the endpoints and methods. So, first add the following code, just below the var builder = WebApplication.CreateBuilder(args);:
var cosmosConfig = builder.Configuration.GetSection("CosmosDb");
var connectionString = cosmosConfig["AccountEndpoint"];
var accountKey = cosmosConfig["AccountKey"];
var databaseName = cosmosConfig["DatabaseName"];

builder.Services.AddDbContext<AppDbContext>(options =>
    options.UseCosmos(connectionString!, accountKey!, databaseName!));
Here we are extracting the information from the environment variables created previously and passing them to the EF Core context class configuration.
Now, let’s create endpoints and methods to insert some sample data and to create the database and collections during program execution if they do not already exist.
Add to the Program.cs class the following code:
app.MapPost("/movies/seed", async (AppDbContext db) =>
{
    await Seed(db);
    return Results.Ok();
});

using (var scope = app.Services.CreateScope())
{
    var dbContext = scope.ServiceProvider.GetRequiredService<AppDbContext>();
    await dbContext.Database.EnsureCreatedAsync();
}

static async Task Seed(AppDbContext dbContext)
{
    var sampleMovies = new List<Movie>
            {
                new Movie
                {
                    Title = "Sci-Fi Adventure",
                    Description = "A thrilling space journey",
                    ReleaseYear = 2022,
                    Genres = new List<string> { "Sci-Fi", "Adventure" },
                    Rating = 8.5,
                    Vector = GenerateRandomVector()
                },
                new Movie
                {
                    Title = "Interstellar Voyage",
                    Description = "A group of explorers travel through a wormhole",
                    ReleaseYear = 2014,
                    Genres = new List<string> { "Sci-Fi", "Drama" },
                    Rating = 8.6,
                    Vector = GenerateRandomVector()
                },
                new Movie
                {
                    Title = "Futuristic Battle",
                    Description = "A war between humans and AI",
                    ReleaseYear = 2023,
                    Genres = new List<string> { "Sci-Fi", "Action" },
                    Rating = 8.2,
                    Vector = GenerateRandomVector()
                },
                new Movie
                {
                    Title = "Galactic War",
                    Description = "Intergalactic conflict between empires",
                    ReleaseYear = 2019,
                    Genres = new List<string> { "Sci-Fi", "Adventure" },
                    Rating = 8.4,
                    Vector = GenerateRandomVector()
                }
            };

    dbContext.Movies.AddRange(sampleMovies);
    await dbContext.SaveChangesAsync();
}

static float[] GenerateRandomVector()
{
    int size = 1536;
    var random = new Random();
    return Enumerable.Range(0, size)
                     .Select(_ => (float)random.NextDouble())
                     .ToArray();
}
Note that to generate the vector we are using the local method GenerateRandomVector(), which sets the vector size to 1536, then instantiates a random number generator (new Random()), then generates a sequence of size integers starting from 0 (random.NextDouble()) and finally converts the sequence to an array. This method is made generically for creating vectors; if you are going to use it elsewhere, remember to modify it to suit your needs.
Now, still in the Program.cs class, add the following endpoint to retrieve the records from the database using the vector search:
app.MapGet("/movies/vector-movies", async (AppDbContext db) =>
{
    var queryVector = GenerateRandomVector();

    #pragma warning disable EF9103 // Type is for evaluation purposes only and is subject to change or removal in future updates. Suppress this diagnostic to proceed.
    var movies = await db.Movies
    .OrderBy(m => EF.Functions.VectorDistance(m.Vector, queryVector))
    .Take(5)
    .ToListAsync();
    #pragma warning restore EF9103 // Type is for evaluation purposes only and is subject to change or removal in future updates. Suppress this diagnostic to proceed.

    return Results.Ok(movies);
});
In the code above, an HTTP GET endpoint is defined that returns a list of the five most similar movies based on a vector comparison. The similarity is determined by calculating the distance between a randomly generated query vector and the vectors associated with each movie in the database. Let’s analyze each part:
- Generating the query vector:
var queryVector = GenerateRandomVector();
Here the GenerateRandomVector() method is called to create a floating point vector with 1,536 elements, each containing a random value between 0.0 (inclusive) and 1.0 (exclusive). This vector serves as a reference for measuring the similarity with the vectors of the stored movies.
- Querying the database:
var movies = await db.Movies
.OrderBy(m => EF.Functions.VectorDistance(m.Vector, queryVector))
.Take(5)
.ToListAsync();
In this query, the list of movies (db.Movies) is ordered based on the vector distance between each movie’s vector (m.Vector) and the queryVector. The EF.Functions.VectorDistance function calculates this distance, allowing the movies to be ordered from the smallest to the largest distance—that is, from the most similar to the least similar to the query vector. Then, the five most similar movies are selected with Take(5) and converted to an asynchronous list with ToListAsync().
- Returning the results:
return Results.Ok(movies);
Finally, the list of selected movies is returned with an HTTP status of 200 OK.
- Compilation warning: Warning suppression is required again. The directives
#pragma warning disable EF9103and#pragma warning restore EF9103are used to suppress warning EF9103 during compilation. This warning indicates that the functionality used is under evaluation and may change or be removed in future updates.
Running Vector Search
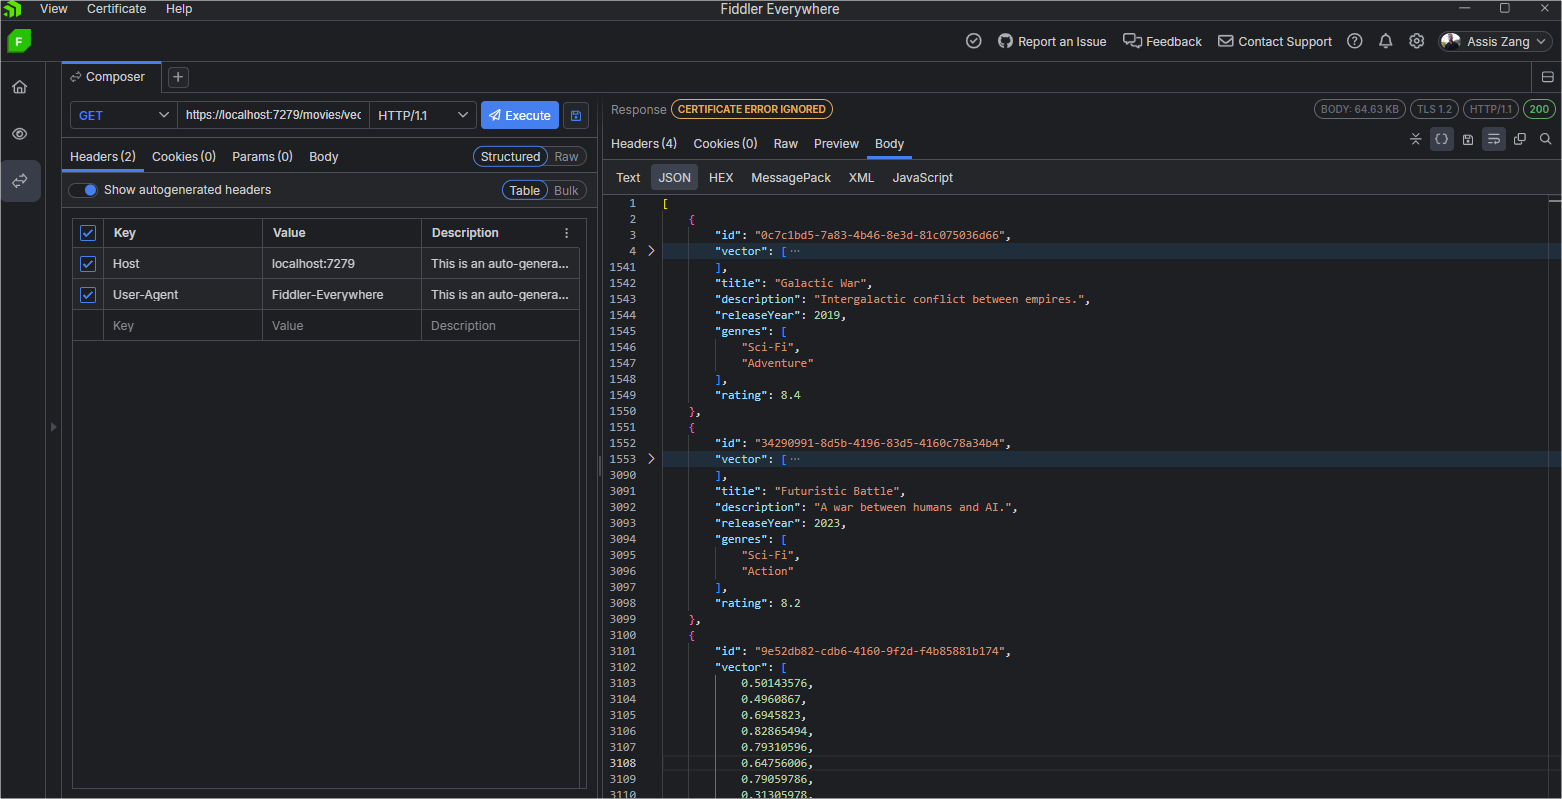
Now let’s run the GET /vector-movies route to return the records using the EF 9 VectorDistance() method, which calculates the distance between vectors, allowing the search for close or similar vectors.
So, just run the application, and run the endpoint to insert data: https://localhost:PORT/movies/seed. Then access the endpoint https://localhost:PORT/movies/vector-movies, so that the list of movies is returned, as you can see in the image below, using Progress Telerik Fiddler Everywhere:

Conclusion
Vector search is an advanced search technique that has evolved a lot in recent years. With the arrival of EF 9, we had the introduction of vector search support in Azure Cosmos DB, which makes it easy to implement and run this feature.
In this post, we created a simple API to insert data into Cosmos DB and use the new feature to retrieve those records using vector search. Remember that this is still an experimental feature, but you can start using it right now and discover the many possibilities that vector search offers.


