
Build GitHub Timeline with Kendo UI for Angular Timeline

Summarize with AI:
Is it really worth it to use a professional Angular UI component library? One developer explores what it’s like to build a timeline for GitHub commit events from scratch vs. with Kendo UI for Angular.
We’ve mentioned multiple times how important and complex it can become to display data and iterate over data and the challenges faced by developers when we need to iterate over a list or think about adding a nice design: the user behavior, re-usability, flexibility and business logic.
As developers, we need to be pragmatic when we think about how to solve business problems, prioritizing the time to market, but at the same time being ready to adapt to changes or new requirements without too much pain.
Most of the time, we try solve our challenges ourselves, by combining HTML, CSS and Angular with a hidden cost 🤪, because we want to feel proud about building our components. But in the real world, sometimes we need to focus and use our skills to solve business problems and delegate other tasks. One great way to be more productive and save time is to use Progress Kendo UI for Angular. I don’t want to push you to use Kendo UI if you don’t need it—you will know why or when you really need it; let’s show a real-world scenario.
Scenario
Your company needs to show progress on the products, but instead of giving access to GitHub for stakeholders, we want to launch a fancy website that displays GitHub commit history like a timeline that alternates the events for a clean and visually appealing layout. If you can deliver it in one hour, it will help us a lot, because other teams need to show their timeline reports.
This is something we can build ourselves using Angular + HTML and CSS, or with Kendo UI for Angular’s Timeline component that provides exactly the features we need to make this happen and something more.
One More Thing
Oops, sorry, the manager also wants a small change, a very tiny change (this is normal in our job):
- Include links to the commits on GitHub for quick access.
- Make it flexible to use in different pages, because for some products we want to show only the title, others the commit, and of course the link to GitHub if they want to go to the details.
- Please don’t change the delivery time.
😈 I already assume that you have thought about usability, accessibility, customization and testing.
OK, challenge accepted, let’s get to work!
The GitHub API Service
We are going to point to the real GitHub API https://api.github.com/repos/. For this example, I want to see one of my favorite projects on GitHub, tour-of-ponies by alyssamichelle, and to know what Alyssa is doing with the ponies. Go to the browser and add the username and the project to the GitHub API.
👉🏽 https://api.github.com/repos/alyssamichelle/tour-of-ponies/commits
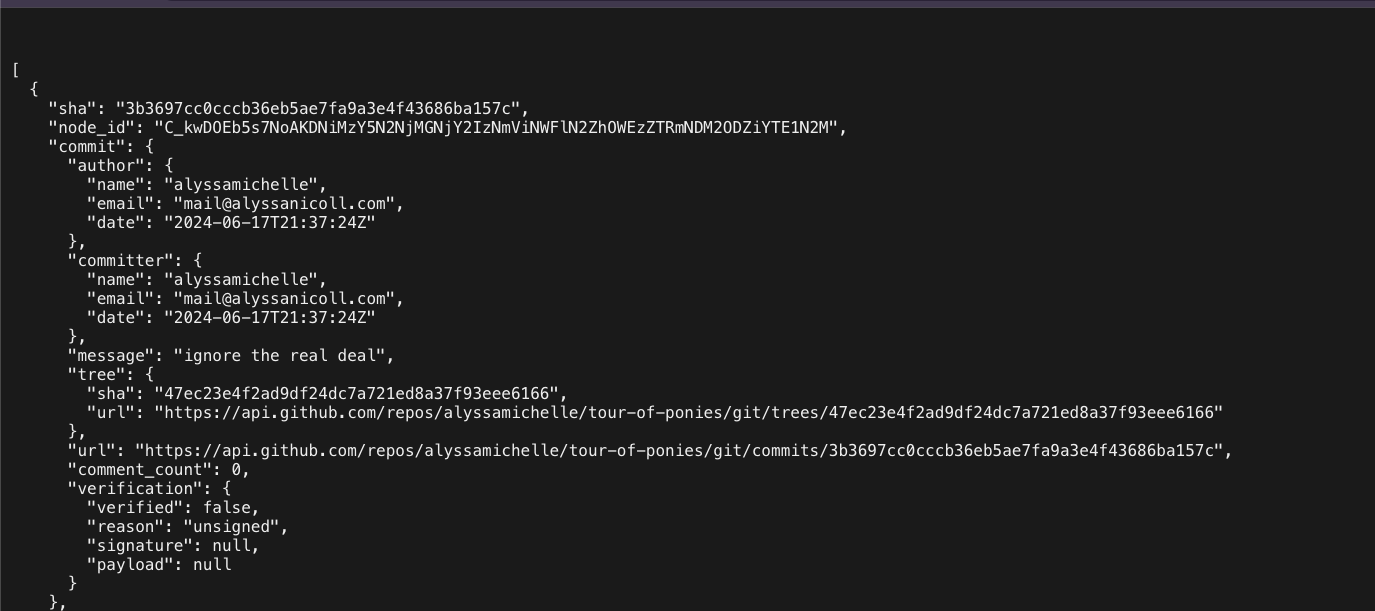
The GitHub API returns a JSON with the commits, but it’s too much information, so we need to simplify how to point to the endpoint and the data to visualize. I think it’s better to create a service and use the map RxJS operator to transform them. Let’s do it!
Setting Up the Project
I’ll use the latest version of Angular. The easiest way to set up the project is by running the following command in the terminal. Answer the default questions:
npx -p @angular/cli ng new timeline-with-kendo
? Which stylesheet format would you like to use? CSS
Do you want to enable Server-Side Rendering (SSR) and Static Site Generati
Next, move to the project folder create the service using the command ng g s services/github.
ng g s services/github
Open github.service.ts and declare the variable githubRepo. It is the base URL to combine with the user and repository to get the commits. Then inject the HttpClient.
 private githubRepo = 'https://api.github.com/repos/';
  http = inject(HttpClient);
Now, let’s give our application access to use HttpClient! In our app.config.ts, add provideHttpClient() to your providers array:
import { ApplicationConfig } from '@angular/core';
import { provideRouter } from '@angular/router';

import { routes } from './app.routes';
import { provideHttpClient } from '@angular/common/http';

export const appConfig: ApplicationConfig = {
 providers: [provideRouter(routes), provideHttpClient()],
};
Next, create the method getCommits(user: string, repo: string) with two parameters , user and repo. Combine the githubRepo with the user and repo using a template literal to use that URL with the HttpClient to return the observable.
getCommits(user: string, repo: string): Observable<any> {
        return this.http.get(`${this.githubRepo}/${user}/${repo}/commits`)
But remember, the data returned by the API needs to be transformed to make our life easier in the component. Using the map operator, iterate over the API response and return a better structure, like title, subtitle, description, date and actions for the user, such as the URL link.
The final code looks like:
import {inject, Injectable} from '@angular/core';
import {HttpClient} from '@angular/common/http';
import {map, Observable} from 'rxjs';

@Injectable({
    providedIn: 'root',
})
export class GithubService {
    private githubRepo = 'https://api.github.com/repos';
    private http = inject(HttpClient);
    getCommits(user: string, repo: string): Observable<any> {
        return this.http.get(`${this.githubRepo}/${user}/${repo}/commits`).pipe(
            map((response: any) => {
                return response.map((commit: any) => ({
                        title: commit.commit.message,
                        subtitle: commit.commit.author.date,
                        description: commit.commit.author.name,
                        date: new Date(commit.commit.author.date),
                       }
                ));
            })
        );
    }
}
OK, let’s see if the API call works.
Open app.component.ts, inject the GithubService and import JsonPipe to visualize the response in the template. Transform the observable to a signal using the toSignal method.
…
import {toSignal} from "@angular/core/rxjs-interop";

@Component({
    selector: 'app-root',
    standalone: true,
    imports: [RouterOutlet,JsonPipe],
    templateUrl: './app.component.html',
    styleUrl: './app.component.scss',
})
export class AppComponent {

    githubService = inject(GithubService);
    public commits$ = toSignal(this.githubService.getCommits('alyssamichelle', 'tour-of-ponies'));
}
In the template, open app.component.html using interpolation, read the commits$ signal using () and the json pipe.
Because we are using standalone, remember to import
JsonPipein the imports sections.
<pre>
{{ (commits$() | json) }}
</pre>
Run ng serve -o and the browser must show the commits!
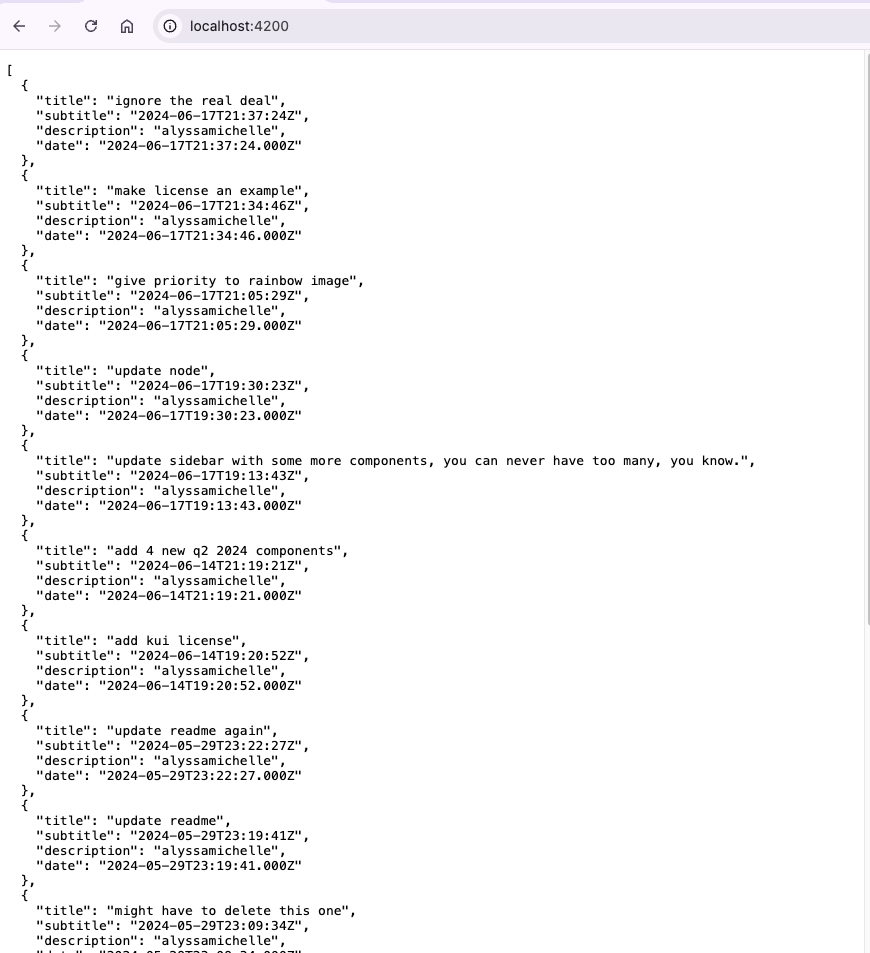
Yeah! We did our first step, but it doesn’t look like a timeline. Let’s start working on the timeline.
Learn more about signals.
Visualize the Timeline
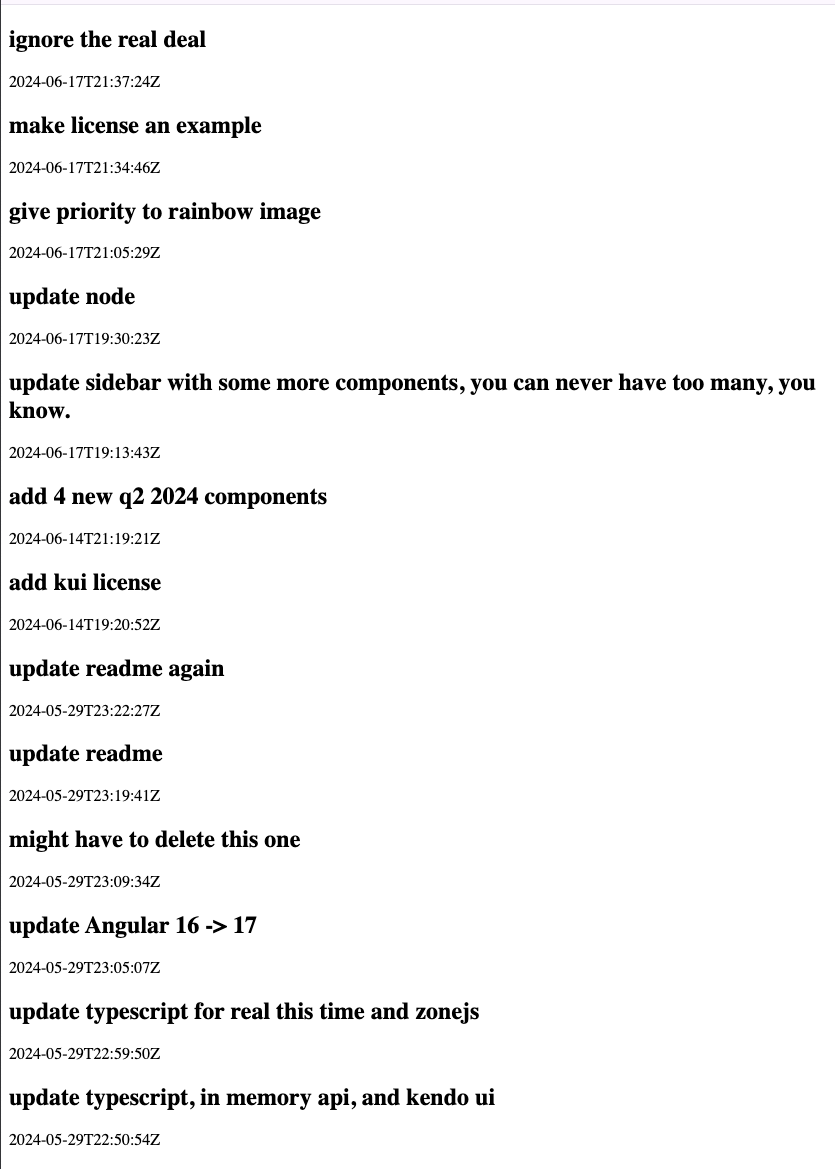
We need to show the list of commits. Let’s try to show the data using @for and bind the data in the template. Create a div with @for and read the properties using interpolation to show title and subtitle.
The final code looks like this:
<div>
 @for (commit of commits$(); track commit) {
   <div>
     <h2>{{ commit.title }}</h2>
     <p>{{ commit.subtitle }}</p>
   </div>
 }
</div>
Save changes and reload! Yes! We have a basic structure for our timeline.
Hold on a second! We have to finish this ASAP. Do you feel proud about your results? And I’m starting to have the feeling we have a lot of missing features.
We need to group the data and enable pagination to navigate between years, make it flexible using ng-content template … You can read some great resources to learn about how to manipulate data and use ng-content, and after reading you can build what you need.
😈 Don’t forget we need to maintain high code quality (testing, accessibility, customization).
But, we have a deadline for our project and don’t want to put our company at risk, so why not try using Kendo UI for Angular Timeline?
Moving to Kendo UI for Angular Timeline
We are going to speed up our development by using Kendo UI for Angular Timeline. It helps display a collection of events and their data in chronological order for each year, showing the information either vertically or horizontally. It also provides event handling, keyboard navigation and template support so we can customize it as we want. The best thing is we can deliver all requirements and more without any rush and make our lives easier. Let’s get started!
First, install Kendo UI for Angular Layout into our project by using the schematics it brings with an incredible list of components including kendo-timeline.
ng add @progress/kendo-angular-layout
Next, to use the full power of Kendo UI for Angular, download a free trial. After that, activate the license by copying the Kendo UI License.txt file into the project, rename it kendo-ui-license.txt and run the following commands:
npm install --save @progress/kendo-licensing
npx kendo-ui-license activate
The kendo-layout package brings a list of powerful components, but we are just going to focus on the kendo-timeline component to help us render a list of events or TimelineEvent types to bind with the events property. Cool side note, the Kendo Timeline component also allows collapsing and expanding the details of each event with [collapsibleEvents], and [alterMode] changes the timeline items to display on both sides of the axis for a cleaner layout.
Learn more about kendo-timeline.
It’s time to refactor our code. First, open the github.service.ts and change the signature of our service to the TimelineEvent[] interface provided by @progress/kendo-angular-layout.
   getCommits(user: string, repo: string): Observable<TimelineEvent[]> {
     ...
Because, in the real world we can get errors, add the
catchErroroperator and returnEMPTYto handle if something fails Learn more.
catchError(() => EMPTY),
The final code looks like this:
import {inject, Injectable} from '@angular/core';
import {HttpClient} from '@angular/common/http';
import {catchError, EMPTY, map, Observable} from 'rxjs';
import {TimelineEvent} from "@progress/kendo-angular-layout";

@Injectable({
 providedIn: 'root',
})
export class GithubService {
 private githubRepo = 'https://api.github.com/repos';
 private http = inject(HttpClient);
 getCommits(user: string, repo: string): Observable<TimelineEvent[]> {
   return this.http.get(`${this.githubRepo}/${user}/${repo}/commits`).pipe(
     catchError(() =>  EMPTY),
     map((response: any) => {
       return response.map((commit: any) => ({
           title: commit.commit.message,
           subtitle: commit.commit.author.date,
           description: commit.commit.author.name,
           date: new Date(commit.commit.author.date)
         }
       ));
     })
   );
 }
}
Before we continue, let’s enable the nice animations, the KENDO_TIMELINE component requires the
provideNoopAnimations()in theapp.config.ts.
import { ApplicationConfig } from '@angular/core';
import { provideRouter } from '@angular/router';
import { routes } from './app.routes';
import { provideHttpClient } from '@angular/common/http';
import {provideNoopAnimations} from "@angular/platform-browser/animations";
export const appConfig: ApplicationConfig = {
 providers: [provideRouter(routes), provideHttpClient(), provideNoopAnimations()],
};
Perfect. Next, open app.component.ts and add KENDO_TIMELINE utility array in the imports section.
You should always provide an initial value; on commits$ set the initial value in the signals declaration
{ initialValue: [] }
The final code looks like this:
import {Component, inject} from '@angular/core';
import {KENDO_TIMELINE} from '@progress/kendo-angular-layout';
import {GithubService} from './services/github.service';

import {toSignal} from "@angular/core/rxjs-interop";
import {DatePipe} from "@angular/common";

@Component({
   selector: 'app-root',
   imports: [KENDO_TIMELINE, DatePipe],
   templateUrl: './app.component.html',
   styleUrl: './app.component.scss'
})
export class AppComponent {
   githubService = inject(GithubService);
   public commits$ = toSignal(this.githubService.getCommits('alyssamichelle', 'tour-of-ponies'),{
     initialValue: []
   });
}
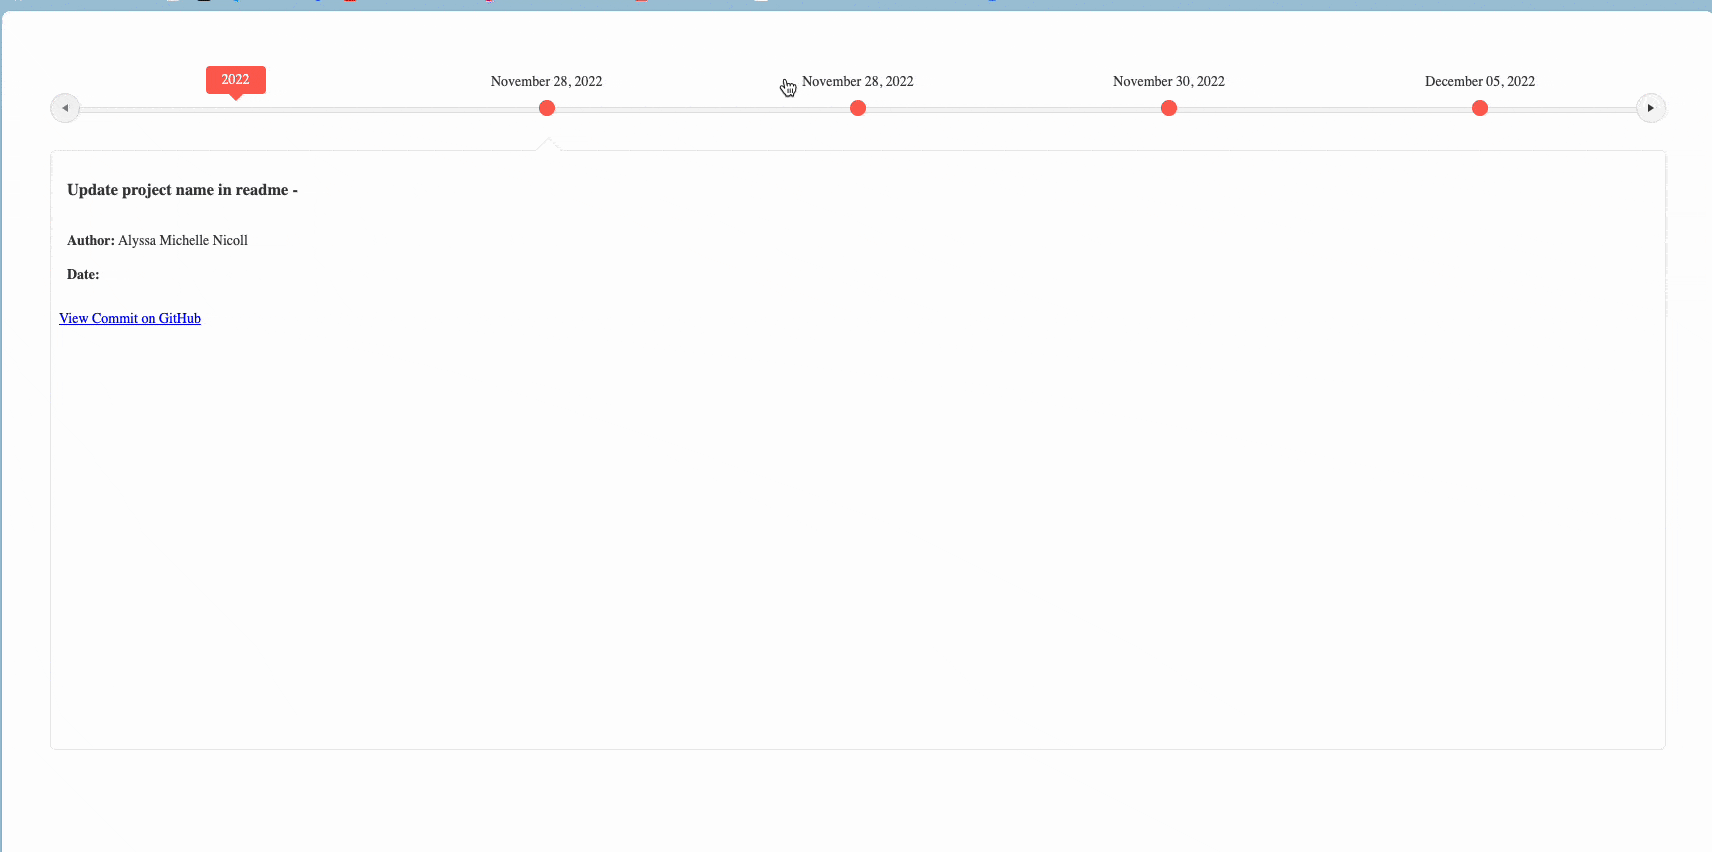
Next, open app.component.html and add the kendo-timeline. Bind the events with the signal commits$, and use the orientation property to display the timeline horizontally.
<h1>Commits</h1>
<kendo-timeline [events]="commits$()" [orientation]="'horizontal'"></kendo-timeline>
Save changes, reload the browser and tada!! We have a nice timeline!!
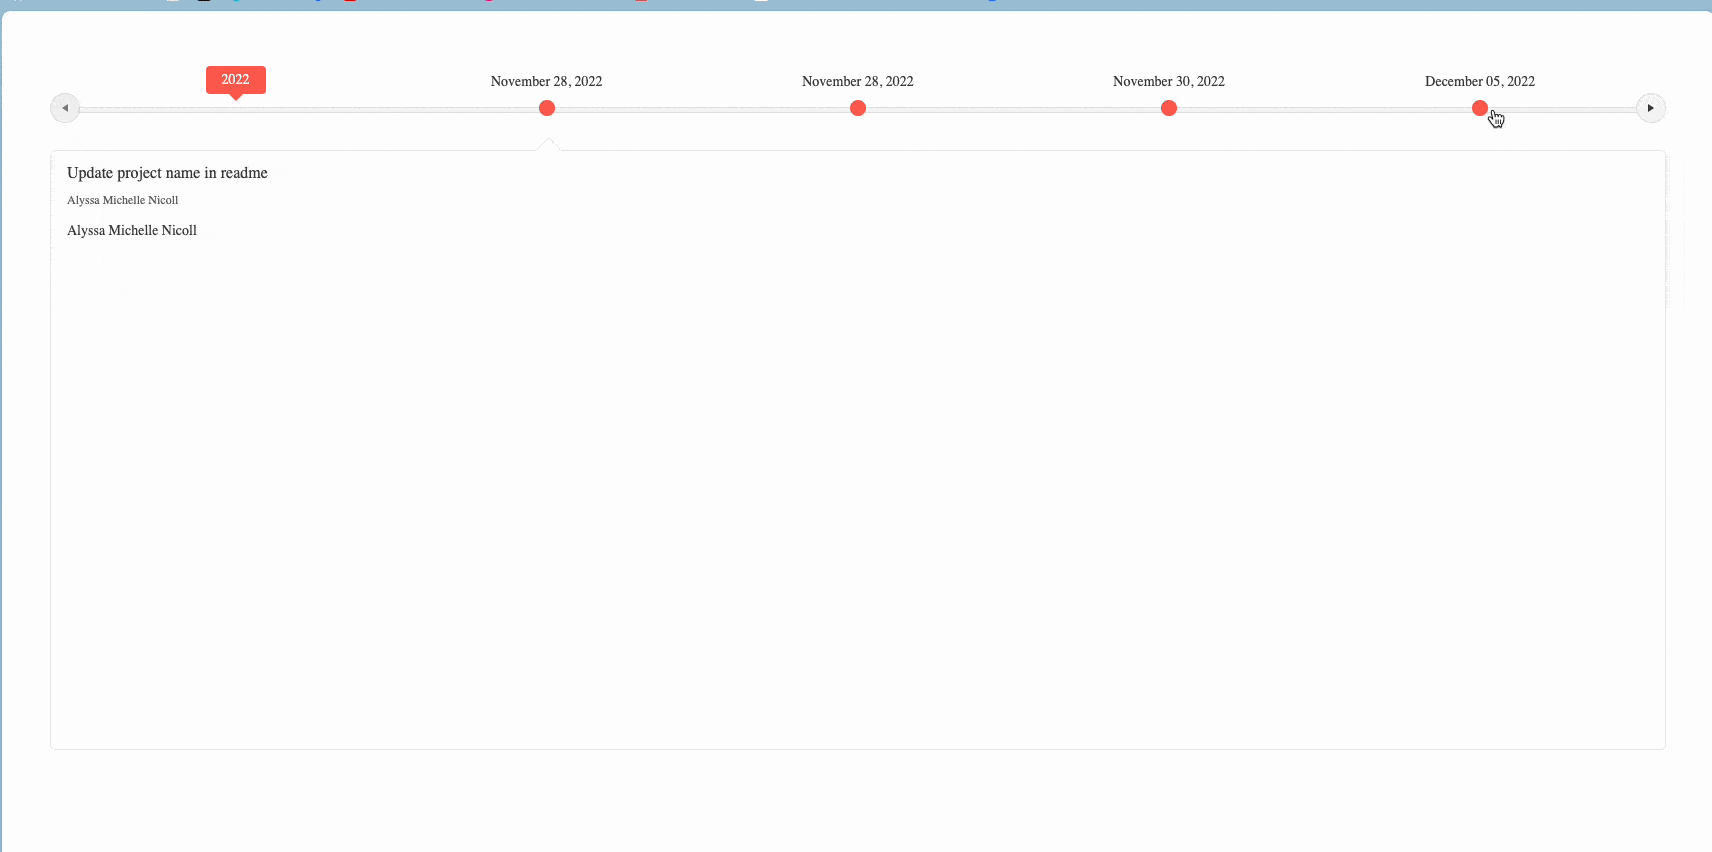
Hold on a second, we did this so fast, but what about making it flexible? Relax! 🧘🏼♂️ I will even have time to watch Netflix because the kendo-timeline bring three directives to customize the header, body or actions template. Let’s play with it.
Customize the Timeline with Templates
The kendo-timeline component is so flexible it allows customizing the header, body and action templates by using three directives: kendoTimelineCardHeaderTemplate, kendoTimelineCardBodyTemplate and kendoTimelineCardActionsTemplate. These directive provide access to each item event with let-event:
For example, we can customize with ng-template and combine with one directive to display information:
kendoTimelineCardHeaderTemplate: Customizes the header—for example, with the commit message and author.kendoTimelineCardBodyTemplate: Displays the author and commit date.kendoTimelineCardActionsTemplate: Adds a clickable link to view the commit on GitHub.
Learn more about kendo-timeline.
We need to make small changes in the getCommits() method by adding actions in the TimelineEvent. This will bind the kendoTimelineCardActions template with the url and text to click with the View commit on Github and url property with commit.html_url.
Open the github.service.ts and update the response.map, adding the actions sections, the code looks like this:
return response.map((commit: any) => ({
   title: commit.commit.message,
   subtitle: commit.commit.author.date,
   description: commit.commit.author.name,
   date: new Date(commit.commit.author.date),
   actions:
     {
       text: 'View commit on GitHub',
       url: commit.html_url,
     },
 }
));
The final code looks like this:
import {inject, Injectable} from '@angular/core';
import {HttpClient} from '@angular/common/http';
import {catchError, EMPTY, map, Observable} from 'rxjs';
import {TimelineEvent} from "@progress/kendo-angular-layout";

@Injectable({
 providedIn: 'root',
})
export class GithubService {
 private githubRepo = 'https://api.github.com/repos';
 private http = inject(HttpClient);
 getCommits(user: string, repo: string): Observable<TimelineEvent[]> {
   return this.http.get(`${this.githubRepo}/${user}/${repo}/commits`).pipe(
     catchError(() =>  EMPTY),
     map((response: any) => {
       return response.map((commit: any) => ({
           title: commit.commit.message,
           subtitle: commit.commit.author.date,
           description: commit.commit.author.name,
           date: new Date(commit.commit.author.date),
           actions:
             {
               text: 'View Commit on GitHub',
               url: commit.html_url,
             },
         }
       ));
     })
   );
 }
}
Next, open the app.component.ts and import the DatePipe to format the date in the kendoTimelineCardBodyTemplate.
import {Component, inject} from '@angular/core';
import {GithubService} from './services/github.service';
import {toSignal} from '@angular/core/rxjs-interop';
import {KENDO_TIMELINE} from '@progress/kendo-angular-layout';
import {DatePipe} from '@angular/common';

@Component({
 selector: 'app-root',
 imports: [KENDO_TIMELINE, DatePipe],
 templateUrl: './app.component.html',
 styleUrl: './app.component.css'
})
export class AppComponent {
 githubService = inject(GithubService);
 public commits$ = toSignal(this.githubService.getCommits('alyssamichelle', 'tour-of-ponies'), {  initialValue: [] });

}
Finally, we can start to use the ng-template to bind specific data in each area. Feel free to show what you need using the event property provide by the directives kendoTimelineCardHeaderTemplate, kendoTimelineCardBodyTemplate and kendoTimelineCardActionsTemplate.
The final code looks like:
<kendo-timeline [events]="commits$()" [orientation]="'horizontal'">
 <ng-template kendoTimelineCardHeaderTemplate let-event>
   <h3>{{ event.title }} - {{ event.subtitle }}</h3>
 </ng-template>

 <ng-template kendoTimelineCardBodyTemplate let-event>
   <p><strong>Author:</strong> {{ event.description }}</p>
   <p><strong>Date:</strong> {{ event.subtitle | date :'mediumDate' }}</p>
 </ng-template>

 <ng-template kendoTimelineCardActionsTemplate let-event>
   <a [href]="event.actions.url" target="_blank">{{ event.actions.text }}</a>
 </ng-template>
</kendo-timeline>
Save the changes and tada! Yes! We have a powerful timeline with a custom UI that is very flexible with just a few lines of code. 🥰
What About Customization?
Don’t worry … do you want to use styles like bootstrap, Material, Fluent UI to change colors or to customize with your Figma styles? Check out ThemeBuilder that simplifies application styles with just a few clicks.
Conclusion
We started our journey by discussing how to build a timeline, but when the real-world challenges came at us, I preferred using a component library to make my work easier. It’s so simple to create a powerful timeline using Kendo UI for Angular Timeline component. By integrating it with the GitHub API, we pulled real commit data and displayed it in a responsive, collapsible timeline.
We saved a lot of time using template customization to enhance the timeline to fit specific needs. Adding more interactive elements and control made it easy to customize and adapt to each company’s requirements, saving time and giving you more free time to watch Netflix. 🍿
- https://github.com/danywalls/timeline-with-kendo (final version)
- https://www.telerik.com/kendo-angular-ui/components/layout/timeline
Don’t forget: Kendo UI for Angular comes with a free 30-day trial, so give it a try today!
Happy coding!

Dany Paredes
Dany Paredes is a Google Developer Expert on Angular and Progress Champion. He loves sharing content and writing articles about Angular, TypeScript and testing on his blog and on Twitter (@danywalls).
Related Posts
Comments
All articles
Topics
Web MobileMobile
Desktop
Design
Productivity
People
