Blazor Basics: The Benefits of Static Server-Side Rendering in Blazor

Summarize with AI:
Learn how to use static server-side rendering in Blazor and how stream rendering improves the user experience.
Blazor comes with different render modes. With .NET 7 and earlier, we had to choose between Blazor Server and Blazor WebAssembly on an application level. Starting with .NET 8 and the Blazor Web App project template, we now have three render modes available: static server-side rendering, Blazor Server interactivity and Blazor WebAssembly interactivity.
In this article, we will explore the non-interactive, now default render mode, static server-side rendering (static SSR).
You can access the code used in this example on GitHub.
Introduction to Static Server-Side Rendering
Starting with .NET 8 and the introduction of static server-side rendering, it is now the default render mode for Blazor applications.
This means that if we do not explicitly provide a render mode on an application level (by declaring it in the App.razor file) or on a page/component level (using the @rendermode directive), the page or component uses static SSR.
Static server-side rendering is a non-interactive render mode—meaning we cannot execute interaction code, such as handling button clicks, from the C# code.
However, we can still use C# to initialize the component, load data asynchronously from an injected service and use the Razor component model to render data conveniently.
The performance benefits of using static server-side rendering come from the simple rendering mode. The client sends a request to the server, and the server provides the rendered HTML. It’s the classic request/response model used since the early days of the internet.
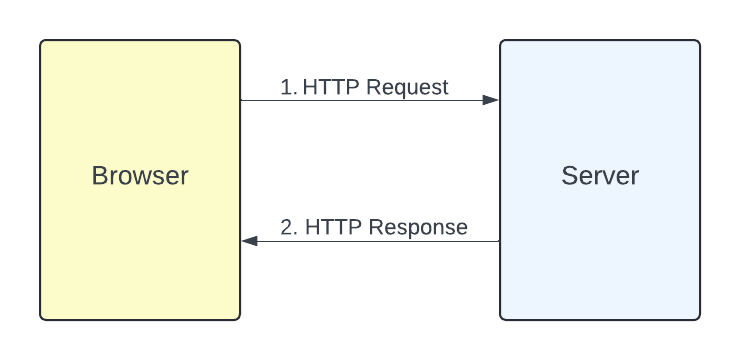
No persistent web socket connection (no SignalR connection) or WebAssembly code is involved.
Caching the response of a static server-side rendered page will further increase the web application’s performance.
How to Configure the Application
When creating a new Blazor web application using the default Blazor Web App project template (“blazor” in the .NET CLI), we can choose an interactive render mode.
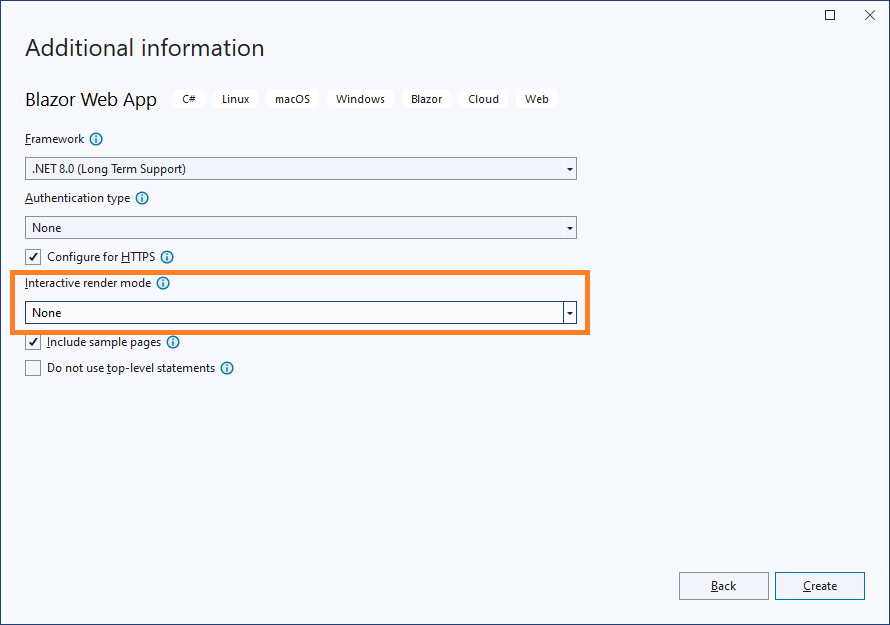
When selecting None, we get the bare minimum of a Blazor web application supporting only static server-side rendering. However, when we choose one of the other available render modes (Blazor Server or Blazor WebAssembly), we still have static SSR support.
In the Program.cs file, we have two lines that enable static SSR support for Razor components inside a Blazor web application.
// Add services to the container.
builder.Services.AddRazorComponents()
First, we need to call the AddRazorComponents method on the WebApplicationBuilder object to register the required services.
app.MapRazorComponents<App>();
Next, we have to call the generic MapRazorComponents, which adds middleware to the HTTP pipeline of the web application.
A Static Server-Side Rendered Page
Let’s implement a Razor component using static server-side rendering. We create a team page for a company website.
@page "/team"
@using BlazorSSR.Services
@inject IEmployeeService EmployeeService

<h1>Team</h1>

<p>Our team members make the magic happen.</p>

<div style="display: grid; grid-template-columns: 1fr 1fr 1fr;">
    @foreach (var member in TeamMembers)
    {
        <div style="margin-bottom: 25px;">
            <h2>@member.Name</h2>
            <div>@member.Role</div>
            <div>@member.StartingDay.ToShortDateString()</div>
        </div>
    }
</div>

@code {
    public IEnumerable<Employee> TeamMembers { get; set; } =
        new List<Employee>();

    protected async override Task OnInitializedAsync()
    {
        TeamMembers = await EmployeeService.GetEmployees();
    }
}
Notice the @page directive, which turns this component into a routable page. We also inject an instance of the IEmployeeService using the @inject directive.
The component template uses a foreach loop to iterate through all elements in the TeamMembers property of type IEnumerable of Employee.
In the code section, we use the injected instance of the IEmployeeService to load the employee data using the asynchronous GetEmployees method inside the OnInitializedAsync lifecycle method.
The EmployeeService class and its IEmployeeService interface look like this:
namespace BlazorSSR.Services;

public interface IEmployeeService
{
    Task<IList<Employee>> GetEmployees();
}

public record Employee(string Name, string Role, DateOnly StartingDay);

public class EmployeeService : IEmployeeService
{
    public async Task<IList<Employee>> GetEmployees()
    {
        var employees = new List<Employee>
        {
            new Employee("Norbert Hugh", "CEO",
                new DateOnly(2022, 8, 1)),
            new Employee("Sonia Balmer", "Head of HR",
                new DateOnly(2022, 8, 1)),
            new Employee("Peter Jackson", "HR Assistant",
                new DateOnly(2023, 7, 16)),
            new Employee("Quincy Rover", "Head of Marketing",
                new DateOnly(2020, 1, 1)),
            new Employee("John Doe", "Software Developer",
                new DateOnly(2020, 2, 1)),
            new Employee("Sabrina Walsh", "Software Developer",
                new DateOnly(2020, 1, 1))
        };

        // Simulate an expensive operation such as querying the database
        await Task.Delay(2000);

        return employees;
    }
}
We register the service with the ASP.NET Core dependency injection system in the Program.cs file as a scoped service.
builder.Services.AddScoped<IEmployeeService, EmployeeService>();
You can access the code used in this example on GitHub.
Hint: Notice the two-second delay (2000 milliseconds) in the
EmployeeServiceimplementation. You will learn why I added this delay shortly.
I also added a navigation item to the /team page inside the NavMenu component:
<div class="nav-item px-3">
    <NavLink class="nav-link" href="team">
        <span class="bi bi-list-nested-nav-menu" aria-hidden="true"></span> Team
    </NavLink>
</div>
Now, let’s build and run the application.
When we navigate to the /team page, we experience a delay of about two seconds before the team page appears.
The reason is that the browser requests the page but the server waits two seconds until it renders the response and sends it back to the client. Only once the client receives the response will it render it on the screen, allowing the user to see the rendered page in the browser.
Now stream rendering comes into play, providing a solution to this issue.
Stream Rendering
With stream rendering, we can stream the response from the server to the client.
This means we can send an initial response to the client as soon as the request hits the server and later update parts of the response with additional content.
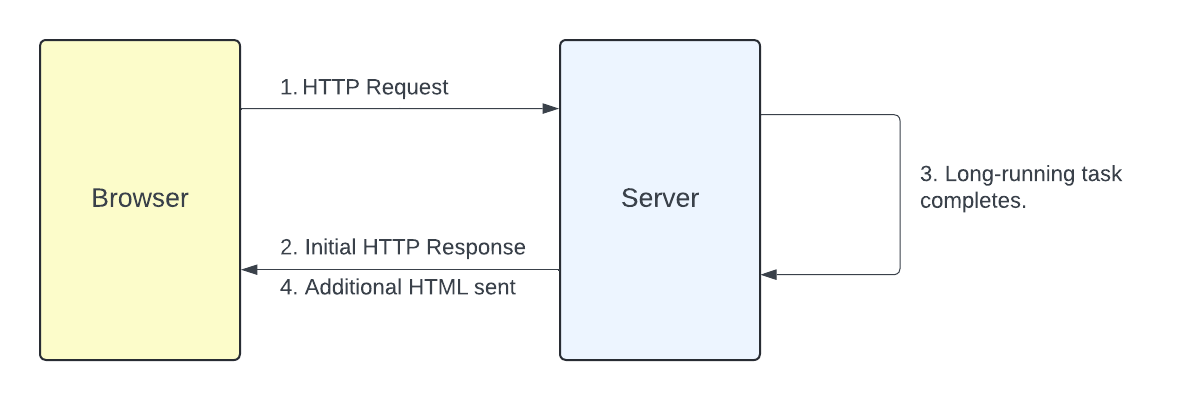
Now, let’s improve the Team component and implement stream rendering.
First, we use the @attribute directive and add the StreamRendering attribute to the component. It activates stream rendering for this page.
@attribute [StreamRendering]
Next, we make the TeamMembers property a nullable reference type and initialize it with null.
public IEnumerable<Employee>? TeamMembers { get; set; } = null;
Next, we use an if statement to check if the TeamMembers property is null. If it is null, we render a placeholder, and if it is not null, we use the same code we used before to render the team members.
The completed component now looks like this:
@page "/team"
@using BlazorSSR.Services
@inject IEmployeeService EmployeeService
@attribute [StreamRendering]

<h1>Team</h1>

<p>Our team members make the magic happen.</p>

@if (TeamMembers != null)
{
    <div style="display: grid; grid-template-columns: 1fr 1fr 1fr;">
        @foreach (var member in TeamMembers)
        {
            <div style="margin-bottom: 25px;">
                <h2>@member.Name</h2>
                <div>@member.Role</div>
                <div>@member.StartingDay.ToShortDateString()</div>
            </div>
        }
    </div>
}
else
{
    <div>Loading...</div>
}

@code {
    public IEnumerable<Employee>? TeamMembers { get; set; } = null;

    protected async override Task OnInitializedAsync()
    {
        TeamMembers = await EmployeeService.GetEmployees();
    }
}
Now, let’s build and run the application again.
When I navigate to the Team page, I instantly see the team page with the placeholder.
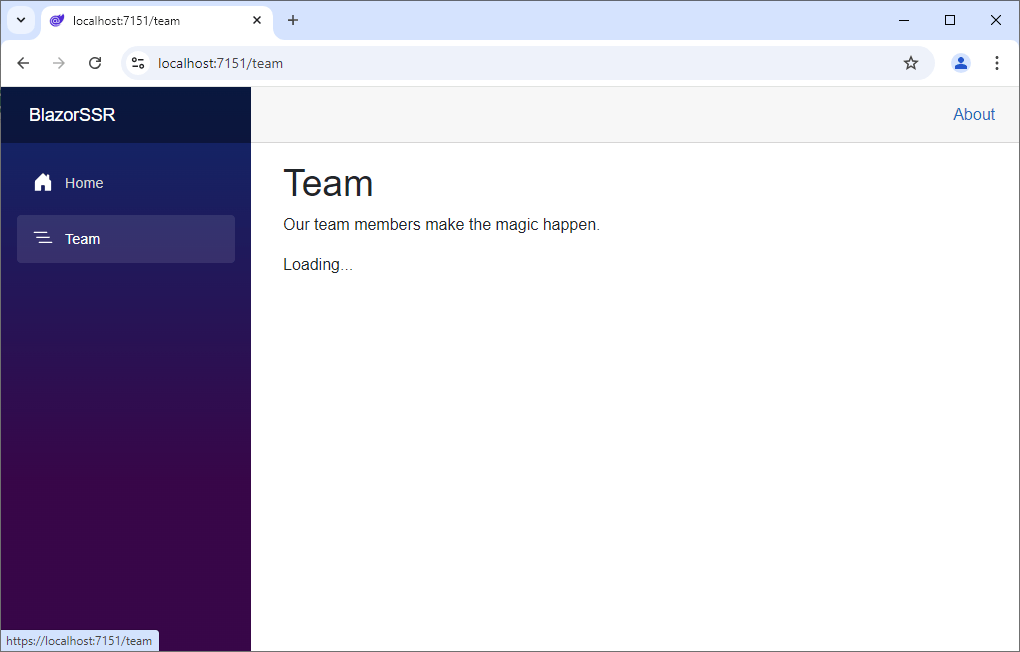
After two seconds, the page updates, and we see all the team members.
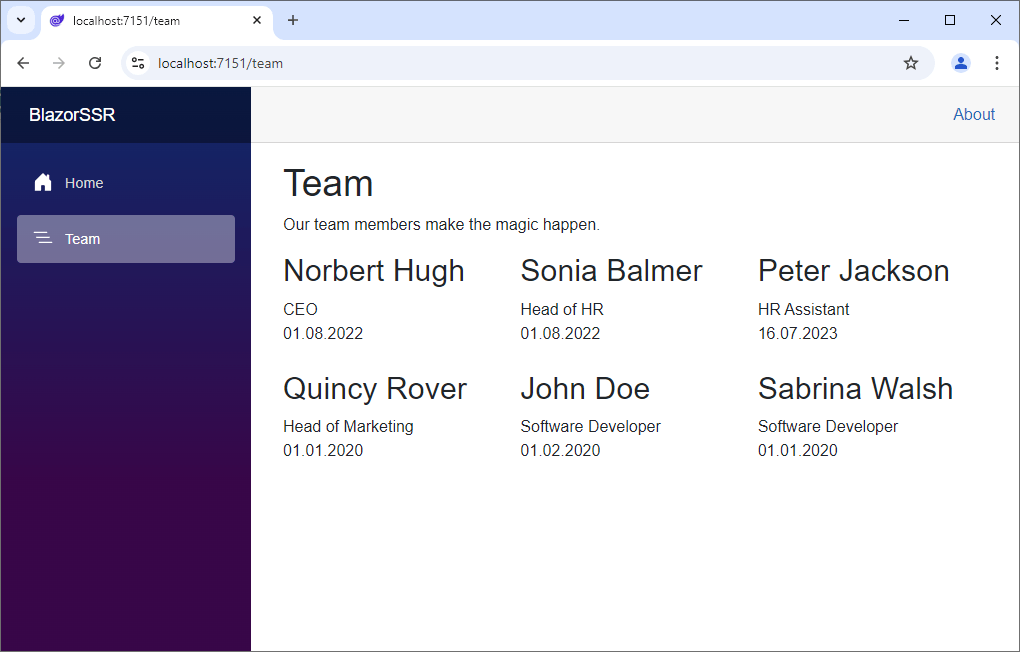
The application feels much more performant and user-friendly, even though it still takes two seconds for the server to load the data and return it to the client, thanks to the artificial delay of two seconds in service implementation.
How Does Stream Rendering Work?
Stream rendering works completely without establishing a persistent SignalR web socket connection or downloading a WebAssembly bundle to the client.
But how does it work?
Stream rendering in Blazor static server-side rendering uses the chunked transfer encoding feature of the HTTP protocol. It’s a native feature of HTTP 1.1 and is implemented in all modern web browsers.
Use Cases for Static Server-Side Rendering
The most common use cases for static SSR are pages that do not require interactivity. Great examples are the company’s history, about pages or website homepage. Or a team member site with static text and images, as shown in this article.
Using static SSR for a contact form or a login page does not work since we cannot handle button clicks or bind to input fields from a non-interactive page or component.
It’s perfectly fine to be selective and mix-and-match render modes within the same application. Using static server-side rendering will provide excellent performance and user experience for your components.
Conclusion
Static server-side rendering is a powerful rendering mode for Blazor web applications introduced with .NET 8. It’s the default render mode for all components that do not explicitly or implicitly use either Blazor Server or Blazor WebAssembly interactivity.
We can implement whole websites or applications with only static server-side rendering and specific pages using static SSR while using Blazor Server or Blazor WebAssembly interactivity on other pages.
We learned what use cases are great candidates for using static SSR in Blazor, mainly pages with static content. We also learned that we cannot have runtime interactivity on those pages.
With stream rendering, we have a mechanism that allows us to render an initial placeholder, providing excellent performance and user experience before the whole data is sent back from the server and rendered to the client.
You can access the code used in this example on GitHub.
If you want to learn more about Blazor development, you can watch my free Blazor Crash Course on YouTube. And stay tuned to the Telerik blog for more Blazor Basics.

Claudio Bernasconi
Claudio Bernasconi is a passionate software engineer and content creator writing articles and running a .NET developer YouTube channel. He has more than 10 years of experience as a .NET developer and loves sharing his knowledge about Blazor and other .NET topics with the community.

