Authorization and Authentication in Minimal APIs

A frequent question is how to implement authentication and authorization in minimal APIs without using controllers. This article shows the answer to this question through a simple and practical example.
When working with web applications, authentication is a subject that is always present. After all, many companies are harmed by attacks and invasions by hackers, and the result of this is that investment in security will continue to grow.
Despite being well known and facilitating the development of web applications, minimal APIs—and specifically securing them—still generate many doubts and confusion, especially among novice developers. In this article, we’ll look at the basics of authentication and authorization, and then we’ll add that to a minimal API.
What Is Authentication?
Authentication is a term that refers to the process of proving that someone or something is genuine.
In computer science, this term is commonly used to prove the authenticity of a user or system that confirms that its identity is true by providing valid credentials—that is, information shared between applications and submitted to verification.
Why Is Authentication Important?
Authentication is an essential requirement in building modern applications. It allows organizations to keep their networks secure and ensures that only authenticated users or processes can access their resources.
Several mechanisms use authentication features, the best known are computer systems, databases, networks, websites, mobile applications and other network-based services.
What Is Authorization?
Authorization is the process of granting someone or something access to a particular resource.
To make it clearer, think of a company where all employees have access to its building interior, as long as they have their identification badge (authentication process) in hand.
Still, there are some areas that can only be accessed by authorized people. The identification badge has a barcode that is read by a sensor installed on the door. If the badge is valid, it allows the employee’s entry. This means that that employee has a certain privilege in relation to that room—this is the authorization process. Despite having “access” to the company, some areas require a certain “authorization” to be accessed.
This is how authorization systems are based, when determining whether someone or something can access a resource based on defined rules compared to the requestor’s credentials.
Implementing Authentication and Authorization in a Minimal API
There are several ways to implement authentication in .NET. In this example, we will use a bearer token, which has native .NET support through the “Microsoft.AspNetCore.Authentication.JwtBearer” library.
About the Project
This article demonstrates how to implement authentication and authorization in a minimal API. As the focus is to show how this process is done, some processes will be simplified and some topics will not be addressed.
The API will have three endpoints:
- /login – Used to generate a new token
- /manager – Used to sign in with the token obtained with the manager credentials
- /operator – Used to sign in with the token obtained with the operator credentials
You can access the complete source code of the project at this link. (Note: This post was written with .NET 6, but .NET 7 is now available!)
Project Dependencies
- Via Project Dependencies
<ItemGroup>
    <PackageReference Include="Microsoft.AspNetCore.Authentication.JwtBearer" Version="6.0.6" />
  </ItemGroup>
- Via Terminal
dotnet add package Microsoft.AspNetCore.Authentication.JwtBearer
Prerequisites
- .NET 6 SDK
- Fiddler Everywhere
Creating the Project in Visual Studio
- Create new project
- Choose ASP.NET Core Web API
- Name: AuthExampleApi
- Next
- Choose .NET 6 (LTS)
- Uncheck the option “Use controllers”
- Create
Creating via Terminal
dotnet new web -o UserAuthMinimalApi
Creating the Entity
First, we will create the entity that will receive authentication and authorization credentials. Then create a new folder called “Models” and inside it the following class:
- User
namespace UserAuthMinimalApi.Models;
public class User
{
    public int Id { get; set; }
    public string? Username { get; set; }
    public string? Password { get; set; }
    public string? Role { get; set; }
}
Creating the Repository
The next step is to create the repository class, which is where the user data that will be compared with the credentials sent by the request comes from. Normally this data is encrypted and stored in a database.
As the focus of the article is authentication/authorization, fake data will be created, just for demonstration. Feel free to create a database if that’s your goal.
So, create a new folder called “Repositories” and inside it add the class below:
- UserRepository
using UserAuthMinimalApi.Models;

namespace UserAuthMinimalApi.Repositories;

public static class UserRepository
{
    public static User Find(string username, string password)
    {
        var users = new List<User>()
        {
            new User() { Id = 42, Username = "manager", Password = "&u*eVFG95%", Role = "manager" },
            new User() { Id = 42, Username = "operator", Password = "3!xeTwVNvc", Role = "operator" },
        };
        return users.FirstOrDefault(user => user.Username.ToLower() == username.ToLower() && user.Password == password);
    }
}
Creating the Secret Key
The secret key will be used by the JwtSecurityTokenHandler class to create a new token. This key must be an array of bytes, so in the class below, a string with a random GUID without dashes is created and passed to the GenerateSecretByte() method, which returns the secret key formatted as a byte array.
Create a new folder called “Settings” and inside it create the class below:
- ApiSettings
using System.Text;

namespace UserAuthMinimalApi;
internal static class Settings
{
    internal static string SecretKey = "6ceccd7405ef4b00b2630009be568cfa";
    internal static byte[] GenerateSecretByte() =>
        Encoding.ASCII.GetBytes(SecretKey);
}
Creating the Token Service
The token service will contain the method responsible for generating a valid token through the token handler based on the secret key. This token will be used to authorize the login endpoint, depending on the role sent in the credentials.
This method also sets the token expiration time to 30 minutes and sets the encryption format to HmacSha256Signature, but this is configurable and can vary depending on need.
Create a new folder called “Services” and add the class below to it:
- TokenService
using Microsoft.IdentityModel.Tokens;
using System.IdentityModel.Tokens.Jwt;
using System.Security.Claims;
using UserAuthMinimalApi.Models;
using UserAuthMinimalApi.Settings;

namespace UserAuthMinimalApi.Services;
internal class TokenService
{
    internal string GenerateToken(User user)
    {
        var tokenHandler = new JwtSecurityTokenHandler();

        var key = ApiSettings.GenerateSecretByte();

        var tokenDescriptor = new SecurityTokenDescriptor
        {
            Subject = new ClaimsIdentity(new Claim[]
            {
                new Claim(ClaimTypes.Name, user.Username.ToString()),
                new Claim(ClaimTypes.Role, user.Role.ToString()),
            }),
            Expires = DateTime.UtcNow.AddMinutes(30),
            SigningCredentials = new SigningCredentials(new SymmetricSecurityKey(key), SecurityAlgorithms.HmacSha256Signature)
        };

        var token = tokenHandler.CreateToken(tokenDescriptor);

        return tokenHandler.WriteToken(token);
    }
}
Configuring the Program Class
Finally, we just need to add some settings in the Program class and add the endpoints with their respective authorizations.
The first is the service class dependency injection configuration. So, just below where the “builder” variable is created, add the following line of code:
builder.Services.AddSingleton<TokenService>();
The following settings are related to authentication and authorization. In the “AddAuthentication” extension method, we are configuring some settings like “SaveToken” and others.
In the “AddAuthorization” method are the “Policies” (manager and operator) that will be validated when the request is sent. The policies are used to define the access level of each profile and can be configured with any value.
Just below where the previous code was added, add the following code:
var secretKey = ApiSettings.GenerateSecretByte();

builder.Services.AddAuthentication(config =>
{
    config.DefaultAuthenticateScheme = JwtBearerDefaults.AuthenticationScheme;
    config.DefaultChallengeScheme = JwtBearerDefaults.AuthenticationScheme;
}).AddJwtBearer(config =>
{
    config.RequireHttpsMetadata = false;
    config.SaveToken = true;
    config.TokenValidationParameters = new Microsoft.IdentityModel.Tokens.TokenValidationParameters
    {
        ValidateIssuerSigningKey = true,
        IssuerSigningKey = new SymmetricSecurityKey(secretKey),
        ValidateIssuer = false,
        ValidateAudience = false
    };
});

builder.Services.AddAuthorization(options =>
{
    options.AddPolicy("manager", policy => policy.RequireRole("manager"));
    options.AddPolicy("operator", policy => policy.RequireRole("operator"));
});
The following code adds the necessary settings to enable authorization and authentication, so add it just below where the “app” variable is created.
app.UseAuthentication();
app.UseAuthorization();
And finally, let’s add the endpoints.
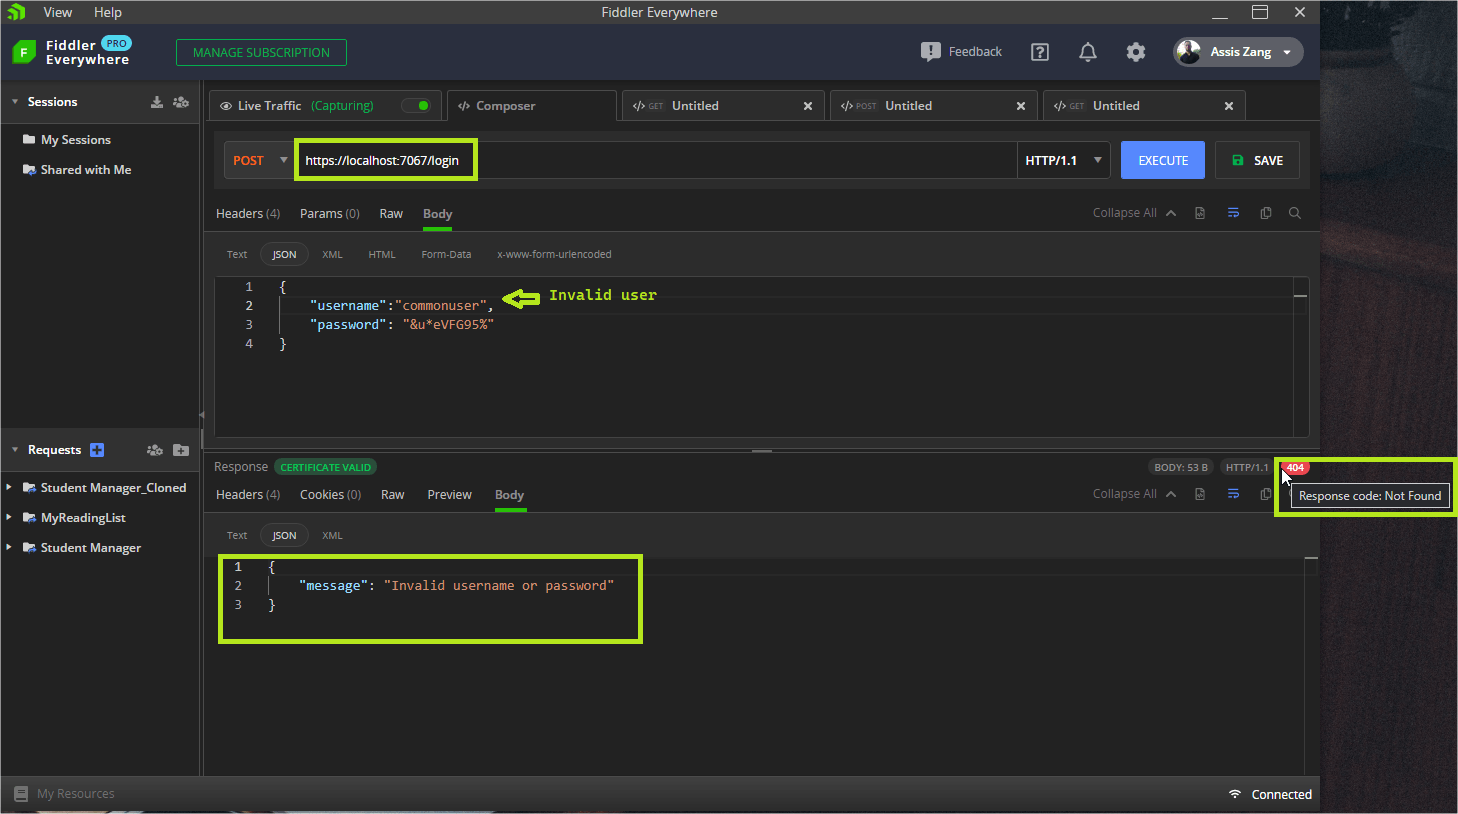
The first endpoint will have the route “/login” and will be used to generate a valid token depending on the credentials passed. If the credentials are valid, a “200 Ok” will be returned with the user data (except the password) and the generated token. If they are invalid—that is, they do not exist in the database—a “404 Not Found” error will be returned with the message “Invalid username or password.”
An important point is that instead of using the [Authorize] attribute as in previous versions, in minimal APIs we have the “RequireAuthorization()” extension method where we pass the role to be verified as a parameter.
So, still in the Program file, add the following code:
app.MapPost("/login", (User userModel, TokenService service) =>
{
    var user = UserRepository.Find(userModel.Username, userModel.Password);

    if (user is null)
        return Results.NotFound(new { message = "Invalid username or password" });

    var token = service.GenerateToken(user);

    user.Password = string.Empty;

    return Results.Ok(new { user = user, token = token });
});
The next endpoints will be used to sign in—that is, the sent token will be verified and, if it is valid, a “200 Ok” will be returned. If it is invalid, a “201 Unauthorized” will be returned.
Add the following code just below the previous code.
app.MapGet("/operator", (ClaimsPrincipal user) =>
{
    Results.Ok(new { message = $"Authenticated as { user?.Identity?.Name }" });
}).RequireAuthorization("Operator");

app.MapGet("/manager", (ClaimsPrincipal user) =>
{
    Results.Ok(new { message = $"Authenticated as { user?.Identity?.Name }" });
}).RequireAuthorization("Manager");
Executing the Requests
To execute the requests, we will use Fiddler Everywhere, a secure web debugging proxy perfect for checking our authorization and authentication.
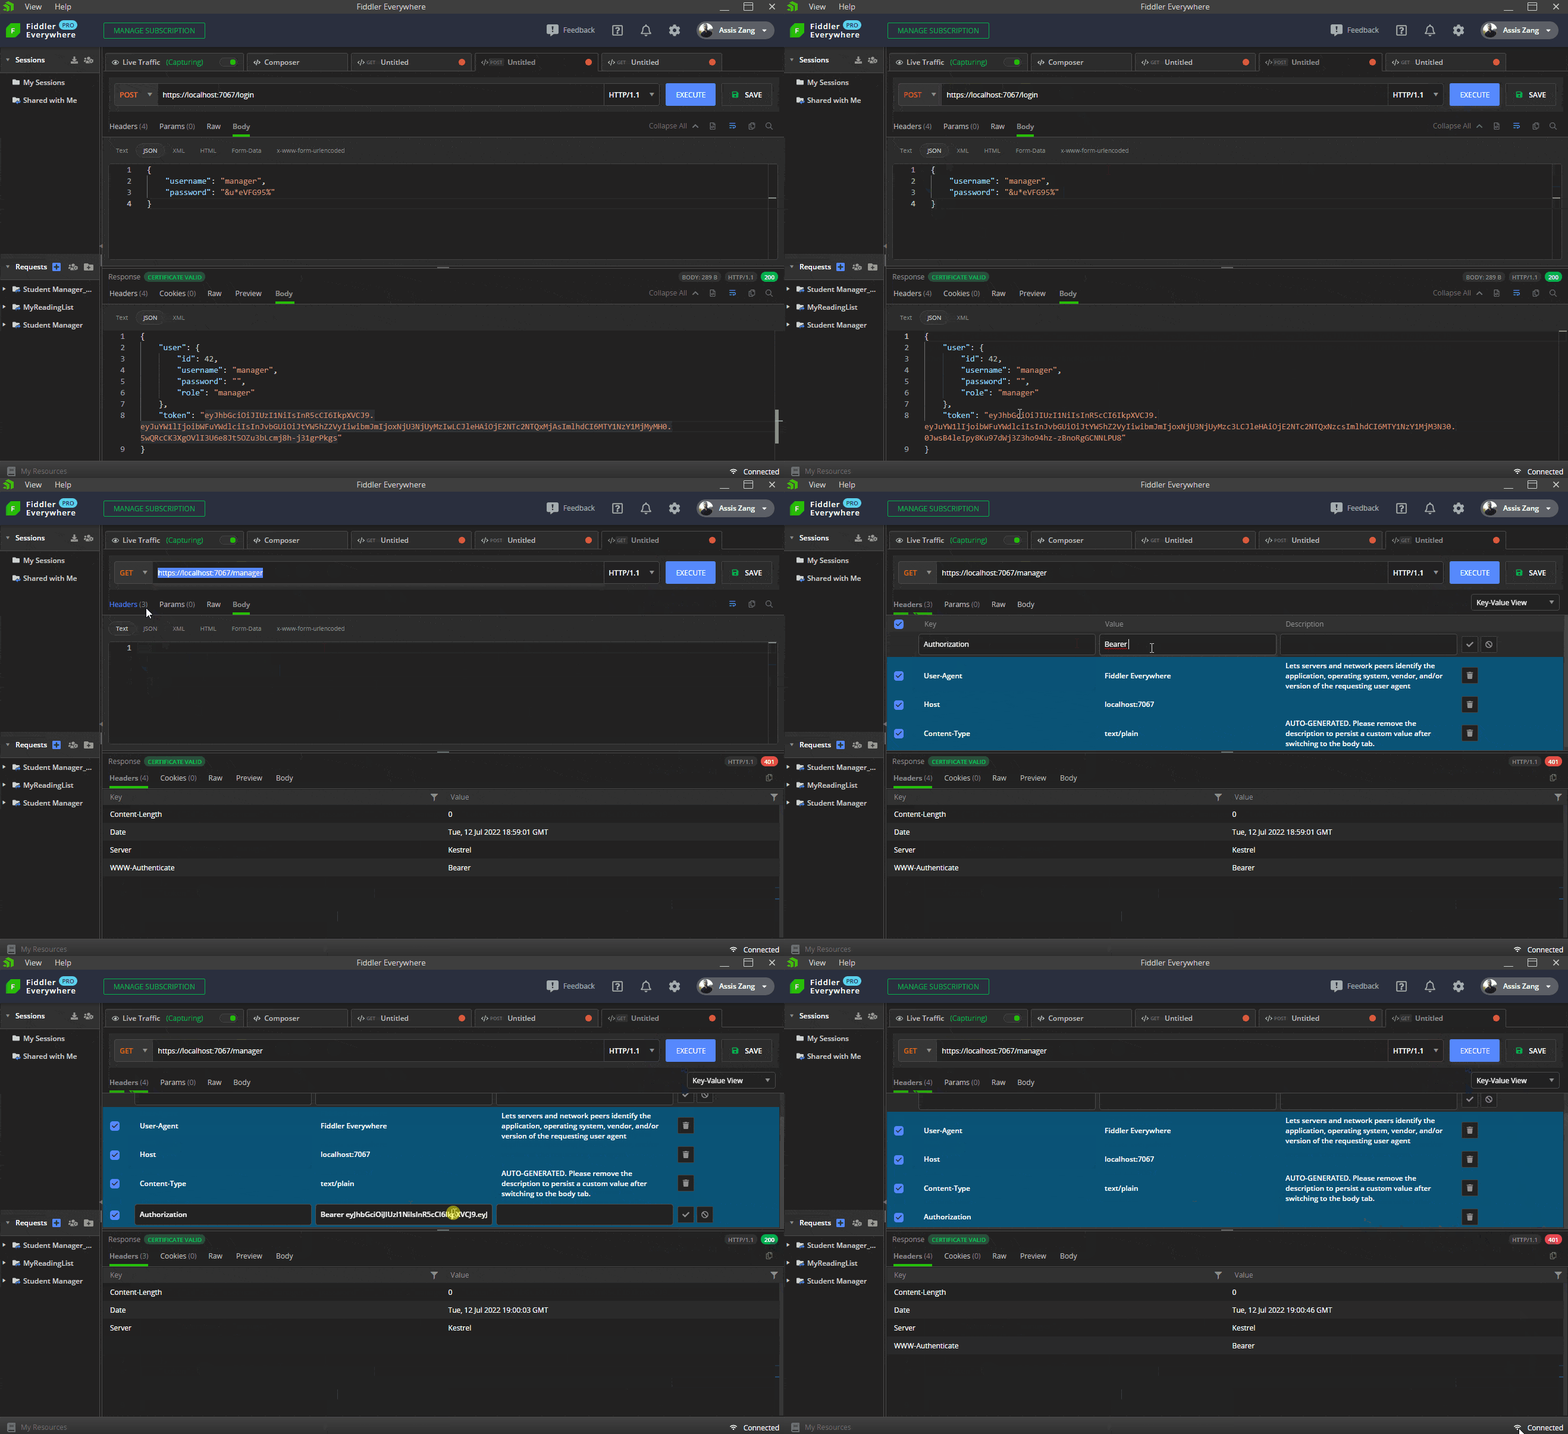
The first GIF shows how to execute the request in Fiddler to obtain a valid token in the “/login” route, passing the credentials of a manager user. Then this token is sent via Bearer Token to the “/manager” route, which returns a “200 Okay.” Finally, the same request is sent, but without the token, which returns a “401 Unauthorized.”
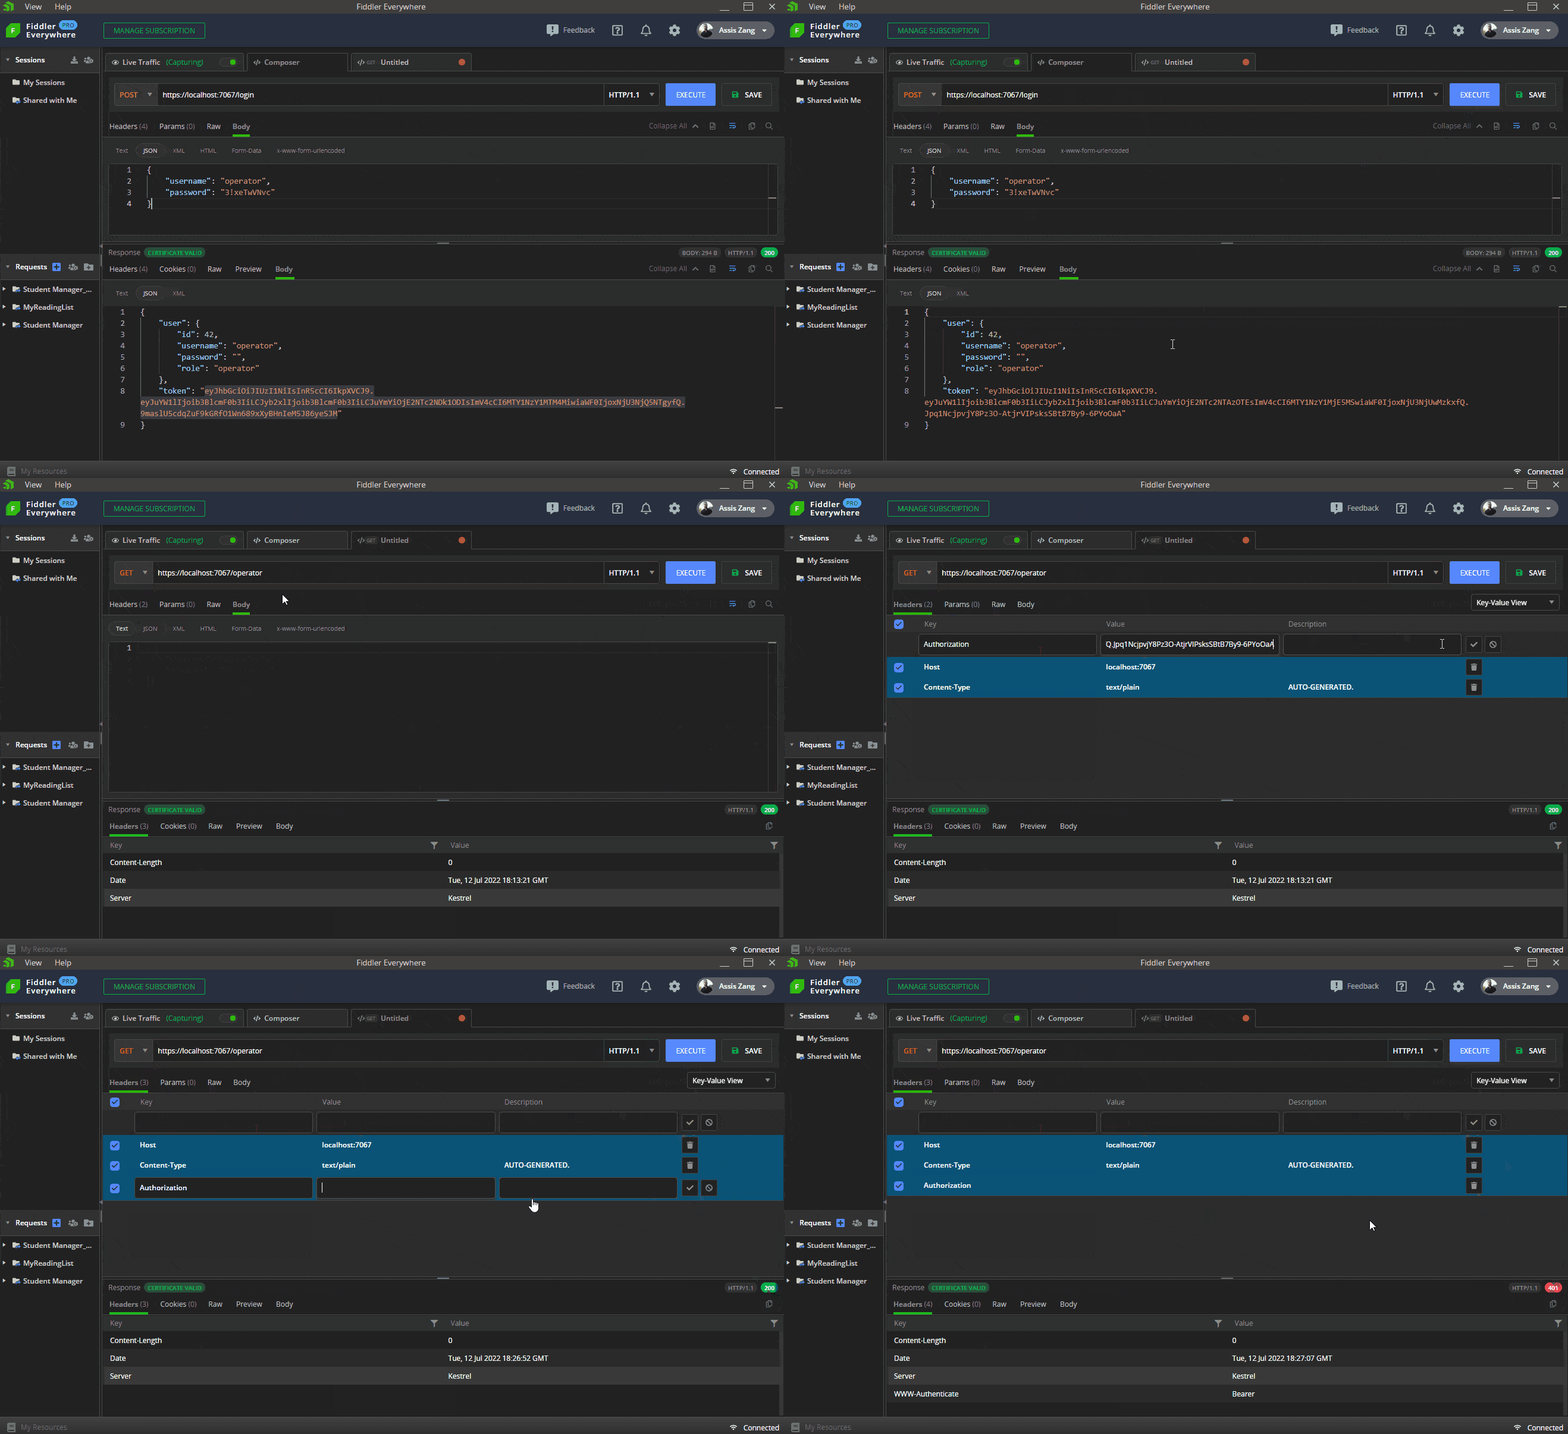
The next GIF shows how to execute the request in Fiddler to obtain a valid token in the “/login” route, passing the credentials of an operator user. Then this token is sent via bearer token to the “/operator” route, which returns a “200 Okay.” Finally, the same request is sent, but without the token, which returns a “401 Unauthorized.”
Another point to note is that if the credentials sent to the “/login” route are invalid, this will result in a “404 Not Found” error, and an “Invalid username or password” message will be displayed.
Conclusion
Minimal APIs arrived to speed up the development of new APIs due to their simplicity, but there are still many doubts about this subject.
In this article, we discussed the basic concepts and differences between authentication and authorization. Then we saw a demonstration for how to implement them in a minimal API using the JWT approach with a bearer token, validated using Fiddler Everywhere.
There are many other forms of authentication, like “Basic Auth” for example. Feel free to explore this theme and implement them in your minimal API projects!


