Getting Started With OAuth 2.0

Summarize with AI:
OAuth doesn’t share password data but instead uses authorization tokens to prove an identity between consumers and service providers. Let’s take a closer look.
The explosion of the web came with possibilities for us to use different applications or services to go about our work, which also meant that we had to store and manage our resources per application. Hence the decentralization of resources brought with it the advantage of separating concerns for users and their data, but it also introduced new flaws.
How can a user’s resources stored on different applications be shared by these applications to perform tasks for the user? The answer to this question is what made the OAuth (Open Authorization) protocol suffice.
The OAuth (latest version 2.0) dictates the standards required of disparate services, web apps or websites to authorize themselves to access resources on behalf of a user.
Let us first look at a flawed solution to this problem to clearly understand what OAuth brings to the table and see how it handles authorization, together with security concerns for these applications that need access to some protected resource.
The Flawed Solution
The simplest way to permit a third-party application (client) to access its resources from another application is by providing it with login credentials (username and password). While this is the most intuitive flow, it presents the following cons:
- If the third-party application becomes compromised, hacked or goes rogue, the user’s resources become vulnerable.
- The entity cannot moderate what it wants the third-party application to access, i.e., the third-party application has privileges to access all resources.
- The entity may authorize multiple applications to access its resources. If the entity wishes to revoke access to an application, it has to modify its login credentials and give the new credentials to permit applications—which is tedious.
- While this solution is possible theoretically, it is not practical as most users cannot entrust their login credentials to some random third-party application.
What OAuth Provides
To clearly understand what OAuth provides and how it addresses the issues above, let us first understand some frequently used terms in the OAuth space.
- Resource: Something that is sought, e.g., photos, videos, personal information.
- Resource owner: An entity that owns some resources stored on a resource server and can authorize another application to access these protected resources on its behalf. An entity could be a person (end user), program or service.
- Client: Any third-party application that needs access to an entity’s resource(s). A client can be a web server, single-page app, mobile app or desktop app.
- Access token: A token issued to the client by the authorization server to access an entity’s resource on the resource server.
- Resource server: A server where the user’s protected resources are kept and managed, e.g., Google Drive, Dropbox, YouTube. The resources stored here can only be accessed by providing a valid access token.
- Authorization server: A server that issues authorization tokens and access tokens to a client to access a resource from a resource server.
- Redirect URI: A registered and secure URI (i.e., one running HTTPS), which the authorization server uses to provide the client with the authorization code after authenticating the resource owner.
Note: The resource server and authorization server may both be running on the same server.
Now, in the OAuth protocol, login credentials are not handed directly to the client. Instead, the client (third-party application) receives an access token, which is then used to access the resource server to obtain the resource; this is the flow at a glance. Next, let us see how this is achieved.
OAuth Flow
The diagram below shows the sequence of events that occur to authorize a client (third-party app) to access a resource from a service implementing OAuth on behalf of a user.
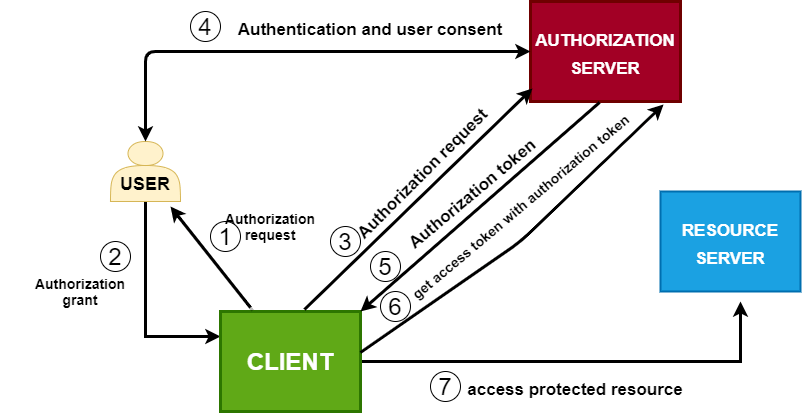
Now, let us take a look at the activities involved in each step.
Steps 1 and 2 involve the resource owner (user) permitting the client to access its resources. The user, in most cases, permits access to only specific portions of its resource. This limitation in the client’s access is referred to as the scope. The user may grant one or more scopes to the client.
In Step 3, the client now, based on this scope, makes another request telling the authorization server that it wants to access a resource on behalf of some resource owner.
Before the client can make any request to the authorization server, the owner of the client application (developer) has to register the application on the service implementing the authorization server, usually by filling an HTML form with information about the application such as its type, domain name, redirect URI, etc.
For demonstration purposes, below is a sample diagram depicting how a client application can be registered for Google OAuth. However, it can be done on any other service using OAuth, such as GitHub, Facebook or Twitter.
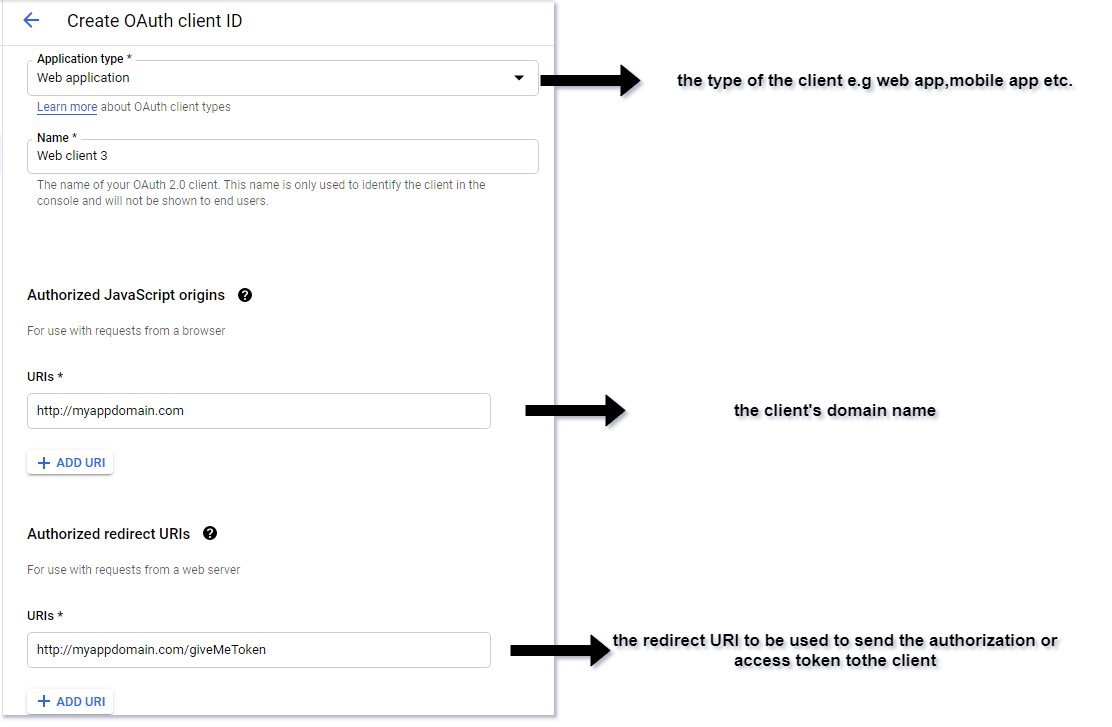
On successful registration, the authorization server issues a client ID or app ID, and, depending on the type of client, a client secret or app secret may be issued.
- Client ID: Used to identify the client on the authorization server.
- Client secret: This is used to sign every request that is made to the authorization server.
{
  client_id:"942821610187-h9d951h3l8f3gfgoqdee8v06oehl.apps.oauthservice.com",
  client_secret:"SflKxwRJSMeKKF2QT4fwpMeJf3"
}
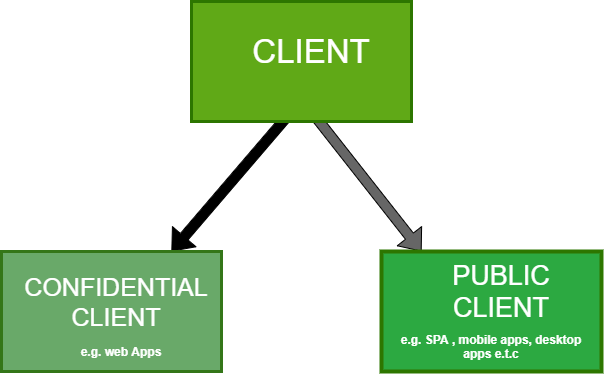
The OAuth protocol specifies different types of clients and issues a client secret depending on the type. Client secrets are issued to confidential clients (clients that run in a secure environment and can keep the secret safe), such as a web app running on a secure web server. In contrast, public clients (clients that cannot keep their secret confidential), such as mobile apps or a SPA running in the browser, are not given a secret. It is essential to note that the type of client determines the OAuth flow.
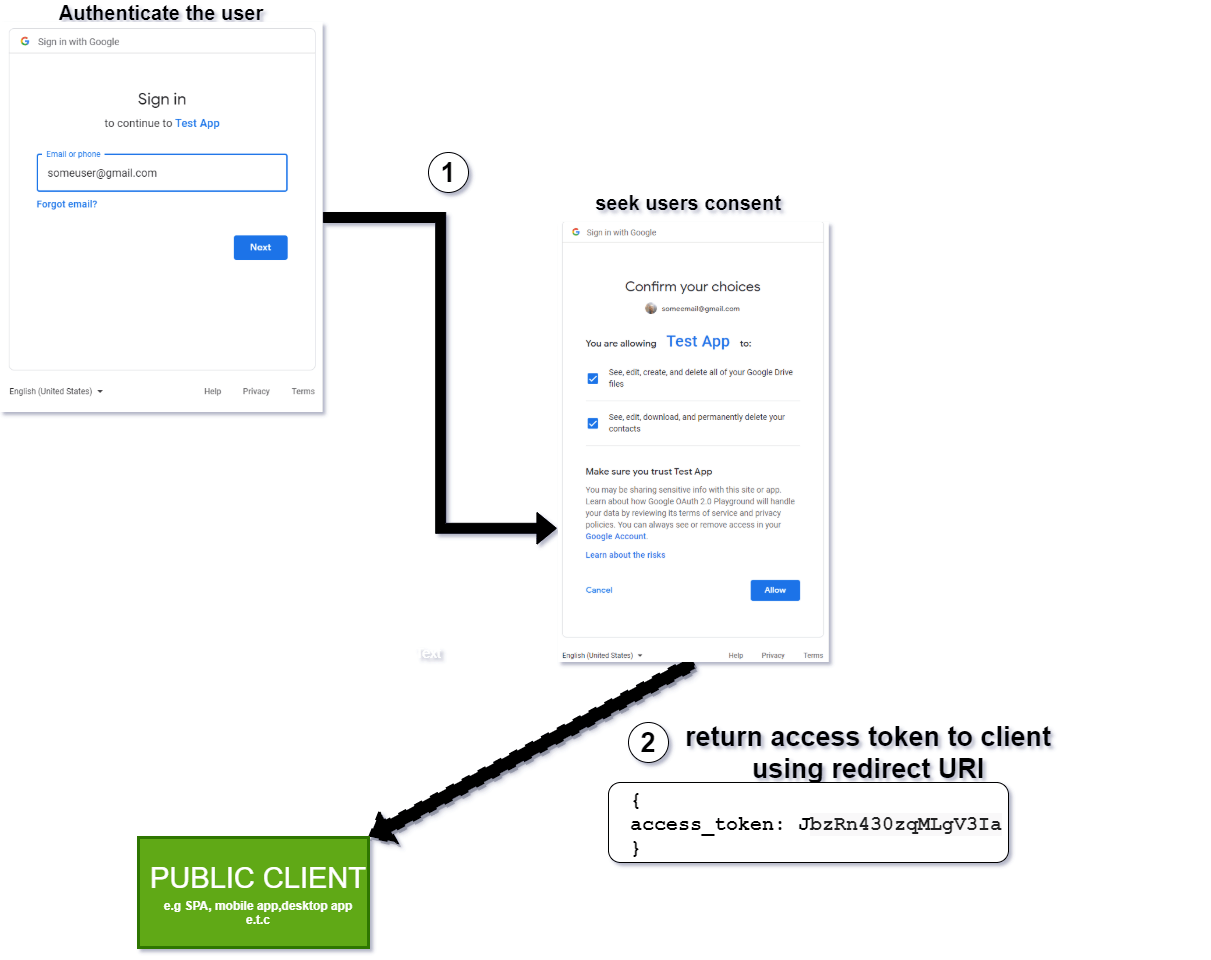
In Step 4, the authorization server has received a request from the client. It then attempts to authenticate the resource owner via a login and requests consent that the client wants to access a subset of the user’s resources dictated by the scope, as said earlier. If permission is granted, the authorization server then, depending on the type of client, does the following:
- For a public client, an access token is generated and returned to the client using the redirect URI provided by the client when it was registered. The public client can access the resource at Step 7 without any need to go through Step 6. This type of OAuth flow is referred to as the implicit flow. The sequence of events in this stage is depicted as follows.
- For confidential clients, the authorization server issues an authorization token, which will be used in Step 6 to obtain the access token.
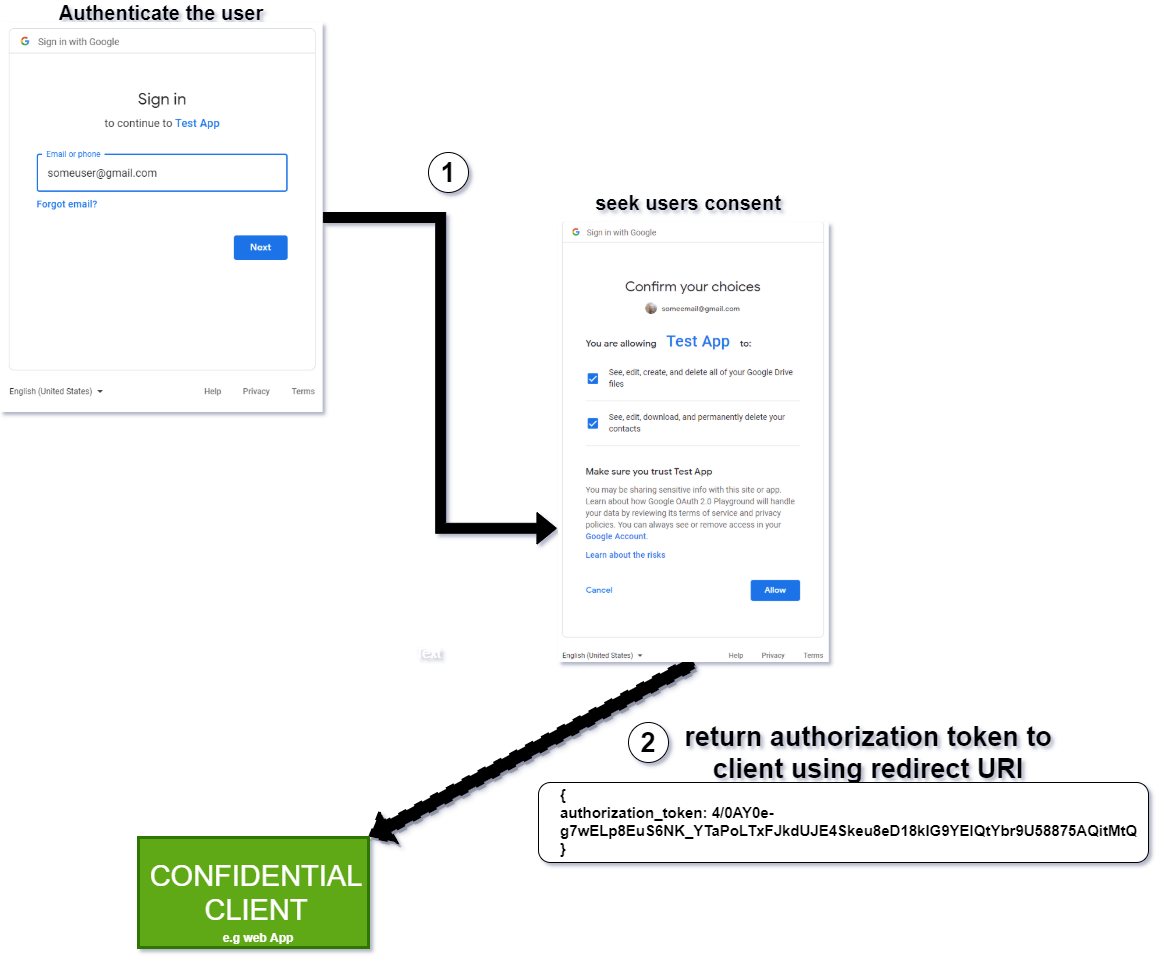
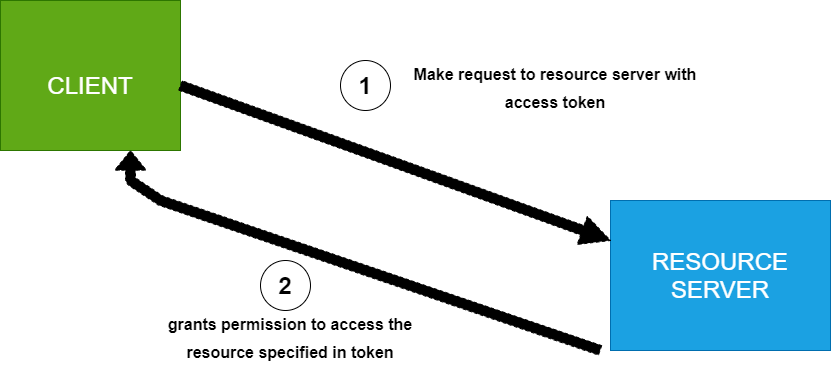
In Step 6, the client (confidential client) obtains an access token using the authorization token from the authorization server, then uses this token to access the user’s resource in Step 7. This type of OAuth flow is called the authorization code flow, which is the preferred and more secure flow compared to the implicit variant.
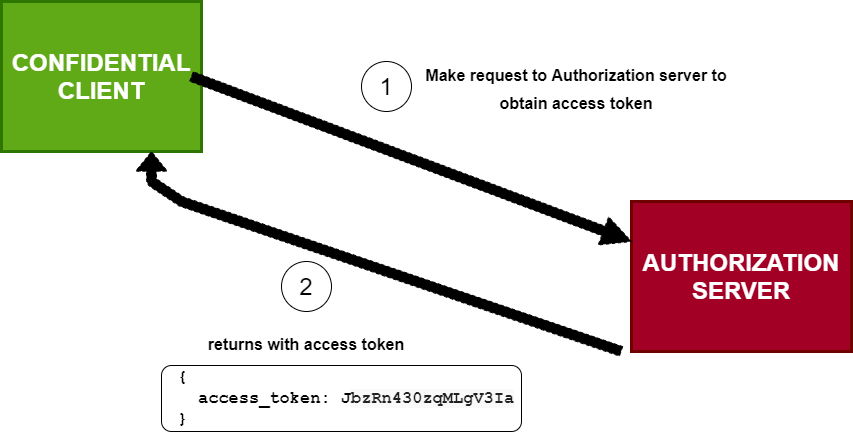
For both types of clients, an access token can be returned with a refresh token in order to get a new access token when the issued token expires.
Finally, the client uses this access token to obtain the user’s resource from the resource server.
Benefits of Using OAuth
- The user does not need to share login credentials with the client.
- The client is only permitted to access specific parts of a user’s resource.
- Tokens can easily be revoked if the user unauthorizes a client without modifying any login credentials.
- OAuth ensures that access tokens are shared via a secure channel.
- A user does not need to create multiple accounts on different third-party applications.
Conclusion
OAuth gives us the ability to allow applications to authorize themselves; security concerns should remain paramount whenever implementing in an application. Hopefully, this guide gives us a head-start in OAuth and puts us in decent shape to further explore it and implement it in future projects.
Next, you can learn how to implement OAuth 2.0 in Node.js.

Chinedu Imoh
Chinedu is a tech enthusiast focused on full-stack JavaScript and Infrastructure engineering.
