Implementing OAuth 2 Using Node.js

Summarize with AI:
OAuth 2.0 is the industry-standard protocol for authorization. In this post, we are going to implement OAuth 2 Using the Node.js runtime.
In this article, we will walk through implementing OAuth on a Node.js server using the Google API to seek permission to access and display the profile data for a Google account owner. We will be focusing on the core concepts involved without using any libraries that abstract complexities. Without further ado, let’s dive in.
A Bit on OAuth Grant Types
Grant types or OAuth flows define the numerous ways our application can obtain an access token. Here’s a list of the various grant types available:
- Client Credentials grant type: It’s used by clients to get an access token outside of the context of a user.
- Password grant type: Here, the client is given login details, i.e., username and password, by the resource owner. The client then uses this info to obtain an access token that is not recommended but used in legacy OAuth apps.
- Authorization Code grant type (the route we will be taking): Here, there are no login credentials given to the client, but rather the authorization server authenticates the user and, based on the user’s consent, issues an authorization token to the client, which the client would then use to obtain the access token to access the resource.
Other grant types include the implicit and refresh token grant types. For further reading, feel free to check here.
Requirements
Here are the requirements for this post:
- Node.js
- HTTP (requests and responses)
- RESTful APIs
Environment Setup
Paste the following command into the terminal to create a working directory, initialize Node Package Manager, and create a server.js file that will hold our server code.
mkdir oauthapp
cd oauthapp
npm init --y
touch server.js utils.js
Next, install the necessary dependencies for the project:
- Express: used to create a web server and listen for requests
- Axios: a promise-based client that is used to make HTTP requests
- Dotenv: used to parse the environment variables from the .env file created earlier
npm i express dotenv axios
Now, we need to create a simple express server. Paste the following code into the server.js file.
const express = require ('express');
const port=4000;

app.get ('/auth', async (req, res) => {
  res.send("auth route")
});
app.listen(port)
The above code bootstraps a simple Node server that registers a single endpoint running on port 4000. Visit localhost:4000/auth on your browser to access the server.

Response from our Node server
That works but doesn’t do much for us. So, where do we go from here? I previously touched on grant types and the different grant types available; that is what decides the next move.
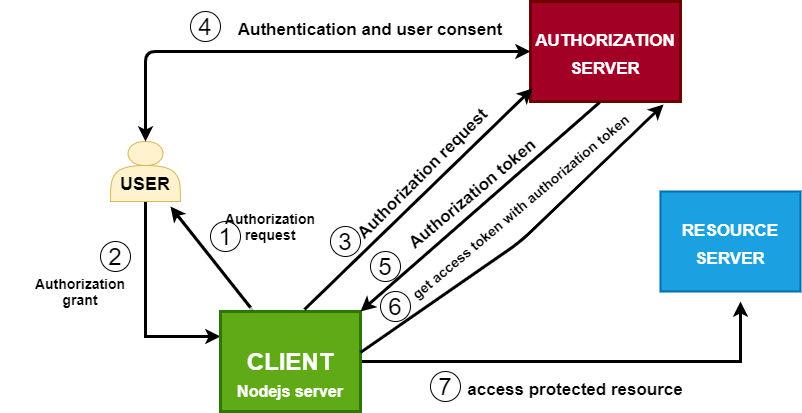
OAuth flow
The above diagram depicts the series of events that need to occur before our client application can access the protected resource. Outlined below are more precise representations of these steps.
- Register your client app on the authorization server to obtain credentials.
- Configure the endpoint used to redirect the user to the authorization server to authenticate and seek the user’s consent.
- Configure the endpoint to be used to obtain the authorization token.
- Use this authorization token to get an access token.
- Use the access token to obtain the protected resource (user profile data).
1. Register Your Client App on the Authorization Server to Obtain OAuth Credentials
The above diagram shows that we are building the client application, and it’s involved in several HTTP round trips with the resource owner and the authorization server (Google OAuth server in this case).
That means we have to give our Node.js application the ability to communicate with the authorization server; we do this by registering our application and obtaining a client id and secret; this ensures that the authorization server knows our app.
Go to Google Cloud Console and create an app, then configure its OAuth consent screen and the scopes you want to allow.

Create an app on Google Cloud Console
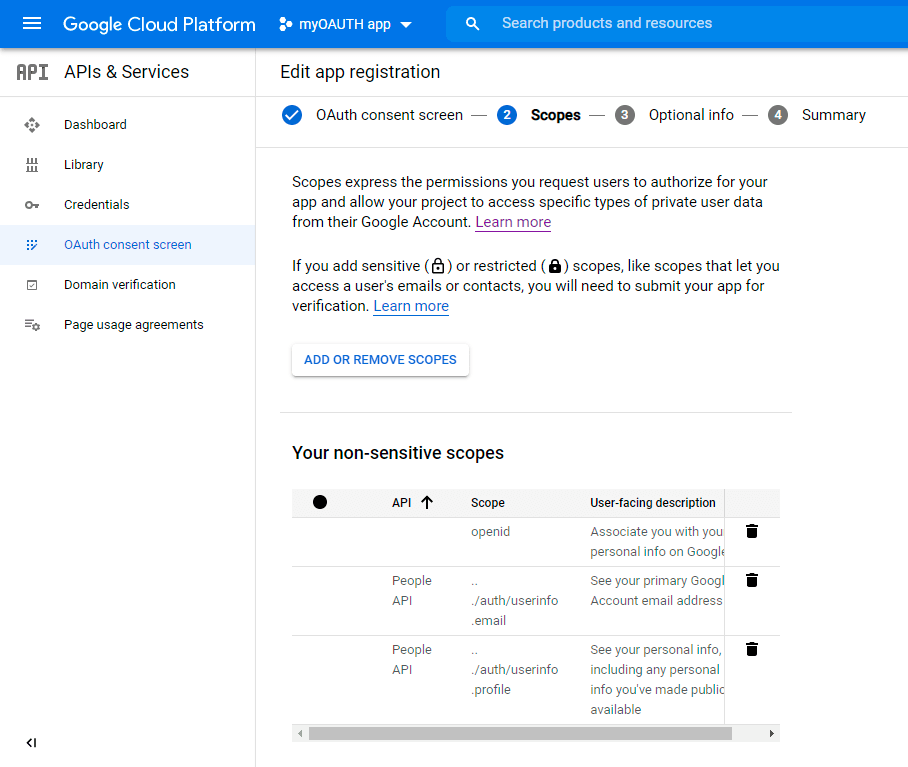
Configure your OAutho screen and enable scopes
Once that’s successful, head over to the credentials section and create credentials. Start by selecting the type of credential you want.

Obtain OAuth credentials
Next, fill in the app name, providing information about the app’s domain name and redirect URI, which the authorization server will use to send the authorization token.
Note: In production-ready apps, the redirect URL is accepted only if it runs on HTTPS, but localhost apps don’t have this restriction.
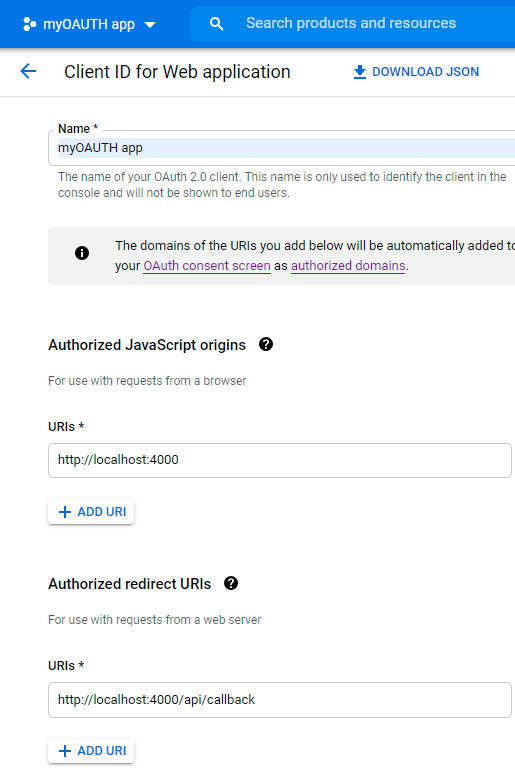
Provide information about your app on Google Cloud
Once that is done, copy the client ID and client secret together with the path in the redirect URI, i.e., /api/callback in this case, and then head over to the .env file in your server directory and create the environment variables.
CLIENT_APP_ID=542685936115-t6b82l8f0s3S988pc3me5adh.apps.googleusercontent.com
CLIENT_APP_SECRET=NF4sJq980cO_qWT_KokKMumfR
REDIRECT_URI=/api/callback
With that in place, the app now has valid credentials to communicate with the authorization server.
2. Configure the Endpoint Used To Redirect User to Authorization Server
Now to configure the endpoint used to redirect the user to the authorization server to authenticate and seek the user’s consent.
Firstly, go to the utils.js file and insert the following code.
const query_string = require ('querystring');
const google_auth_token_endpoint ='https://accounts.google.com/o/oauth2/v2/auth';
const query_params = {
  client_id: process.env.CLIENT_APP_ID,
  redirect_uri: `http://localhost:4000${process.env.REDIRECT_URI}`,
};
// this objects contains information that will be passed as query params to the auth // token endpoint
  const auth_token_params = {
    ...query_params,
    response_type: 'code',
  };
// the scopes (portion of user's data) we want to access
const scopes = ['profile', 'email', 'openid'];
// a url formed with the auth token endpoint and the
  const request_get_auth_code_url = `${google_auth_token_endpoint}?${query_string.stringify (auth_token_params)}&scope=${scopes.join (' ')}`;
module.exports ={request_get_auth_code_url}
The above code uses the query string module, then defines the Google API endpoint to obtain an access token and, lastly, creates a composed object with the following keys and their meanings.
- Redirect URI: the endpoint used by the authorization server to issue the authorization token
- Response type: must be set to code to ensure that the server issues an authorization token
- Client ID: a unique id used to identify our app on the authorization server
A variable called scopes is then defined, which holds an array of strings that specifies the segment of the user’s information we want to access. Finally, a URL composed of the Google API endpoint and a query string formed from the composed object and the scopes defined above is bound to a variable and finally exported.
Now we need to modify the server.js file.
const express=....
const utils = require ('./utils');

app.get ('/auth', async (req, res) => {
  try {
    res.redirect (utils.request_get_auth_code_url);
  } catch (error) {
    res.sendStatus (500);
    console.log (error.message);
  }
});
Firstly, we imported everything from the utils.js file. In our /auth endpoint, we redirect the user to the authorization server using the URL we imported earlier, save the code and restart the server.
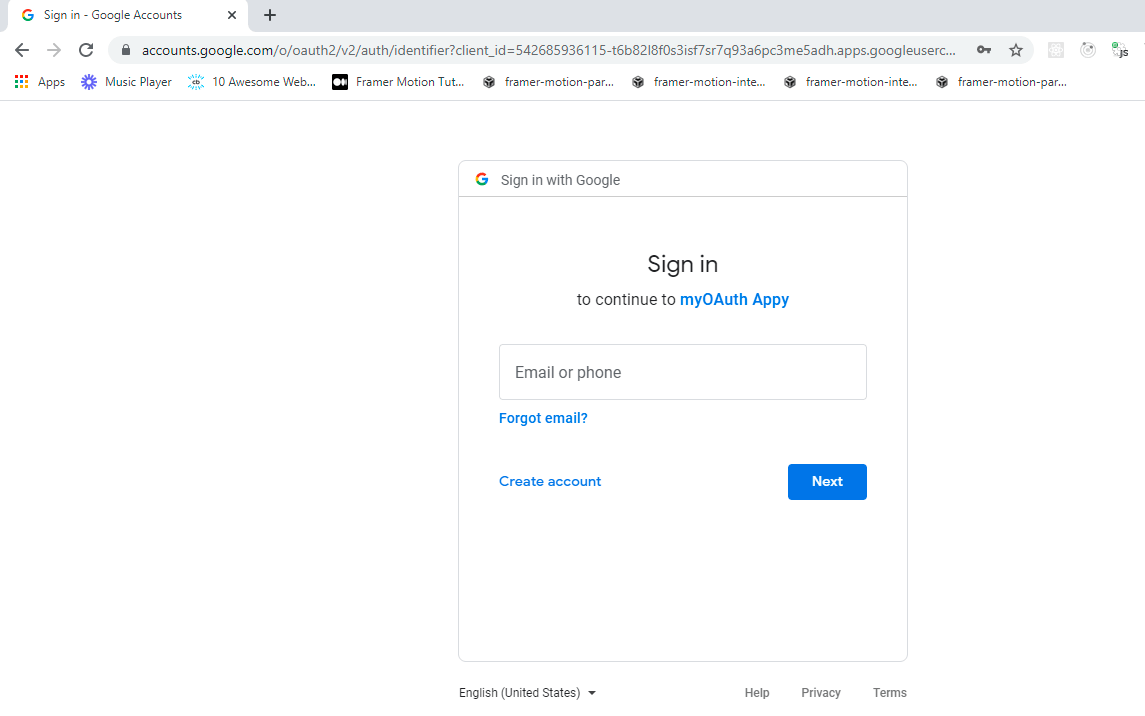
Visiting localhost:4000/auth
3. Configure the Endpoint To Obtain the Authorization Token
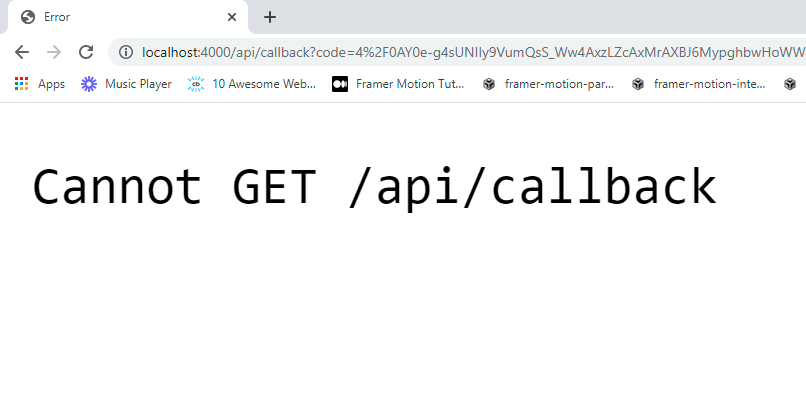
No redirect URI on our server to handle request from authorization server
After the user successfully authenticates, the app still shows an error. The authorization server makes a GET request to the redirect URI provided in the previous request, but we haven’t defined an endpoint on our server to handle it.
In your server.js file, insert the following.
app.get("/auth",(req,res)=>{.....})
app.get (process.env.REDIRECT_URI, async (req, res) => {
  // ! get authorization token from request parameter
  const authorization_token = req.query.code;
});
The above code uses the redirect URL from the environment variables declared earlier to define the endpoint used to handle the incoming request from the authorization server and obtains the authorization token from the request query parameters.
4. Use This Authorization Token to Obtain an Access Token
Now we have obtained the authorization token. It’s time to exchange this token for an access token. Include the following in your utils.js file.
const query_string=require(...)
const axios = require("axios")
const google_access_token_endpoint = 'https://oauth2.googleapis.com/token';

const query_params={....}
const get_access_token = async auth_code => {
  const access_token_params = {
    ...query_params,
    client_secret: process.env.CLIENT_APP_SECRET,
    code: auth_code,
    grant_type: 'authorization_code',
  };
  return await axios ({
    method: 'post',
    url: `${google_access_token_endpoint}?${query_string.stringify (access_token_params)}`,
  });
};

module.exports = {request_get_auth_code_url, get_access_token};
In the above code, we first imported the Axios module. Next, we defined the endpoint used to obtain the access token. After that, we defined a method that expects the authorization token as its parameter, and then finally, we created an object with several keys such as the client id, client secret as well as other newer parameters, which include:
- Client secret: a string used to sign our request.
- Grant type: as said earlier, this is a set of authorization codes. This field could hold a password or any other grant type depending on the application needs.
- Code: this holds the authorization code.
Internally, this method makes a post request to the endpoint to obtain the access token.
Finally, we added the method to our list of exports.
In the server.js file, include the following code.
app.get (process.env.REDIRECT_URI, async (req, res) => {
  // get authorization token
    const authorization_token = req.query.code;
    try {
      // ! get access token using authorization token
      const response = await utils.get_access_token (authorization_token.code);
      console.log ({data: response.data});
      // get access token from payload
      const {access_token} = response.data;
    } catch (error) {
      res.sendStatus (500);
    }
});
The above code uses the method defined in the utils.js file to request the access token. The response to this request contains several values such as the following:
- Access token: used to obtain the resource
- Refresh token (optional): used to obtain another access token if the current one expires
5. Use the Access Token to Obtain the User Profile Data
Finally, we use the access token to obtain the user’s resources similarly as we did before updating our utils.js file with the following.
const get_profile_data = async access_token => {
  return await axios ({
    method: 'post',
    url: `https://www.googleapis.com/oauth2/v3/userinfo?alt=json&access_token=${access_token}`,
  });
};
module.exports = {request_get_auth_code_url, get_access_token,get_profile_data};
The above code defines another method that receives the access token as its parameter and then makes an HTTP post request to access the user’s profile data in the request URL.
We defined and exported a method that we would use to get the user’s profile information. Next, we now import and use this method in our server.js file as follows.
app.get (process.env.REDIRECT_URI, async (req, res) => {
  const authorization_token = req.query;
  console.log ({auth_server_response: authorization_token});
  try {
    // get access token using authorization token
    const response = await helpers.get_access_token (authorization_token.code);
  // get access token from payload
    const {access_token} = response.data;
    // get user profile data
    const user = await helpers.get_profile_data (access_token);
    const user_data = user.data;
    res.send (`
      <h1> welcome ${user_data.name}</h1>
      <img src="${user_data.picture}" alt="user_image" />
    `);
    console.log (user_data);
  } catch (error) {
    console.log (error.message);
    res.sendStatus (500);
  }
});
We now obtain the user’s profile data (resource), and, for this simple use case, we send the user’s name and photo in template strings.
Note: Credentials such as access tokens, request tokens and resources should be kept safe.
Conclusion
We have implemented the inner workings of the authorization OAuth flow. Security concerns are also paramount to ensure that an attacker does not intercept credentials. Another variant of the authorization code flow is the implementation with PKCE “pixie” to add another layer of security to the normal authorization code flow. This article gives you a solid basis to build on and integrate different OAuth providers in your future projects.

Chinedu Imoh
Chinedu is a tech enthusiast focused on full-stack JavaScript and Infrastructure engineering.
