ASP.NET Core Basics: Customizing the Look and Feel of Components

Summarize with AI:
Let’s go beyoned the basics with ASP.NET Core to create beautiful designs by customizing components—in this example to make a personal blog.
When creating web applications, it is always important to ensure that the app is working properly and that it will perform the functions for which it was built.
Another important factor to consider is the user experience (UX) when using the app. Recent studies show that the appearance of the application can directly affect its success or failure in relation to the user’s perception of its quality and reliability.
If an app looks professional and well-designed, it can increase user confidence that the app was created by experienced and trusted developers. On the other hand, if an application appears outdated or poorly designed, this can lead to user rejection, meaning the effort spent on the project can be compromised.
But don’t worry—you don’t need to be a UX expert to create a beautiful layout. Just custom CSS can make a big difference, and that’s what we’ll see throughout this article.
What are We Going to Build?
In this post, we are going to create a personal blog in ASP.NET Core and then customize its look and feel, making it more beautiful with a more user-friendly design.
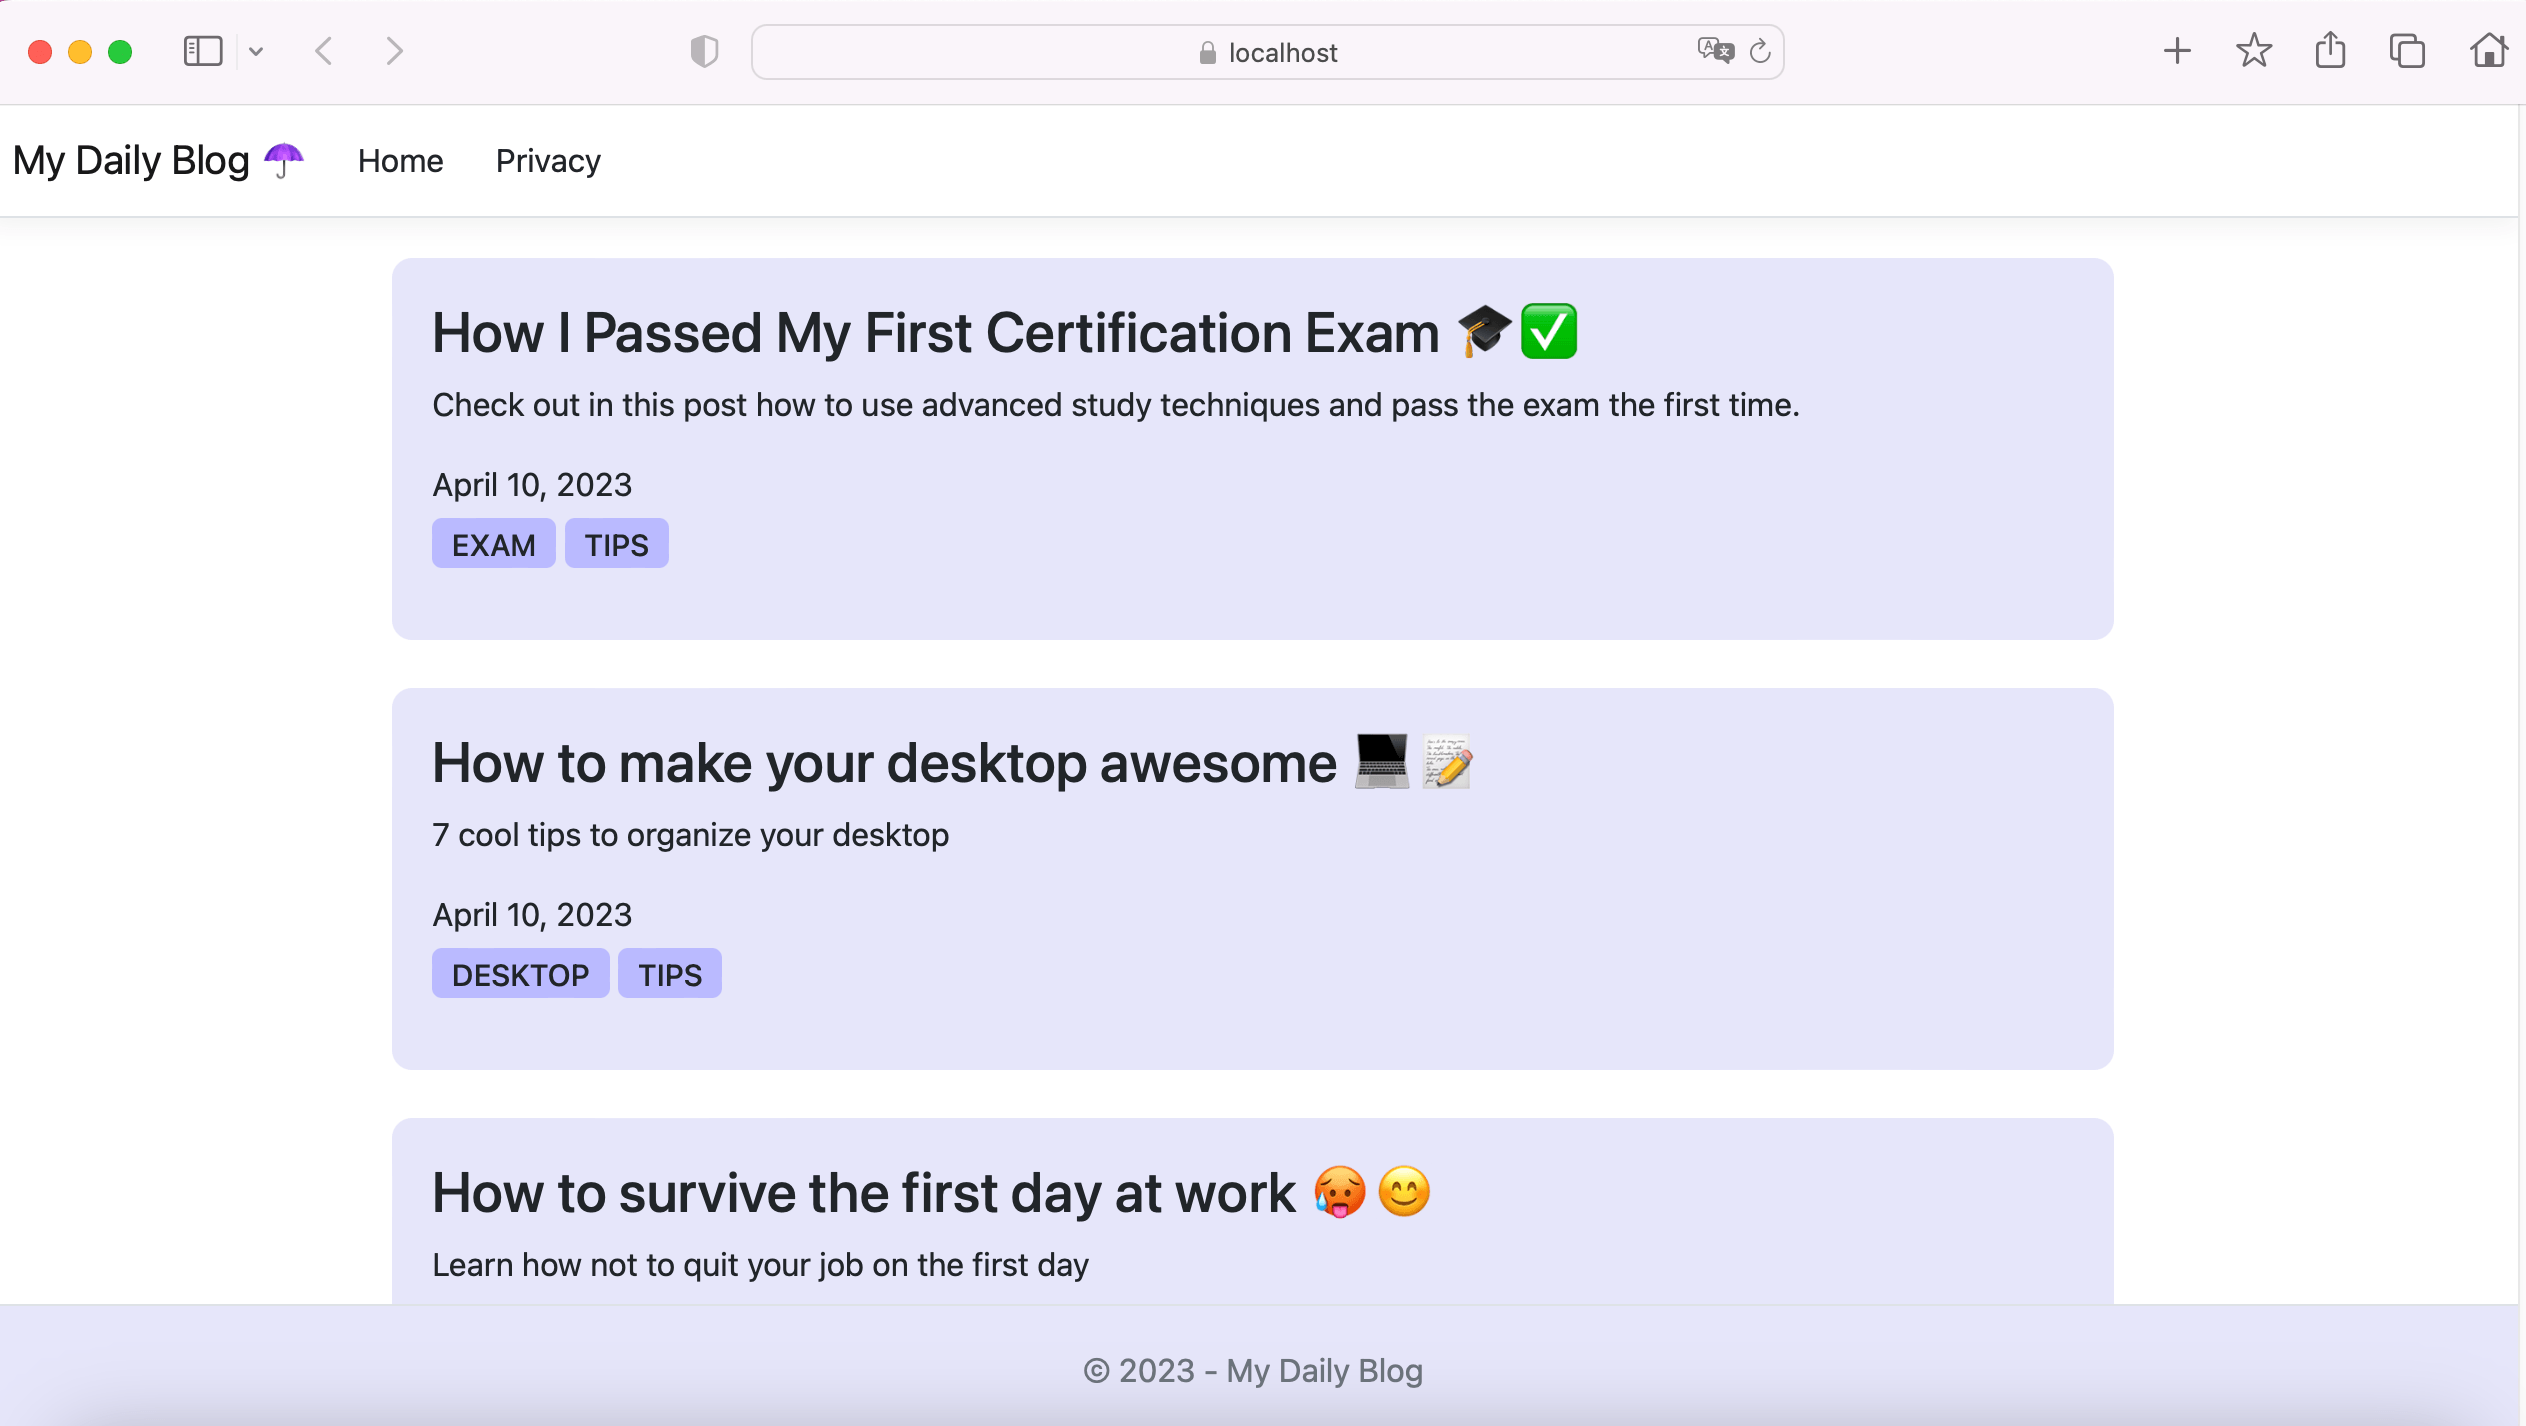
At the end of the post we will have the following result:

Creating the Application
Prerequisites
To create the application, you need to have .NET 7 or higher installed. You also need Visual Studio (you can use another IDE of your choice, but this article will only cover using Visual Studio).
You can access the source code of the project here: My Daily Blog Source Code.
In Visual Studio follow these steps:
- Click on “Create a new project”
- Select ASP.NET Core Web App (Model-View-Controller)
- Choose a name for the project (in this article the name “MyDailyBlog” will be used but you can adapt it according to your preference)
- Choose the version of .NET 7 (Standard Term Support)
- Click on “Create”
Creating the Model Class
The model class will represent the main entity of the app—in this case, the blog post. So, create a new folder called “Models.” Inside it, create a new class called “BlogPost” and then replace the existing code with the code below:
namespace MyDailyBlog.Models;

public class BlogPost
{
    public Guid Id { get; set; }
    public string? Title { get; set; }
    public string? LongTitle { get; set; }
    public string? Content { get; set; }
    public List<string>? Tags { get; set; }
    public DateTime CreationDate { get; set; }
}
Adding Data
To keep things simple, this article will not use a traditional database or an ORM. Instead, we’ll use a file with a JSON extension. If you want to add a database, check out this article that teaches you how to do it: .NET Basics: ORM.
So, in the root of the project create a new folder called “Data” and inside it add a file with the name “collectionPosts.json” and replace the existing code with the one below:
[
  {
    "Id": "17a28a60-e456-4c17-b166-2d7b08e81419",
    "Title": "How I Passed My First Certification Exam 🎓✅",
    "LongTitle": "Check out in this post how to use advanced study techniques and pass the exam the first time.",
    "Content": "<p>Passing the certification exam was a major milestone in my personal and professional development. It required significant effort and dedication, and I'm proud of myself for achieving this goal. In this text, I will share the steps I took to prepare for the exam and ultimately pass it.</p><p>First, I researched the exam requirements and the skills and knowledge I needed to have to pass. Then, I created a study plan that allowed me to cover all the topics and practice with sample questions. I used a combination of resources, such as online courses, textbooks, and practice tests, to ensure that I was fully prepared for the exam. I also scheduled my study time consistently to avoid procrastination and stay focused.</p><p>On the day of the exam, I was nervous but confident. I arrived early at the testing center and reviewed my notes one last time. When the exam started, I read each question carefully and used the techniques I learned during my preparation to answer them. I managed my time effectively to ensure that I had enough time to review my answers before submitting the exam. When the results were released, I was thrilled to find out that I passed with flying colors.</p><p>In conclusion, passing the certification exam required a lot of hard work and dedication, but it was worth it. It allowed me to gain new skills and knowledge and advance my career. I encourage anyone who is considering taking a certification exam to set a study plan and stick to it, stay motivated, and believe in yourself.</p>",
    "Tags": [ "exam", "tips" ],
    "CreationDate": "2023-04-10T13:45:00.000Z"
  },
    {
        "Id": "17a28a60-e456-4c17-b166-2d7b08e81420",
        "Title": "How to make your desktop awesome 💻📝",
        "LongTitle": "7 cool tips to organize your desktop",
        "Content": "Text example...",
        "Tags": [ "desktop", "tips" ],
        "CreationDate": "2023-04-10T13:45:00.000Z"
    },
  {
    "Id": "17a28a60-e456-4c17-b166-2d7b08e81421",
    "Title": "How to survive the first day at work 🥵😊",
    "LongTitle": "Learn how not to quit your job on the first day",
    "Content": "Text example...",
    "Tags": [ "work", "productivity" ],
    "CreationDate": "2023-04-10T13:45:00.000Z"
  }
]
Note that this JSON file has a list of blog posts, where the data is just for example. You can add your own data, just be sure that the text in the “Content” field is in a single line, or it will generate an error in the JSON file. You can go deeper into JSON files through this article: Objects JSON.
Creating the Post Search
To add search methods for posts, still inside the “Data” folder, add a new class called “PostManager” and replace the existing code with:
using MyDailyBlog.Models;
using System.Text.Json;

namespace MyDailyBlog.Data;
public class PostManager
{
    public static List<BlogPost> _posts = new List<BlogPost>();
    private readonly string _pathData = @"~/Data/collectionPosts.json";

    public PostManager()
    {
        _posts = GetAllPosts();
    }

    public List<BlogPost> GetAllPosts()
    {
        using var jsonFile = File.OpenRead(_pathData.Replace("~/", ""));

        var posts = JsonSerializer.Deserialize<List<BlogPost>>(jsonFile);
        return posts.OrderByDescending(x => x.CreationDate).ToList();
    }

    public BlogPost GetPostById(Guid Id) =>
        _posts.Find(p => p.Id == Id);
}
Note that in the code above we defined a variable called _pathData which is where the JSON file with the data is. We’ve also defined two methods, one to fetch all blog posts and populate the _posts variable, and the other to fetch a single post that will be used by the post display page.
Adding PostManager Class Configuration
In order for the app to use the PostManager class, we need to add its configuration in the Program class. Then, in the “Program.cs” file below the snippet:
builder.Services.AddControllersWithViews();
add the following code:
builder.Services.AddTransient<PostManager>();
Adding the Search for Posts in the Controller
To display the list of posts on the home screen, let’s add the search to the Index method of the home controller. Then replace the existing code in the “HomeController” file (it’s inside the Controllers folder) with the code below:
using Microsoft.AspNetCore.Mvc;
using MyDailyBlog.Data;
using MyDailyBlog.Models;
using System.Diagnostics;

namespace MyDailyBlog.Controllers
{
    public class HomeController : Controller
    {
        private readonly ILogger<HomeController> _logger;
        private readonly PostManager _manager;

        public HomeController(ILogger<HomeController> logger, PostManager manager)
        {
            _logger = logger;
            _manager = manager;
        }

        public IActionResult Index()
        {
            var blogs = _manager.GetAllPosts();

            ViewBag.Empty = false;
            return View(blogs);
        }

        public IActionResult Privacy()
        {
            return View();
        }

        [ResponseCache(Duration = 0, Location = ResponseCacheLocation.None, NoStore = true)]
        public IActionResult Error()
        {
            return View(new ErrorViewModel { RequestId = Activity.Current?.Id ?? HttpContext.TraceIdentifier });
        }
    }
}
Adding Custom Components
ASP.NET Core allows the creation of custom components that can be shared between application pages. In this example, we are going to create a footer component to use on the pages we are going to create.
So, in the root of the project create a new folder called “Shared” and inside it create a new view.
To do so, in Visual Studio, just right-click on the folder, choose the option “Add” -> “New item” and the template “Razor view – Empty.” Then put the name “_Footer.cshtml” and replace the existing code of the generated file with:
<footer class="border-top footer text-muted">
<div class="container">
© 2023 - My Daily Blog
</div>
</footer>
Now that we’ve created our custom footer, we no longer need the default footer generated by .NET. Inside the folder “Views” > “Shared” open the file “_Layout.cshtml” and delete the code snippet below:
<footer class="border-top footer text-muted">
<div class="container">
© 2023 - MyDailyBlog - <a asp-area="" asp-controller="Home" asp-action="Privacy">Privacy</a>
</div>
</footer>
Creating the Home View
Now let’s create the code to display the blog’s homepage with the list of posts. Inside the “Views” > “Home” folder in the “Index.cshtml” file, replace the existing code with:
@model List<MyDailyBlog.Models.BlogPost>
<!DOCTYPE html>
<html>
<head>
    <title>Main Page</title>
</head>
<body>
    @if (Model == null || Model.Count == 0)
    {
        <h4>Blog empty</h4>
        <p>Visit back again later</p>
    }
    else
    {
        foreach (var post in Model)
        {
            <div class="post-card">
                <h3><a href="~/blog/@post.Id">@post.Title</a></h3>
                <p>@post.LongTitle</p>
                <div class="post-date">@post.CreationDate.ToString("MMMM dd, yyyy")</div>
                <p>
                    @foreach (var tag in post.Tags)
                    {
                        <span class="tag"><a href="~/blog/tag/@tag">@tag</a></span>
                    }
                </p>
            </div>
            <br />
        }
    }
    @await Html.PartialAsync("~/Shared/_Footer.cshtml")
</body>
</html>
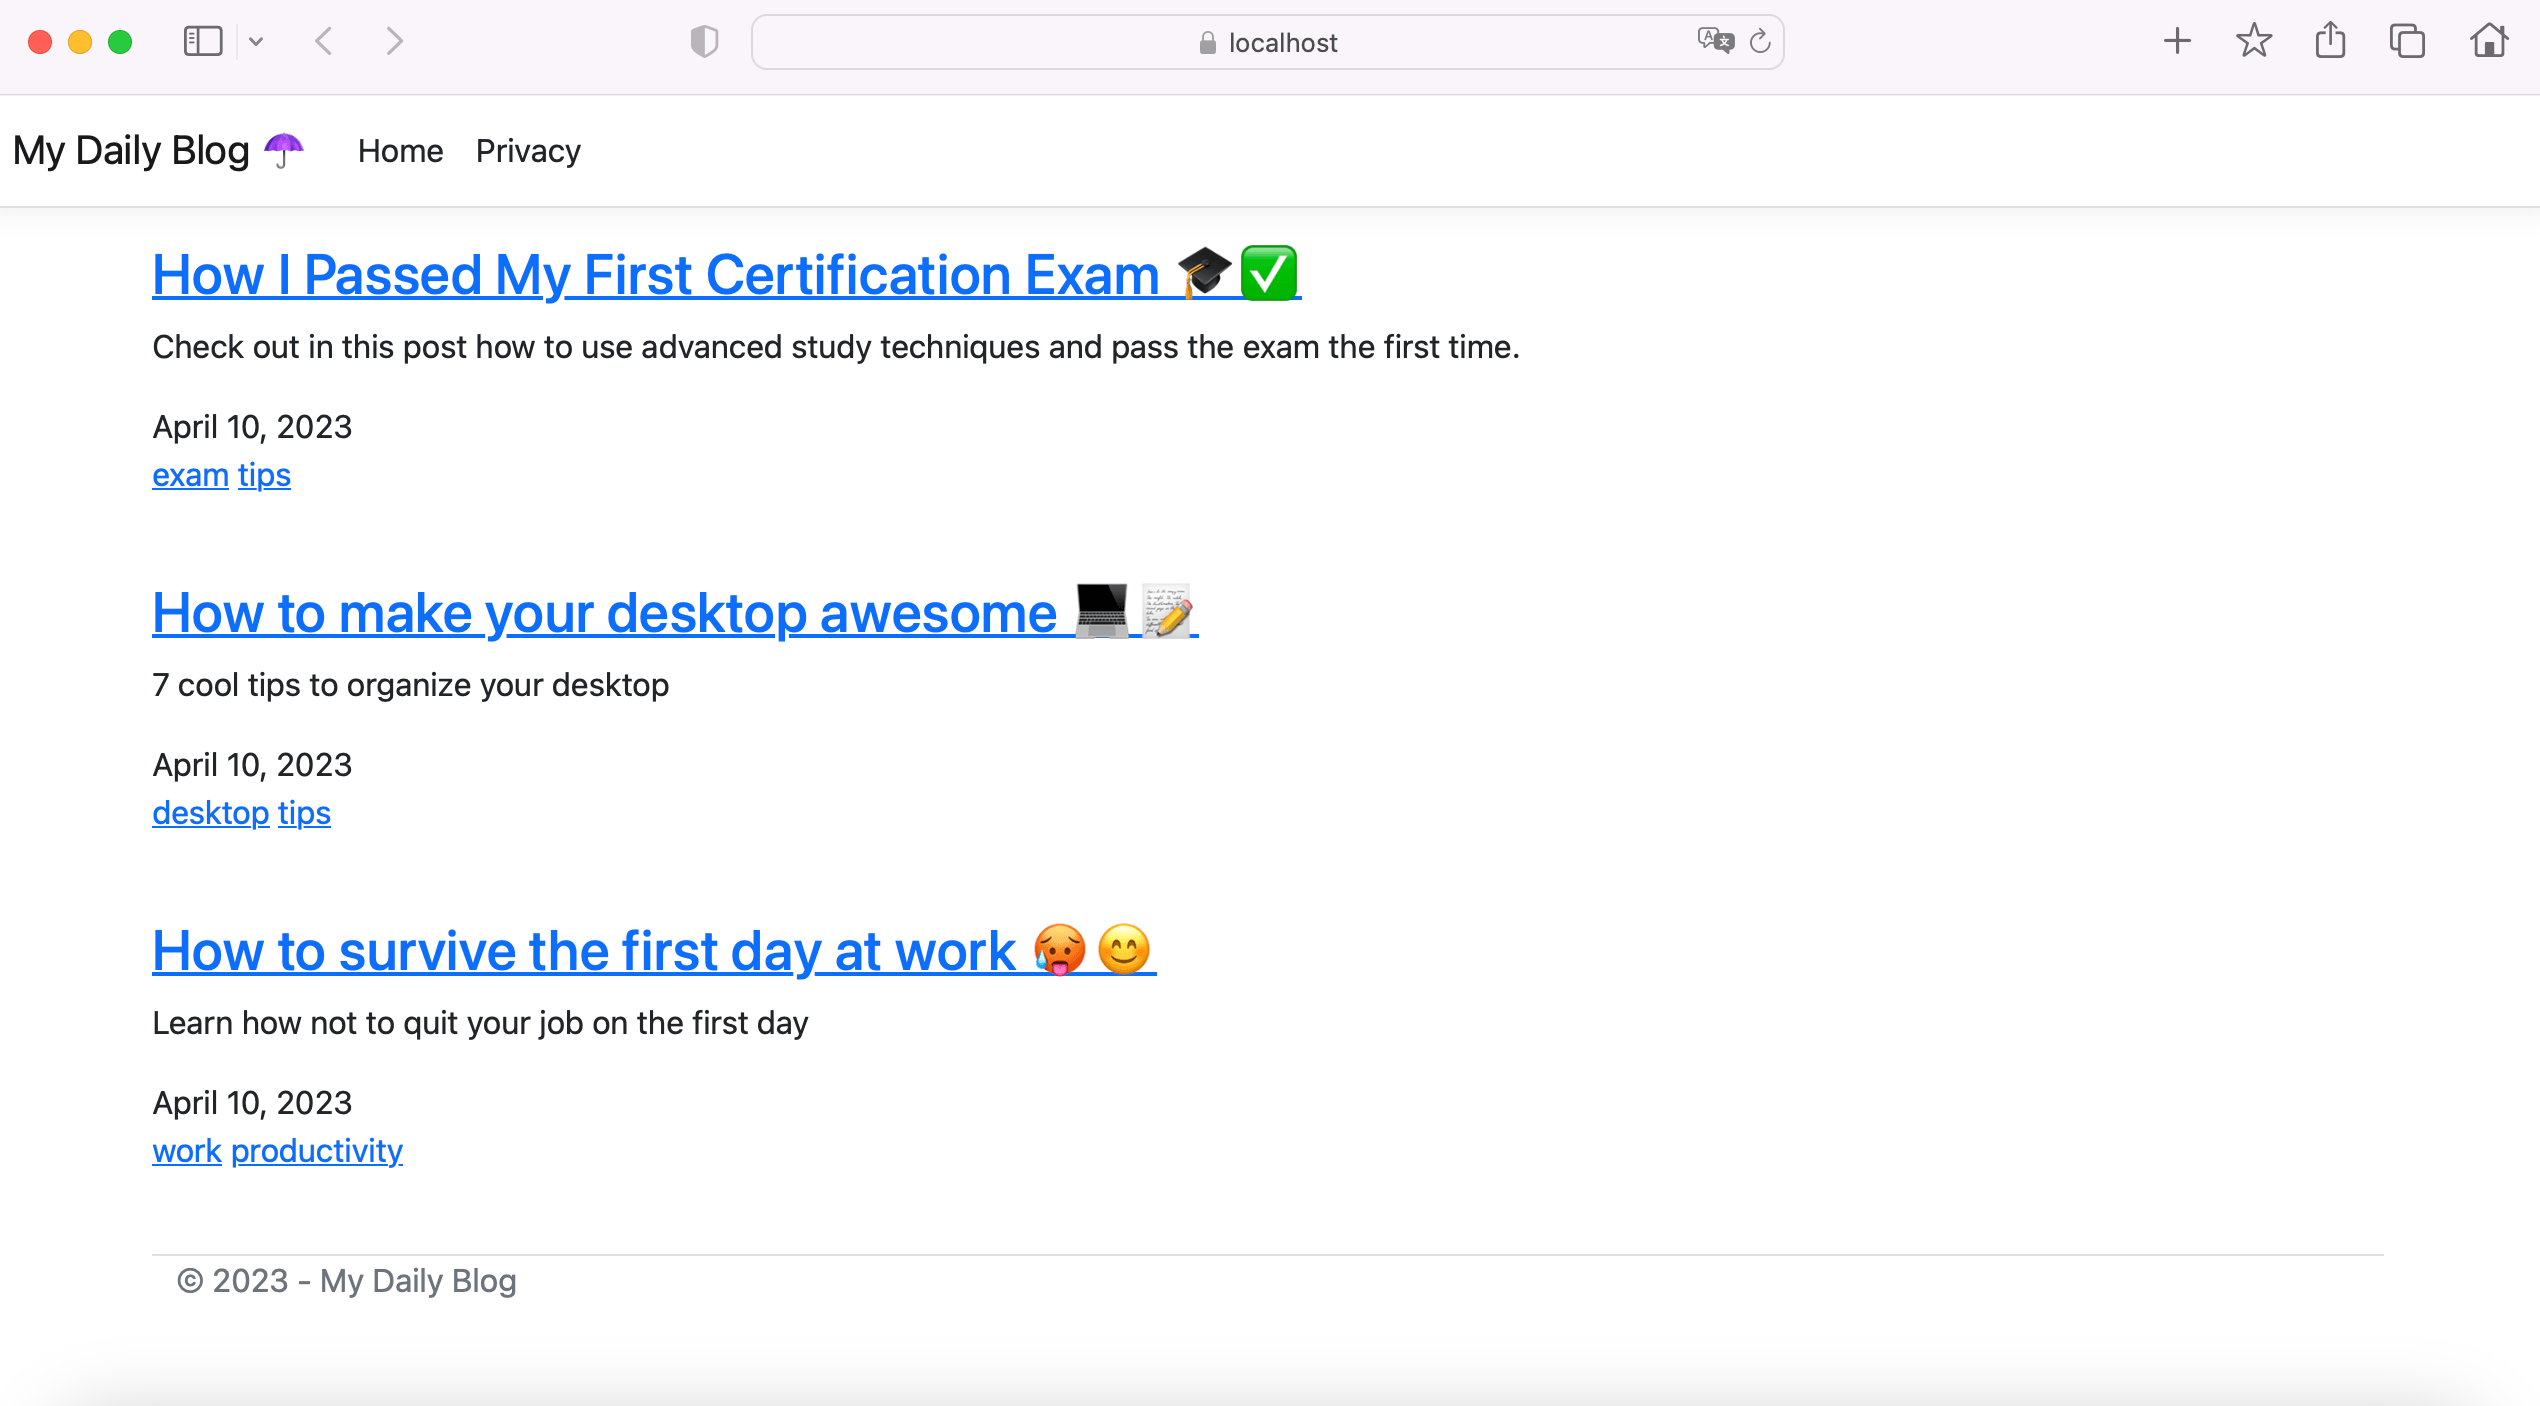
Note that in the above code, we are retrieving the list of posts and displaying each one. We are also embedding the footer we just created through the Html.PartialAsync("~/Shared/_Footer.cshtml") method.
If you run the application you will have something similar to the image below:

Styling the Components
To style the components we created in HTML, we will use CSS. In ASP.NET Core applications, the main file with the styles is inside the “wwwroot” > “css” directory in the “site.css” file.
Replace the existing code in “site.css” with the code below:
html {
    font-size: 14px;
}

@media (min-width: 768px) {
    html {
        font-size: 16px;
    }
}

.btn:focus,
.btn:active:focus,
.btn-link.nav-link:focus,
.form-control:focus,
.form-check-input:focus {
    box-shadow: 0 0 0 0.1rem white, 0 0 0 0.25rem #258cfb;
}

html {
    position: relative;
    min-height: 100%;
}

body {
    margin-bottom: 60px;
}

header h1 {
    margin: 0;
}

nav ul {
    margin: 0;
    padding: 0;
    list-style: none;
}

    nav ul li {
        display: inline-block;
        margin-right: 10px;
    }

        nav ul li a {
            color: #212529;
            text-decoration: none;
        }

main {
    margin: 20px;
}

a {
    color: #212529;
    text-decoration: none;
}

    a:hover {
        color: #6d6dfb;
    }

.post-card {
    background-color: #e6e6faff;
    width: 60%;
    border-radius: 10px;
    padding: 20px;
}

article {
    flex: 3;
    padding: 30px 30px 20px 30px;
    background-color: #e6e6faff;
    border-radius: 10px;
}

    article h2 {
        margin-top: 0;
    }

.metadata {
    font-style: italic;
    margin-bottom: 10px;
}

section {
    line-height: 1.5;
}

blockquote {
    font-style: italic;
    background-color: #f2f2f2;
    padding: 10px;
}

aside {
    flex: 1;
}

.bg-custom {
    background-color: #e6e6fa;
}

.post-card img {
    width: 100%;
    height: auto;
    margin-bottom: 10px;
}

.tag {
    background-color: #babaff;
    display: inline-block;
    font-size: 15px;
    font-weight: 500;
    padding: 2px 0.66em 1px;
    text-transform: uppercase;
    border-radius: 5px;
}

    .tag a:hover {
        color: #6d6dfb;
    }

.post-date {
    margin-bottom: 5px;
}

.footer {
    background-color: #e6e6fa;
    color: #666;
    text-align: center;
    padding: 20px;
    position: fixed;
    left: 0;
    bottom: 0;
    width: 100%;
}
Now if you run the application you will have a result similar to the image below:

Note that the CSS added above is just a suggestion. Feel free to change fonts, colors, sizes, etc.
Our blog is already beautiful, but we still need to make it functional—that is, when clicking on the title of the card, the page of the post should be opened.
Creating the Blog Controller
The blog controller will access the specific pages of the blog, like the post page for example.
Right-click on the “Controllers” folder, choose the options “Add” > “controller” > “MVC Controller – Empty.” Name it “BlogController.cs” and in the generated file replace the existing code with:
using Microsoft.AspNetCore.Mvc;
using MyDailyBlog.Data;

namespace MyDailyBlog.Controllers
{
    public class BlogController : Controller
    {
        private readonly PostManager _manager;

        public BlogController(PostManager manager)
        {
            _manager = manager;
        }

        // GET: BlogController/{id}
        [Route("blog/{id}")]
        public ActionResult Index(Guid id)
        {
            var post = _manager.GetPostById(id);
            return View(post);
        }
    }
}
In the code above, we are declaring a route to access the data of the selected post, passing the Id as a parameter. So when we click on the title of the post on the list screen, a page with the content of the post will open.
The next step will be to create the post-page view. So, inside the “Views” folder create a new folder called “Blog” and inside it add a new view, right-clicking on the folder, and choosing the options “Add” > “View…” > “Razor View – Empty.” Name it “Index.cshtml”. Then open the created file and replace the existing code with the code below:
@model MyDailyBlog.Models.BlogPost
@{
    ViewBag.Title = Model.Title;
}
<article>
    <header>
        <h2 style="font-weight: bold;">@Model.Title</h2>
        <p>By — Author — on @Model.CreationDate.ToString("MMMM dd, yyyy 'at' hh:mm tt")</p>
        <p>
            @foreach (var tag in Model.Tags)
            {
                <span class="tag"><a href="~/blog/tag/@tag">@tag</a></span>
            }
        </p>
    </header>
    <section>
        <p>@Html.Raw(Model.Content.Replace("\r\n", "<br />"))</p>
    </section>
</article>
@await Html.PartialAsync("~/Shared/_Footer.cshtml")
Running the Complete Project
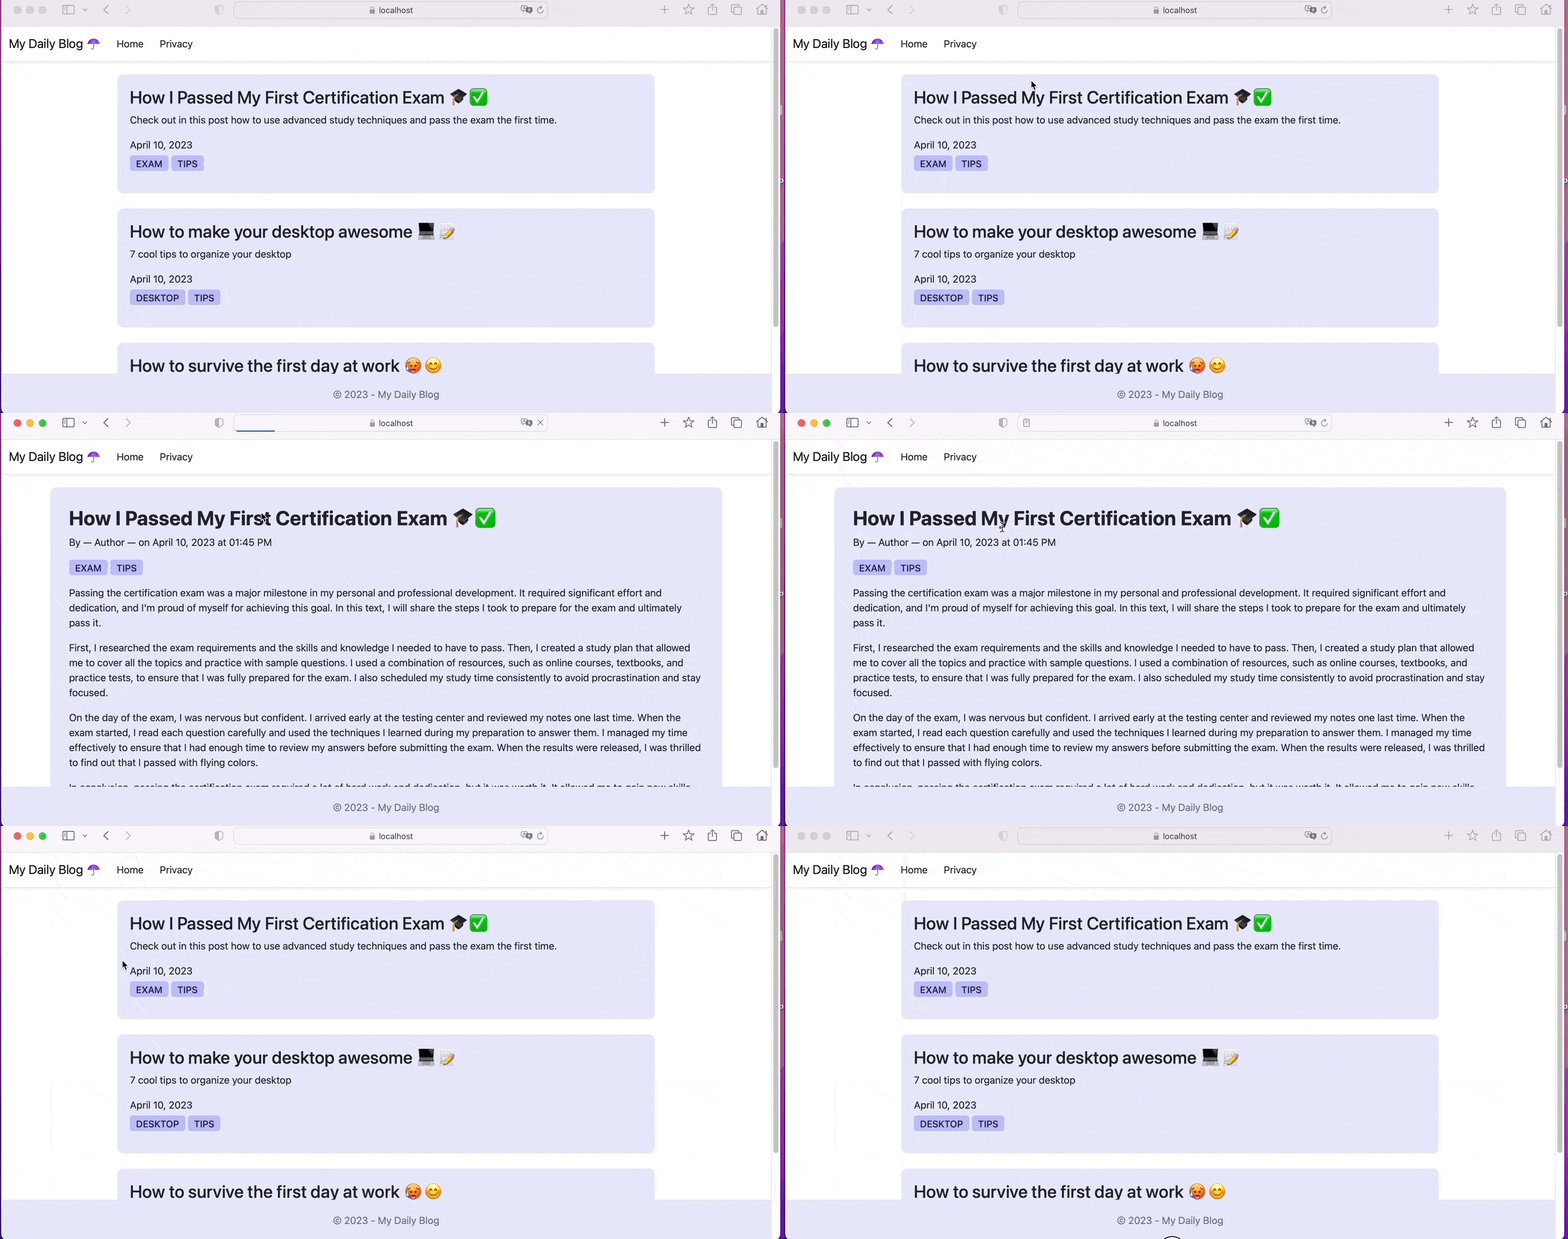
Our blog is fully functional! When we run the application and click on the title of a post, the post page opens displaying data for reading.
The GIF below demonstrates the application running:

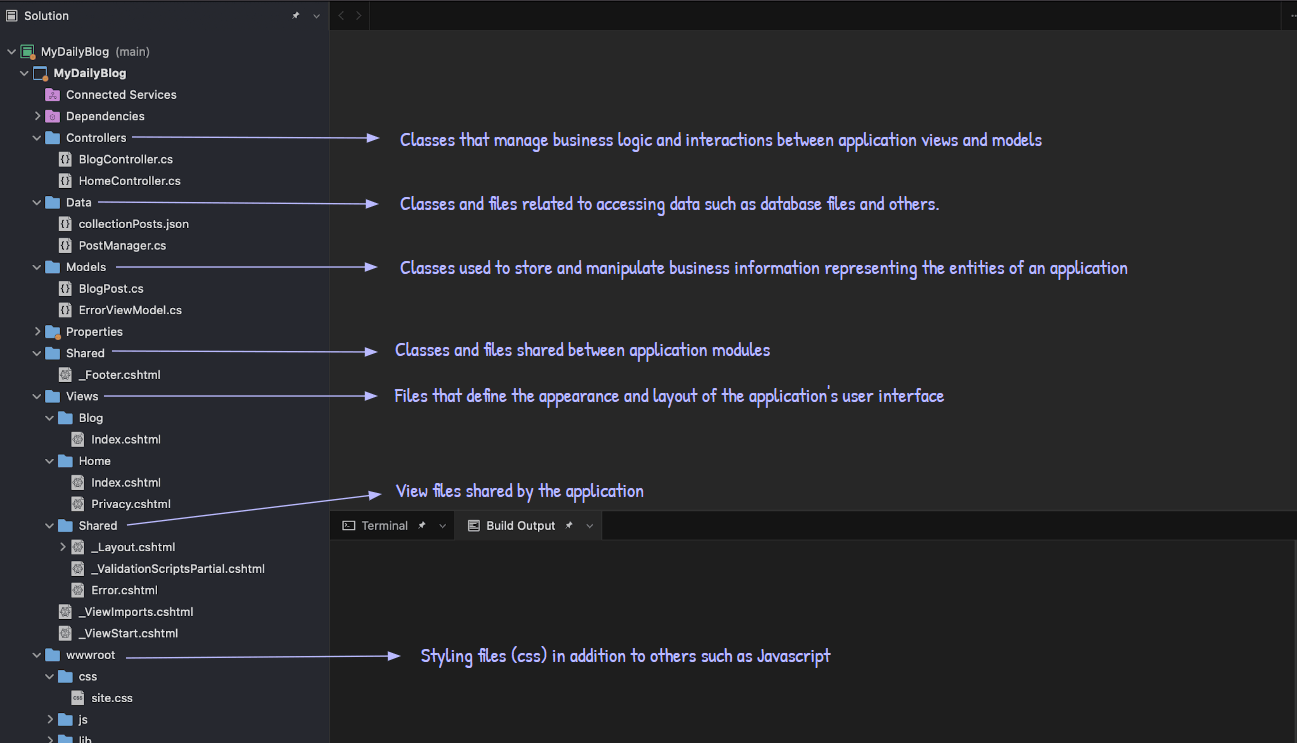
Now that our application is complete, we can look at the basic structure of an ASP.NET Core application.

Conclusion
In this post, we saw how to create an application in ASP.NET Core and customize the look and feel of the components through HTML tags and adding custom CSS.
There are many ways to improve the usability of the application, so feel free to create more pages and components in the project and customize them according to your preference.
Try Telerik UI for ASP.NET Core Today
Want to start taking advantage of the 110+ ready-made ASP.NET Core components, like the Grid or the Scheduler? Start a free trial today and experience for yourself that building rich interactive applications in half the time is not a fairytale.


