ASP.NET Core Basics: Create a Beautiful ASP.NET Core Web Application

Summarize with AI:
ASP.NET Core lets you create beautiful web applications backed by powerful backend features. For example, let’s create a digital photo album.
ASP.NET Core is well known for its extremely useful backend capabilities—web APIs, worker services and real-time communication, among others. Still, beyond that, it is possible to use its resources to create beautiful applications using HTML and CSS side by side with all its powerful backend features.
In this article, we are going to create from scratch a digital photo album using the native .NET MVC template and see in practice how it is possible to obtain an excellent result using ASP.NET Core.
What Is MVC?
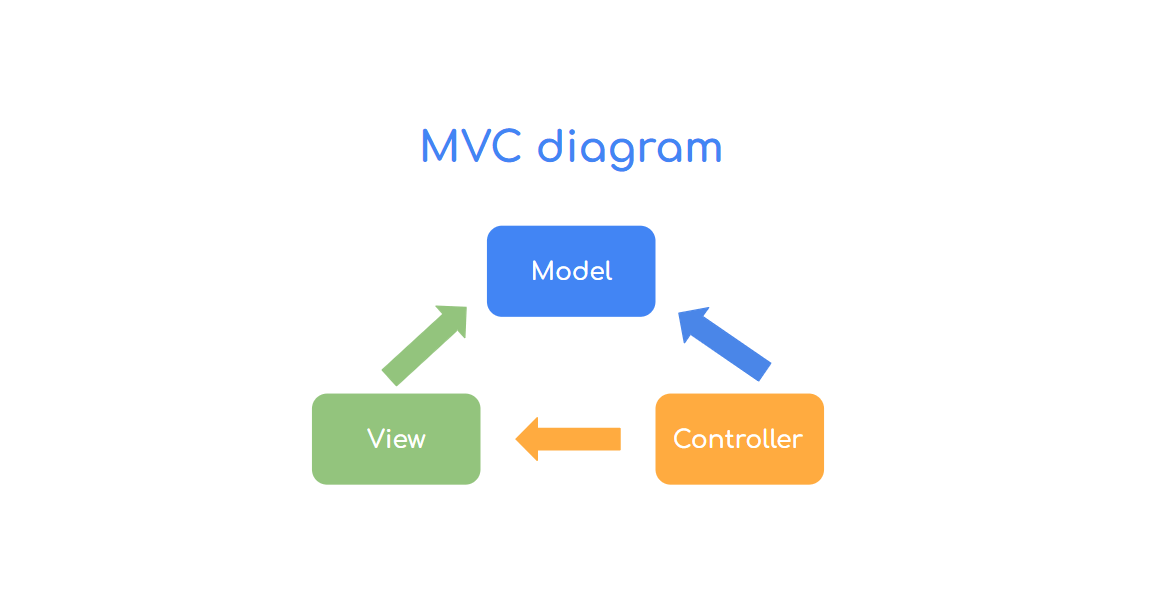
Model-View-Controller (MVC) is an architectural pattern that separates an application into three main groups of components: Models, Views and Controllers.
The MVC pattern is used to separate areas of interest for an application, so user requests are routed to a Controller that is responsible for working with the Model to perform user actions and/or retrieve query results. The Controller chooses the View to be displayed to the user and provides it with all the necessary Model data.
The diagram below demonstrates the three components that makeup MVC and how they relate to each other:

For a more in-depth look at MVC, you can check out this article in the Microsoft documentation: Overview ASP.NET Core MVC.
What Are We Going to Build?
We will create an application in .NET 7 using the MVC template. This application will be like a photo album for you to visualize the places you visited. Rremember that this is just a model suggestion—feel free to change the scope of the website. You can, for example, create a photo album for your pet or even for your collection items.
Prerequisites
- .NET 7 SDK
- Visual Studio
Creating the ASP.NET Core Web App
You can access the full source code of the project here: source code.
To create the project in Visual Studio:
- Click on “Create a new project”
- Choose "ASP.NET Core web app (Model-View-Controller)”
- Choose a name (in this example, I’m using MyFavoritePlaces)
- Choose .NET 7
Now let’s create the model class that will be the main entity of our app, so in the Models folder, create the class below:
- PlaceCollectionItem
using System.ComponentModel.DataAnnotations;

namespace MyFavoritePlaces.Models
{
    public class PlaceCollectionItem
    {
        [Required]
        public string? Description { get; set; }
        [Required]
        public string? ImageUrl { get; set; }
        [Required]
        public DateTime Date { get; set; }
    }
}
To display the images, we will create cards with a custom CSS, and the data that will feed cards will be sent from a .json file.
To keep things simple, we will not create a database, but feel free to implement it if you find it necessary. You can use this tutorial to create it: Applying the CQRS Pattern in an ASP.NET Core Web Application in the Creating the Database Context and Running EF Core Commands sections.
So, to create the JSON file, create a new folder called Data, and inside it create a file with the name collection.json and put the code below in it:
[
  {
    "Description": "Walking through the square...",
    "ImageUrl": "https://github.com/zangassis/my-favorite-places-photos/blob/main/hospital-square.jpg?raw=true",
    "Date": "2023-04-01T18:25:43.511Z"
  },
  {
    "Description": "A day in the park 1",
    "ImageUrl": "https://github.com/zangassis/my-favorite-places-photos/blob/main/square-soldier-adriano-1.jpg?raw=true",
    "Date": "2023-04-01T18:25:43.511Z"
  },
  {
    "Description": "A day in the park 2",
    "ImageUrl": "https://github.com/zangassis/my-favorite-places-photos/blob/main/square-soldier-adriano-2.jpg?raw=true",
    "Date": "2023-04-01T18:25:43.511Z"
  },
  {
    "Description": "A day in the park 3",
    "ImageUrl": "https://github.com/zangassis/my-favorite-places-photos/blob/main/square-soldier-adriano-3.jpg?raw=true",
    "Date": "2023-04-01T18:25:43.511Z"
  },
  {
    "Description": "A day in the park 4",
    "ImageUrl": "https://github.com/zangassis/my-favorite-places-photos/blob/main/square-soldier-adriano-4.jpg?raw=true",
    "Date": "2023-04-01T18:25:43.511Z"
  },
  {
    "Description": "A day in the park 5",
    "ImageUrl": "https://github.com/zangassis/my-favorite-places-photos/blob/main/square-soldier-adriano-5.jpg?raw=true",
    "Date": "2023-04-01T18:25:43.511Z"
  },
  {
    "Description": "A day in the park 6",
    "ImageUrl": "https://github.com/zangassis/my-favorite-places-photos/blob/main/square-soldier-adriano-6.jpg?raw=true",
    "Date": "2023-04-01T18:25:43.511Z"
  },
  {
    "Description": "A day in the park 7",
    "ImageUrl": "https://github.com/zangassis/my-favorite-places-photos/blob/main/square-soldier-adriano-7.jpg?raw=true",
    "Date": "2023-04-01T18:25:43.511Z"
  },
  {
    "Description": "A day in the park 8",
    "ImageUrl": "https://github.com/zangassis/my-favorite-places-photos/blob/main/square-soldier-adriano-8.jpg?raw=true",
    "Date": "2023-04-01T18:25:43.511Z"
  }
]
Note that to display the images we will use links that refer to the addresses where the images are stored. It is a good practice to store images on cloud servers, as storing images within the application can greatly increase the application deployment
time and is not recommended. The images used in this example are for educational purposes only. Feel free to use your own images, just change the property value for ImageUrl.
Now let’s modify the application’s controller so that the application receives data from the JSON file and sends it to the .cshtml page that we will create next.
So, inside the “Controllers” folder in the “HomeController.cs” file, replace the code of the Index() method with the code below:
string pathData = "Data/collection.json";

using var jsonFile = System.IO.File.OpenRead(pathData);

var items = JsonSerializer.Deserialize<List<PlaceCollectionItem>>(jsonFile);

return View(items);
Note that in the code snippet above we are passing the directory where the JSON file is to the File.OpenRead() method that will read the data, convert it back to JSON, deserialize it, and then return it to the
view.
Next, we will implement the visual layer of our application. Inside the “Views” > “Home” folder, replace the existing code with the code below:
@model IEnumerable<MyFavoritePlaces.Models.PlaceCollectionItem>

@{
    ViewData["Title"] = "Home Page";
}

<div class="page-title">
    <PageTitle>My favorite places 🌄</PageTitle>
</div>
<div class="place-columns">
    @foreach (var item in Model)
    {
        @Html.Partial("_PlaceCard", item)
        ;
    }
</div>
The above code loops through the list of items coming from the JSON file, then the card’s HTML code is rendered using the data obtained. The next step is to create the HTML for the card.
So, in the “Shared” folder, right-click and choose the option “Add” -> “View…” then choose the option “Razor View - Empty” and put the name “_PlaceCard” then click “Add.”
Then, in the file that was created replace the existing code with the code below:
@model MyFavoritePlaces.Models.PlaceCollectionItem

<div class="card">
	<img src="@Model.ImageUrl" alt="Photo of a place" style="width:100%">
	<div class="container">
		<div class="card-description">@Model.Description</div>
		<div class="card-date">@Model.Date</div>
	</div>
</div>
We also need to customize the default layout to display the cards correctly. In the “Shared” folder, replace the code from the “_Layout.cshtml” file with the code below:
<!DOCTYPE html>
<html lang="en">
<head>
    <meta charset="utf-8" />
    <meta name="viewport" content="width=device-width, initial-scale=1.0" />
    <title>@ViewData["Title"] - My Favorite Places 🌄</title>
    <link rel="stylesheet" href="~/lib/bootstrap/dist/css/bootstrap.min.css" />
    <link rel="stylesheet" href="~/css/site.css" asp-append-version="true" />
    <link rel="preconnect" href="https://fonts.googleapis.com">
    <link rel="preconnect" href="https://fonts.gstatic.com" crossorigin>
    <link href="https://fonts.googleapis.com/css2?family=Dancing+Script&family=Pacifico&family=Patrick+Hand&display=swap" rel="stylesheet">
</head>
<body>

    <div class="main">
        <div class="content px-4">
            @RenderBody()
        </div>
    </div>
    <script src="_framework/blazor.webassembly.js"></script>
</body>
</html>
Applying the CSS
The last part is to apply the CSS that will organize the cards and improve the appearance of our application so inside the folder “wwwroot” > “css” > in the “site.css” file, replace the existing code with the code below:
.card {
    box-shadow: 0 4px 8px 0 rgba(0,0,0,0.2);
    transition: 0.3s;
    width: 40%;
    margin-bottom: 30px;
    margin-right: 30px;
    max-width: 400px;
    min-width: 400px;
}

    .card:hover {
        box-shadow: 0 8px 16px 0 rgba(0,0,0,0.2);
    }

.container {
    padding: 2px 16px;
}

.place-columns {
    display: flex;
    flex-direction: row;
    flex-wrap: wrap;
    padding-left: 15%;
}

.page-title {
    font-size: 40px;
    padding-bottom: 20px;
    padding-top: 20px;
    font-family: 'Pacifico', cursive;
    text-align: center;
}

.card-description {
    font-family: 'Pacifico', cursive;
    padding-top: 1rem;
    padding-bottom: 2rem;
}

.card-date {
    font-family: 'Pacifico', cursive;
    padding-bottom: 0.2rem;
    font-size: 13px;
}
Running the Application
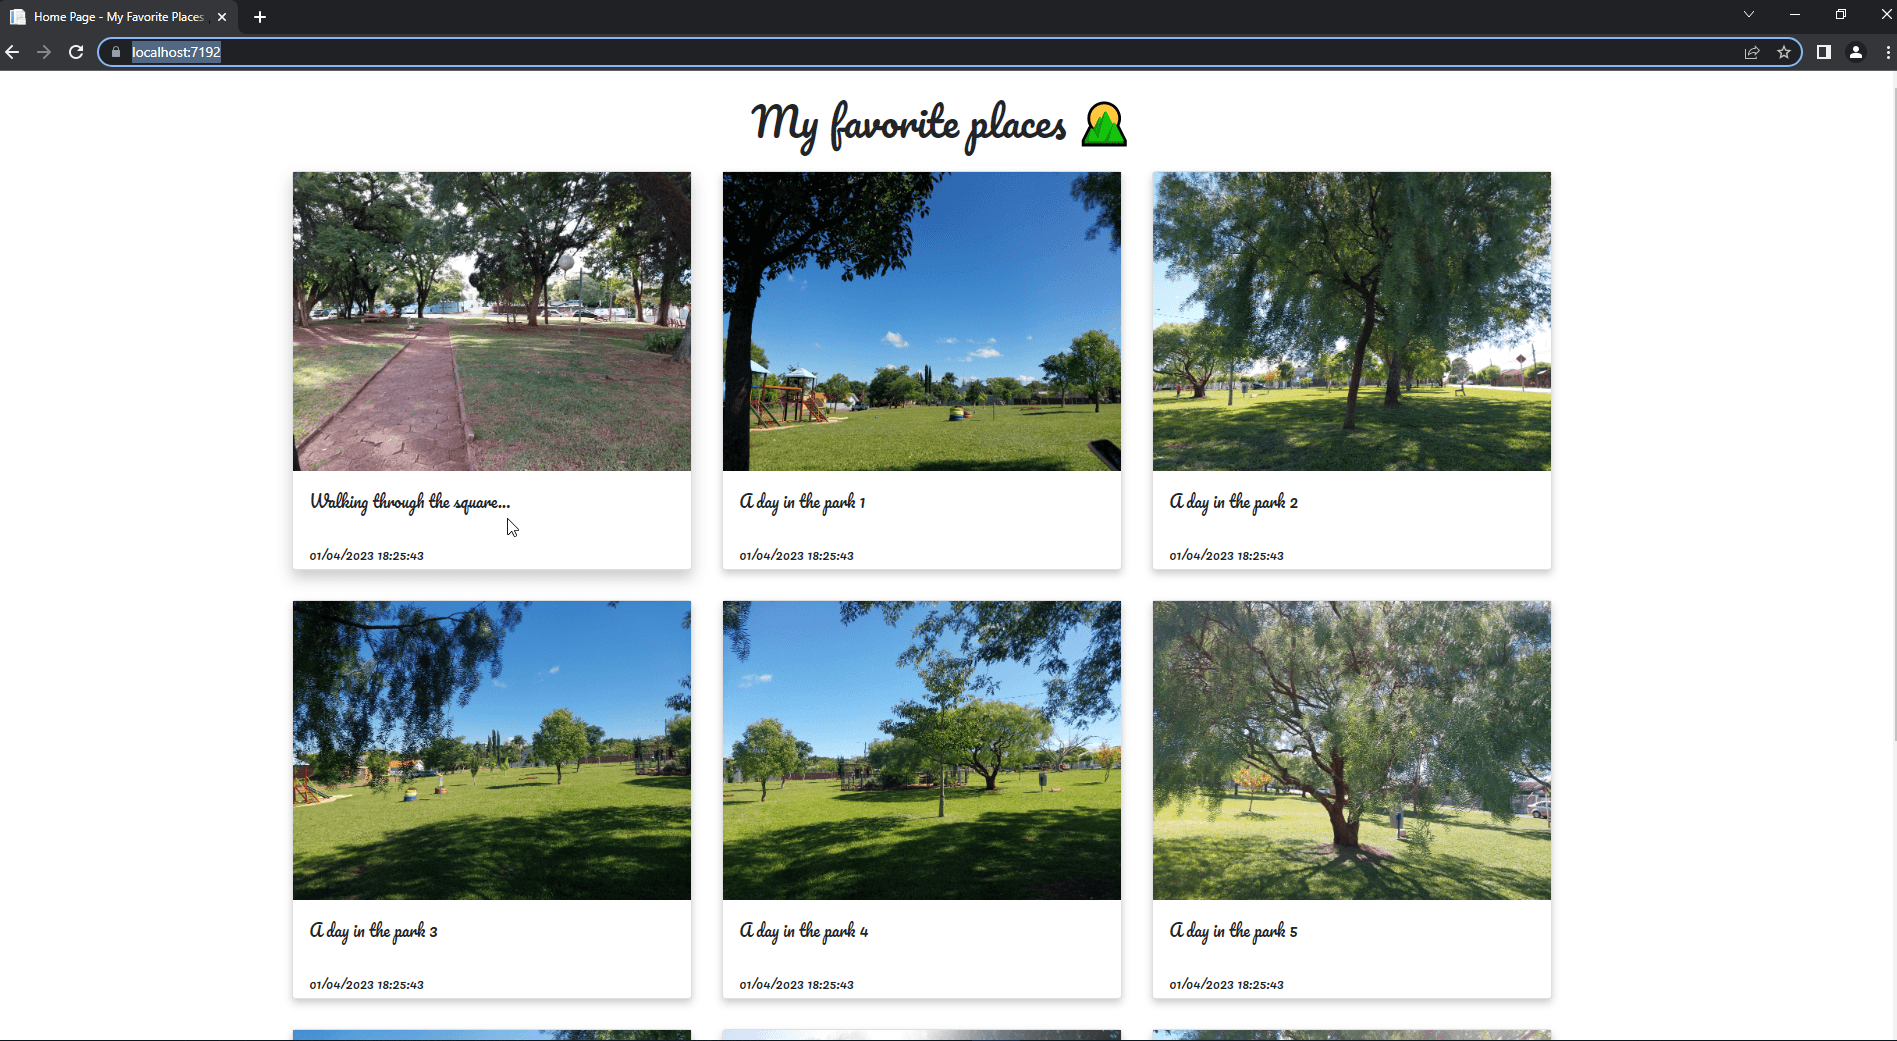
If you followed the previous steps, the application is ready to start. In Visual Studio, click on the button with the Play icon and a browser window will open on the application’s homepage, and you will see the result as shown in the image below:

Conclusion
As demonstrated in the article, it is possible to create beautiful ASP.NET Core web applications without too much effort using the MVC model.
MVC has everything needed to implement applications for the most varied types of needs, from complex applications using different resources, as well as simple applications like the one we just created.
So, whenever you need to create a new web system, consider using ASP.NET Core.
Create modern cross-platform web applications with over 110+ full-featured ASP.NET Core UI components for any scenario. Check out the Progress Telerik UI for ASP.NET Core component library.


