Appling Effects on Parts of an Image With RadImageEditor in UI for WPF

Summarize with AI:
The newest addition to RadImageEditor is the Selection tool, which allows you to select a specific area from an image and apply different effects to it.
You can now isolate a part of an image and apply different effects to it while the unselected area remains as is. Let’s have a look at how you can add the tool to your project and enable your customers to edit a specific area of the image. All you need to do is to define the selection tool item and add some of the predefined selection shapes in tool’s SelectionShapes collection:
<telerik:RadImageEditorUI> <telerik:RadImageEditorUI.ImageToolsSections> <telerik:ImageToolItem ImageKey="Selection" telerik:LocalizationManager.ResourceKey="ImageEditor_Selection" Command="commands:ImageEditorRoutedCommands.ExecuteTool"> <telerik:ImageToolItem.CommandParameter> <tools:SelectionTool > <tools:SelectionTool.SelectionShapes> <shapes:RectangleShape /> <shapes:EllipseShape /> <shapes:FreeformShape /> <local:TelerikLogoSelectionShape/> </tools:SelectionTool.SelectionShapes> </tools:SelectionTool> </telerik:ImageToolItem.CommandParameter> </telerik:ImageToolItem> </telerik:ImageToolsSection> </telerik:RadImageEditorUI.ImageToolsSections> </telerik:RadImageEditorUI>That’s it. So easy. Let’s see it in action.
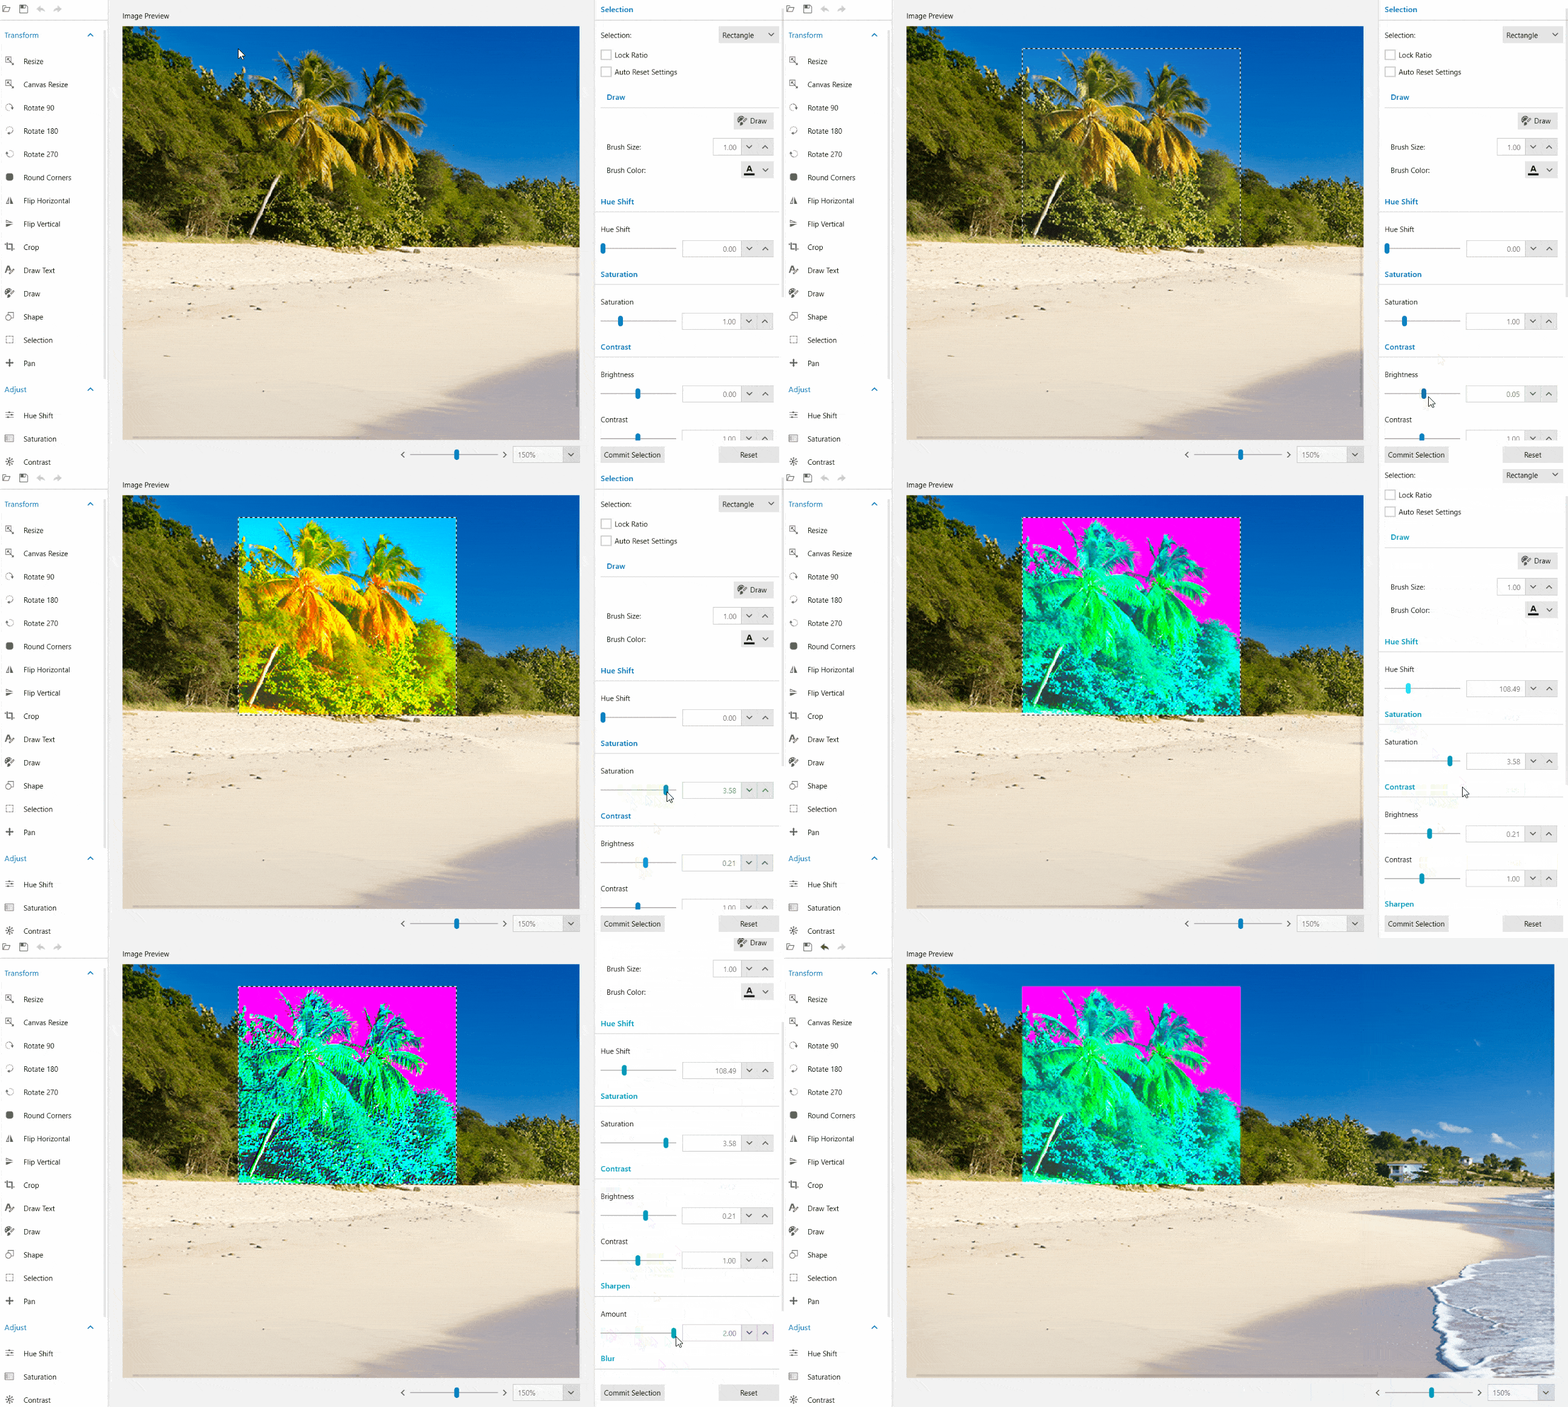
Predefined Selection Shapes
The selection tool, also features various predefined shapes that you can use for selection such as:
- RectagleShape
- EllipseShape
- FreeformShape
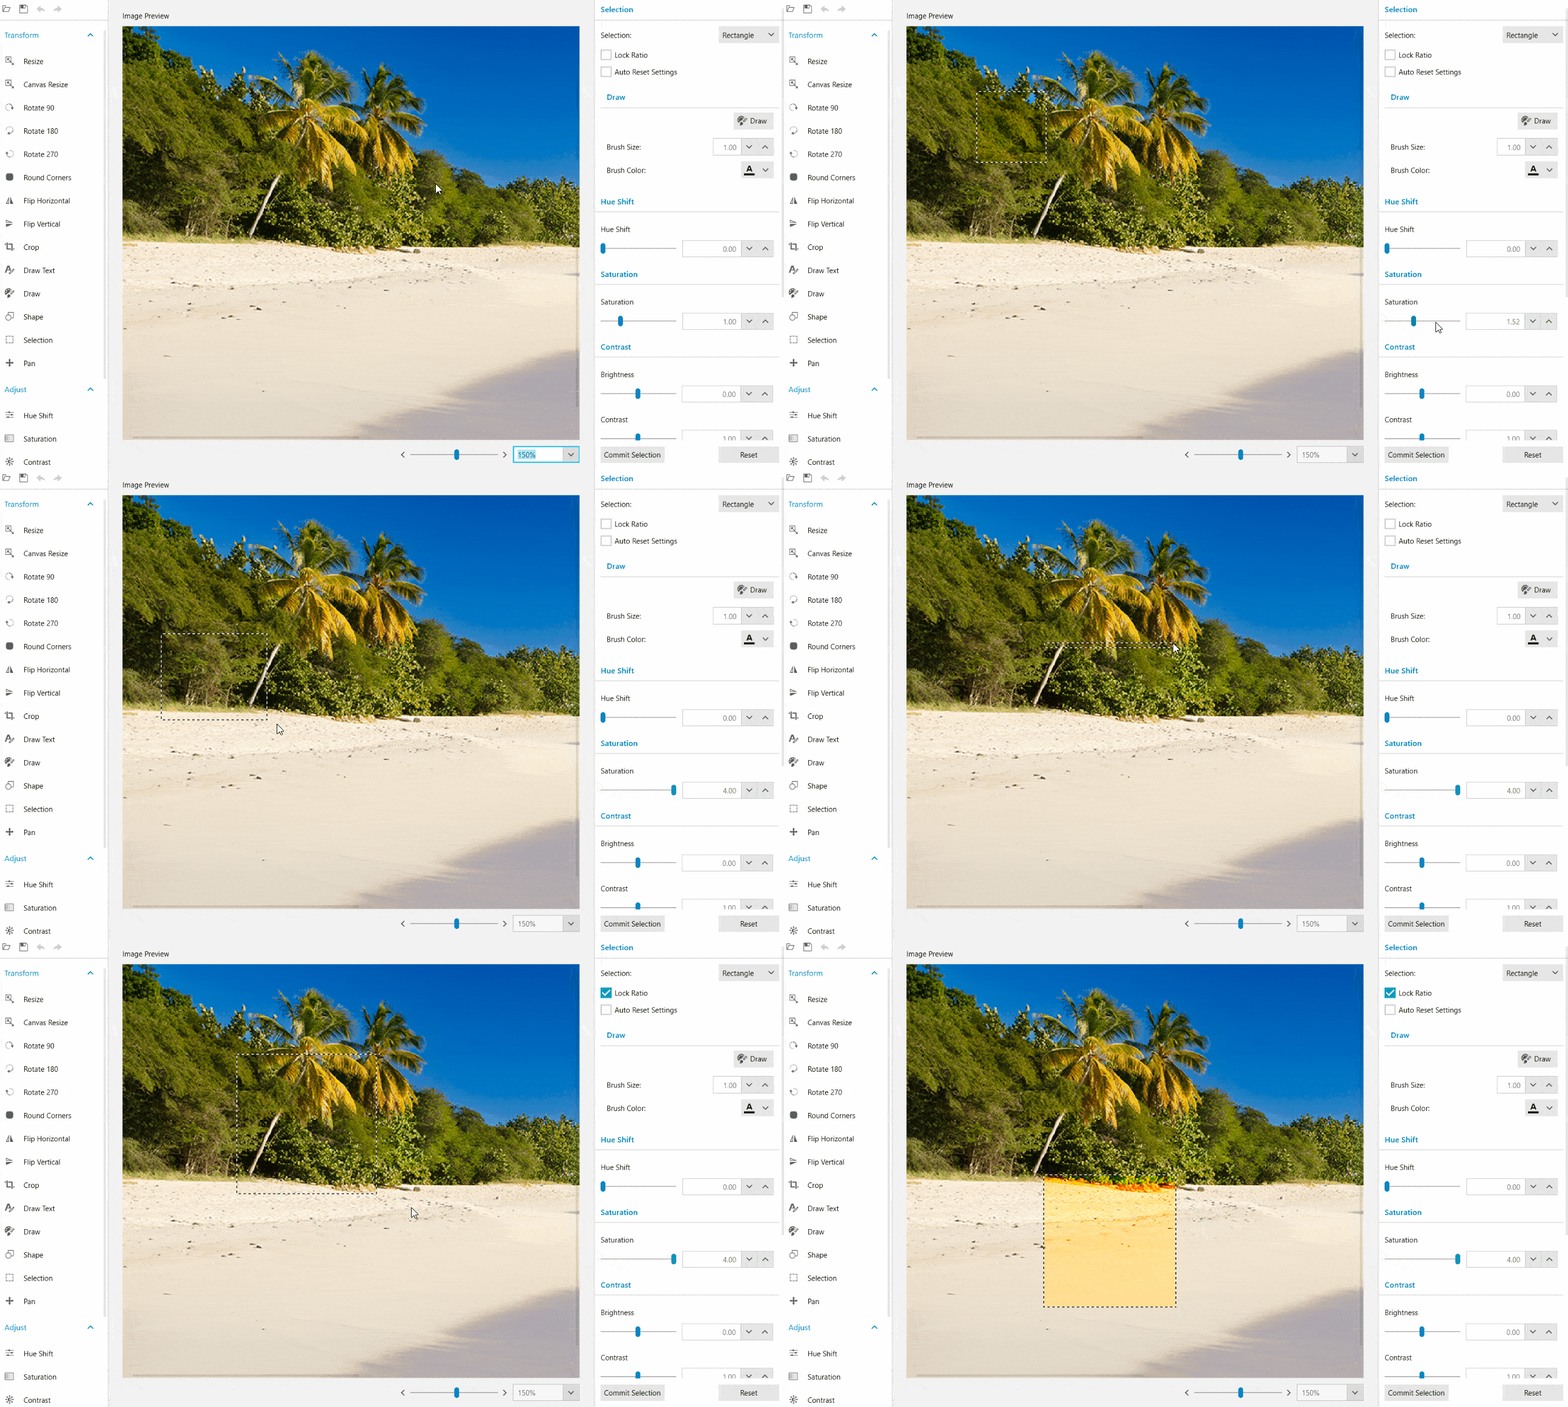
The RectangleShape draws rectangles by default, however, you can choose to draw squares by setting the LockRatio checkbox to true.
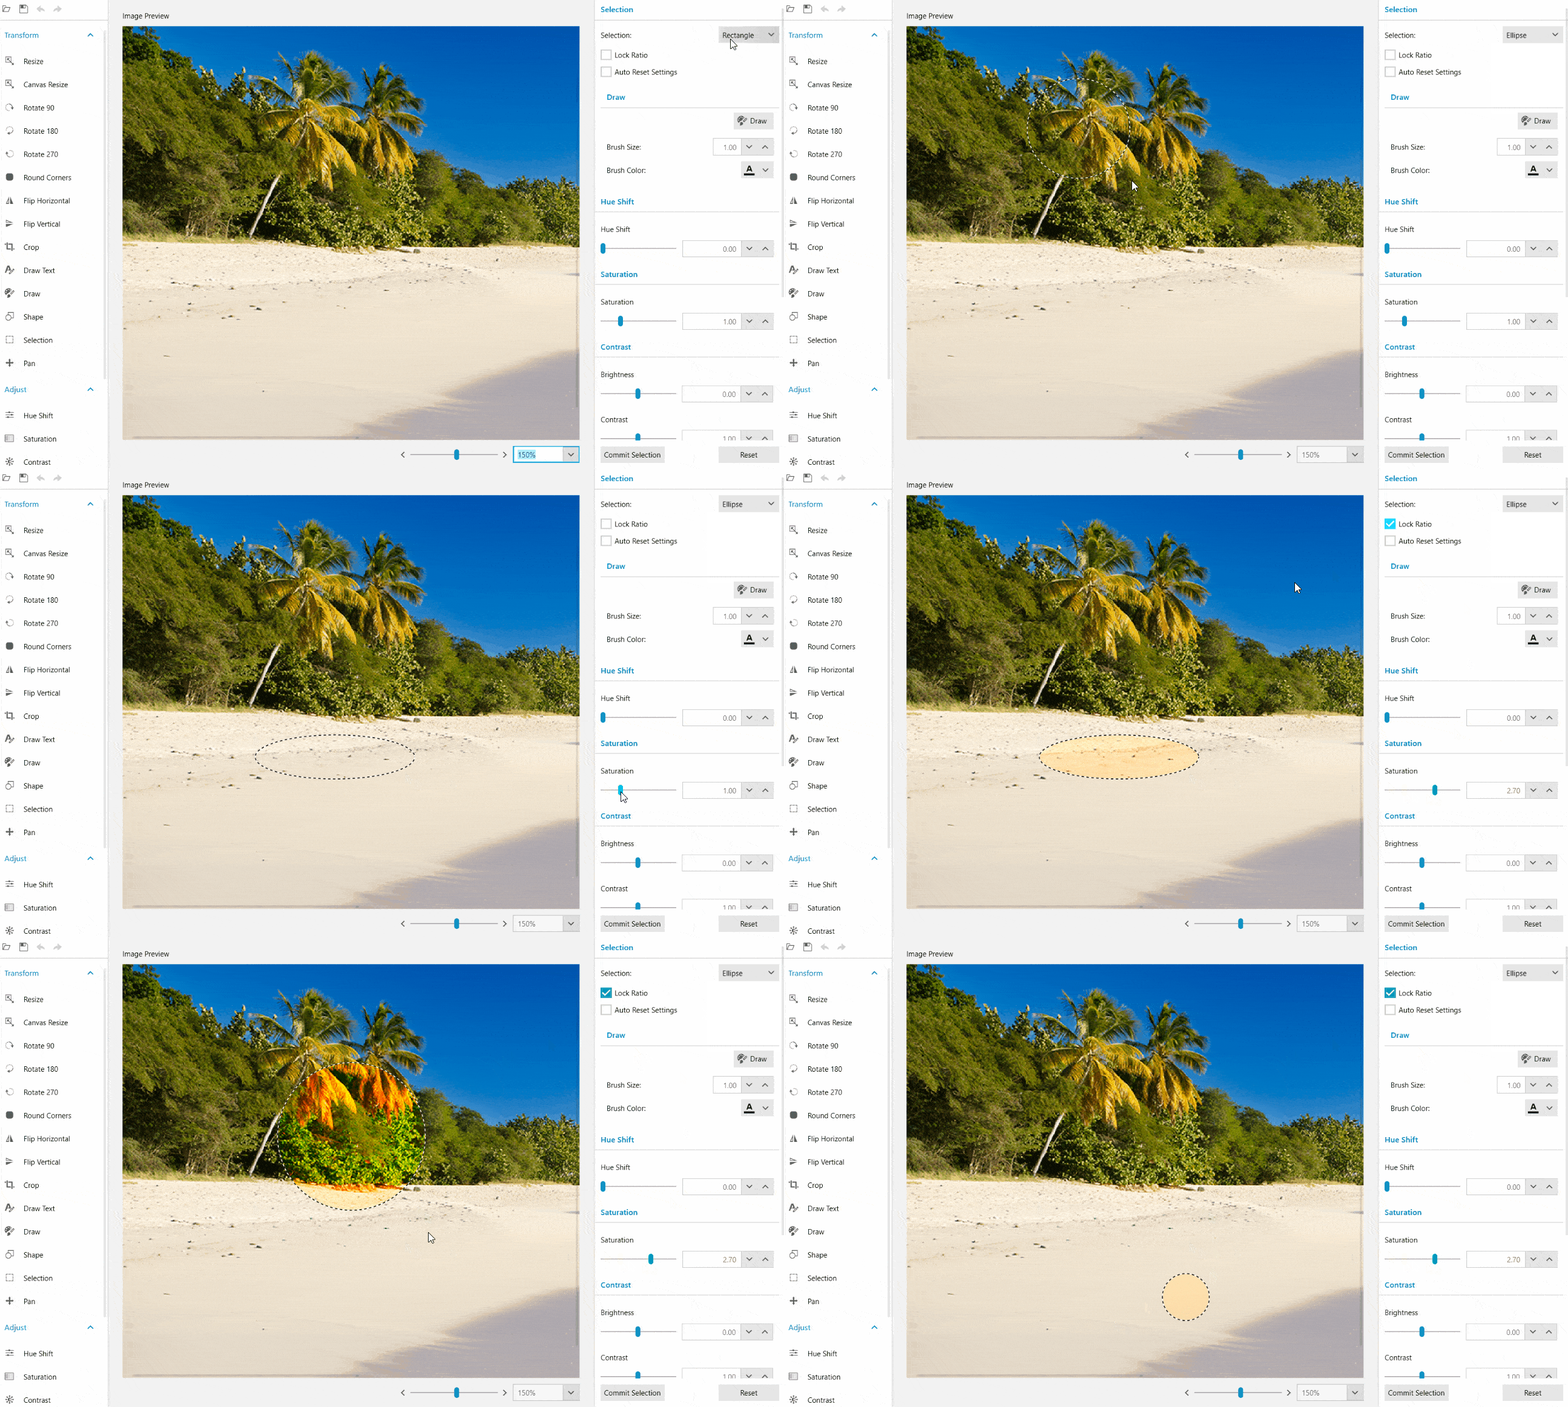
If you want to select an elliptical area on your image, then you can define the EllipseShape in SelectionTool’s SelectionShapes collection.
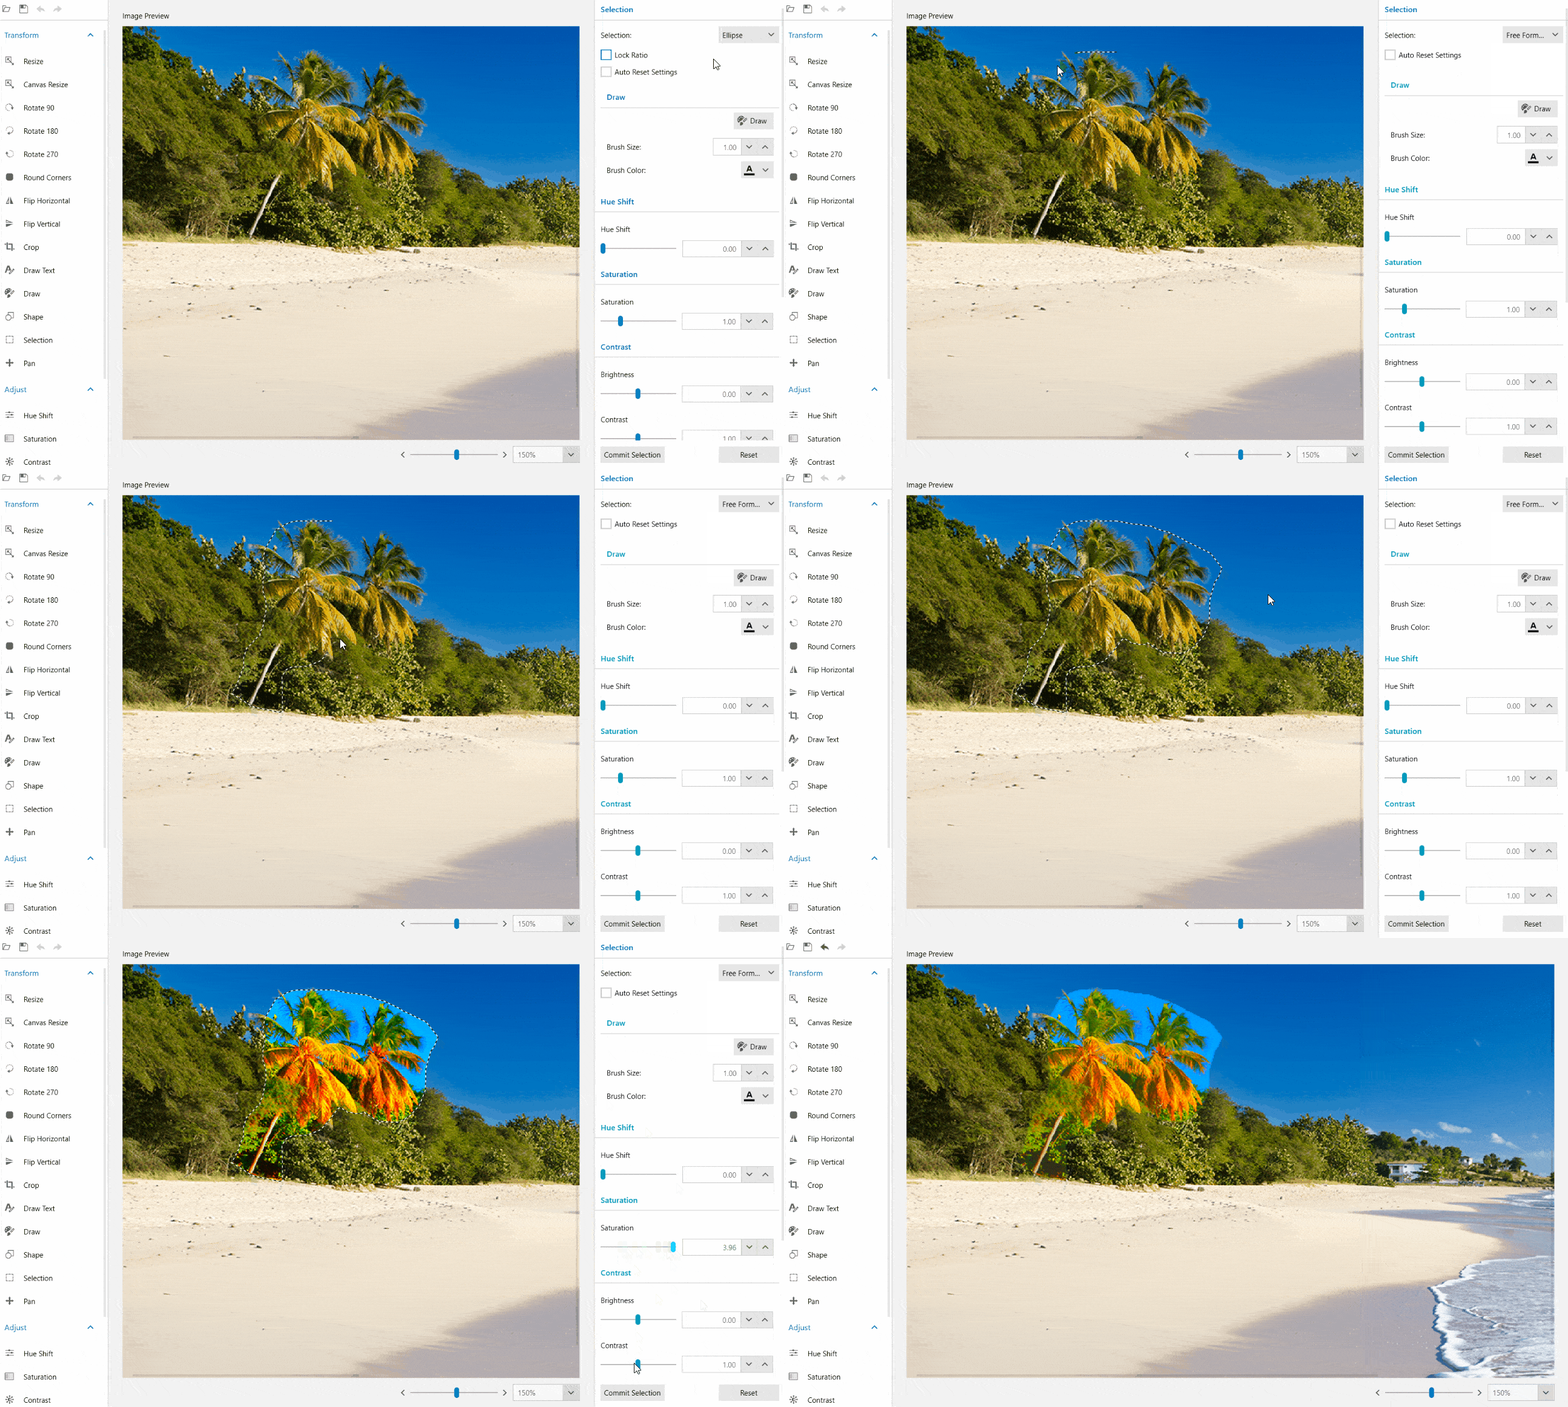
There are cases where the rectangle or the ellipse are not enough. This is why you can use the FreeformShape to draw a selection around an object as if you were outlining it on paper with a pen. The edge of the selected region will follow the mouse cursor as it is dragged around the canvas. The shape will automatically be closed with a straight line from the current cursor location back to the starting point.
If you want to be more precise, you can define your own custom shape as well.
Custom Selection Area Shapes
In order to create a custom selection shape, you need to implement the IShape interface. The method that is responsible for drawing the shape is called GetShapeGeometry() and you can add the drawing logic for your custom shape inside. The following example demonstrates how to create a shape with the Telerik logo:
public class TelerikLogoSelectionShape : IShape { public string DisplayName { get { return "Telerik"; } } public Geometry GetShapeGeometry() { PathFigure outer = new PathFigure(); outer.IsClosed = true; outer.StartPoint = new Point(0, 2.5); outer.Segments.Add(new LineSegment() { Point = new Point(2.5, 0) }); outer.Segments.Add(new LineSegment() { Point = new Point(5, 2.5) }); outer.Segments.Add(new LineSegment() { Point = new Point(7.5, 0) }); outer.Segments.Add(new LineSegment() { Point = new Point(10, 2.5) }); outer.Segments.Add(new LineSegment() { Point = new Point(9, 3.5) }); outer.Segments.Add(new LineSegment() { Point = new Point(7.5, 2) }); outer.Segments.Add(new LineSegment() { Point = new Point(6, 3.5) }); outer.Segments.Add(new LineSegment() { Point = new Point(8.5, 6) }); outer.Segments.Add(new LineSegment() { Point = new Point(5, 9.5) }); outer.Segments.Add(new LineSegment() { Point = new Point(1.5, 6) }); outer.Segments.Add(new LineSegment() { Point = new Point(4, 3.5) }); outer.Segments.Add(new LineSegment() { Point = new Point(2.5, 2) }); outer.Segments.Add(new LineSegment() { Point = new Point(1, 3.5) }); PathFigure inner = new PathFigure(); inner.StartPoint = new Point(3.5, 6); inner.IsClosed = true; inner.Segments.Add(new LineSegment() { Point = new Point(5, 7.5) }); inner.Segments.Add(new LineSegment() { Point = new Point(6.5, 6) }); inner.Segments.Add(new LineSegment() { Point = new Point(5, 4.5) }); PathGeometry logoGeometry = new PathGeometry(); logoGeometry.Figures.Add(inner); logoGeometry.Figures.Add(outer); return logoGeometry; } }The DisplayName string is the name of the shape, which is displayed in the dropdown list.The GetShapeGeometry() method returns the custom figure.
Now, we have to add the TelerikLogoSelectionShape in the SelectionShapes collection. Here is our custom selected region:
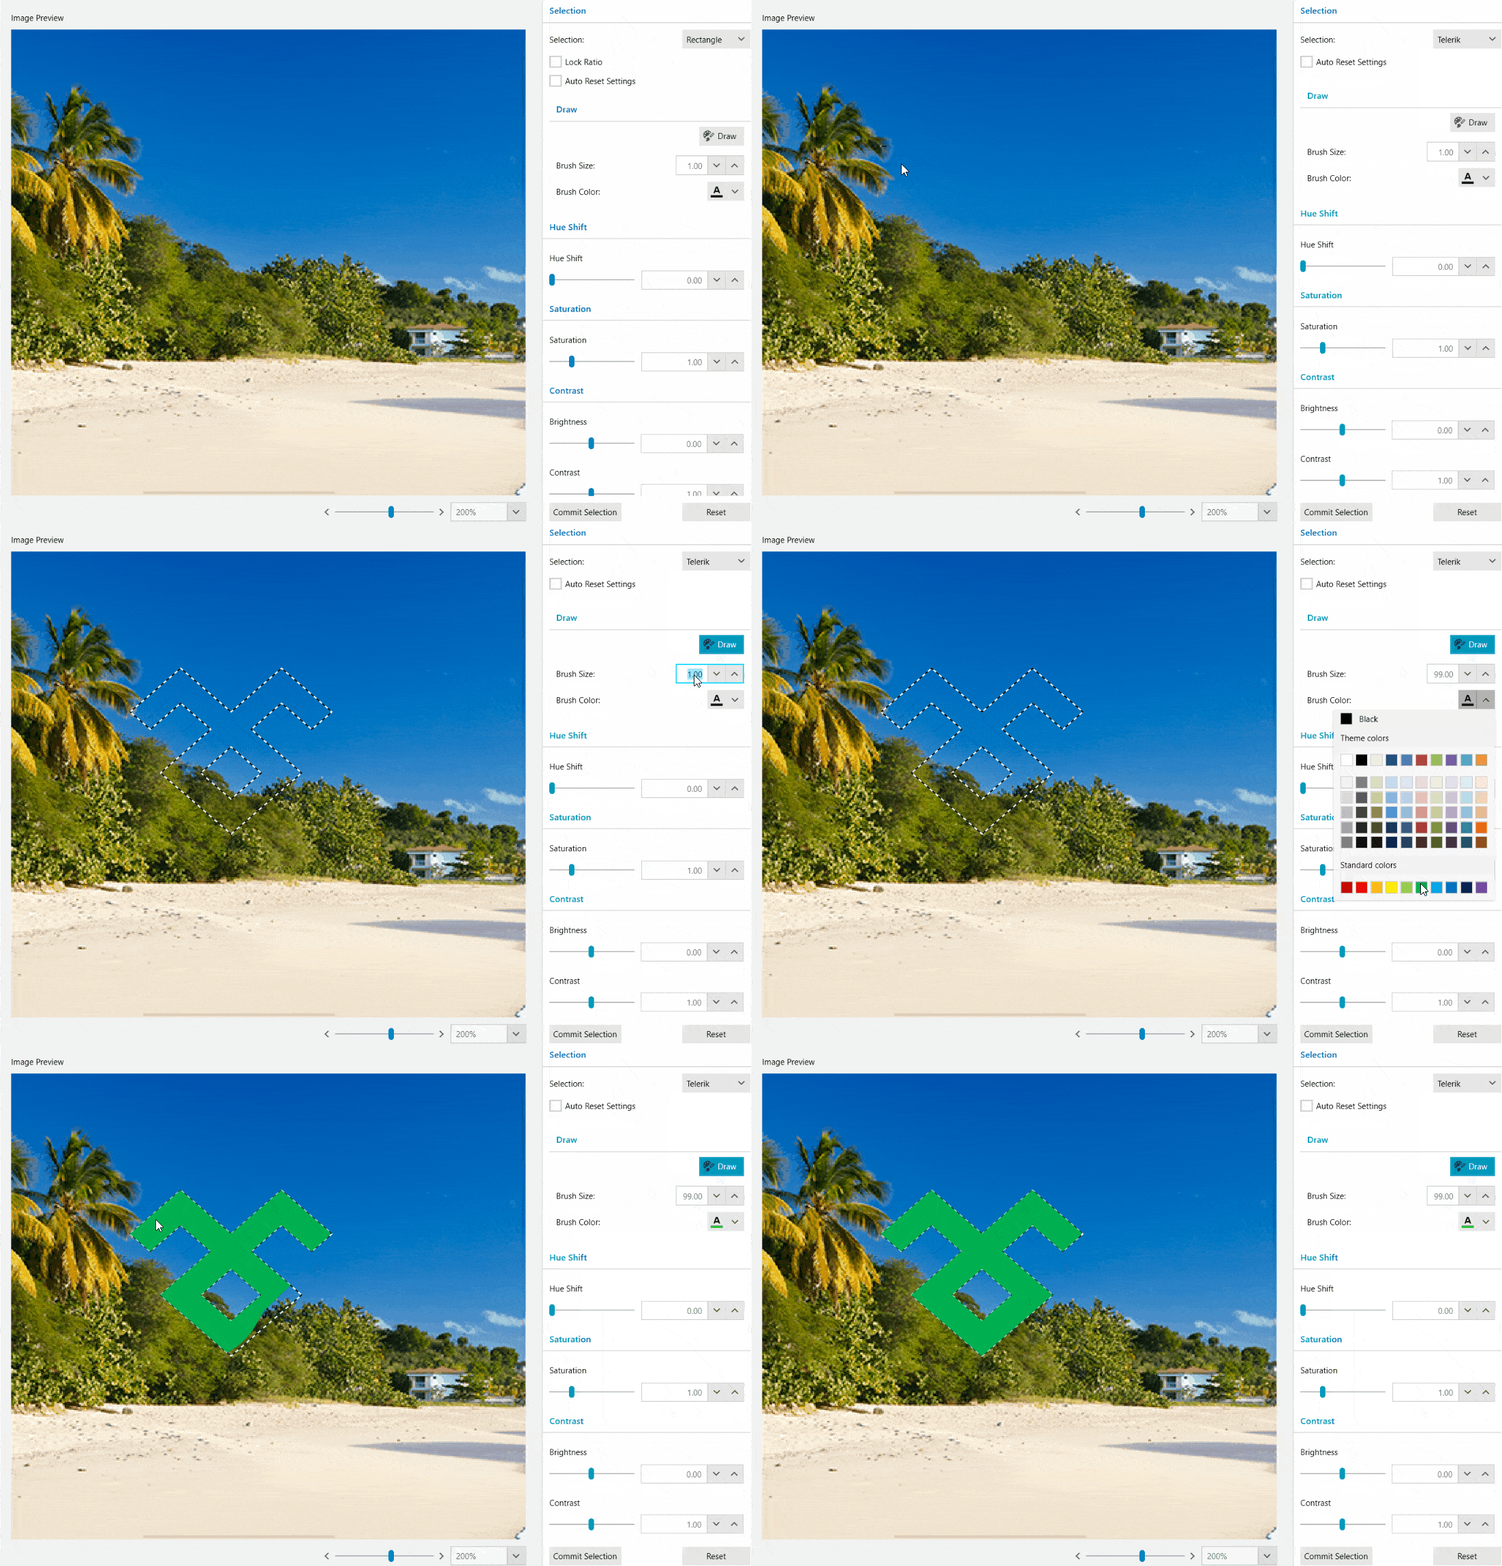
The changes made in the selected area are committed on the image when the Commit Selection button is clicked or when you switch to another tool.
That is pretty much what you need to know to start using the tool. In case of any questions or if you would like to share any feedback, we would be happy to hear from you.
Yoan Krumov
Yoan has 10+ years of experience at Progress Telerik. During these years he passed through different positions in the company, including being a developer for the WPF and WinUI team, and he is now the Product Manager for Desktop & Mobile suites—UI for .NET MAUI and UI for WPF/WinForms. Outside of his professional endeavors, Yoan is passionate about keeping up with technology trends through tech blogs, chilling and exploring the world.
