Getting Started with WPF InlineAIAssistant
This tutorial will walk you through the creation of a sample application that contains a RadInlineAIAssistant control attached to a TextBox.
Adding Telerik Assemblies Using NuGet
To use RadInlineAIAssistant when working with NuGet packages, install the Telerik.Windows.Controls.ConversationalUI.for.Wpf.Xaml package. The package name may vary slightly based on the Telerik dlls set - Xaml or NoXaml
Read more about NuGet installation in the Installing UI for WPF from NuGet Package article.
Adding Assembly References Manually
If you are not using NuGet packages, you can add a reference to the following assemblies:
- Telerik.Licensing.Runtime
- Telerik.Windows.Controls
- Telerik.Windows.Controls.ConversationalUI
- Telerik.Windows.Controls.Input
- Telerik.Windows.Controls.Navigation
- Telerik.Windows.Data
Attaching the RadInlineAIAssistant to a TextBox
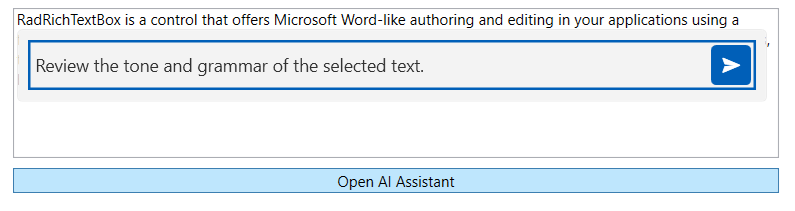
RadInlineAIAssistant does not need to be placed in the visual tree. Instead, you attach it to a target element (in this example, a TextBox) through the InlineAIAssistant attached property, and open it on demand by setting the IsOpen property.
Defining a TextBox and a button that toggles the assistant
<StackPanel Margin="20">
    <TextBox x:Name="textBox" AcceptsReturn="True" TextWrapping="Wrap" Height="120"/>
    <Button Content="Open AI Assistant" Click="OnOpenAssistantButtonClick" Margin="0 8 0 0"/>
</StackPanel>
Before it can open, RadInlineAIAssistant needs an InteractionProvider that describes how it should read from and write to the target element. The control ships with a built-in provider for TextBox, called InlineAIAssistantTextBoxProvider.
To learn more about interaction providers, including the built-in
RadRichTextBoxprovider and how to implement your own, check the Configuring Interaction Providers article.
Creating the RadInlineAIAssistant, setting its InteractionProvider, and attaching it to the TextBox
private RadInlineAIAssistant assistant;

public MainPage()
{
    InitializeComponent();

    this.assistant = new RadInlineAIAssistant();
    this.assistant.InteractionProvider = new InlineAIAssistantTextBoxProvider(this.textBox);
    this.assistant.PromptRequest += this.OnPromptRequest;

    RadInlineAIAssistant.SetInlineAIAssistant(this.textBox, this.assistant);
}

private void OnOpenAssistantButtonClick(object sender, RoutedEventArgs e)
{
    this.assistant.IsOpen = !this.assistant.IsOpen;
}
The assistant also closes itself automatically: when the end user presses Escape while it has focus, clicks outside of it, or when the TextBox it is attached to is unloaded.
RadInlineAIAssistant Opened next to a TextBox
Requesting a Response
When the end user submits the prompt input, RadInlineAIAssistant raises the PromptRequest event. In the handler, you contact your AI model and set the response back through the InlineAIAssistantPromptRequestEventArgs.SetResponse method.
Handling the PromptRequest event
private void OnPromptRequest(object sender, InlineAIAssistantPromptRequestEventArgs e)
{
    // Pass e.Prompt (and, optionally, e.SelectedText / e.FullText) to your AI model.
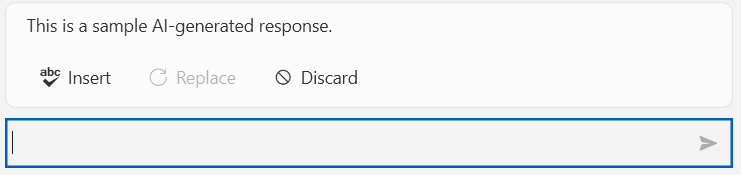
    e.SetResponse("This is a sample AI-generated response.");
}
Once a response is set, RadInlineAIAssistant displays it above the input area with Insert, Replace, and Discard actions. To learn how to stream a response instead of setting it all at once, check the Handling Responses article.
RadInlineAIAssistant Displaying a Response