Create Master-Detail Reports with SubReports
Environment
| Product | Progress® Telerik® Reporting |
Description
How can I create a Master-Detail report by using a SubReport report item that contains the detail data in Visual Studio Report Designer?
Solution
To achieve the desired scenario:
- Create the detail report
- Create a report parameter and a filter that uses the report parameter
- Create the master report
- Configure the SubReport item
For an alternative approach that requires no separate detail report, see Creating a Master-Detail Layout with a Table and Nested Row Groups.
The master report data in this example consists of product categories from the AdventureWorks database. The detail report displays product names and numbers. The example uses the Report Parameter to filter the detail report by a product category.
Creating the Detail Report in Visual Studio Report Designer
-
Create a new class library named
MasterDetailthat will contain the reports.
-
Add a new Telerik Report item to the project through Add New item -> Reporting -> Telerik Reporting [VERSION] Wizard -> Blank Report. Name it
DetailReport. -
From the upper left corner of design surface, click the report selector to select the report.
-
Navigate to the
DataSourceproperty of the report, open it, select Add New Data Source and choose SqlDataSource Component. -
Set up the data connection to the AdventureWorks database, save it so you can use it later on when creating the master report. Click Next. Enter the following SQL statement. Click Finish in the DataSource wizard.
SQLSELECT P.Name,ProductID,ProductNumber,PC.ProductCategoryID FROM Production.Product P, Production.ProductSubcategory PS, Production.ProductCategory PC WHERE P.ProductSubcategoryID=PS.ProductSubcategoryID AND PS.ProductCategoryID=PC.ProductCategoryID -
Remove the page header and page footer sections. Open the Data Explorer and add the ProductNumber and Name fields to the detail section of the report.
The detail report in the designer will now look like the following.

Configuring the Report Parameter and Filter
Create a report parameter and a filter that uses the report parameter. The master report passes in the current ProductCategoryID for each record and the detail report displays all products with that ProductCategoryID.
-
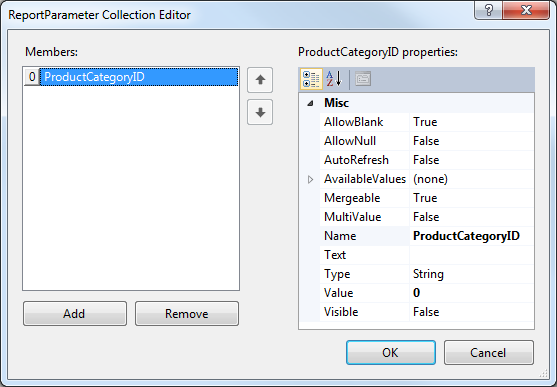
In the Property Window, navigate to the ReportParameters property and click the ellipses.
-
In the ReportParameter Collection Editor, click the Add button. In the Name property for the parameter enter ProductCategoryID. Enter zero for the Value property.
-
In the Property Window, navigate to the Filters property and click the ellipses.
-
Click the New button to create a new filter. In the Expression drop-down for the filter select =Fields.ProductCategoryID. Leave the operator at the default equals to (=) sign. In the Value property drop-down, select the =Parameters.ProductCategoryID.Value report parameter you created earlier.

-
Click the OK button to close the dialog.
Creating the Master Report
The master report will contain only a simple listing of product categories.
-
Add a new report item to the project and name it MasterReport.
-
The Report Wizard opens when you select Telerik Report [VERSION] Wizard - Band Report Wizard.
-
On the Choose Data Source page of the wizard, click the Add New Data Source button and select SqlDataSource Component. On the Choose Your Data Connection page of the wizard, select the saved database connection you created for the detail report. Click the Next button.
-
Enter the SQL statement below and click the Next button.
SQLSELECT ProductCategoryID,Name FROM Production.ProductCategory -
In the Design Data Layout page of the wizard, add the Name column to the detail section and click the Next button. Accept the remaining defaults to complete the wizard.
Configuring the SubReport Item
This step ties both reports together by using a SubReport to display the details and by passing the current ProductCategoryID from each record of the master report to the detail.
The detail report uses the parameter to filter the data to products for the specified product category only.
-
Resize the detail section to create some vertical room for a
SubReportitem. -
Drag a
SubReportfrom the Toolbox to the detail section of the report. -
In the Properties window for the
SubReport, open the ReportSource dialog, select Type name (`TypeReportSource), and set it to the DetailReport. Build the project first if DetailReport does not appear in the list. -
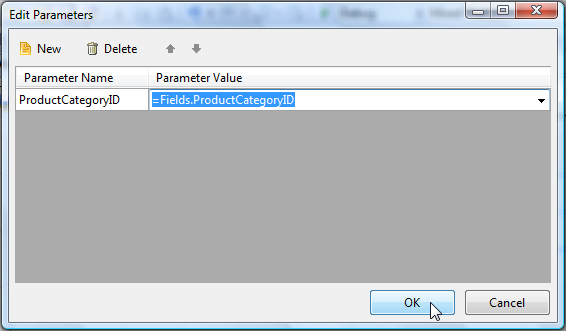
Click the Edit Parameters button to display the Edit Parameters dialog.
-
Click the New button to define a parameter.
-
Set the Parameter Name to ProductCategoryID and the parameter value to =Fields.ProductCategoryID.
-
Click the OK button to close the parameters dialog. Click OK again to close the Report Source dialog.
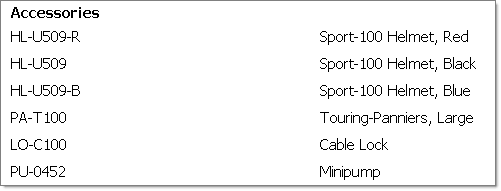
Click the Preview button to preview the MasterReport. The product numbers and names from the detail report appear under each product category from the master report.
Creating a Master-Detail Layout with a Table and Nested Row Groups
As an alternative to the SubReport approach, you can achieve a master-detail layout in a single Table item that uses nested row groups. This approach requires no separate detail report and no parameter passing between reports.
-
Create a new report and configure its data source with a query that joins the master and detail tables:
sqlSELECT PC.Name AS CategoryName, PS.Name AS SubcategoryName, P.Name AS ProductName, P.ProductNumber FROM Production.ProductCategory PC INNER JOIN Production.ProductSubcategory PS ON PS.ProductCategoryID = PC.ProductCategoryID INNER JOIN Production.Product P ON P.ProductSubcategoryID = PS.ProductSubcategoryID -
Drag a Table item from the Toolbox onto the detail section of the report.
-
In the Table Wizard, bind the data source and add ProductName and ProductNumber as columns. Click Finish.
-
Open the Group Explorer (View > Group Explorer). Under Row Groups, right-click Detail and select Add Group > Parent Group.
-
In the Table Group dialog, set Group By to
=Fields.CategoryName. Select Add group header and click OK. -
In the group header row, bind a text box to
=Fields.CategoryNameto label each category.
The Table renders one group header row per unique CategoryName value, with the corresponding product rows nested beneath it. The group is dynamic because it generates one row per unique field value at run time.
To add a subcategory level between the category and the product rows, add a second nested row group under the category group in the Group Explorer and bind its header row to
=Fields.SubcategoryName.
You can create the SubReport-based layout with the Standalone Report Designer. Specify subreports by a path to a TRDX file or by placing the sub-report XML directly in the
SubReport.ReportSourceeditor.