Working with Templates at Design Time
You can add a template using the Template Design Surface. This provides you with a surface where you can visually design the template, dragging and dropping controls from the toolbox.
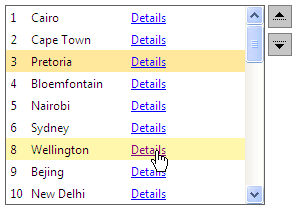
This example shows how to use the Template Design Surface to add several controls to the ItemTemplate. These will be two labels and a hyperlink control achieving the following multi-column layout:

-
Drag a RadListBox from the toolbox onto your Web page.
-
From the Smart Tag that appears when you drop the RadListBox, choose Edit Templates.
-
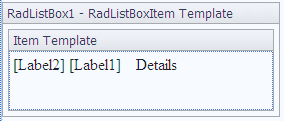
The Template Design Surface appears, set for editing the ItemTemplate.
-
Drag two labels and one hyper link controls from the toolbox onto the Template Design Surface:

-
Edit the DataBindings of these controls so they are populated appropriately:
<ItemTemplate>
   <asp:Label ID="Label2" runat="server" Text='<%# Eval("ID") %>'
	   CssClass="idClass" ></asp:Label>
   <asp:Label ID="Label1" runat="server" Text='<%# Eval("Name") %>' CssClass="list"></asp:Label>
   <asp:HyperLink ID="HyperLink1" runat="server"
	   NavigateUrl='<%# "Details.aspx?ID=" + Eval("ID") %>' Text='Details' CssClass="list" ></asp:HyperLink>
</ItemTemplate> -
Use the Smart Tag anchor to display the Edit Templates pop-up, and choose End Template Editing to close the Template Design Surface.
-
From the Smart Tag add some items to RadListBox or bind it to a datasource. At this point, the declaration for your RadListBox should look as follows:
<telerik:RadListBox RenderMode="Lightweight" Height="200px" AllowReorder="true"
   Width="290px"
   ID="RadListBox1"
   runat="server"
   Skin="Simple"
   DataSourceID="SqlDataSource1"
   DataTextField="Name"
   DataValueField="ID" >
   <ItemTemplate>
	   <asp:Label ID="Label3" runat="server" Text='<%# Eval("ID") %>'
		   CssClass="idClass" ></asp:Label>
	   <asp:Label ID="Label4" runat="server" Text='<%# Eval("Name") %>' CssClass="list"></asp:Label>
	   <asp:HyperLink ID="HyperLink2" runat="server"
		   NavigateUrl='<%# "Details.aspx?ID=" + Eval("ID") %>' Text='Details' CssClass="list" ></asp:HyperLink>
   </ItemTemplate>
</telerik:RadListBox>
7.1. Add the following CSS rules to the section of your page:
<style type="text/css">
	.list {
	   float: left;
	   width: 100px;
	   }
	.idClass {
	   float: left;
	   width: 20px;
	}
</style> - Run the application. You will see that every RadListBox item will contain two labels and a hyperlink as shown in the image above.