Integration with Telerik Document Processing Libraries (DPL)
Telerik Document Processing is a bundle of UI-independent cross-platform libraries that enable you to process the most commonly used text, PDF, and spreadsheet file formats. The Document Processing library allows you to create, import, modify and export documents without relying on external dependencies like Adobe Acrobat or Microsoft Office.
For more details about the benefits of using Telerik Document Processing, see the Telerik Document Processing product overview page.
The DPL are supported and shipped with the Telerik® UI for ASP.NET AJAX suite starting from Q2 2014. More information about the assemblies and how to include them in your project can be found in the Included assemblies help article.
Create an Excel Document
Required Assemblies for building the Excel Document
- Telerik.Windows.Documents.Core.dll
- Telerik.Windows.Documents.Spreadsheet.dll
- Telerik.Windows.Documents.Spreadsheet.FormatProviders.OpenXml.dll
- Telerik.Windows.Zip.dll
Using/Imports statement
	using Telerik.Windows.Documents.Spreadsheet.FormatProviders;
	using Telerik.Windows.Documents.Spreadsheet.FormatProviders.OpenXml.Xlsx;
using xlsx = Telerik.Windows.Documents.Spreadsheet.Model;Steps to create a Workbook object, and Write text into Cells
	// Create a Workbook object
	xlsx.Workbook myWorkbook = new xlsx.Workbook();

	// Create Worksheet object for the Workbook
	xlsx.Worksheet myWorksheet = myWorkbook.Worksheets.Add();

	// Write a Text to the First Cell of the First Row
	// Select the First Cell
	int columnIndex = 0; // 1st Cell Index
	var rowIndex = 0; // 1st Row Index
	xlsx.CellSelection selectedCell = myWorksheet.Cells[rowIndex, columnIndex];

	// Set Cell Value
	selectedCell.SetValue("First Cell First Row");

	// Wite a Text to the 4th Cell in the 5th Row
	// Select the Next Cell
	columnIndex = 3; // 4th Cell index
	rowIndex = 4; // 5th Row Index
	selectedCell = myWorksheet.Cells[rowIndex, columnIndex];

	// Set Cell Value
selectedCell.SetValue("Fourth Cell Fifth Row");Result
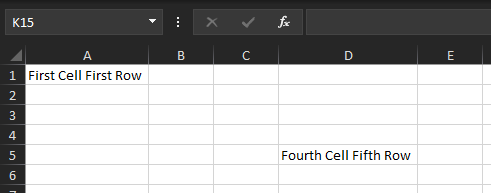
This was just a very basic example of creating an Excel Document using the DPL. More information about the APIs and examples can be found on the DPL documentation page, see Telerik Document Processing - SpreadProcessing.
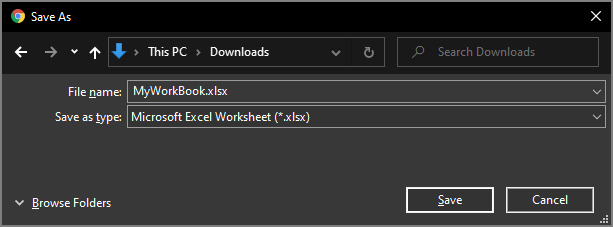
Once done building the Workbook, you can convert it to an Excel Document and save it to the disk or Send it back in the Response for Downloading.
Create a Word Document
	// Create a FlowDocument
	docx.RadFlowDocument flowDocument = new docx.RadFlowDocument();
	// Create a Document Section
	docx.Section section = flowDocument.Sections.AddSection();
	// Insert a Table into the Document Section
	docx.Table table = section.Blocks.AddTable();

	// Create Cell Border Style
	docx.Styles.TableCellBorders tableCellBorders = new docx.Styles.TableCellBorders(new docx.Styles.Border(docx.Styles.BorderStyle.Single));

	// Loop for creating 5 rows and 4 cells per row
	for (int rowIndex = 0; rowIndex < 5; rowIndex++)
	{
	    // Insert more Rows into the Table
	    docx.TableRow row = table.Rows.AddTableRow();

	    for (int colIndex = 0; colIndex < 4; colIndex++)
	    {
	        docx.TableCell cell = row.Cells.AddTableCell();
	        // Apply the border style to the Cell
	        cell.Borders = tableCellBorders;
	    }
	}

	// First Cell in the First Row
	docx.TableCell selectedCell = table.Rows[0].Cells[0];
	// Add a Paragraph to the Cell
	docx.Paragraph paragraph = selectedCell.Blocks.AddParagraph();
	// Set Paragraph value
	paragraph.Inlines.AddRun("First Cell First Row");

	// Fourth Cell Fifth Row
	selectedCell = table.Rows[4].Cells[3];
	// Add a Paragraph to the Cell
	paragraph = selectedCell.Blocks.AddParagraph();
	// Set Paragraph value
paragraph.Inlines.AddRun("Fourth Cell Fifth Row");Result
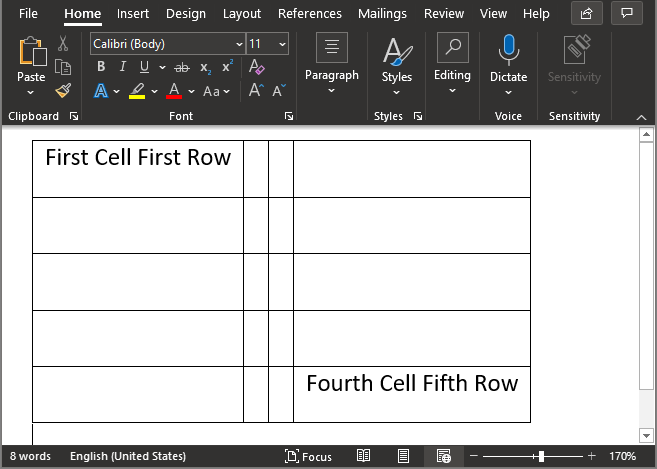
Save the Document to Disk
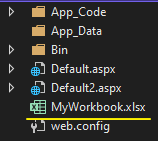
This uses the Workbook object created in the Create an Excel Document section to save it to the Disk.
	// Create an Excel Format Provider which will be used to convert the Workbook to an Excel Document
	IWorkbookFormatProvider formatProvider = new XlsxFormatProvider();

	// Create a Path including the Filename and Extension
	string virtualPath = "~/MyWorkbook.xlsx";

	// FileStream only Supports Physical Path, if you used a Virtual Path, Convert it to a Physical Path
	string absolutePath = Server.MapPath(virtualPath);

	// Use Stream to Create the Excel File
	using (Stream output = new FileStream(absolutePath, FileMode.Create))
	{
	    // Export the Workbook Object to the Excel File
	    formatProvider.Export(myWorkbook, output);
}Result
Download the Document
	// Create an Excel Format Provider which will be used to convert the Workbook to an Excel Document
	IWorkbookFormatProvider formatProvider = new XlsxFormatProvider();

	using (MemoryStream ms = new MemoryStream())
	{
	    // Convert Workbook to MemoryStream
	    formatProvider.Export(myWorkbook, ms);

	    // Convert MemoryStream to Byte array
	    byte[] output = ms.ToArray();

	    // Clear Previous Response
	    Response.Clear();
	    // Set the Content (mime) type for Excel XLSX
	    Response.ContentType = "application/vnd.openxmlformats-officedocument.spreadsheetml.sheet";

	    // Define the FileName
	    string fileName = "MyWorkBook.xlsx";

	    // Use Content-Disposition: attachment if you want browser to offer the File to Download
	    Response.AddHeader("Content-Disposition", "attachment;filename=\"" + fileName + "\"");

	    // Use "Content-Disposition: inline" if you want browsers to open the file directly (only works with browsers that have extensions to open this document)
	    //Response.AddHeader("Content-Disposition", "inline;filename=\"" + fileName + "\"");

	    // Return the Output
	    Response.BinaryWrite(output);

	    // End the Response
	    Response.End();
}Result
Export RadGrid to Excel
In addition to the built-in export functionalities and Support Export Formats the RadGrid can offer, you can also use the DPL APIs to export the Grid to Excel (XLSX) and Word (DOCX) document manually.
Exporting the Grid manually comes handy when trying to create a Document structure that is beyond the built-in functionality.
The following steps walk you through the entire process of Exporting the a simple structure of Grid (headers & rows) to Excel Document manually.
-
Required Assemblies for building the Excel Document:
- Telerik.Windows.Documents.Core.dll
- Telerik.Windows.Documents.Spreadsheet.dll
- Telerik.Windows.Documents.Spreadsheet.FormatProviders.OpenXml.dll
- Telerik.Windows.Zip.dll
The assembly names above are not the same thing as the source namespaces used in the code samples. The Document Processing Libraries namespace migration changed some source namespaces from
Telerik.Windows.*toTelerik.*, while supported assembly identities can retain theirTelerik.Windows.*names. Do not remove or replace an assembly based only on a search of source-code namespaces; inspect the resolved package assets and deployed files for the target framework and version. -
Using/Imports statement
C#using Telerik.Documents.Spreadsheet.FormatProviders; using Telerik.Documents.Spreadsheet.FormatProviders.OpenXml.Xlsx; using xlsx = Telerik.Documents.Spreadsheet.Model; -
Start by creating a Workbook object and add a new Worksheet object to the Worksheets collection.
C#xlsx.Workbook workbook = new xlsx.Workbook(); xlsx.Worksheet worksheet = workbook.Worksheets.Add(); -
Create an array of GridItemTypes containing the following GridItemTypes: Header, Item and AlternatingItem.
C#GridItemType[] supportedItemTypes = new GridItemType[] { GridItemType.Header, GridItemType.AlternatingItem, GridItemType.Item }; -
Get a Collection of Items that will include the Grid Header and Grid Rows by using the GetItems() method of the Grid MasterTable.
C#GridItem[] gridItems = RadGrid1.MasterTableView.GetItems(supportedItemTypes); -
Traverse all cells of each item which will be contained in the exported file and assign their text to the appropriate cell of the Excel document.In the following code snippet an enumeration with tree values is created which will help you get the items which need to be exported.
C#private GridItemType[] supportedItemTypes = new GridItemType[] { GridItemType.Header, GridItemType.AlternatingItem, GridItemType.Item }; -
After the worksheet is populated with data an instance of the XlsxFormatProvider is created and by calling its Export method a file is generated on the server.
	string excelFile = Server.MapPath("~/ExcelFile.xlsx");
	using (FileStream fs = new FileStream(excelFile, FileMode.Create))
	{
	    XlsxFormatProvider provider = new XlsxFormatProvider();
	    provider.Export(worksheet.Workbook, fs);
}After following these steps you will get the following example that presents exporting on button click.
<telerik:RadScriptManager ID="RadScriptManager2" runat="server">
</telerik:RadScriptManager>
<asp:Button Text="Export to excel" ID="ExportToExcel" OnClick="ExportToExcel_Click" runat="server" />
<telerik:RadGrid RenderMode="Lightweight" ID="RadGrid1" runat="server" OnNeedDataSource="RadGrid1_NeedDataSource" AutoGenerateColumns="false">
    <MasterTableView CommandItemDisplay="Top">
        <Columns>
            <telerik:GridBoundColumn DataField="ID" HeaderText="ID"></telerik:GridBoundColumn>
            <telerik:GridBoundColumn DataField="ContactName" HeaderText="Contact Name"></telerik:GridBoundColumn>
            <telerik:GridBoundColumn DataField="CompanyName" HeaderText="Company Name"></telerik:GridBoundColumn>
        </Columns>
    </MasterTableView>
</telerik:RadGrid>As of R1 2021, the MasterTableView's
GenerateXlsxOutput()method can return an already populated Workbook. It is perfect for a scenario where you need to populate the data to a preformatted template Xlsx file. More information can be found in Xlsx and Docx export - Generate Export Output article and the Export Grid to a Preformatted Template file online demo.
Export RadGrid to Word
The assemblies that must be referenced in order to export the RadGrid are:
-
Telerik.Windows.Documents.Core.dll
-
Telerik.Windows.Documents.Flow.dll
-
Telerik.Windows.Zip.dll
The following steps walk you through the entire process of creating an Word document and then export it to the server.
-
Create an instance of the RadFlowDocument class and add a new Section object to the Sections collection. After the section is created a new Table object is added to it.
C#RadFlowDocument flowDoc = new RadFlowDocument(); Section section = flowDoc.Sections.AddSection(); Table table = section.Blocks.AddTable(); -
Traverse all cells of each item which will be contained in the exported file and assign their text to the appropriate cell of the created Word table.In the following code snippet an enumeration with tree values is created which will help you get the items which need to be exported.
C#private GridItemType[] supportedItemTypes = new GridItemType[] { GridItemType.Header, GridItemType.AlternatingItem, GridItemType.Item };C#foreach (GridItem item in RadGrid1.MasterTableView.GetItems(supportedItemTypes)) { Telerik.Windows.Documents.Flow.Model.TableRow wordRow = null; wordRow = table.Rows.AddTableRow(); foreach (System.Web.UI.WebControls.TableCell cell in item.Cells) { if (!cell.Visible) continue; Telerik.Windows.Documents.Flow.Model.TableCell wordCell = wordRow.Cells.AddTableCell(); Paragraph paragraph = wordCell.Blocks.AddParagraph(); paragraph.Inlines.AddRun(cell.Text); } } -
After the worksheet is populated with data an instance of the DocxFormatProvider is created and by calling its Export method a file is generated on the server.
	string wordFile = Server.MapPath("~/WordFile.docx");
	using (FileStream fs = new FileStream(wordFile, FileMode.Create))
	{
	    DocxFormatProvider provider = new DocxFormatProvider();
	    provider.Export(table.Document, fs);
}After following these steps you will get the following example that presents exporting on button click.
	<telerik:RadScriptManager ID="RadScriptManager3" runat="server">
	</telerik:RadScriptManager>
	<asp:Button Text="Export to word" ID="Button1" OnClick="ExportToWord_Click" runat="server" />
	<telerik:RadGrid RenderMode="Lightweight" ID="RadGrid2" runat="server" OnNeedDataSource="RadGrid1_NeedDataSource" AutoGenerateColumns="false">
	    <MasterTableView CommandItemDisplay="Top">
	        <Columns>
	            <telerik:GridBoundColumn DataField="ID" HeaderText="ID"></telerik:GridBoundColumn>
	            <telerik:GridBoundColumn DataField="ContactName" HeaderText="Contact Name"></telerik:GridBoundColumn>
	            <telerik:GridBoundColumn DataField="CompanyName" HeaderText="Company Name"></telerik:GridBoundColumn>
	        </Columns>
	    </MasterTableView>
	</telerik:RadGrid>