.NET MAUI PromptInput Affix Content
The PromptInput allows you to add custom content in different regions around the input area. This is useful for scenarios such as displaying the active topic, selecting a chat model, or showing a character counter next to the input.
Configure the affix content through the following properties:
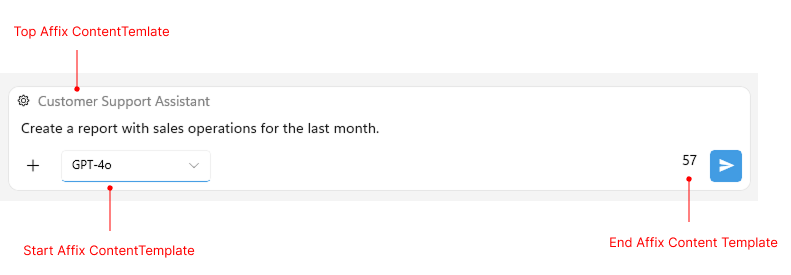
TopAffixContentTemplate(DataTemplate)—Defines the template for the content displayed above the text input area and below the attached files view.StartAffixContentTemplate(DataTemplate)—Defines the template for the content displayed on the left side at the bottom of the prompt input area, after the default content, that is, the 'More' button.EndAffixContentTemplate(DataTemplate)—Defines the template for the content displayed on the right side at the bottom of the prompt input area, before the default content, that is, the Speech-to-Text and Send buttons.
The following example demonstrates how to add custom content in the top, start, and end affix regions of the PromptInput.
1. Define the top affix template, which renders a settings icon with a popup and a label for the active topic:
<DataTemplate x:Key="TopAffixTemplate">
<HorizontalStackLayout Spacing="8">
<Label Text=""
FontFamily="TelerikFontExamples"
FontSize="13"
VerticalTextAlignment="Center">
<Label.GestureRecognizers>
<TapGestureRecognizer Command="{Binding BindingContext.OpenPopup, Source={x:Reference promptInput}}" />
</Label.GestureRecognizers>
<telerik:RadPopup.Popup>
<telerik:RadPopup IsOpen="{Binding BindingContext.IsPopupOpen, Source={x:Reference promptInput}}"
OutsideBackgroundColor="#66000000"
Placement="{OnPlatform Android=Center, iOS=Center}"
VerticalOffset="8">
<telerik:RadBorder BackgroundColor="#F9F9F9"
CornerRadius="8"
WidthRequest="300">
<Grid BackgroundColor="#E0E0E0"
Padding="12">
<Label Text="Settings Popup"
TextColor="#666666"
HorizontalOptions="Center" />
<Label Text=""
FontFamily="TelerikFontExamples"
FontSize="16"
TextColor="#666666"
HorizontalOptions="End">
<Label.GestureRecognizers>
<TapGestureRecognizer Command="{Binding BindingContext.ClosePopup, Source={x:Reference promptInput}}" />
</Label.GestureRecognizers>
</Label>
</Grid>
</telerik:RadBorder>
</telerik:RadPopup>
</telerik:RadPopup.Popup>
</Label>
<Label Text="Customer Support Assistant" TextColor="Gray" />
</HorizontalStackLayout>
</DataTemplate>2. Define the start affix template, which renders a combo box for selecting a chat model:
<DataTemplate x:Key="StartAffixTemplate">
    <telerik:RadComboBox ItemsSource="{Binding BindingContext.ChatModels, Source={x:Reference promptInput}}"
                         SelectedItem="{Binding BindingContext.SelectedModel, Source={x:Reference promptInput}}"
                         IsClearButtonVisible="False"
                         WidthRequest="150"
                         FontSize="12" />
</DataTemplate>
3. Define the end affix template, which displays the current character count:
<DataTemplate x:Key="EndAffixTemplate">
    <Label Text="{Binding BindingContext.CharacterCount, Mode=TwoWay, Source={x:Reference promptInput}}" />
</DataTemplate>
4. Apply the templates to the PromptInput:
<telerik:RadPromptInput x:Name="promptInput"
                        DisplayMode="Expanded"
                        Message="{Binding PromptText, Mode=TwoWay}"
                        Placeholder="Type a prompt"
                        TopAffixContentTemplate="{StaticResource TopAffixTemplate}"
                        StartAffixContentTemplate="{StaticResource StartAffixTemplate}"
                        EndAffixContentTemplate="{StaticResource EndAffixTemplate}" />
5. Define the ViewModel and set it as the BindingContext of the page:
public class AffixViewModel : NotifyPropertyChangedBase
{
    private string promptText = string.Empty;
    private bool isPopupOpen;
    private string selectedModel;

    public AffixViewModel()
    {
        this.OpenPopup = new Command(() => this.IsPopupOpen = true);
        this.ClosePopup = new Command(() => this.IsPopupOpen = false);

        this.ChatModels = new List<string>
        {
            "GPT-4o",
            "GPT-4o mini",
            "GPT-4.1",
            "Claude 3.5 Sonnet",
            "Claude 4 Opus",
            "Gemini 2.5 Pro",
            "Gemini 2.5 Flash",
            "LLaMA 4"
        };

        this.SelectedModel = this.ChatModels[0];
    }

    public ICommand OpenPopup { get; }

    public ICommand ClosePopup { get; }

    public List<string> ChatModels { get; }

    public string SelectedModel
    {
        get => this.selectedModel;
        set => this.UpdateValue(ref this.selectedModel, value);
    }

    public bool IsPopupOpen
    {
        get => this.isPopupOpen;
        set => this.UpdateValue(ref this.isPopupOpen, value);
    }

    public string ActiveTopic => "Customer Support Assistant";

    public string PromptText
    {
        get => this.promptText;
        set
        {
            if (this.promptText == value)
            {
                return;
            }

            this.promptText = value;
            this.OnPropertyChanged();
            this.OnPropertyChanged(nameof(this.CharacterCount));
        }
    }

    public string CharacterCount
    {
        get
        {
            if (this.PromptText == null)
            {
                return "0";
            }

            return this.PromptText.Length.ToString();
        }
    }
}
This is the result on WinUI:
For a runnable example demonstrating the PromptInput Affix Content, see the SDKBrowser Demo Application and go to the PromptInput > Features category.