
Rapid Cross-Platform Development with the Angular 2 CLI

Summarize with AI:
The origin of the quote, "With great power comes great responsibility," may be subject to debate, but the truth behind it is universally accepted. As the power of the web grows, so does its complexity and the opportunity for error.
Angular 2 represents a major step in the evolution of modern web front-end frameworks,but it comes with a price. From TypeScript compilation to running test scripts,bundling JavaScript, and following the Angular 2 Style Guide, "ng2 developers" are faced with myriad problems to solve and challenges to overcome.
Fortunately, there exists a way to simplify the process of building Angular 2 applications. Whether your goal is to stand up a rapid prototype or build an enterprise-ready line of business application that is continuously deployed to the cloud, the Angular CLI is a tool that you don't want to code without.
Getting Started: The Prerequisites
Angular 2 supports cross-platform development with open source tools. Regardless of your development environment, a few simple steps will get you up and running.
- Install the Long Term Support (LTS) version of Node.js®
- Install your favorite open source IDE. Mine is Visual Studio Code
- Finally, go to a Node.js command line prompt and install the Angular-CLI:
npm install -g angular-cli.
Now you're ready to start your first project!
Creating your First Project
To start a new project, navigate to the parent folder and execute the following command:
ng new my-first-app
Replace "my-first-app" with your project name. This single command executes several tasks, including:
- Creates a local folder structure
- Generates an initial set of HTML pages, TypeScript source files, CSS styles and tests
- Writes a
package.jsonthat has all the basic Angular 2 dependencies - Installs all Node (npm) dependencies for you
- Sets up Karma for running unit tests with Jasmine
- Configures Protractor for running end-to-end (E2E) tests
- Initializes a Git repository and commits the initial project
- Creates various files to help with building and generating your production app.
You now have everything thing you need to build and run the project! Make sure you are in the root project directory and issue the following command:
ng serve
You will see something like the following image:
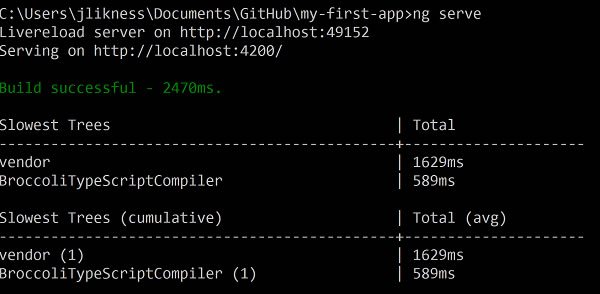
If your browser doesn't open automatically, launch it and navigate to the address on the "serving" line (i.e. port 4200). You should see the app. You can keep the command running and as you make changes, the site will automatically reload to reflect the changes.
Project Structure
There are a number of folders generated automatically. These include:
- config - this folder contains configuration information for the deployment and testing.
- dist - this folder is not included in source control by default and is the distribution or generated build for your app.
- e2e - this folder contains the scripts for end-to-end tests.
- node_modules - this folder is not included in source control and is the standard folder for
npmpackages. - public - this is a generic folder with an
.npmignorefile. - src - this folder contains all source assets, including code, stylesheets, images, and HTML markup, for your app.
- tmp - temporary folder.
- typings - this folder contains TypeScript description files that provide live documentation and auto-completion for libraries you use.
There are several JavaScript and JSON files in the project's root that you do not have to edit directly and update via CLI commands.
Source Structure
The root of the src folder contains some important files.
index.htmlis the main page loaded that bootstraps the entire application.main.tsis the bootstrap code. You should only have to edit this if you need to add modules when the app is bootstrapped.system-config.tsconfigures dependencies for the app. Later you will learn how to use this to add third-party libraries.tsconfig.jsoncontains the configuration for the TypeScript compiler.typings.d.tsis used for ambient type declarations that your application will use.
Underneath the app folder you will find the templates, styles, code, and test specifications for the project. Based on the Angular 2 style guide, you will find that components and services are grouped together with a common name for the template (HTML), style (CSS), source code (TypeScript) and specification (TypeScript). When you generate a new component, the CLI will create a folder for that component. A module id is used for the component's definition that makes it easier to move the component to a new location if you need to at a later time. Routes will also generate subfolders.
You may notice an index.ts file exists in the root and is also generated when you create new components. This file exports the types that you declare for that component to make it easier to reference. For example, because the root index.ts under the app folder has this line:
export * from './my-first-app.component';
You can reference the component using the /app path without specifying the file name. This is demonstrated in the root main.ts file:
import { MyFirstAppAppComponent, environment } from './app/';
Components have a similar convention, allowing you to import them from the component path instead of the filename.
Testing
The CLI automatically configures the Karma test runner to use Jasmine, includes dependencies and generates basic tests for you to build upon. To see the tests in action, simply type:
ng test
Be sure that you are at the root of the project in a Node.js command line. This will build the app, spin up a browser to host the tests, and execute them for you. The test harness runs continuously so you can update code and tests and have them rerun automatically.
Note: on some Windows systems, the test command may fail due to filesystem compatibility issues. If that's the case, don't despair! There is a simple workaround. First, build the project:
ng buildNext, execute the test script with a special option to suppress the test build:
ng test --build:falseThis should get you up and running with tests. With this approach, you will have to rebuild manually to trigger a refresh of the tests. You can use
ng servein another window to automatically rebuild and refresh.
Production
You may notice that the dist folder essentially copies all the compiled JavaScript files from your application and includes the .map.js files to link the generated JavaScript to its TypeScript source. Although this is perfect for testing and debugging, it is common to bundle files for production to reduce overall load time.
You can create a production build using this command:
ng build --prod
This will generate a production-ready build with bundled files. The command will output the relative file sizes and how small they will be on servers that support dynamic compression:
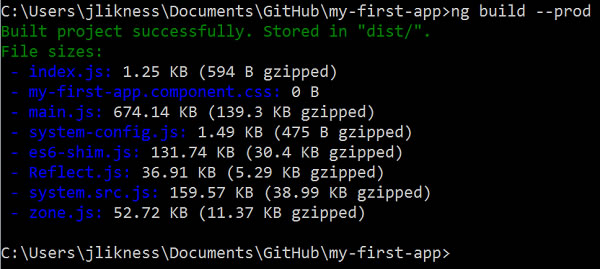
Easy Deployment
If you are using GitHub, you can optionally deploy code to GitHub pages for quick, easy hosting of lightweight projects. Angular 2 supports publishing to the gh-pages branch automatically. To learn how, read the excellent Quick Angular 2 Hosting with the Angular CLI and GitHub Pages article by TJ VanToll.
Services
Services are typically reusable pieces of logic that don't leverage templates or UI. Services may perform calculations, manage state for the application or fetch data from web service end points. To scaffold a new service, type:
ng g service GenerateNumbers
Where GenerateNumbers is the name of the service that you wish to generate. The CLI will automatically parse the camel case and translate it to generate-numbers.service.ts. The corresponding test includes spec in the filename. Per the style guide, the service is generated with the name GenerateNumbersService so don't add the Service suffix to your own names as it will be provided for you.
The following code will generate a Fibonacci sequence of numbers.
import { Injectable } from '@angular/core';

@Injectable()
export class GenerateNumbersService {

  private _x: number;
  private _next: number;

  constructor() {
    this._x = 1;
    this._next = 1;
  }

  public fetch(): number {
    let current = this._x;
    let next = this._x + this._next;
    this._x = this._next;
    this._next = next;
    return current;
  }
}
A corresponding test looks like this:
describe('GenerateNumbers Service', () => {
  beforeEachProviders(() => [GenerateNumbersService]);

  it('should generate a Fibonacci sequence',
      inject([GenerateNumbersService], (service: GenerateNumbersService) => {
    expect(service).toBeTruthy();
    let expected = [1, 1, 2, 3, 5, 8];
    let actual = [];
    while (actual.length < expected.length) {
      actual.push(service.fetch());
    }
    for (let idx = 0; idx < expected.length; idx += 1) {
      expect(actual[idx]).toBe(expected[idx]);
    }
  }));
});
Pipes
Pipes are reusable formatters for data. They take in raw data and transform it to an output as part of data-binding. To generate a pipe, use:
ng g pipe NumberToStyle
The template will generate the source and a test. The implementation takes in a source value with optional arguments and returns the transformed value. This example will translate a number to the style properties to set the width and height of an element in pixels:
transform(value: any, args?: any): any {
    let numeric = Number(value);
    return 'height: ' + numeric + 'px; width: ' + numeric + 'px;';
}
Components
Components are reusable, self-contained units that include templates, styles, and related code. You generate a component like this:
ng g component Tile
This will create a folder based upon the component's name and export the component types via a generated index.ts file. Per the suggested naming convention, this component will be called TileComponent.
It's important to note that the CSS for the component is self-contained. You can specify a generic div style in the CSS and it will only apply to div tags that are present in the component's template. Angular supports this by either using Shadow DOM or, for browsers that don't support mshadow DOM, by generating unique CSS classes for the component automatically.
Routes
To generate a route, use:
ng g route AboutUs
This will generate a folder and corresponding component from the route, and add the necessary decorators to configure the route.
You will notice in your top-level MyFirstAppAppComponent there is now a @Routes definition:
@Routes([
  {path: '/AboutUs', component: AboutUsComponent}
])
Note: Although the generator will add the appropriate import statement for routes, you may need to manually configure support to embed links. Simply add
ROUTER_DIRECTIVESto the list of directives andROUTER_PROVIDERSto the list of providers, and then you can configure a link to the route like this:
<div><a [routerLink]="['AboutUs']">About Us</a></div>You can include this in the top-level component or may wish to build a specific navigation component to generate the menu.
You may have noticed the route folder is prefixed to look like this: +AboutUs. This indicates the route is "lazy-loaded," which means the assets are not pulled into the DOM until the user actually requests the route. This can help with performance and reduce application overhead. You can specify a permanent route that is pre-loaded when the application bootstraps by adding the --lazy false option.
Third-Party Support
There are a few steps to integrate third-party libraries. First, install the third-party package. For example, to install the showdown library that converts markdown to HTML, execute this command:
npm i showdown --save
This will install the package and save it in the project configuration.
Next, configure the build to include the package. This step will vary depending on how the package installs. For this example, add the following item to the vendorNpmFiles array in angular-cli-build.js:
'showdown/dist/showdown.js'
You can execute an ng build to verify the correct files get copied to a folder called vendor under dist.
Next, edit system-config.ts to inform the TypeScript compiler and system.js module loader how to reference the library. Again, this will vary from library to library so check the vendor's documentation for the appropriate configuration. For this example we add a map and a packages entry like this:
const map: any = {
  'showdown':'vendor/showdown/dist'
};

const packages: any = {
  'showdown': {
    main: 'showdown.js',
    format: 'global'
  }
};
Optionally you can install the type information for the library or specify an ambient declaration in the root typings.d.ts like this:
declare var showdown: any;
To use it in a component, import it:
import 'showdown';
Then use the library:
public text: string;

constructor() {
    let converter = new showdown.Converter();
    this.text=converter.makeHtml('#About Us\r\n## This works!');
}
That's it!
Conclusion
This article only scratched the surface of what the Angular CLI is capable of. Here are a few tips to wrap-up with:
- If you want to serve the app and run continuous tests at the same time, there is no need for both commands to build the app. Launch
ng serveand then launchng test --build falseseparately. - Scaffolding new files can throw the automated builds off. I recommend that you stop any current processes first, scaffold your new items, then restart the processes and modify them as needed.
- The Angular team updates the CLI often, so you should periodically issue the
npm i angular-cli -gcommand to keep it up to date. - Anytime you change the configuration for the CLI itself, including
angular-cli-build.js, you should stop any running processes and restart them to pick up the changes. Only changes underneath the src folder will be auto-detected.
Have fun rapidly building and deploying your Angular 2 apps!
Related Resources
- The Command Line: Reinvented for Modern Developers (whitepaper)
- .NET Productivity Tools You Might Be Missing Out On (article)
- A Fast Angular 2 Setup with Components and the Component Router (article)
- Quick Angular 2 Hosting with the Angular CLI and GitHub Pages (article)
- Kendo UI R2'16 Release Webinar Wrap Up (blog post)

Jeremy Likness
Jeremy is a senior cloud developer advocate for Azure at Microsoft and a former 8-year Microsoft MVP. Jeremy is an experienced entrepreneur and technology executive who has successfully helped ship commercial enterprise software for 20 years. You can read more from him at his blog or find him on GitHub.