
Next.js Server Actions Made Dead Simple

Summarize with AI:
Since Server Actions are ready in Next.js, let’s see a simple illustration emulating a database, handling errors and using optimistic updates.
Server Actions are finally ready! I was going to write this article a few months back, but there were so many bugs and issues, I decided to wait. I frankly don’t use React for any projects, and I dislike it for many reasons (mainly state management), but I appreciate Next.js and what the team is doing. I am also a little bullish on Server Components and Server Actions.
This example actually took a lot longer than it should have to build; the documentation is extremely lacking, especially when it comes to TypeScript. Next.js just mostly copied the examples from React, and not even the good ones. Also, most examples do not follow the Single Responsibility Principle, which am a huge fan of. So, let’s get started with a dead-simple example!
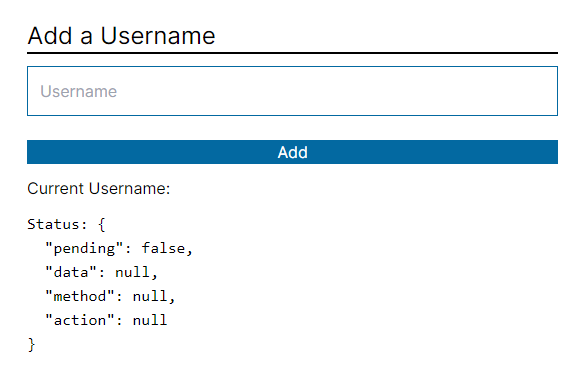
Add a Username
With React Server Components, the correct way to connect to the server to change your data is to use Server Actions. Svelte has had Actions for a while now, but React works a little differently. Some things are extremely intuitive, while others are not. To keep you from needing to be a React expert, I have simplified things. The easiest example I could think of is adding a username to a database. This example emulates a database, handles errors and uses optimistic updates.
useFormState
You cannot use useFormState with useOptimistic, plus I find the typing and mechanics of useFormState a bit odd. We sometimes need to return data from the server, not just an error. Either way, you don’t need it here.
page.tsx
import { Username } from "./username";

export default function Home() {
  return (
    <main>
      <Username />
    </main>
  );
}
Nothing surprising here on the main page.
username.tsx
'use client';

import { useRef } from "react";
import { useUsername } from "./use-username";
import { UsernameStatus } from "./username-status";

export function Username() {

    const formRef = useRef(null);

    const { username, usernameError, addUsernameAction } = useUsername(formRef);

    return (
        <section className="m-10">
            <h1 className="text-2xl border-b-2 border-black my-3">Add a Username</h1>
            <form className="flex flex-col gap-3" ref={formRef} action={addUsernameAction}>
                <input className="border border-sky-700 p-3" type="text" name="username" placeholder="Username" />
                {usernameError &&
                    <p className="text-red-500 text-xs my-2">
                        {usernameError}
                    </p>
                }
                <button className="bg-sky-700 text-white mt-3" type="submit">Add</button>
                <p>Current Username: {username}</p>
                <UsernameStatus />
            </form>
        </section>
    );
}
Ok. What’s going on here? First, we are creating a useRef hook for the form. This will allow us to reset the form later when we pass it to our custom hook. Notice how beautiful this looks. I highly suggest you always create a custom hook when dealing with complex state. It keeps you in line with the Single Responsibility Principle, and ultimately makes your code easier to read, update and manage for a single creator or a team.
Next, we create a form with formRef and action, make it look good with Tailwind, display the error (if there is one), and show the username state. All of this is standard React, but we don’t get bogged down trying to understand it; our code is in the custom hook.
username-status.tsx
import { useFormStatus } from "react-dom";

export function UsernameStatus() {

    const status = useFormStatus();

    return (
        <pre>
            <p>Status: {JSON.stringify(status, null, 2)}</p>
        </pre>
    );
}
This code is also extremely easy to understand and just shows you the status of the form along with the data. You won’t see the data being submitted, as it is technically a formData type. You would need to get the form data just like any other form, then use it accordingly.
I could only see a use for this method in rare circumstances, as you could just intercept the form action and get the data directly in most cases. However, the status pending is very useful to disable buttons, show loading states, etc.
add-username.tsx
type AddUsername = {
    success: false;
    error: string;
} | {
    success: true;
    username: string;
};

export async function addUsername(formData: FormData): Promise<AddUsername> {
    const { username } = Object.fromEntries(formData);

    if (!username || typeof username !== 'string' || username.length < 2) {
        return {
            success: false,
            error: 'Username must be at a valid string of at least 2 characters'
        };
    }

    // simulate adding to database
    await new Promise((res) => setTimeout(res, 3000));

    return {
        success: true,
        username: 'server-' + username
    };
}
Ok, let’s talk about the form action itself. Here we are validating the username and returning an error or the new username. Notice my return types are false and true other than boolean. This is a trick to help with valid return types. If it returns success: true, then there must be a username. Other wise success: false will return an error.
I would highly recommend Valibot on the server instead of Zod. Zod is overly complicated, and most importantly, does not use Tree Shaking. This means you will import classes and methods you don’t need, slowing down your server. Whatever you do, do NOT use Zod on the frontend. I’m not sure where that came from for other content creators, but HTML5 has built-in validators for that.
use-username.tsx
import { useState, type MutableRefObject, useOptimistic } from "react";
import { addUsername } from "./add-username";

export function useUsername(formRef: MutableRefObject<HTMLFormElement | null>) {

    const [usernameError, setUsernameError] = useState('');
    const [username, setUsername] = useState('');
    const [optimisticUsername, setOptimisticUsername] = useOptimistic(username);

    return {
        username: optimisticUsername,
        usernameError,
        addUsernameAction: async (formData: FormData) => {

            const { username } = Object.fromEntries(formData);

            formRef.current?.reset();
            setUsernameError('');

            if (typeof username !== 'string') {
                // validation done on server for this example
                return;
            }
            setOptimisticUsername('client-' + username);

            const result = await addUsername(formData);

            if (!result.success) {
                setUsernameError(result.error);
                return;
            }
            setUsername(result.username);
        }
    };
};
Ok, now let’s get to the beauty of the code: the custom hook. Here the useUsername hook takes the formRef as a parameter to reset the form when necessary. Create a usernameError state to handle errors, username state to handle to actual username and optimisticUsername to handle the user’s optimistic view of the username.
Most examples I found overcomplicate useOptimistic. Think of it just like useState, except it gets automatically rolled back when the server data is returned. You need to setUsername after all is said and done so that there is an actual value when the server is done.
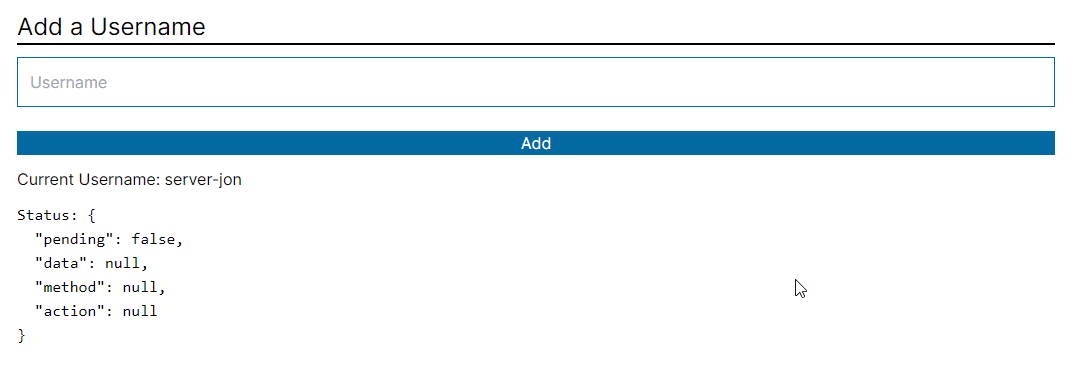
And you can see the input data change from client to server after a few seconds. This is what optimistic updates do.
Error Handling in Server Actions
There are technically two ways you can handle errors in Server Actions:
- Use an ErrorBoundary. In this case you throw an error in your
addUsernameaction. However, I’m not a fan of using that in this case. I feel like this should somewhat model what a Rest API does. However, this is not wrong either. - Just return the error in an object. If there is an error, just return the error and display it accordingly. Only difference is Rest API would return a
400or500error, which you would have to check for withresponse.ok. Connection issues should also be handled in your code as well. Most other examples don’t even handle errors.
Here, if there is an error, you just print it.
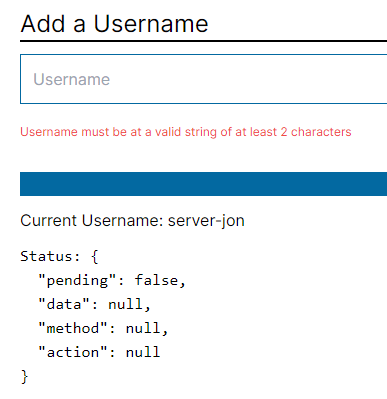
I just made this error for an example’s sake, but in a real app you would handle form validation on BOTH the backend and the frontend.
That’s it! Pretty simple, huh? The key here is for you to use a custom hook. React is arguably not built for programmers using the Single Responsibility Principle, so you must program responsibly and optimistically.
Repo: GitHub

Jonathan Gamble
Jonathan Gamble has been an avid web programmer for more than 20 years. He has been building web applications as a hobby since he was 16 years old, and he received a post-bachelor’s in Computer Science from Oregon State. His real passions are language learning and playing rock piano, but he never gets away from coding. Read more from him at https://code.build/.
Related Posts
Comments
All articles
Topics
Web MobileMobile
Desktop
Design
Productivity
People
