.NET MAUI Barcode & QR Code: For Inventory, Orders & Loyalty

Summarize with AI:
Learn how to get started with the .NET MAUI barcode component for easy support of scanning.
What if all this technological evolution … ends up taking my job?
It’s one of the most common questions when talking about new tools or integrating existing ones. But that’s where the real mistake lies: seeing them as enemies. In reality, technology is here to support and accelerate our work—not replace us.
Today, there are still many manual processes that could be optimized with the right tools. And what do we gain from that? Getting more done in less time, reducing errors and focusing on what truly adds value.
A clear example of this can be found in many retail companies. Imagine employees spending hours generating and manually typing the codes for thousands of products. But what if, instead, they could simply generate and scan those barcodes using an app?
It would be a game-changer: faster workflows, fewer errors and much less stress.
Because yes, we’re not just talking about speed—we’re talking about precision. A scanner won’t mistype a digit like a human might when entering data quickly. And in environments where a small error can cost time or money, that makes all the difference.
In this article, I’ll show you how barcodes can help streamline inventory and order management. I’ll also introduce you to a .NET MAUI Barcode control you can easily integrate into your apps using Progress Telerik UI for .NET MAUI.
Let’s Start!
As developers, we must stay ahead of the curve and continuously add value to the applications we build. That’s why today you’ll learn much more about barcodes and how they can enhance the functionality of your apps.
First of All, What Is a Barcode?
It’s a visual representation of data that can be read by a scanner. Among its main functions are product identification, inventory tracking, streamlining payments or check-ins, and much more. You can also customize it by setting the foreground and background colors to match your app’s design.
Barcode Types
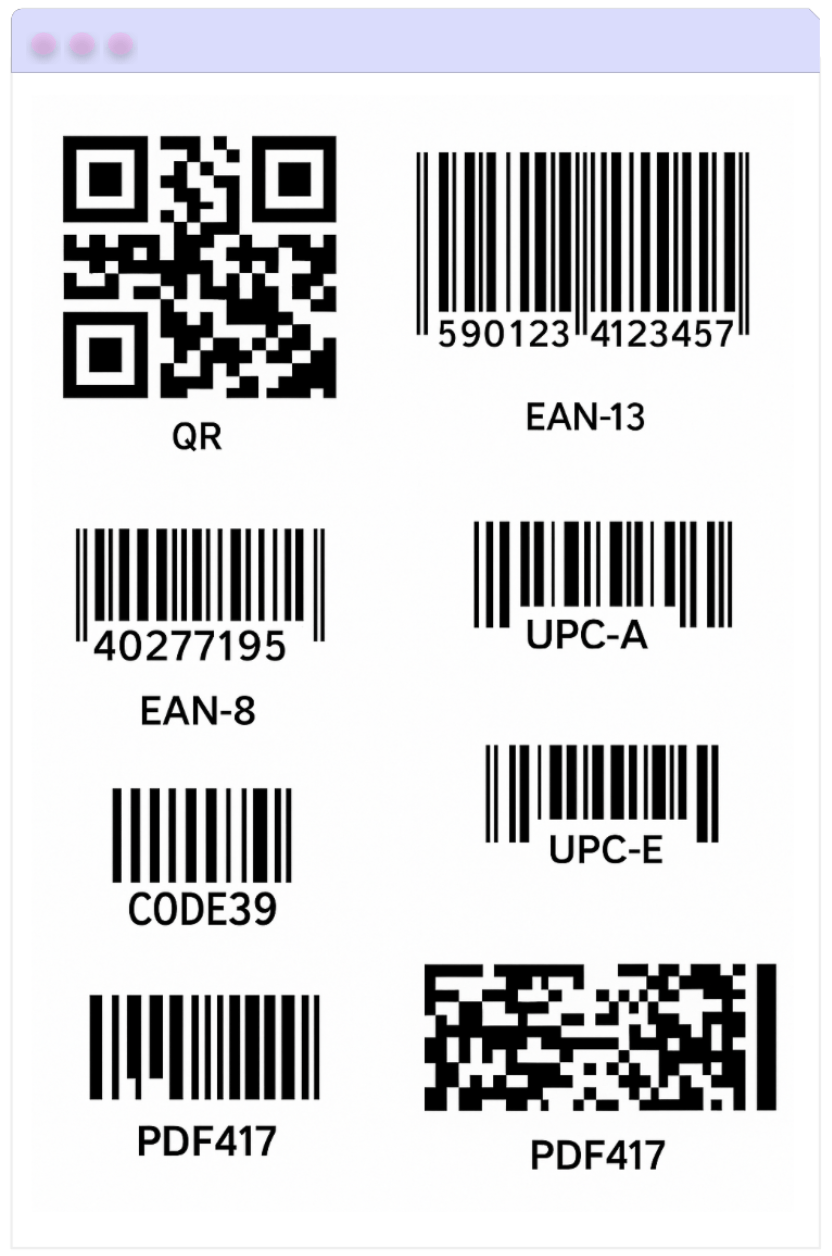
There are different types of barcodes, and the Telerik Barcode control supports a wide variety of them. Below, you’ll find a graphical representation of each one, along with a brief description of when to use them.

The barcodes that you can create using the Progress Telerik Barcode control are the ones shown in the image. Let’s take a closer look at each of them:
- QR (Quick Response): A 2D barcode with a capacity of over 7,000 characters. It can store text, URLs and complex data. Ideal for mobile apps, payments and digital interactions.
- EAN-13: A 1D barcode containing 13 digits. It’s the global standard for retail products, widely used in supermarkets and stores.
- EAN-8: Also 1D, with 8 digits. Designed for small packaging where an EAN-13 code wouldn’t fit.
- UPC-A (Universal Product Code): A 1D barcode with 12 digits, commonly used in the U.S. and Canada for retail products.
- UPC-E: A compact version of UPC-A, using only 6 digits (expandable to 12). Ideal for small packages where space is limited.
- Code 39: A 1D barcode that supports 43 characters including letters, numbers and symbols. Commonly used in industrial settings, logistics and ID cards.
- PDF417: A 2D barcode capable of storing over 1,800 characters. It can encode both text and binary data, and is often used in official documents, boarding passes and licenses.
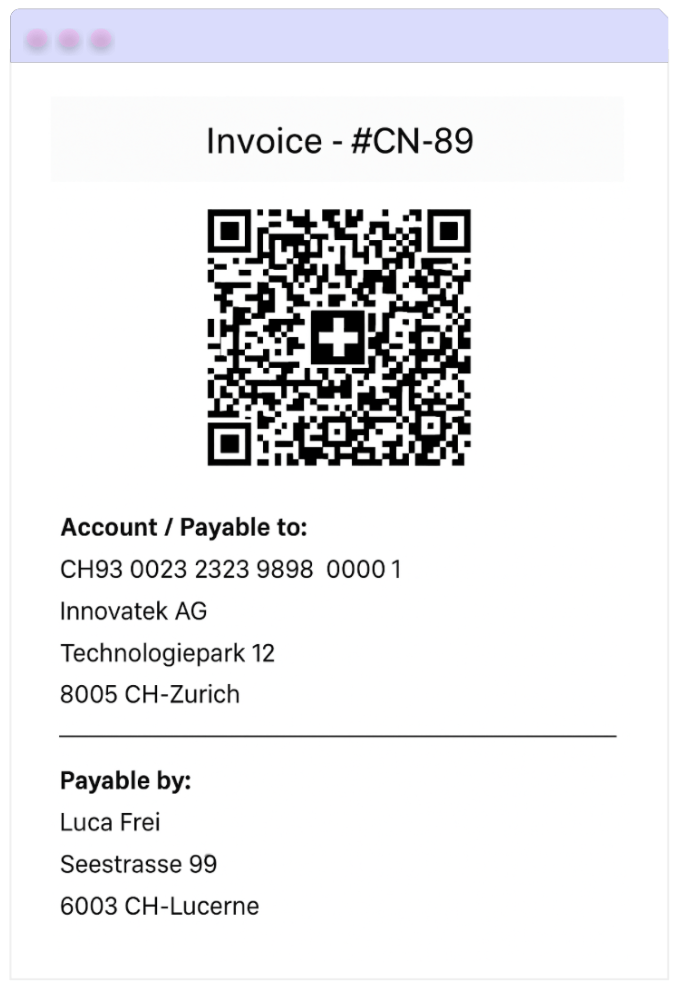
Support for Swiss QR Code

The Swiss QR Code is a type of code specifically designed for payments in Switzerland, meaning it includes all the necessary information and complies with regulatory requirements to perform transactions in a structured and secure way.
How Can You Set the Size? 🤔
There are three ways to adjust the barcode size:
- Manual: Allows you to define how thin the smallest line or dot in the barcode should be.
- Snap: The barcode stretches to fit, but every line or dot uses a precise number of pixels to avoid distortion.
- Stretch: The barcode resizes to perfectly fit the space, even if it distorts the original proportions.
How Do I Get Started with the Barcode Control? 🤔
Now that you’ve seen everything this can do, let’s walk through how to bring it to life in your own app. Getting started is easy—just follow a few simple steps using Telerik UI for .NET MAUI free trial:
- Make sure your .NET MAUI app is set up.
- Download Telerik UI for .NET MAUI.
- Install the Telerik component into your project.
Once everything’s ready, you’re all set to start building!
Step 1: Import the Telerik Namespace
Open your XAML file and add this line to include the Telerik controls:
xmlns:telerik="[http://schemas.telerik.com/2022/xaml/maui](http://schemas.telerik.com/2022/xaml/maui)"
Step 2: Register Telerik in MauiProgram.cs
Go to your MauiProgram.cs file, and inside the CreateMauiApp method, make sure to register Telerik by adding the .UseTelerik() extension method. It’s recommended to place it above the .UseMauiApp() line, like this:
using Telerik.Maui.Controls.Compatibility;

public static class MauiProgram
{
public static MauiApp CreateMauiApp()
{
    var builder = MauiApp.CreateBuilder();
    builder
    .UseTelerik()
    .UseMauiApp<App>()
    .ConfigureFonts(fonts =>
    {
	    fonts.AddFont("OpenSans-Regular.ttf", "OpenSansRegular");
    });
    return builder.Build();
    }
}
Step 3: Adding the Namespace
xmlns:telerik="http://schemas.telerik.com/2022/xaml/maui"
Step 4: Let’s Add a QR Code to Your .NET MAUI App!
<telerik:RadBarcode x:Name="barcode"
    AutomationId="barcode"
    Value="https://www.telerik.com/maui-ui">
	    <telerik:RadBarcode.Symbology>
	    <telerik:QRCode SizingMode="Stretch" />
	    </telerik:RadBarcode.Symbology>
</telerik:RadBarcode>
To specify the type of barcode you need in your app, you can refer to the available formats mentioned above. For example, let’s do it using the Code39 type:
<telerik:RadBarcode
	    WidthRequest="200"
	    HeightRequest="100"
	    HorizontalOptions="Center"
	    VerticalOptions="Center"
	    Value="58000106">
    <telerik:RadBarcode.Symbology>
	    <telerik:Code39 HorizontalTextAlignment="Center"
	    SizingMode="Stretch"
	    ShowText="True"
	    CodeTextSpacing="10"/>
    </telerik:RadBarcode.Symbology>
</telerik:RadBarcode>
Wrap-up
And that’s it! 😎 With these simple steps, you’ve learned how to implement the Telerik Barcode control in your .NET MAUI applications. You also discovered its various use cases and the different barcode types available.
Go ahead and start integrating them into your apps from now on!
Thanks for reading! 💚💕
References

Leomaris Reyes
Leomaris Reyes is a Software Engineer from the Dominican Republic, with more than 5 years of experience. A Xamarin Certified Mobile Developer, she is also the founder of Stemelle, an entity that works with software developers, training and mentoring with a main goal of including women in Tech. Leomaris really loves learning new things! 💚💕 You can follow her: Twitter, LinkedIn , AskXammy and Medium.

