Manage Forms Data With Telerik UI for ASP.NET Core and EF Core

Summarize with AI:
See how to quickly build an ASP.NET Core app that performs Data Grid CRUD operations with Telerik UI for ASP.NET Core Form and Grid UI components, and EF Core.
Building new functionality takes effort and is time consuming—even the creation of a simple registration form in your app. Typically, we need to implement ourselves data modeling, CRUD functions, the UI and more. Luckily, you don’t have to build everything yourself from the ground up. There are great tools and UI libraries that contain hundreds of built-in features, which allow you to simply plug in pre-built UI components, bind them to data and let them do the work for you.
Following up on our first article in this two-part series, “Manage Forms Data with Telerik UI for Blazor and EF Core,” let’s see how to implement the same scenario in ASP.NET Core.
Our goal for the current article: Show you how easy and fast it is to create a registration system in an ASP.NET Core application with EF Core and the Data Grid and Form UI components by Telerik.
Our ASP.NET Core Project
As an example project, we will create an ASP.NET Core app in .NET 6 (the latest official and long-term supported version of .NET). Our app will register products, allowing users to read, create, alter and delete records.
The database I will use is SQLite because it is easy to configure, but you can use any relational database you prefer, like MySQL or SQL SERVER. You’ll just need to change the connection string and the configuration of the “ApplicationDbContext” class.
The database schema will be modeled according to the Model classes and created/updated by EF Core commands.
For the frontend, we will use Telerik UI for ASP.NET Core, which has all the UI components we will need—such as Form and Data Grid—with hundreds of built-in features such as sorting, filtering, pagination, virtualization and much more.
You can access the complete source code of the final project at this link: Source Code.
Creating the Project
To create the project in Visual Studio, you can follow this great guide produced by Telerik: First Steps with Telerik UI for ASP.NET Core.
You can name the project “ProductCatalog.”
Project Dependencies
Next you need to add the project dependencies—either directly in the project code “ProductCatalog.csproj” or by downloading NuGet Packages:
 <ItemGroup>
    <PackageReference Include="Microsoft.EntityFrameworkCore" Version="6.0.3" />
    <PackageReference Include="Microsoft.EntityFrameworkCore.Design" Version="6.0.3">
      <PrivateAssets>all</PrivateAssets>
      <IncludeAssets>runtime; build; native; contentfiles; analyzers; buildtransitive</IncludeAssets>
    </PackageReference>
    <PackageReference Include="Microsoft.EntityFrameworkCore.Sqlite" Version="6.0.3" />
    <PackageReference Include="Microsoft.EntityFrameworkCore.Tools" Version="6.0.3">
      <PrivateAssets>all</PrivateAssets>
      <IncludeAssets>runtime; build; native; contentfiles; analyzers; buildtransitive</IncludeAssets>
    </PackageReference>
    <PackageReference Include="Telerik.UI.for.AspNet.Core" Version="2022.1.301" />
  </ItemGroup>
Model Classes
Create a new folder called “Models” and inside it create the classes below. These classes will model the database when we run the Entity Framework commands.
- BrandViewModel
namespace ProductCatalog.Models
{
    public class BrandViewModel
    {
        public Guid Id { get; set; }
        public string Name { get; set; }
    }
}
- CategoryViewModel
namespace ProductCatalog.Models
{
    public class CategoryViewModel
    {
        public Guid Id { get; set; }
        public string Name { get; set; }
        public Guid ProductId { get; set; }
    }
}
- ProductPriceViewModel
namespace ProductCatalog.Models
{
    public class ProductPriceViewModel
    {
        public Guid Id { get; set; }
        public Guid ProductId { get; set; }
        public double Price { get; set; }
    }
}
- ProductViewModel
namespace ProductCatalog.Models
{
    public class ProductViewModel
    {
        public Guid Id { get; set; }
        public string Displayname { get; set; } = string.Empty;
        public DateTime CreationDate { get; set; }
        public DateTime LastUpdateDate { get; set; }
        public bool Active { get; set; }
        public BrandViewModel Brand { get; set; }
        public ProductPriceViewModel Price { get; set; }
        public CategoryViewModel Category { get; set; }
        public Guid BrandId { get; set; }
    }
}
- ProductDtoViewModel
using System.ComponentModel.DataAnnotations;

namespace ProductCatalog.Models
{
    public class ProductDtoViewModel
    {
        public Guid Id { get; set; }

        [Display(Name = "Displayname*:")]
        [Required(ErrorMessage = "You must specify the Displayname.")]
        public string Displayname { get; set; }

        public DateTime CreationDate { get; set; }
        public DateTime LastUpdateDate { get; set; }
        public bool Active { get; set; }

        [Display(Name = "Brand*:")]
        [Required(ErrorMessage = "You must specify the Brand.")]
        public string Brand { get; set; }

        [Display(Name = "Price*:")]
        [Required(ErrorMessage = "You must specify the Price.")]
        public double Price { get; set; }

        [Display(Name = "Category*:")]
        [Required(ErrorMessage = "You must specify the Category.")]
        public string Category { get; set; }
    }
}
Creating the DBContext
Next, we will create the class that will contain the database entities and configurations:
- Create a new folder called “Data.”
- Inside that, create a new folder called “Context.”
- There, create a new class called “ApplicationDbContext”:
- ApplicationDbContext
using Microsoft.EntityFrameworkCore;
using ProductCatalog.Models;

namespace ProductCatalog.Data.Context
{
    public class ApplicationDbContext : DbContext
    {
        public ISession _session;

        public ApplicationDbContext(DbContextOptions options, IHttpContextAccessor httpContextAccessor) : base(options)
        {
            _session = httpContextAccessor.HttpContext.Session;
        }

        protected override void OnConfiguring(DbContextOptionsBuilder options)
            => options.UseSqlite("DataSource = productCatalog; Cache=Shared");

        public DbSet<ProductViewModel> Products { get; set; }
        public DbSet<ProductPriceViewModel> ProductPrices { get; set; }
        public DbSet<CategoryViewModel> Categories { get; set; }
        public DbSet<BrandViewModel> Brands { get; set; }
        public ISession Session { get { return _session; } }
    }
}
- In the “Program” class, add the code below:
builder.Services.AddDbContext<ApplicationDbContext>();
Running EF Core Commands
Our data modeling is ready and represented by the Model classes. The database will reflect these classes through some commands that are available in the EF Core library.
To execute the commands, you can open the Visual Studio console by right-clicking on the project and choosing “Open in Terminal.” You can also execute the commands through the terminal of your machine at the root of the project.
So you can first run the command below:
dotnet ef migrations add InitialModel
The “dotnet ef migrations add” command creates the EF Core model from the domain (entity) classes. Migrations will create or update the database schema based on the EF Core model.
In simple terms, EF Core will create a new folder called “Migrations.” This folder will contain the files responsible for applying the creations and changes regarding the database with all the relationships between the entities, based on the Model classes we created in the project.
Then we will execute the command that applies the script created with the previous command.
So, run the command below:
dotnet ef database update
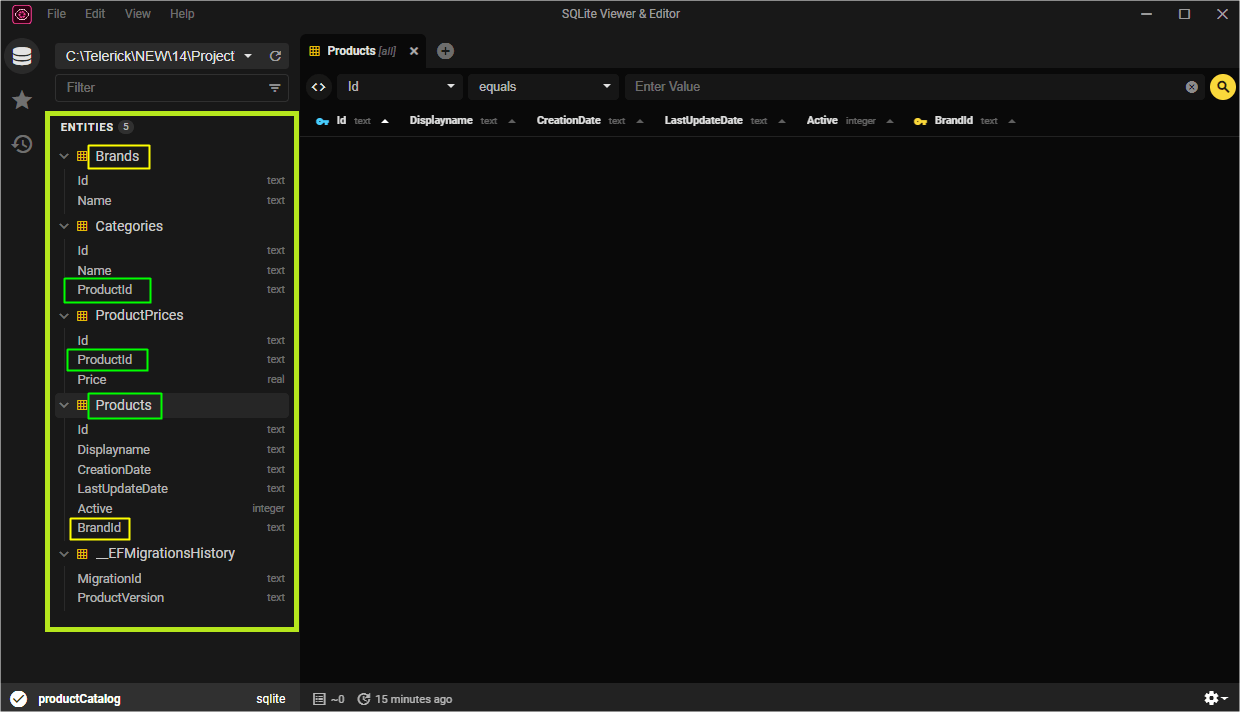
This command creates a database, which, as we are using SQLite, is a file with the extension .db at the root of the project. In this article, we will use the SQLite View Editor available for free on the Microsoft Store if you use Windows, but you can use any other.
The SQL Viewer Editor image below shows the structure of the tables generated by the EF Core commands. Note the relationships created between the tables:
Creating the Service Class
The service class will be responsible for performing CRUD operations on the database. It will refer to the “ApplicationDbContext” class, which has all the methods we need thanks to its inheritance from the “DbContext” class.
First let’s create a method that will fetch an object as JSON and another to set it as JSON, which will be used in the service class. Then create a new folder “Helpers” and inside it a new class “SessionExtensions” with the following code:
using Newtonsoft.Json;
namespace ProductCatalog.Helpers
{
    public static class SessionExtensions
    {
        public static void SetObjectAsJson(this ISession session, string key, object value)
        {
            session.SetString(key, JsonConvert.SerializeObject(value));
        }

        public static T? GetObjectFromJson<T>(this ISession session, string key)
        {
            var value = session.GetString(key);

            return value == null ? default(T) : JsonConvert.DeserializeObject<T>(value);
        }
    }
}
Create a new folder called “Services” and inside it create a new class “ProductService”:
using ProductCatalog.Data.Context;
using ProductCatalog.Helpers;
using ProductCatalog.Models;

namespace ProductCatalog.Services
{
    public class ProductService
    {
        private readonly ApplicationDbContext _dbContext;

        public ProductService(ApplicationDbContext dbContext)
        {
            _dbContext = dbContext;
        }

        public IEnumerable<ProductDtoViewModel> Read() => GetAll();

        public IList<ProductDtoViewModel> GetAll()
        {
            var result = _dbContext.Session.GetObjectFromJson<IList<ProductDtoViewModel>>("Products");

            if (result == null)
            {
                var products = _dbContext.Products.ToList();
                var categories = _dbContext.Categories.ToList();
                var brands = _dbContext.Brands.ToList();
                var prices = _dbContext.ProductPrices.ToList();

                result = products.Select(product =>
                      {
                          var productCategory = categories.FirstOrDefault(p => p.ProductId == product.Id).Name;
                          var productBrand = brands.FirstOrDefault(b => b.Id == product.BrandId).Name;
                          var productPrice = prices.FirstOrDefault(x => x.ProductId == product.Id).Price;

                          return new ProductDtoViewModel
                          {
                              Id = product.Id,
                              Displayname = product.Displayname,
                              CreationDate = product.CreationDate,
                              LastUpdateDate = product.LastUpdateDate,
                              Price = productPrice,
                              Active = product.Active,
                              Brand = productBrand,
                              Category = productCategory
                          };
                      }).ToList();
                _dbContext.Session.SetObjectAsJson("Products", result);
            }
            return result;
        }

        public ProductDtoViewModel Create(ProductDtoViewModel productDto)
        {
            var entity = new ProductViewModel();
            Guid id = Guid.NewGuid();

            entity.Id = id;
            entity.Displayname = productDto.Displayname;
            entity.Active = true;
            entity.Price = new ProductPriceViewModel() { Id = Guid.NewGuid(), Price = productDto.Price, ProductId = id };
            entity.CreationDate = DateTime.UtcNow;
            entity.LastUpdateDate = DateTime.UtcNow;
            entity.Brand = new BrandViewModel() { Id = Guid.NewGuid(), Name = productDto.Brand };
            entity.Category = new CategoryViewModel() { Id = Guid.NewGuid(), Name = productDto.Category, ProductId = id };

            _dbContext.Products.Add(entity);
            _dbContext.SaveChanges();

            var products = GetAll();

            productDto.Id = id;
            productDto.Active = true;

            products.Insert(0, productDto);

            _dbContext.Session.SetObjectAsJson("Products", products);

            return productDto;
        }

        public void Update(ProductDtoViewModel productDto)
        {
            var product = _dbContext.Products.FirstOrDefault(p => p.Id == productDto.Id);
            var brand = _dbContext.Brands.FirstOrDefault(b => b.Id == product.BrandId);
            var category = _dbContext.Categories.FirstOrDefault(c => c.ProductId == productDto.Id);
            var price = _dbContext.ProductPrices.FirstOrDefault(x => x.ProductId == productDto.Id);

            var brandEntity = new BrandViewModel() { Id = product.BrandId, Name = productDto.Brand };
            var categoryEntity = new CategoryViewModel() { Id = category.Id, Name = productDto.Category, ProductId = productDto.Id };
            var priceEntity = new ProductPriceViewModel() { Id = price.Id, Price = productDto.Price, ProductId = productDto.Id };
            var productEntity = new ProductViewModel();

            productEntity.Id = productDto.Id;
            productEntity.Displayname = productDto.Displayname;
            productEntity.Active = productDto.Active;
            productEntity.Price = priceEntity;
            productEntity.CreationDate = product.CreationDate;
            productEntity.LastUpdateDate = DateTime.UtcNow;
            productEntity.Brand = brandEntity;
            productEntity.Category = categoryEntity;
            productEntity.BrandId = brand.Id;

            _dbContext.Entry(brand).CurrentValues.SetValues(brandEntity);
            _dbContext.Entry(category).CurrentValues.SetValues(categoryEntity);
            _dbContext.Entry(price).CurrentValues.SetValues(priceEntity);
            _dbContext.Entry(product).CurrentValues.SetValues(productEntity);

            _dbContext.SaveChanges();

            var products = GetAll();
            var target = products.FirstOrDefault(e => e.Id == productDto.Id);

            if (target != null)
            {
                target.Displayname = productDto.Displayname;
                target.Active = productDto.Active;
                target.Price = productDto.Price;
                target.CreationDate = productDto.CreationDate;
                target.LastUpdateDate = productDto.LastUpdateDate;
                target.Brand = productDto.Brand;
                target.Category = productDto.Category;
            }

            _dbContext.Session.SetObjectAsJson("Products", products);
        }

        public void Destroy(ProductDtoViewModel productDto)
        {
            var productEntity = _dbContext.Products.FirstOrDefault(p => p.Id == productDto.Id);
            var brandEntity = _dbContext.Brands.FirstOrDefault(b => b.Id == productEntity.BrandId);
            var categoryEntity = _dbContext.Categories.FirstOrDefault(c => c.ProductId == productDto.Id);
            var priceEntiy = _dbContext.ProductPrices.FirstOrDefault(p => p.ProductId == productDto.Id);

            _dbContext.Brands.Remove(brandEntity);
            _dbContext.Categories.Remove(categoryEntity);
            _dbContext.ProductPrices.Remove(priceEntiy);
            _dbContext.Products.Remove(productEntity);

            _dbContext.SaveChanges();

            var products = GetAll();
            var target = products.FirstOrDefault(e => e.Id == productDto.Id);

            if (target is not null)
            {
                products.Remove(target);
                _dbContext.Session.SetObjectAsJson("Products", products);
            }
        }
    }
}
In the Program.cs, replace the existing code with the code below:
using ProductCatalog.Data.Context;
using ProductCatalog.Services;

var builder = WebApplication.CreateBuilder(args);

// Add services to the container.
builder.Services.AddControllersWithViews()
                // Maintain property names during serialization. See:
                // https://github.com/aspnet/Announcements/issues/194
                .AddNewtonsoftJson(options => options.SerializerSettings.ContractResolver = new Newtonsoft.Json.Serialization.DefaultContractResolver());
// Add Kendo UI services to the services container
builder.Services.AddKendo();
builder.Services.AddSession();
builder.Services.AddSingleton<IHttpContextAccessor, HttpContextAccessor>();
builder.Services.AddDbContext<ApplicationDbContext>();
builder.Services.AddScoped<ProductService>();

var app = builder.Build();

// Configure the HTTP request pipeline.
if (!app.Environment.IsDevelopment())
{
    app.UseExceptionHandler("/Home/Error");
    // The default HSTS value is 30 days. You may want to change this for production scenarios, see https://aka.ms/aspnetcore-hsts.
    app.UseHsts();
}

app.UseHttpsRedirection();
app.UseStaticFiles();

app.UseRouting();

app.UseAuthorization();

app.UseSession();

app.MapControllerRoute(
    name: "default",
    pattern: "{controller=Home}/{action=Index}/{id?}");

app.Run();
Creating the Frontend With Telerik UI
Thanks to Telerik UI for ASP.NET Core, forms are very easy and fast to implement. That’s because the “Telerik.UI.for.AspNet.Core” library includes nearly 120 UI components such as Data Grid, Form, Scheduler, Editor, Gantt, Buttons and more.
Telerik UI for ASP.NET Core offers two flavors for declaring the components—by using HTML or TagHelpers—so we will show both in the sample project. You can choose either of these approaches to help you implement the AutoComplete component in your project.
As a next step, we will create two pages:
- The first one (AddProduct) will be used to add new items. This page will use the TagHelpers approach.
- The second page (Index) will display the data in addition to providing functionality to add, edit and delete data. It will use the HTMLHelpers approach.
Inside the “Views” folder, create a new folder called “Product” and inside it add the views below:
- AddProduct
@using Microsoft.AspNetCore.Components
@using ProductCatalog.Models
@using ProductCatalog.Services
@inject ProductService productService
@inject NavigationManager NavigationManager
@{
    ViewData["Title"] = "AddProduct";
}
<div class="demo-section k-content">
    <div id="validation-success"></div>

    <kendo-form name="exampleForm" form-data="@Model" on-validate-field="onFormValidateField" on-clear="onFormClear" action="AddProduct" method="POST">
        <form-items>
            <form-item type="group">
                <item-label text="Registration Form" />
                <form-items>
                    <form-item field="Displayname">
                        <item-label text="Displayname:" />
                        <textbox-editor placeholder="Displayname"></textbox-editor>
                    </form-item>
                    <form-item field="Brand">
                        <item-label text="Brand:" />
                        <textbox-editor placeholder="Brand"></textbox-editor>
                    </form-item>
                    <form-item field="Price">
                        <item-label text="Price:" />
                        <numerictextbox-editor></numerictextbox-editor>
                    </form-item>
                    <form-item field="Category">
                        <item-label text="Category:" />
                        <textbox-editor placeholder="Category"></textbox-editor>
                    </form-item>
                </form-items>
            </form-item>
        </form-items>
        <validatable validate-on-blur="true" />
    </kendo-form>
</div>

<script>
       function onFormValidateField(e) {
        $("#validation-success").html("");
    }

    function onFormClear(e) {
        $("#validation-success").html("");
    }
</script>
● Index
@{
    ViewData["Title"] = "Product";
}

@model List<ProductDtoViewModel>
@using Kendo.Mvc
@using ProductCatalog.Models

@(Html.Kendo().Grid(Model)
	  .Name("grid")
	  .Columns(columns =>
	  {
		columns.Bound(p => p.Displayname).Width(300);
        columns.Bound(p => p.Price).Width(105);
        columns.Bound(p => p.Active).Width(130);
        columns.Bound(p => p.Category).Width(130);
        columns.Bound(p => p.Brand).Width(125);
		columns.Command(command => { command.Edit(); command.Destroy(); }).Width(250);
	  })
	  .ToolBar(tools =>
	  {
		  tools.Create();
	  })
	  .Sortable()
	  .Pageable()
	  .Filterable()
	  .DataSource(dataSource =>
		  dataSource
			.WebApi()
			.Model(model =>
			{
				model.Id(p => p.Id);
			})
			.Events(events => events.Error("error_handler"))
			.Read(read => read.Action("Get", "Product"))
			.Create(create => create.Action("Create", "Product"))
			.Update(update => update.Action("Update", "Product"))
			.Destroy(destroy => destroy.Action("Delete", "Product", new { id = "{0}" }))
	  )
)

<script>

function error_handler(e) {
    var errors = $.parseJSON(e.xhr.responseText);

    if (errors) {
        alert("Errors:\n" + errors.join("\n"));
    }
}
</script>
Creating the Product Controller
Inside the “Controllers” folder, create the controller below:
- ProductController
using Kendo.Mvc.Extensions;
using Kendo.Mvc.UI;
using Microsoft.AspNetCore.Mvc;
using Microsoft.EntityFrameworkCore;
using ProductCatalog.Data.Context;
using ProductCatalog.Models;
using ProductCatalog.Services;

namespace ProductCatalog.Controllers
{
    public class ProductController : Controller
    {
        private readonly ApplicationDbContext _context;
        private readonly ProductService _productService;

        public ProductController(ApplicationDbContext context, ProductService productService)
        {
            _context = context;
            _productService = productService;
        }

        public IActionResult Index()
        {
            return View();
        }

        public IActionResult AddProduct()
        {
            ViewData["Message"] = "Your create product page.";

            return View();
        }

        [HttpGet]
        public DataSourceResult Get([DataSourceRequest] DataSourceRequest request)
        {
            return _productService.Read().ToDataSourceResult(request);
        }

        [HttpPost]
        public IActionResult AddProduct(ProductDtoViewModel productDto)
        {
            if (!ModelState.IsValid)
                return View(productDto);
            else
            {
                _productService.Create(productDto);
                return RedirectToAction(nameof(Index));
            }
        }

        [HttpPost]
        public IActionResult Create(ProductDtoViewModel productDto)
        {
            ModelState.Remove("CreationDate");
            ModelState.Remove("LastUpdateDate");
            ModelState.Remove("Id");

            if (!ModelState.IsValid)
                return BadRequest(ModelState.Values.SelectMany(v => v.Errors).Select(error => error.ErrorMessage));

            var newProduct = _productService.Create(productDto);

            return new ObjectResult(new DataSourceResult { Data = new[] { newProduct }, Total = 1 });
        }

        [HttpPut]
        public IActionResult Update(Guid id, ProductDtoViewModel productDto)
        {
            ModelState.Remove("CreationDate");
            ModelState.Remove("LastUpdateDate");
            ModelState.Remove("Id");

            if (ModelState.IsValid && id == productDto.Id)
            {
                try
                {
                    _productService.Update(productDto);
                }
                catch (DbUpdateConcurrencyException)
                {
                    return new NotFoundResult();
                }

                return new StatusCodeResult(200);
            }
            else
            {
                return BadRequest(ModelState.Values.SelectMany(v => v.Errors).Select(error => error.ErrorMessage));
            }
        }

        [HttpDelete]
        public IActionResult Delete(Guid id)
        {
            try
            {
                _productService.Destroy(new ProductDtoViewModel { Id = id });
            }
            catch (DbUpdateConcurrencyException)
            {
                return new NotFoundResult();
            }

            return new StatusCodeResult(200);
        }
    }
}
And in the file ~/Views/Shared/_Layout.cshtml, just below where the “items” parameter is created, add this code:
items.Add().Text("Add Product").Action("AddProduct", "Product", new { area = "" }); items.Add().Text("Products").Action("Index", "Product", new { area = "" });
And in the ~/Views/Shared/EditorTemplates/Boolean.cshtml file, replace the existing code with this:
@model bool?

@(Html.Kendo().CheckBoxFor(m => m).HtmlAttributes(new { title = Html.ViewContext.ViewData.TemplateInfo.GetFullHtmlFieldName("")}))
Inserting Data via Frontend
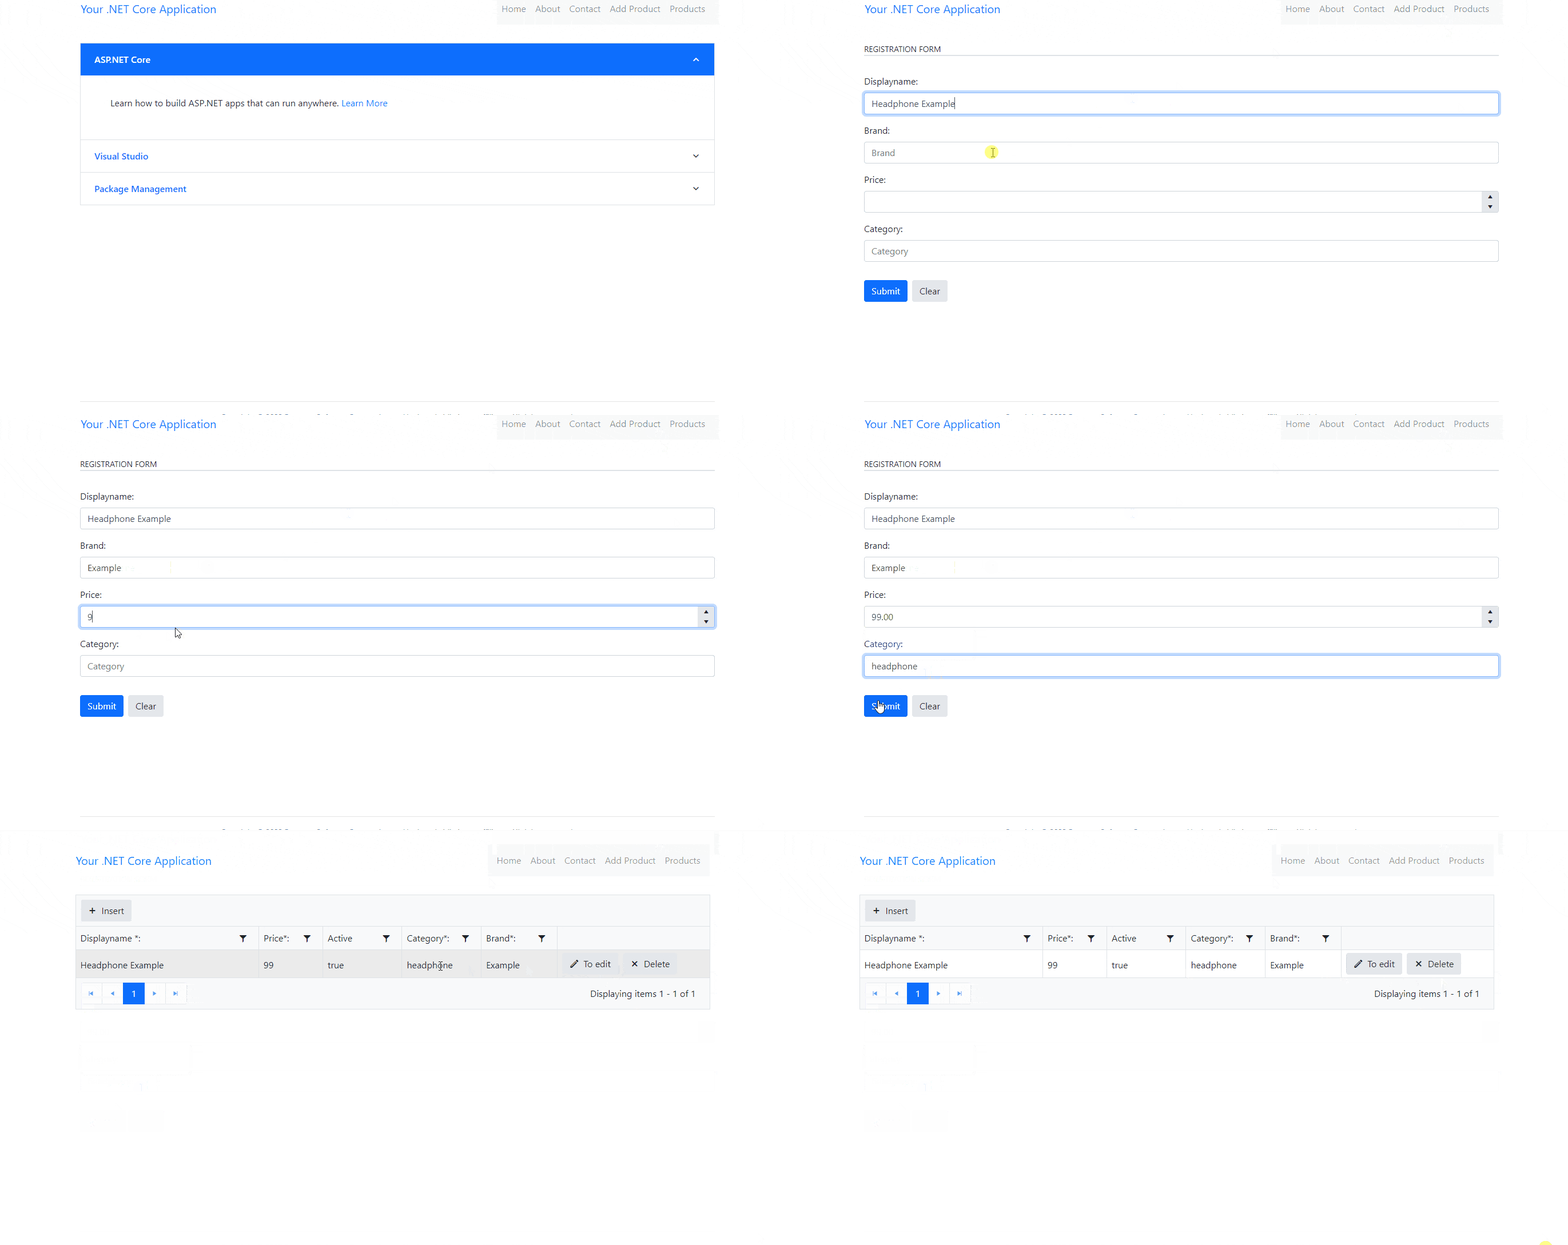
Now you can start the application. The Products menu will display an empty table, so we will add new data to perform the change and delete operations.
Click on the menu, “Add Product,” fill in the data and hit “Save.” You will be redirected to the products display page, as in the GIF below:
Editing and Deleting Data
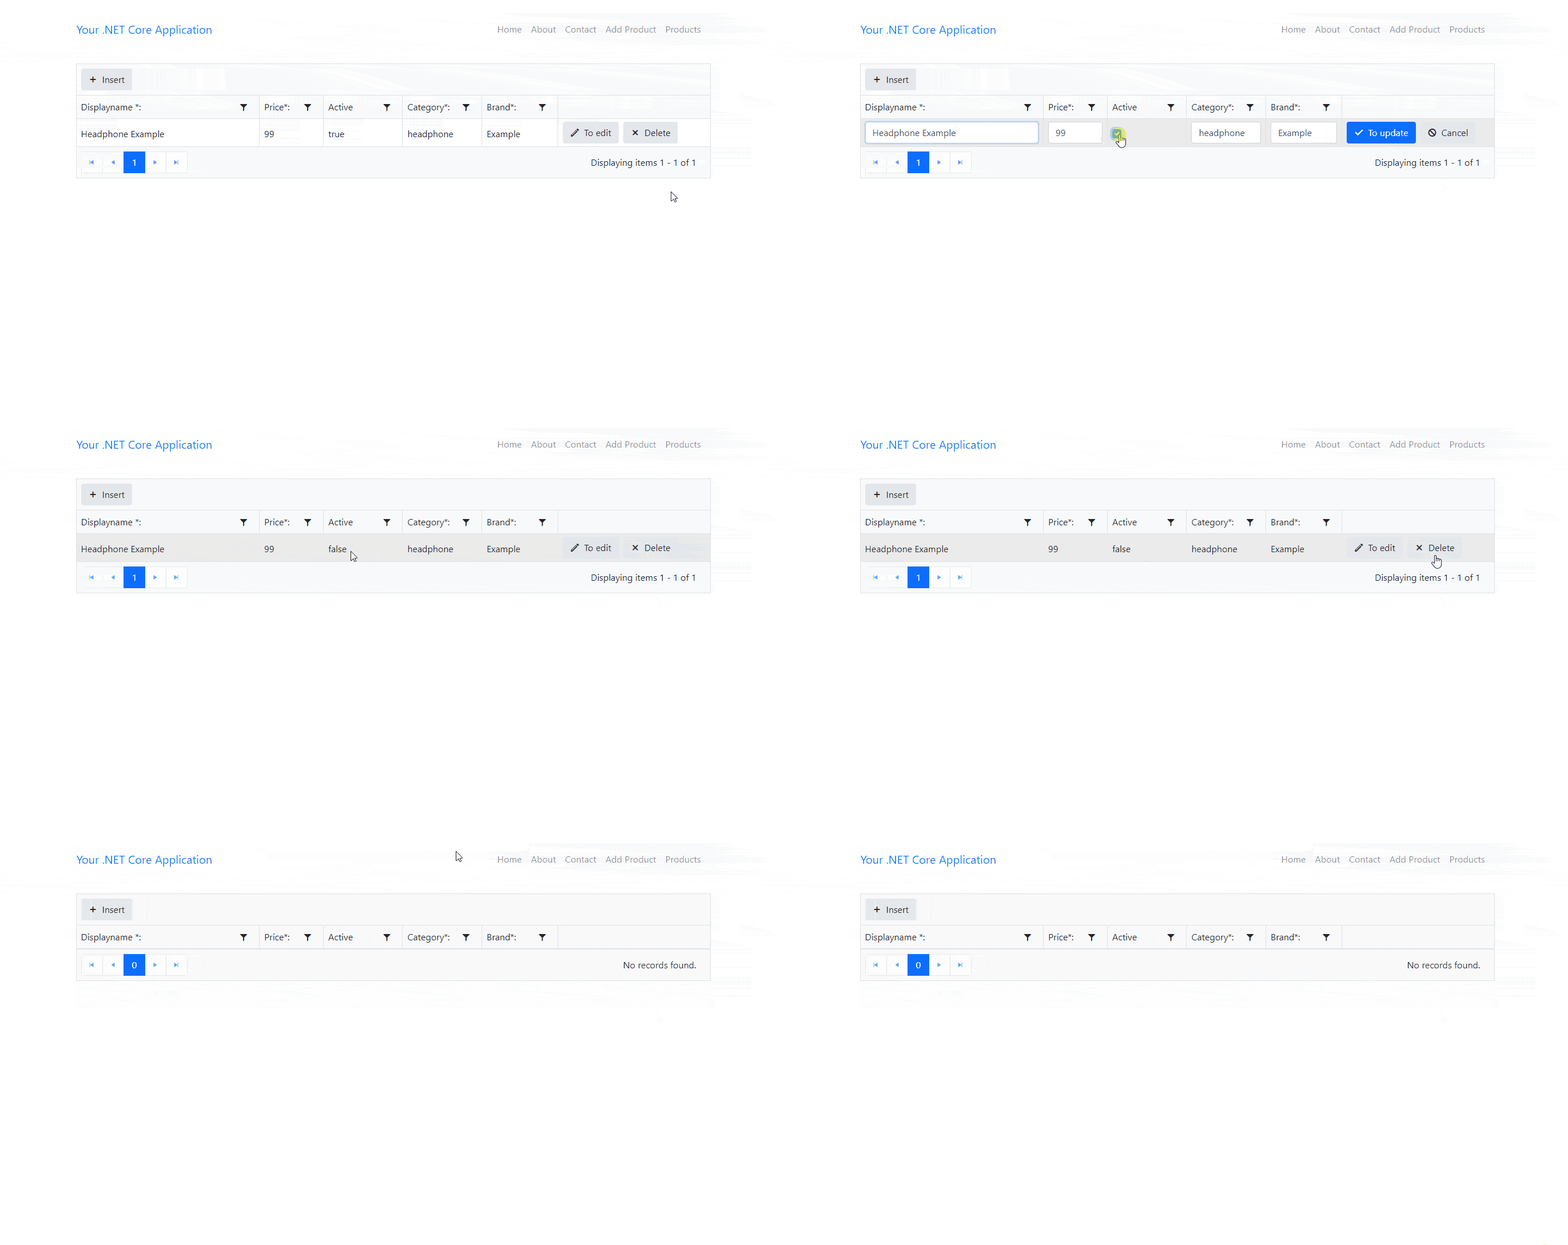
As I said before, thanks to Telerik UI for ASP.NET Core, we don’t need to create pages for editing and deleting actions, as Telerik components already have everything inside the same form, even the create function. In the GIF below, you can see the three functions being executed.
Conclusion
In this article, we created an ASP.NET Core project and made the relationship between the tables with a few simple commands using Entity Framework Core. Then we developed all the functions of adding, editing and deleting data easily with the help of Telerik UI for ASP.NET Core.
See even more ASP.NET Core examples.
Drop us a line in the comments below telling us what other ASP.NET Core examples and how-to articles you would like to see.


