Introducing Server Components in TanStack Start

Summarize with AI:
This simple app shows how React Server Components work in TanStack Start, how server and client components compose together, and what this means for performance and application design.
Modern web applications have always faced a trade-off. Ship more JavaScript to the browser, and you get rich interactivity, but at the cost of larger bundles and slower pages. Ship less JavaScript, and performance improves at the cost of user experience.
React Server Components (RSCs) aim to fix this trade-off by keeping server-only code on the server instead of sending it to the client. The result is smaller bundles and less JavaScript for the browser to download. This also means a different way of building React applications.
TanStack Start is one of the first frameworks outside of Next.js to adopt RSC. Although it is still experimental, it’s stable enough to explore the architecture in practice.
In this post, we’ll build a simple blog reader to see how React Server Components work in TanStack Start, how server and client components compose together, and what this means for performance and application design.
Prerequisites
To get the most out of this article, it is assumed that you have:
- A basic understanding of the React library
- Comfortability with TypeScript
- Node.js installed
React Server Components
What are React Server Components? RSCs are components that render on the server, and only the rendered output gets sent to the browser. None of the component code (imports, logic, dependencies) reaches the browser. In a nutshell, the browser just gets a finished product, which in this case is rendered content.
This is different from the normal React components we’re used to. In a normal React component, when you import a library at the top of your file, that library gets bundled and shipped to the browser. Every user who visits your page has to download it.
For instance, the Markdown parser we’ll be using in this article converts Markdown format to HTML. The user never needs to interact with it directly, but if it’s one of your imports, it gets added to everything the browser has to download.
With a server component, that import stays on the server. You can use a library of maybe 500kB, and none of it reaches the browser. The server does the parsing and sends the browser the finished HTML. This way, the user’s device does less work.
Server components are also async by default. This means you can await database queries, API calls or any async operation directly inside the component without useEffect. The component just waits for the data and renders it. The constraint is that server components can’t have interactivity. Server components are for the static, data-heavy parts of your UI. Interactivity lives in client components. The two can work together through composition, which we’ll look at further down in the article.
RSC, SSR and Server Functions
We’ve already looked at RSC and what it entails, but there are major misconceptions around three concepts that are often confused: RSC, server-side rendering (SSR) and server functions.
With SSR, instead of waiting for the browser to execute your JavaScript, the server renders the page first and sends back HTML that’s already populated with content (hence “server-side rendering”). That means users can start reading the content on the page almost immediately.
There’s still one important thing to understand, though. SSR doesn’t stop your React code from being sent to the browser. After the HTML arrives, the browser downloads your JavaScript, runs your components again and tries to wire up all the event handlers so the page becomes interactive. That second step is known as hydration. This means your components render twice. First on the server to produce the initial HTML, and then in the browser to make that HTML interactive. SSR solves the problem of slow initial rendering, but it doesn’t reduce the amount of JavaScript the browser still has to download.
RSC goes further. Server components render on the server, and their code never reaches the browser. There is no hydration because there is no client code to hydrate. The server renders and sends the output. The difference from SSR is that SSR sends HTML and then reruns your component on the client. RSC sends the rendered output and never reruns the component on the client, because the component code never went there.
Server functions are different from both. A server function isn’t a component at all. It is a function that runs on the server and returns data. You call it from the client, it executes on the server and it sends back a result.
In TanStack Start, server functions and RSC work together. You render a server component inside a server function handler and return the rendered output through a loader. The server function runs the server component and delivers its output to the route.
With that out of the way, let’s set up our project and see React Server Components in action.
Project Setup
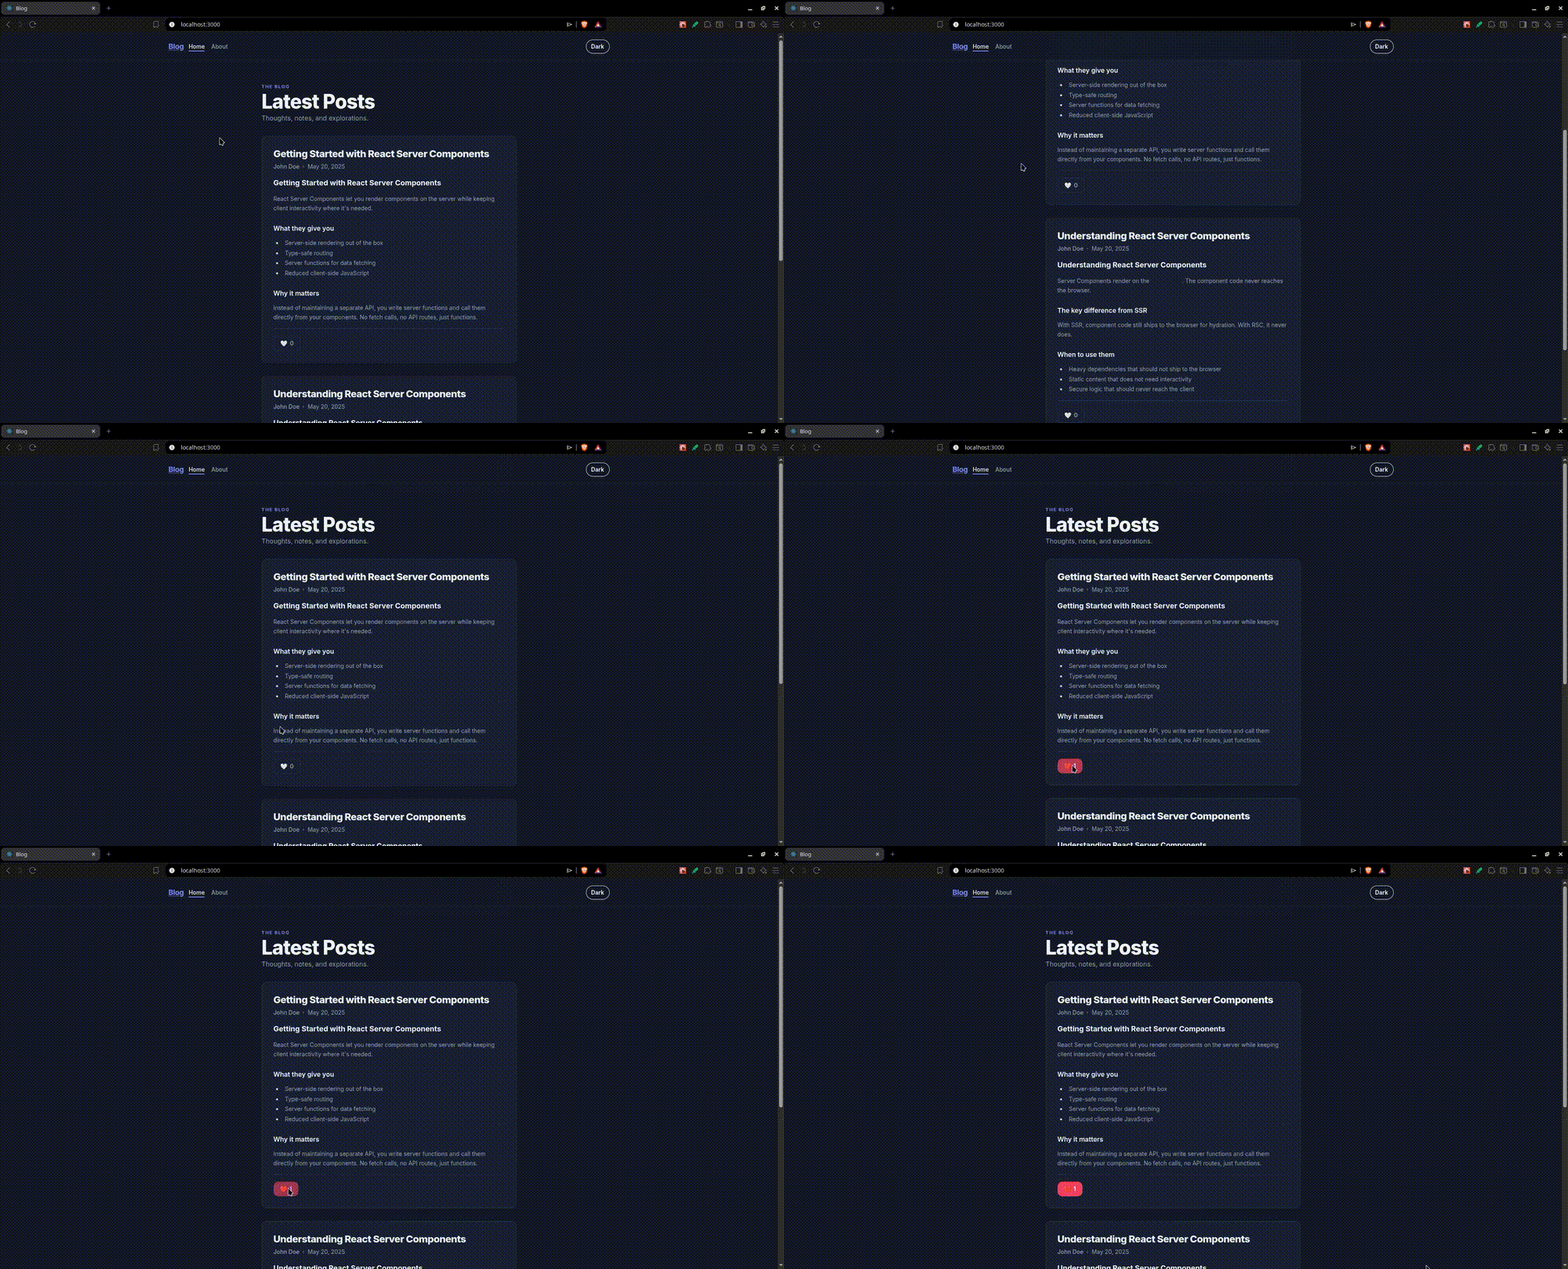
In this article, we will build a blog post reader. The app will have a list of posts where the content is written in Markdown. A Markdown parser will convert that content to HTML on the server, meaning the parser never ships to the browser. Later on, we’ll see how we can add interactivity to these server components with the help of RSC composition.
Here is a GIF representation of the app we’ll be building.
Let’s scaffold a new TanStack Start project by running the following command in the terminal:
npx @tanstack/cli create tanstack-rsc-blog -y
Navigate into the project and install dependencies:
cd tanstack-rsc-blog
npm install
RSC isn’t enabled by default in a TanStack Start project. We need to bring in an extra Vite plugin that tells Vite how to split the bundle correctly, keeping server component code on the server and only sending client code to the browser.
npm install -D @vitejs/plugin-rsc
Now open your vite.config.ts file and update it to enable RSC:
import { defineConfig } from 'vite'
import { devtools } from '@tanstack/devtools-vite'
import { tanstackStart } from '@tanstack/react-start/plugin/vite'
import viteReact from '@vitejs/plugin-react'
import tailwindcss from '@tailwindcss/vite'
import rsc from '@vitejs/plugin-rsc'

const config = defineConfig({
  resolve: { tsconfigPaths: true },
  plugins: [
    devtools(),
    tailwindcss(),
    tanstackStart({
      rsc: {
        enabled: true,
      },
    }),
    rsc(),
    viteReact(),
  ],
})

export default config
Two things changed from the default config: we added import rsc from '@vitejs/plugin-rsc' and passed rsc: { enabled: true } to tanstackStart. Without both of these, createCompositeComponent will not work.
Finally, start the dev server to confirm everything is working:
npm run dev
If you see the default TanStack page in your browser, you’re good to go.
Defining the Data
Before we build any components, we need data to work with. In production, this might come from a database, but to keep the focus on RSC, we’ll use a hardcoded array of posts.
Create a src/data/posts.ts file, and add the following to it:
export type Post = {
  id: string;
  title: string;
  author: string;
  date: string;
  content: string;
};

export const posts: Post[] = [
  {
    id: "1",
    title: "Getting Started with TanStack Start",
    author: "John Doe",
    date: "May 20, 2025",
    content: `
# Getting Started with TanStack Start

TanStack Start is a **full-stack React framework** built on TanStack Router.

## What it gives you

- Server-side rendering out of the box
- Type-safe routing
- Server functions with \`createServerFn\`
- React Server Components

## Why it matters

Instead of maintaining a separate API, you write server functions and call them directly from your components. No fetch calls, no API routes, just functions.
    `,
  },
  {
    id: "2",
    title: "Understanding React Server Components",
    author: "John Doe",
    date: "May 20, 2025",
    content: `
# Understanding React Server Components

Server Components render on the **server only**. The component code never reaches the browser.

## The key difference from SSR

With SSR, component code still ships to the browser for hydration. With RSC, it never does.

## When to use them

- Heavy dependencies that should not ship to the browser
- Static content that does not need interactivity
- Secure logic that should never reach the client
    `,
  },
];
We just have a standard type definition and hardcoded data here. The important detail is that the content field is raw Markdown, not HTML. The conversion from Markdown to HTML happens inside the server component, which we’ll see when we build it next.
Building the PostCard Server Component
This is where we’ll start seeing RSC in practice. Before anything, we need to install a Markdown parser that converts a Markdown string into HTML that can be rendered by our component.
npm install marked
Create a src/components/PostCard.tsx file and add the following to it:
import { marked } from "marked";
import { createCompositeComponent } from "@tanstack/react-start/rsc";
import type { Post } from "../data/posts";

export async function createPostCard(post: Post) {
  const contentHtml = await marked(post.content);

  return createCompositeComponent(
    (props: { renderLikeButton?: () => React.ReactNode }) => (
      <article className="card rounded-xl p-7 space-y-4 hover:shadow-[var(--shadow-md)] transition-shadow">
        <div className="space-y-1.5">
          <h2 className="text-2xl font-extrabold text-[var(--ink)] leading-tight tracking-tight">
            {post.title}
          </h2>
          <div className="flex items-center gap-2 text-sm text-[var(--ink-soft)]">
            <span className="font-medium">{post.author}</span>
            <span className="w-1 h-1 rounded-full bg-[var(--ink-soft)] opacity-40" />
            <span>{post.date}</span>
          </div>
        </div>
        <div
          className="prose-content"
          dangerouslySetInnerHTML={{ __html: contentHtml }}
        />
        <div className="pt-4 border-t border-[var(--line)] flex items-center">
          {props.renderLikeButton?.()}
        </div>
      </article>
    ),
  );
}
In the code above, we used createCompositeComponent instead of renderServerComponent because this component needs a place where a client component can be inserted. renderServerComponent comes in handy when you only need server-rendered output, while createCompositeComponent lets us expose slots that client components can later fill.
We also import marked to convert each post’s Markdown into HTML. Since this code runs on the server, marked is never shipped to the client bundle. Inside createPostCard, we parse the Markdown and render the post layout. You’ll also notice renderLikeButton in the component props. We’ve also made it optional so the component can still render if nothing is passed.
Finally, we call props.renderLikeButton?.() where we want the interactive Like button to appear. We’ll build that button next. It will have useState, click handlers, and all the client-side interactivity that server components can’t provide. Think of this as leaving an empty spot where a client component with interactivity can come and live. Further down, when we render this component with CompositeComponent, we’ll pass the function that fills this slot.
Client Component
Now we need interactivity. Server components can’t handle click events, state, or any client-side behavior, as we mentioned earlier. We need a client component for this.
Create a src/components/LikeButton.tsx file and add the following to it:
"use client";

import { useState } from "react";

export function LikeButton() {
  const [count, setCount] = useState(0);
  const [liked, setLiked] = useState(false);

  const handleClick = () => {
    if (liked) {
      setCount(count - 1);
      setLiked(false);
    } else {
      setCount(count + 1);
      setLiked(true);
    }
  };

  return (
    <button
      onClick={handleClick}
      className={`inline-flex items-center gap-1.5 px-4 py-2 rounded-xl text-sm font-semibold transition-all select-none ${
        liked
          ? "bg-[var(--like-heart)] text-white shadow-md"
          : "bg-[var(--surface)] text-[var(--ink-soft)] border border-[var(--line)] hover:border-[var(--accent)] hover:text-[var(--accent)] hover:shadow-sm active:scale-95"
      }`}
    >
      <span className={liked ? "scale-110" : ""}>
        {liked ? "❤️" : "🤍"}
      </span>
      <span>{count}</span>
    </button>
  );
}
The "use client" directive tells React that this component should run on the client. It handles the interactivity, useState and event handlers, and this code ships to the browser. Basically, this component just tracks likes and toggles between liked and unliked states, and the button style changes based on the state.
Building the Homepage
What we do now is bring everything into the route. Open src/routes/index.tsx and replace the default code with:
import { createServerFn } from "@tanstack/react-start";
import { CompositeComponent } from "@tanstack/react-start/rsc";
import { posts } from "../data/posts";
import { createPostCard } from "../components/PostCard";
import { LikeButton } from "../components/LikeButton";
import { createFileRoute } from "@tanstack/react-router";

const getPosts = createServerFn().handler(async () => {
  const renderedPosts = await Promise.all(
    posts.map(async (post) => {
      const src = await createPostCard(post);
      return { id: post.id, src };
    }),
  );
  return { renderedPosts };
});

export const Route = createFileRoute("/")({
  loader: async () => {
    return await getPosts();
  },
  component: HomePage,
});

function HomePage() {
  const { renderedPosts } = Route.useLoaderData();

  return (
    <div className="max-w-2xl mx-auto px-4 py-10 sm:px-6 sm:py-14 space-y-8">
      <div className="space-y-1">
        <p className="kicker mb-1">The Blog</p>
        <h1 className="text-4xl font-extrabold tracking-tight text-[var(--ink)] sm:text-5xl">
          Latest Posts
        </h1>
        <p className="text-base text-[var(--ink-soft)]">
          Thoughts, notes, and explorations.
        </p>
      </div>
      {renderedPosts.map((post) => (
        <div key={post.id}>
          <CompositeComponent
            src={post.src}
            renderLikeButton={() => <LikeButton />}
          />
        </div>
      ))}
    </div>
  );
}
In the code above, two pieces are working together here that are worth understanding: createCompositeComponent and CompositeComponent. They might look similar, but each has a different job. createCompositeComponent runs on the server. This is where we define the server-rendered layout and decide where interactive client components can be inserted. Those slots, or insertion points, are simply props that return JSX. In our case, we created one called renderLikeButton.
CompositeComponent, on the other hand, runs on the client. It receives the serialized server output through the src prop and fills any slots we defined on the server. When we pass renderLikeButton={() => <LikeButton />}, TanStack calls that function and inserts the returned JSX into the matching slot.
A good way to think about it is this: createCompositeComponent creates the blueprint on the server, while CompositeComponent assembles it on the client by filling in the interactive pieces. They never run in the same environment, but they work together to produce a single UI.
Now, run the dev server:
npm run dev
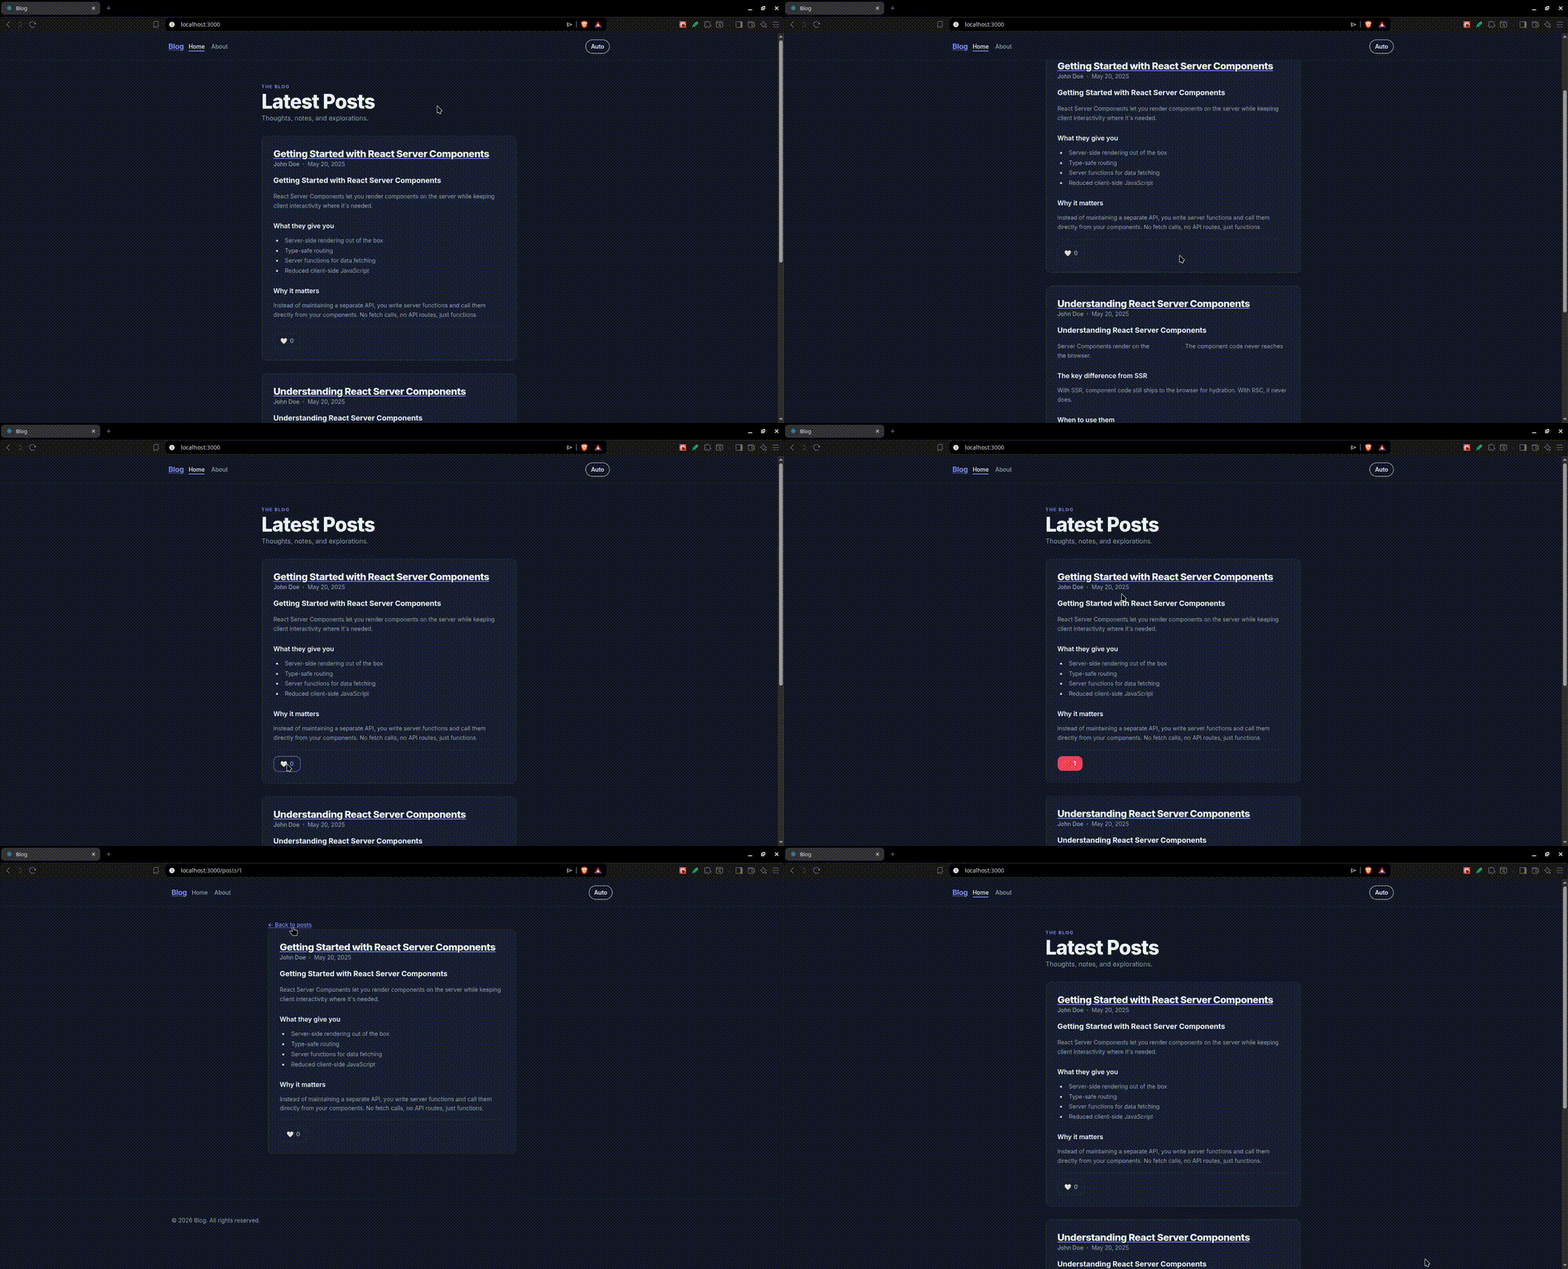
If you followed along correctly, you should see the blog page like the one below.
Dynamic Routes
Currently, all our posts are on the homepage, which works fine, but we want each post to have its own URL. We’ll achieve that by building a detail page for each post in this section.
Create a src/routes/posts.$id.tsx file and add the following to it:
import { createFileRoute, Link } from "@tanstack/react-router";
import { createServerFn } from "@tanstack/react-start";
import { CompositeComponent } from "@tanstack/react-start/rsc";
import { posts } from "../data/posts";
import { createPostCard } from "../components/PostCard";
import { LikeButton } from "../components/LikeButton";

const getPost = createServerFn()
  .validator((data: unknown) => {
    if (typeof data !== "object" || data === null) throw new Error("Invalid");
    if (!("id" in data) || typeof data.id !== "string")
      throw new Error("ID required");
    return data as { id: string };
  })
  .handler(async ({ data }) => {
    const post = posts.find((p) => p.id === data.id);
    if (!post) throw new Error("Post not found");
    const src = await createPostCard(post);
    return { src };
  });

export const Route = createFileRoute("/posts/$id")({
  loader: async ({ params }) => {
    return await getPost({ data: { id: params.id } });
  },
  component: PostPage,
});

function PostPage() {
  const { src } = Route.useLoaderData();

  return (
    <div className="max-w-2xl mx-auto p-8 space-y-6">
      <Link to="/" className="text-[var(--accent)] hover:underline text-sm font-medium">
        ← Back to posts
      </Link>
      <CompositeComponent src={src} renderLikeButton={() => <LikeButton />} />
    </div>
  );
}
The overall pattern here is the same as what we did on the index route. The only difference is the validator and handler inside the server function. Instead of returning everything, we select the post we want based on the id and build a card for it. The validator checks that the id is actually a string. The handler either finds the post or throws an error. The route captures the specific id from the URL using $id in the file name. The loader passes that id to the server function, and the component renders the result.
Linking to Posts
We need a way to navigate to the detail page for each post. Open your src/components/PostCard.tsx file and wrap the post title with the Link component:
import { Link } from "@tanstack/react-router";


export async function createPostCard(post: Post) {
  const contentHtml = await marked(post.content);

  return createCompositeComponent(
    (props: { renderLikeButton?: () => React.ReactNode }) => (
      <article>
        <div className="space-y-1.5">
          <Link
            to="/posts/$id"
            params={{ id: post.id }}
            className="hover:underline"
          >
            <h2 className="text-2xl font-extrabold text-[var(--ink)] leading-tight tracking-tight">
              {post.title}
            </h2>
          </Link>
          {/* rest of the component */}
        </div>
      </article>
    ),
  );
}
The Link component works on both the server and the client. Here, it uses the $id parameter from the route to generate the correct URL.
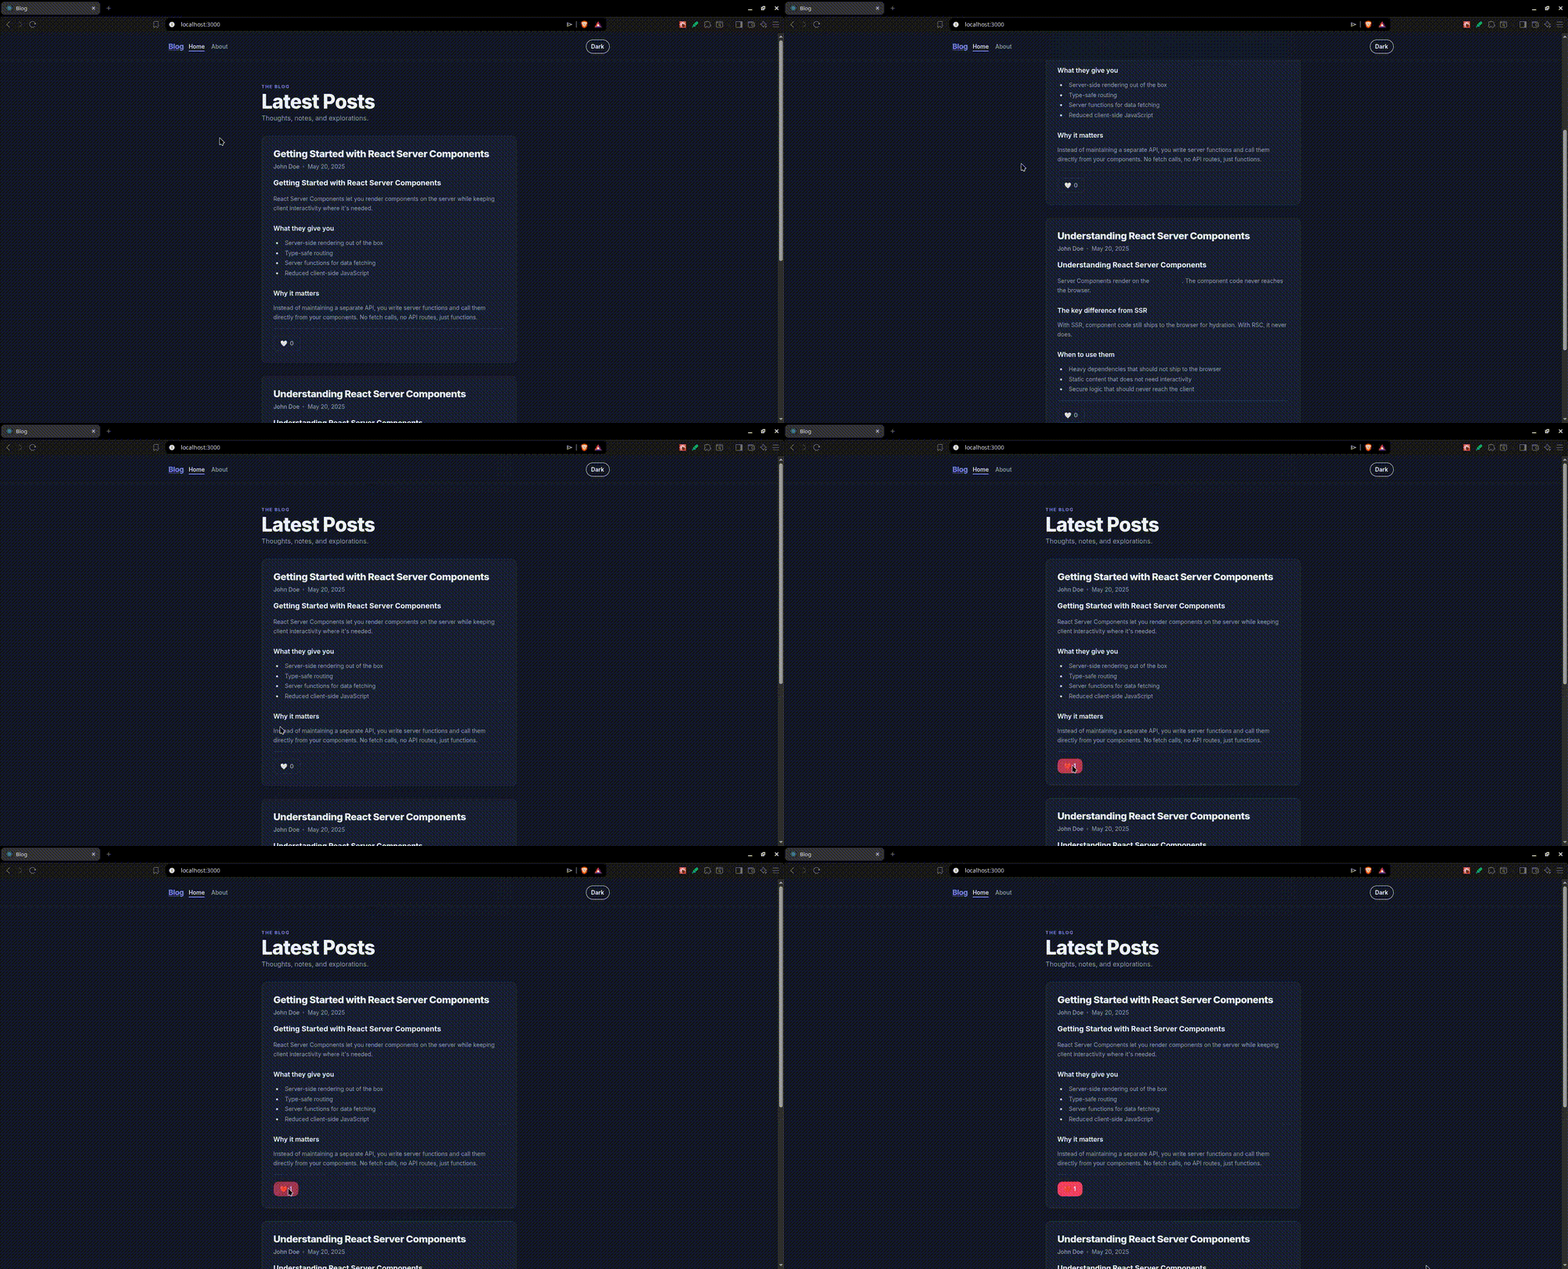
Below is a preview of the dynamic route in action. Clicking a post title takes you to its dedicated detail page, and our Like button remains interactive.
Inspecting the Production Build
One easy way to understand how React Server Components work is to inspect the production build. This lets us see what ends up on the server and what ends up on the client.
Run:
npm run build
We’ll look at two parts of the output: the first is the server RSC build, and the second is the client build.
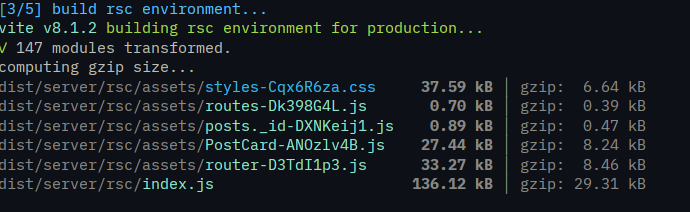
Notice that PostCard appears in the server RSC build output. Since PostCard imports marked, that dependency never reaches the browser. It stays on the server and is never included in the client build.
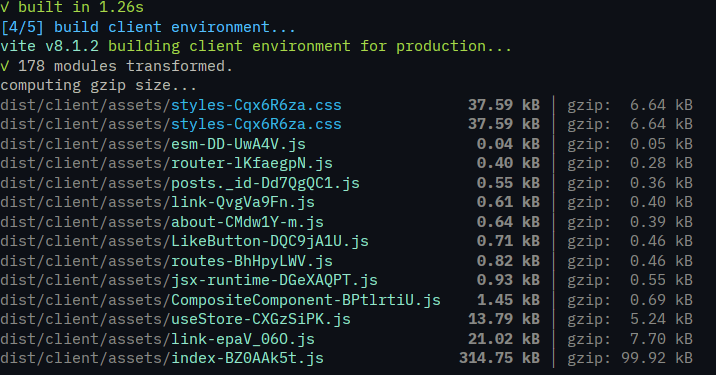
Looking at the client build, instead of shipping PostCard and the Markdown parsing logic, the browser only receives the code it needs for interactivity, such as LikeButton and CompositeComponent. The server has already done the heavy lifting of converting the Markdown to HTML. The browser doesn’t need to download or execute marked at all.
Conclusion
React Server Components change where your code runs, not just how your app looks. We built a simple blog reader and, along the way, saw how server components keep heavy dependencies off the client. In our case, the marked Markdown parser never made it into the client bundle. We also explored createCompositeComponent and saw how it lets you slot interactive client components into an otherwise server-rendered UI without giving up interactivity.
There’s still a lot more to explore. The TanStack RSC blog post and the official documentation are great places to continue from here.
Did You Know?
One of the most robust React Grids on the market comes with a native RSC mode! Learn more about it in this blog post:

Christian Nwamba
Chris Nwamba is a Senior Developer Advocate at AWS focusing on AWS Amplify. He is also a teacher with years of experience building products and communities.
Related Posts
Comments
All articles
Topics
Web MobileMobile
Desktop
Design
Productivity
People